1, Foreword
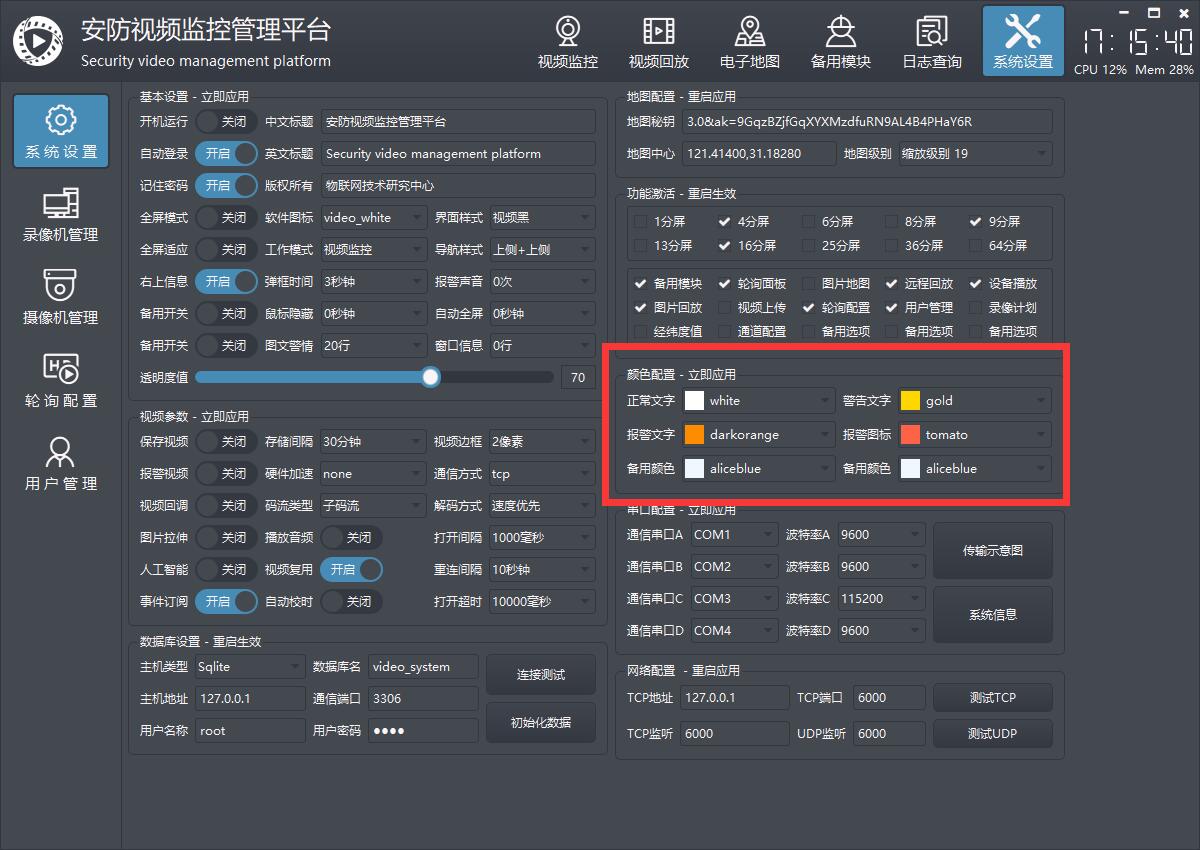
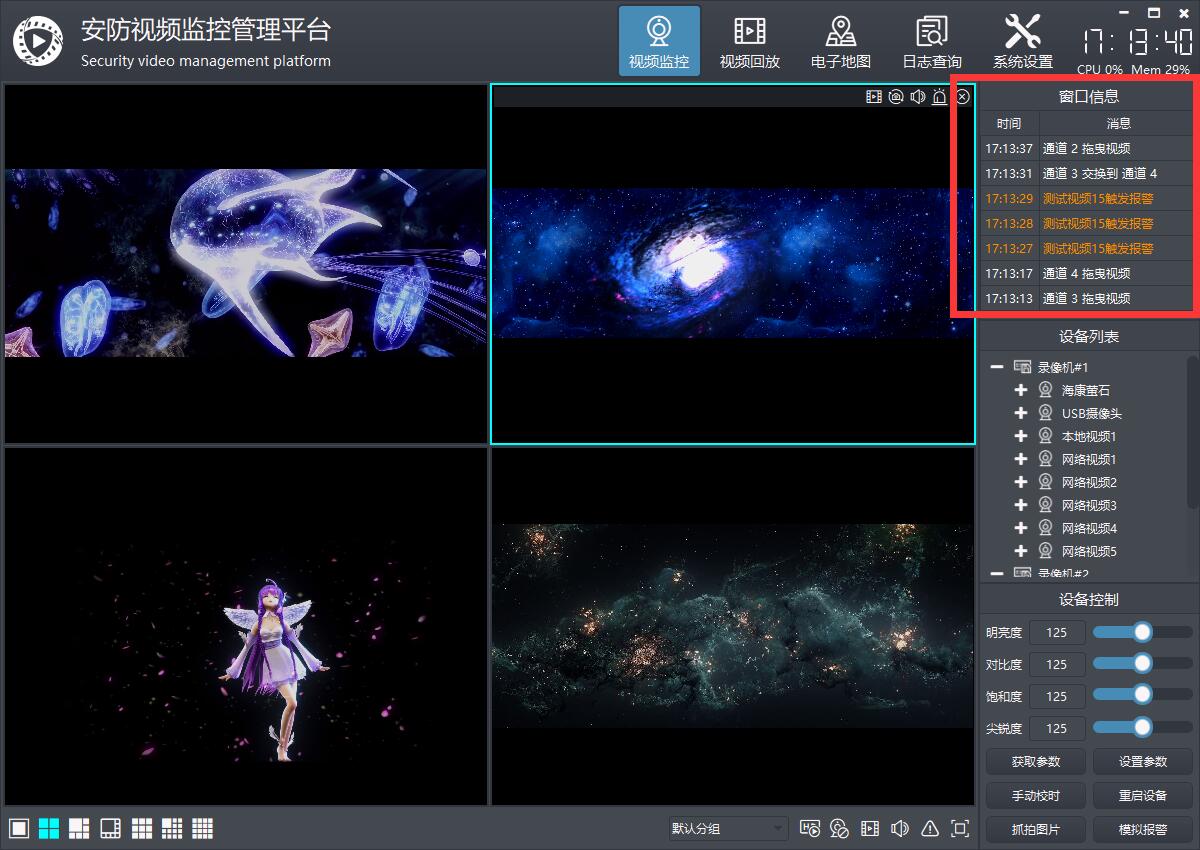
In the system print log or window information bar, all kinds of temporary print information are displayed here. In many cases, we also need to highlight the color display of specific categories of information, such as alarm information, and even different colors can be displayed for information of different alarm levels, which will look more humanized. If all information is displayed in one color, If different message types are not treated differently, users will have no time to find the alarm in time, resulting in missed reporting accidents. Therefore, it is necessary to provide a special parameter for color configuration. The color value can use the built-in color value name of Qt. In the color setting interface, a color drop-down box is provided for users to choose from. Select to complete the application immediately and apply it directly when the next message arrives.
The temporary alarm message bar is displayed by QTableWidget table control. Generally, it needs at least time and content. In order to simplify the time, it can directly display hours, minutes and seconds. As for the date and milliseconds, it is generally not necessary. Each cell of QTableWidget control is a QTableWidget item, and text (setText), text alignment (setTextAlignment) can be set separately Text color (setforegroup or setTextColor, it is recommended to use setforegroup to be compatible with Qt4 to Qt6. In fact, setforegroup is the final setting of setTextColor, but Qt may find that programmers are more accustomed to using setTextColor in the process of design evolution, so this function is added for programmers to use. However, in the Qt6 era, in order to simplify the operation, it returns to the original position again Rational function).
2, Functional features
(1) Software module
- Video monitoring module, various docking small window sub modules, including equipment list, graphic alarm, window information, PTZ control, preset position, cruise setting, equipment control, suspension map, web browsing, etc.
- Video playback module, including local playback, remote playback, device playback, picture playback, video upload, etc.
- Electronic map module, including picture map, online map, offline map, path planning, etc.
- Log query module, including local log, device log, etc.
- System setting module, including system setting (basic setting, video parameters, database setting, map configuration, serial port configuration, etc.), VCR management, camera management, polling configuration, user management, etc.
(2) Basic functions
- It supports various video streams (rtsp, rtmp, http, etc.), video files (mp4, rmvb, avi, etc.) and local USB camera playback.
- Support multi screen switching, including 1, 4, 6, 8, 9, 13, 16, 25, 36 and 64 screen switching.
- Full screen switching is supported, including right-click menu, toolbar button and shortcut key (alt+enter full screen, esc exit full screen).
- Support video polling, including 1, 4, 9 and 16 picture polling, and set polling packet (polling plan), polling interval, code stream type, etc.
- Support onvif protocol, including device search, PTZ control and device control (picture parameters, proofreading time, system restart, capturing pictures, etc.).
- Permission management is supported. Different users can correspond to different module permissions, such as deleting logs, shutting down the system, etc.
- The database supports a variety of, including sqlite, mysql, sqlserver, postgresql, oracle, NPC gold warehouse, etc.
- The local USB camera supports setting parameters such as resolution and frame rate.
- All docking modules automatically generate corresponding menus to control display and hiding. Right click in the title bar to pop up.
- It supports displaying all modules, hiding all modules, resetting normal layout and resetting full screen layout.
- Double click the device to pop up the real-time preview video, which supports picture map, online map, offline map, etc.
- Drag the camera node to the corresponding window to play video, and drag local files to play directly.
- To delete a video, you can right-click to delete it, close the hoverbar to delete it, and drag it outside the video monitoring panel to delete it.
- The device button on the picture map can be dragged freely to automatically save the location information. Baidu map can click to obtain longitude and latitude information to update the device location.
- Any channel in the video monitoring panel form supports drag switching and instant response.
- It encapsulates Baidu map, view switching, motion track, equipment point position, mouse click to obtain longitude and latitude, etc.
- Double click the node, drag the node, drag the window to exchange positions and other operations will automatically update and save the last playback address, and the software will open the automatic application next time.
- The volume bar control in the lower right corner is automatically hidden when the focus is lost, and the volume bar has a mute icon.
- Support video screenshots. You can specify a single or all channel screenshots. There is also a screenshot button on the bottom small toolbar.
- Support timeout automatic hiding of mouse pointer and automatic full screen mechanism.
- It supports onvif PTZ control and can move PTZ cameras up, down, left and right, including reset and focal length adjustment.
- Support any onvif camera, including but not limited to Haikang, Dahua, Yushi, Tiandi Weiye, Huawei, etc.
- Video can be saved, with options of regular storage or single file storage, and optional storage interval.
- The video stream communication mode tcp+udp can be set, and the video decoding modes such as speed priority, quality priority and equalization can be set.
- The Chinese name, English name, LOGO icon, etc. of the software can be set.
- The stored video files can be exported to the specified directory and uploaded to the server in batches.
(3) Characteristic function
- The main interface adopts docked form mode, and various components are added in the form of small modules, which can be added by any module.
- The docking module can drag any position to embed and suspend, and supports maximizing the full screen and multi screen.
- Dual layout file storage mechanism. The normal mode and full screen mode correspond to different layout schemes and are automatically switched and saved. For example, the full screen mode can highlight several modules and display them transparently in the specified position, which is more sci-fi and modern.
- The original onvif protocol mechanism adopts the underlying protocol parsing (udp broadcast search + http request execution command), which is lighter, easy to understand, easy to learn and expand, and does not rely on any third-party components, such as gsoap.
- The original data import and export mechanism can export data instantly without relying on any components across platforms.
- Built in multiple original components, the universe is super valuable, including data import and export components (export to xls, pdf, printing), database components (database management thread, automatic data cleaning thread, universal paging, data request, etc.), map components, video monitoring components, file multithreading transceiver components, onvif communication components, general browser kernel components, etc.
- User defined information box + error box + query box + prompt box in the lower right corner (including multiple formats), etc.
- Exquisite skin change, up to 17 sets of skin styles can be changed at will, and all styles are unified, including menu, etc.
- Multiple buttons can be added to the video control suspension bar, and buttons can also be added to the small toolbar at the bottom of the monitoring interface.
- Double click the camera node to automatically play videos. Double click the node to automatically add videos one by one. You will automatically skip to the next node. Double click the parent node to automatically add all videos under the node. Main code stream and sub code stream can be selected.
- For video recorder management and camera management, you can add, delete, modify, import and export printing information, and immediately apply the new equipment information to generate a tree list without restarting.
- A variety of cores can be freely switched. ffmpeg, vlc, mpv, etc. can be set in pro. ffmpeg is recommended, with the most cross platforms. The libraries compiled on linux and mac platforms are provided by default.
- Hard decoding is supported, and hard decoding types (qsv, dxva2, d3d11va, etc.) can be set.
- opengl is used to draw video by default, with ultra-low CPU resource occupation. It supports yuyv and nv12 formats, which is very awesome.
- Highly customizable, users can easily derive their own functions on this basis, such as adding custom modules, adding operation modes, robot monitoring, UAV monitoring, excavator monitoring, etc.
- Support xp, win7, win10, linux, mac, various domestic systems (UOS, bid winning Kirin, Galaxy Kirin, etc.), embedded linux and other systems.
- Complete notes, clear project structure, super detailed and complete use and development manual, accurate to the functional description of each code file, and continuously iterative versions.
3, Experience address
- Experience address: https://pan.baidu.com/s/1d7TH_GEYl5nOecuNlWJJ7g Extraction code: 01jf file name: bin_video_system.zip.
- Domestic sites: https://gitee.com/feiyangqingyun
- International sites: https://github.com/feiyangqingyun
- Personal homepage: https://blog.csdn.net/feiyangqingyun
- Zhihu homepage: https://www.zhihu.com/people/feiyangqingyun/
- Online documentation: https://feiyangqingyun.gitee.io/qwidgetdemo/video_system/
4, Renderings
5, Core code
void DeviceHelper::initDeviceTable()
{
    if (deviceTable == NULL) {
        return;
    }

    QList<QString> columnNames;
    QList<int> columnWidths;
    columnNames << "time" << "news";
    columnWidths << 60 << 80;
    deviceTable->setRowCount(AppConfig::MsgTableCount);

    //Title + column width setting
    int columnCount = columnNames.count();
    deviceTable->setColumnCount(columnCount);
    deviceTable->setHorizontalHeaderLabels(columnNames);
    for (int i = 0; i < columnCount; i++) {
        deviceTable->setColumnWidth(i, columnWidths.at(i));
    }
}

void DeviceHelper::addMsg(const QString &msg, quint8 type)
{
    if (deviceTable == NULL) {
        return;
    }

    //Remove the last line and insert the current message into the first line
    deviceTable->removeRow(deviceTable->rowCount() - 1);
    deviceTable->insertRow(0);

    //Set different text colors according to different types
    //If you only want to use the color matching automatic switching of the system, you can comment on the judgment below
    QColor textColor = QUIConfig::TextColor;
    if (type == 0) {
        textColor = AppConfig::ColorTextNormal;
    } else if (type == 1) {
        textColor = AppConfig::ColorTextWarn;
    } else if (type == 2) {
        textColor = AppConfig::ColorTextAlarm;
    }

    QTableWidgetItem *itemTime = new QTableWidgetItem(TIME);
    itemTime->setTextAlignment(Qt::AlignCenter);
    itemTime->setForeground(textColor);
    deviceTable->setItem(0, 0, itemTime);

    QTableWidgetItem *itemMsg = new QTableWidgetItem(msg);
    //itemMsg->setTextAlignment(Qt::AlignCenter);
    itemMsg->setForeground(textColor);
    deviceTable->setItem(0, 1, itemMsg);
}

void frmConfigSystem::initColorConfig()
{
    ui->cboxColorTextNormal->setColorName(AppConfig::ColorTextNormal);
    connect(ui->cboxColorTextNormal, SIGNAL(colorChanged(QString)), this, SLOT(saveColorConfig()));

    ui->cboxColorTextWarn->setColorName(AppConfig::ColorTextWarn);
    connect(ui->cboxColorTextWarn, SIGNAL(colorChanged(QString)), this, SLOT(saveColorConfig()));

    ui->cboxColorTextAlarm->setColorName(AppConfig::ColorTextAlarm);
    connect(ui->cboxColorTextAlarm, SIGNAL(colorChanged(QString)), this, SLOT(saveColorConfig()));

    ui->cboxColorIconAlarm->setColorName(AppConfig::ColorIconAlarm);
    connect(ui->cboxColorIconAlarm, SIGNAL(colorChanged(QString)), this, SLOT(saveColorConfig()));
}

void frmConfigSystem::saveColorConfig()
{
    AppConfig::ColorTextNormal = ui->cboxColorTextNormal->getColorName();
    AppConfig::ColorTextWarn = ui->cboxColorTextWarn->getColorName();
    AppConfig::ColorTextAlarm = ui->cboxColorTextAlarm->getColorName();
    AppConfig::ColorIconAlarm = ui->cboxColorIconAlarm->getColorName();
    AppConfig::writeConfig();
}