introduction
The edge deployment of the model requires in-depth learning, the model is more miniaturized and lightweight, and the speed is required to be fast enough! A quantized model can be executed by integer operation, which greatly reduces the floating-point calculation overhead. The python framework supports 8-bit quantization. Compared with the 32-bit floating-point number model, the memory requirement of the model size can be reduced by about four times, and the model reasoning can be accelerated by about two to four times after the hardware supports 8-bit quantization. Model quantification is the preferred technical scheme for model deployment and accelerated reasoning and prediction.
Pytoch quantitative support
Pytoch supports the deep learning model quantization technology on a variety of processors. In most common cases, it trains the FP32 number model and then derives the model of transfer behavior INT8. At the same time, pytoch still supports training quantization, completes the training by using pseudo quantization measurement, and finally derives the quantitative low-precision model. The quantitative model in pytoch needs three input elements, which are:
Quantization configuration: declare the quantization method of weight parameters and activation functions
 Computing backend: supported hardware platforms
 Quantization engine: the hardware platform supported by the engine statement should be consistent with the statement in the quantization configuration
The quantization background supported locally includes:
X86 CPU series + avx2up, support
https://github.com/pytorch/FBGEMM
ARM CPUs support
https://github.com/pytorch/QNNPACK
Both of these two methods support direct quantization, but GPU does not support it. How to support GPU? The latest version of pytoch's official document says that the training method of quantitative perception must be used to train the model before the model supports GPU quantization.
Default setting fbgemm
# set the qconfig for PTQ
qconfig = torch.quantization.get_default_qconfig('fbgemm')
# or, set the qconfig for QAT
qconfig = torch.quantization.get_default_qat_qconfig('fbgemm')
# set the qengine to control weight packing
torch.backends.quantized.engine = 'fbgemm'
Default qnnpack:
# set the qconfig for PTQ
qconfig = torch.quantization.get_default_qconfig('qnnpack')
# or, set the qconfig for QAT
qconfig = torch.quantization.get_default_qat_qconfig('qnnpack')
# set the qengine to control weight packing
torch.backends.quantized.engine = 'qnnpack'
Eager mode quantization
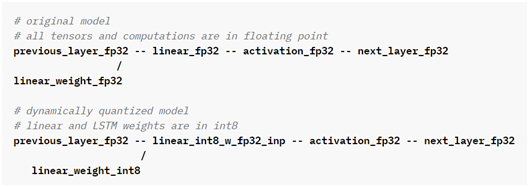
Dynamic quantization
It is the simplest quantization method. This quantization method is more suitable for models with long loading memory operation than reasoning time. The typical reasoning is the reasoning of LSTM model. The comparison before and after quantization is as follows:
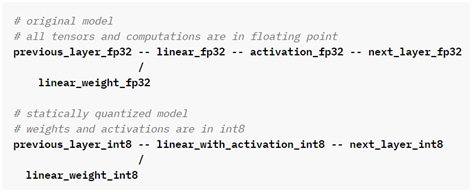
Static quantization
It is the well-known PTO (post training quantification). The quantification method after training is mainly aimed at CNN network. The comparison before and after quantification is as follows:
It can be seen that dynamic quantization is mainly aimed at the activation function!
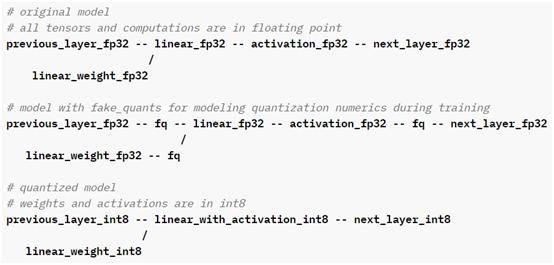
Quantitative perception training
The accuracy of the model obtained by the quantitative perception training method is higher than that of other methods. Compared with the original floating-point model, the accuracy decline is not as large as that of the PTO method. The comparison before and after quantification is as follows:
API function demonstration:
import torch

# define a floating point model where some layers could benefit from QAT
class M(torch.nn.Module):
    def __init__(self):
        super(M, self).__init__()
        # QuantStub converts tensors from floating point to quantized
        self.quant = torch.quantization.QuantStub()
        self.conv = torch.nn.Conv2d(1, 1, 1)
        self.bn = torch.nn.BatchNorm2d(1)
        self.relu = torch.nn.ReLU()
        # DeQuantStub converts tensors from quantized to floating point
        self.dequant = torch.quantization.DeQuantStub()

    def forward(self, x):
        x = self.quant(x)
        x = self.conv(x)
        x = self.bn(x)
        x = self.relu(x)
        x = self.dequant(x)
        return x

# create a model instance
model_fp32 = M()

# model must be set to train mode for QAT logic to work
model_fp32.train()

# attach a global qconfig, which contains information about what kind
# of observers to attach. Use 'fbgemm' for server inference and
# 'qnnpack' for mobile inference. Other quantization configurations such
# as selecting symmetric or assymetric quantization and MinMax or L2Norm
# calibration techniques can be specified here.
model_fp32.qconfig = torch.quantization.get_default_qat_qconfig('fbgemm')

# fuse the activations to preceding layers, where applicable
# this needs to be done manually depending on the model architecture
model_fp32_fused = torch.quantization.fuse_modules(model_fp32,
    [['conv', 'bn', 'relu']])

# Prepare the model for QAT. This inserts observers and fake_quants in
# the model that will observe weight and activation tensors during calibration.
model_fp32_prepared = torch.quantization.prepare_qat(model_fp32_fused)

# run the training loop (not shown)
training_loop(model_fp32_prepared)

# Convert the observed model to a quantized model. This does several things:
# quantizes the weights, computes and stores the scale and bias value to be
# used with each activation tensor, fuses modules where appropriate,
# and replaces key operators with quantized implementations.
model_fp32_prepared.eval()
model_int8 = torch.quantization.convert(model_fp32_prepared)

# run the model, relevant calculations will happen in int8
res = model_int8(input_fp32)
Preview, the next complete example!
reference resources:
https://pytorch.org/docs/stable/quantization.html
https://arxiv.org/pdf/1506.02025.pdf