Packing NW.js Application and Making windows Installation File
To update:
Some of the technical points in this article have fallen behind. Latest Articles
This is probably the most detailed package of NW.js in Chinese history.
This article adapts to have a certain js foundation, the first time to play under Windows setup packaging classmates, the default environment windows. Then, the article is too detailed. It will take a lot of time to finish reading. I don't want to put it into practice for the time being. I will provide one directly. vue-nw-seed The seed project contains some optimization points of the current article.
This paper deals with the following points:
Node.js packages zip, file processing, crypto extracts MD5, iconv processes strings, etc.
Resource Hacker configures application permissions, icons, copyrights, etc.
InnoSetup Making Installation Package and iss File Configuration
Updates to NW.js applications (incremental, full updates)
...
Points not covered:
Code encryption, desktop applications based on the mentality of the front end, code Uglify has become invisible. If there are confidential codes or encryption algorithms that need to be considered separately from the scope of this article, provide an official document. Protect JavaScript Source Code
I. Strong ability to toss and toss, directly above the document
There's nothing to say about this part. It's very simple.
Be friendly to beginners. There's also an NW.js package on the gayhub and an npm package. nw-builder This is simpler to use. I don't even want to write an example. Then you need to download NW.js SDK or NORMAL packages, in the same way as my last article. Quick Construction of NW.js Project with vue2 and webpack The bad part of China's network
2. Self-Packing
NW.js is packaged in a folder, which contains the entire runtime and an exe file. At this time, the whole package is successful, about 100 MB.
However, our application is no longer for internal use, downloading to users can not directly copy a folder or download zip compressed package to users, so unreliable appearance, what virus do you think it is?
Can we take whatever we want and pack it like a buffet?
Ideas for Realization
Make a runtime by yourself, zip the packaged code into package.nw with Node.js, then put it into runtime, and pack it into a setup.exe with the official recommendation InnoSetup.
1. XP compatibility issues
The main advantage of using NW.js is compatibility with XP. The education industry is really important...
NW.js does not support XP in all versions, since Chromium 50 has not supported XP since its inception, so if your client wants to support XP, the current best version option is 0.14.7. See NW.js blog NW.js v0.14.7 (LTS) Released
2. Make your own runtime
From the official website http://dl.nwjs.io/v0.14.7/ Download a normal package and DIY on that basis.
Maybe that's what the catalogue looks like.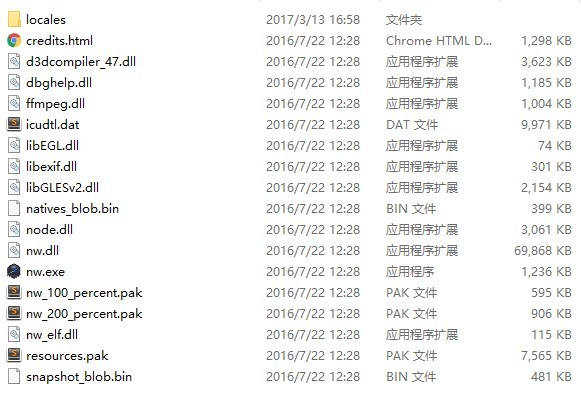
Then start optimizing and customizing:
1) Collate the language packages under locales to reduce some redundancy.
2) Substitution ffmpeg.dll Solve the playback problem of some format video s and so on. When downloading, pay attention to the next version, which corresponds to NW.js.
3) Rename nw.exe to our application name, such as myProgramApp.exe, more formally. Then use Resource Hacker to modify the next version and copyright company and other related information.
4) Use Resource Hacker to replace the icon. The recommended size is 256.
5) Administrator privileges are added to it at the same time. Because we need to do incremental updates, we need to use Node.js to write files to the directory where the application is located. When the installation directory is C:Program Files\\\\\\\
The specific operation is to open myProgramApp.exe with Resource Hacker and find it in Manifest.
<requestedExecutionLevel level="asInvoker" uiAccess="false"/></requestedPrivileges>
Amend to read
<requestedExecutionLevel level="requireAdministrator" uiAccess="false"/></requestedPrivileges>
That's probably what it looks like after we finish it.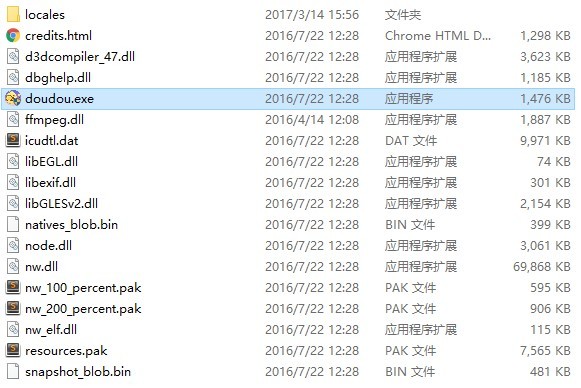
3. package.nw with Node.js
Dependencies requiring a zip process archiver For the first time, using this dependency, it is suggested to go directly to their English documents and use bulk cautiously, which was abandoned at 0.21.0.
The way to pack zip is probably the same:
const fs = require('fs')
const archive = require('archive')

function buildZipFile({ outZipPath, files, mainPackage } = {}) {
  let filesArr = Array.isArray(files) ? files : [files]

  // Create a zip file for a writable stream
  var output = fs.createWriteStream(outZipPath)
  var archive = archiver('zip', { store: true })

  archive.on('error', console.error)

  // nw file with zip compressed package format in packaged dist directory
  archive.pipe(output)

  if (filesArr.length > 0) {
    filesArr.forEach(p => {
      if (!p) return

      // Eliminate package.json
      let hasPackJson = path.resolve(p, 'package.json')
      if (fs.existsSync(hasPackJson)) fs.unlinkSync(hasPackJson)

      // Compressed directory
      archive.directory(p, '')
    })

    // Add package.json
    archive.file(mainPackage, { name: 'package.json' })
  }

  archive.finalize()
}
4. InnoSetup Packaging and Installation Package
Node.js'rich ecology has been provided node-innosetup-compiler Yes, so it's also very convenient. But for the first time I play this player is still a bit confused, especially the iss file writing...
Since this article does not want to be written as an InnoSetup usage tutorial, I will only talk about common usage. If you need more complex functions, give you a document. Inno Setup Help
I provide a setup.iss file that I use, starting with an underscore (e.g. _appName), which will be matched by the js regular
; Script generated by the Inno Setup Script Wizard.
; SEE THE DOCUMENTATION FOR DETAILS ON CREATING INNO SETUP SCRIPT FILES!
; The execution directory is setup.iss Where is the catalog, please note the splicing relative catalog

#define MyAppName "_appName"
#define MyAppNameZh "_appZhName"
#define MyAppVersion "_appVersion"
#define MyAppPublisher "_appPublisher"
#define MyAppURL "_appURL"
#define MyAppExeName "_appName.exe"
#define OutputPath "_appOutputPath"
#define SourceMain "_appRuntimePath\_appName.exe"
#define SourceFolder "_appRuntimePath\*"
#define LicenseFilePath "_appResourcesPath\license.txt"
#define SetupIconFilePath "_appResourcesPath\_appName.ico"
#define MyAppId "_appId"

[Setup]
; NOTE: The value of AppId uniquely identifies this application.
; Do not use the same AppId value in installers for other applications.
; (To generate a new GUID, click Tools | Generate GUID inside the IDE.)
AppId={#MyAppId}
AppName={#MyAppName}
AppVersion={#MyAppVersion}
AppVerName={#MyAppName}
AppPublisher={#MyAppPublisher}
AppPublisherURL={#MyAppURL}
AppSupportURL={#MyAppURL}
AppUpdatesURL={#MyAppURL}
DefaultDirName={pf}\{#MyAppName}
LicenseFile={#LicenseFilePath}
OutputDir={#OutputPath}
OutputBaseFilename={#MyAppName}-v{#MyAppVersion}-setup
SetupIconFile={#SetupIconFilePath}
Compression=lzma
SolidCompression=yes
PrivilegesRequired=admin
Uninstallable=yes
UninstallDisplayName={#MyAppNameZh}
DefaultGroupName={#MyAppNameZh}

[Tasks]
Name: "desktopicon"; Description: "{cm:CreateDesktopIcon}"; GroupDescription: "{cm:AdditionalIcons}"; Flags: checkedonce

[Files]
Source: {#SourceMain}; DestDir: "{app}"; Flags: ignoreversion
Source: {#SourceFolder}; DestDir: "{app}"; Flags: ignoreversion recursesubdirs createallsubdirs

[Icons]
Name: "{commondesktop}\{#MyAppNameZh}"; Filename: "{app}\{#MyAppExeName}"; Tasks: desktopicon
Name: "{group}\{#MyAppNameZh}"; Filename: "{app}\{#MyAppExeName}"
Name: "{group}\uninstall{#MyAppNameZh}"; Filename: "{uninstallexe}"

[Languages]
Name: "chinese"; MessagesFile: "innosetup\Languages\ChineseSimp.isl"

[Run]
Filename: "{app}\{#MyAppExeName}"; Description: "{cm:LaunchProgram,{#StringChange(MyAppName, '&', '&&')}}"; Flags: nowait postinstall skipifsilent
Create a resources folder with icon and license, like this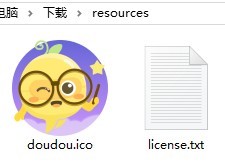
Then this iss is used with makeExeSetup, which is particularly sour. Please ignore the replace ment string, 233333333.
// New dependencies to handle utf and ansi strings
const iconv = require('iconv-lite')

function makeExeSetup(opt) {
  const { issPath, outputPath, mainPackage, runtimePath, resourcesPath, appPublisher, appURL, appId } = opt
  const { name, appName, version } = require(mainPackage)
  const tmpIssPath = path.resolve(path.parse(issPath).dir, '_tmp.iss')
  const innosetupCompiler = require('innosetup-compiler')

  // rewrite name, version to iss
  fs.readFile(issPath, null, (err, text) => {
    if (err) throw err

    let str = iconv.decode(text, 'gbk')
      .replace(/_appName/g, name)
      .replace(/_appZhName/g, appName)
      .replace(/_appVersion/g, version)
      .replace(/_appOutputPath/g, outputPath)
      .replace(/_appRuntimePath/g, runtimePath)
      .replace(/_appResourcesPath/g, resourcesPath)
      .replace(/_appPublisher/g, appPublisher)
      .replace(/_appURL/g, appURL)
      .replace(/_appId/g, appId)


    fs.writeFile(tmpIssPath, iconv.encode(str, 'gbk'), null, err => {
      if (err) throw err

      // inno setup start
      innosetupCompiler(tmpIssPath, { gui: false, verbose: true }, function(err) {
        fs.unlinkSync(tmpIssPath)
        if (err) throw err
      })
    })
  })
}
It's time to make an installation package, like this
Then there's the installation process.
Installation completed directory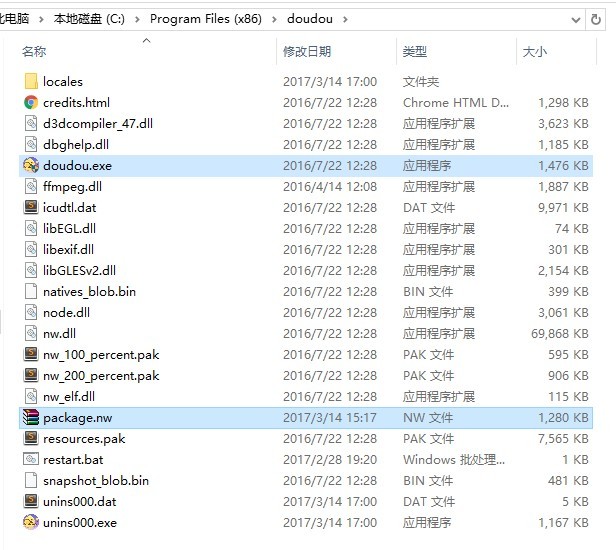
3. Cool Installation Interface
Although InnoSetup is simple and easy to use, the default installation interface for the built installation package is the Windows 2000 interface, the ugly old one....
If your application can only be used, that's enough.
But how can technicians not toss around? Here, let's make a cool installation package.
Let's start with an example that I imitated. INNOSETUP Imitates Dow Cloud Installation Package Interface At the same time, there is a reference material: Installation Package Interface Design of Internet Software-Inno setup Sincerely spit out a slot, this information is very little...
In fact, I have written one according to the existing material package, but our ui has not yet designed a more beautiful installation interface, so I will not put the relevant resources and effects in place for the time being.
IV. Updating of Applications
This piece should be the easiest, clam.
Our renewal strategy is divided into two kinds: one is to update our business code only, only need to download more than 1MB of business code each time, take incremental renewal channels; the other is to update our runtime, or other important updates, need to update in full, take full renewal channels.
Ideas for Realization
Write the version and update information into update.json when packaging. Request this JSON every time the client opens. Check if the version in JSON matches the version in client. If the mismatch is not matched, incremental updates or full updates are made according to the agreed rules in json.
1. Ready to update files
One development principle is to be lazy and lazy. If you can do it with tools, you must do it with tools. With this principle in mind, clam, let's continue to optimize the packaging construction mentioned above.
Use Node.js to copy package.nw(zip) package temporarily placed in runtime to output directory, and then write update information to update.json according to changelog.txt file.
Prepare a changelog.txt file in the config configuration directory. It's about as long as this. Each update is divided by - - - the first line is the version, followed by the update information:
0.1.0
 - Programmer peter started developing!
- By the way, ask the boss to raise peter's salary.
---
1.0.0
 - The official client version has been released successfully.
- At the same time, peter will not have any other updates for the time being because he has been disabled and hospitalized for asking for a raise in salary.
---
Some of my classmates asked me why we should design a log.txt so that we can not describe it directly in other forms such as json.
Because this file may be packaged into applications in the future, along with the license file for packaging; there is also a separation of this part of the description, easier to expand.
Then write a way to read the log
function getLatestLogBycheckVersion({ changelogPath, mainPackage }) {
  // get package.json by package
  const packageJson = require(mainPackage)

  // check version
  // More than or equal to 3 is because the legal version information is the least "---" has three lengths.
  const changeLogArr = fs.readFileSync(changelogPath, 'utf-8').split('---').filter(v => v.trim().length >= 3)
  const latestInfo = changeLogArr.pop().split('\n').map(v => v.trim()).filter(v => v.length)
  const version = latestInfo[0]

  if (packageJson.version !== version) {
    // Update the version of package.json
    packageJson.version = version
    fs.writeFileSync(mainPackage, JSON.stringify(packageJson, null, '  '), 'utf-8')
  }
  return latestInfo
}

// This is the global options.
opt.latestLog = getLatestLogBycheckVersion(opt)

// Update convention to determine whether incremental updates are required for the current version
opt.noIncremental = process.argv.indexOf('--noIncremental') >= 0
Incremental Update Agreement
It seems a bit cumbersome to detect whether incremental updates are needed and write them into options through process.argv. If you have any better ideas, you are welcome to come up with them. issue Or trust me directly, thank you!
Next, we move on to the packaged process, which requires moving nw to the output directory and writing an update.json
const crypto = require('crypto')

function finishedPackage(opt) {
  const { mainPackage, outputPath, latestLog, outZipPath, updateServerPath, noIncremental } = opt
  const { name, appName, version } = require(mainPackage)

  let versionCode = parseInt(version.replace(/\./g, ''))
  let updateDesc = latestLog.slice(1).join('#%#')

  let outNWName = `${name}-v${version}.nw`
  let outNWPath = path.resolve(outputPath, outNWName)
  let updateJsonPath = path.resolve(outputPath, 'update.json')

  // write update.json
  let updateJson = {
    appName,
    version,
    versionCode,
    requiredVersion: version,
    requiredVersionCode: versionCode,
    updateDesc,
    filePath: updateServerPath + outNWName,
    incremental: !noIncremental
  }

  // fileSize and MD5
  getMd5ByFile(outZipPath, (err, hexStr) => {
    if (err) throw err
    updateJson.MD5 = hexStr
    updateJson.fileSize = fs.statSync(outZipPath).size
    fs.writeFileSync(updateJsonPath, JSON.stringify(updateJson, null, '  '), 'utf-8')

    copyFile(outZipPath, outNWPath)
    fs.unlink(outZipPath, err => err && console.error(err))
  })
}

function getMd5ByFile(filePath, callback) {
  let rs = fs.createReadStream(filePath)
  let hash = crypto.createHash('md5')
  rs.on('error', err => {
    if (typeof callback === 'function') callback(err)
  })
  rs.on('data', hash.update.bind(hash))
  rs.on('end', () => {
    if (typeof callback === 'function') callback(null, hash.digest('hex'))
  })
}

function copyFile(src, dst) {
  fs.createReadStream(src).pipe(fs.createWriteStream(dst))
}
It's almost like that after the whole packing.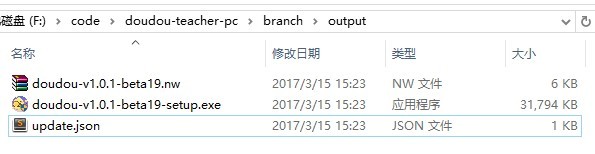
That's what's actually going on in that update.json
{
  "appName": "doudou",
  "version": "1.0.1-beta19",
  "versionCode": 101,
  "requiredVersion": "1.0.1-beta19",
  "requiredVersionCode": 101,
  "updateDesc": "- Programmer peter There is nothing to say.",
  "filePath": "http://upgrade.iclassedu.com/doudou/upgrade/teacher/doudou-v1.0.1-beta19.nw",
  "incremental": true,
  "MD5": "9be46fc8fb04d38449eeb4358c3b5a31",
  "fileSize": 5469
}
2. Get update.json and check for updates
Up code, code switch to src directory, write utils/update.js in our application code. Specific small methods, see the notes.
import { updateApi } from 'config/app'
import { App } from 'nw.gui'

const options = { method: 'GET', mode: 'cors', credentials: 'include' }
let tmpUpdateJson = null

// Request update.json, returning JSON of promise type
export function getUpdateJson(noCache) {
  if (!noCache && tmpUpdateJson) return new Promise((resolve, reject) => resolve(tmpUpdateJson))
  return window.fetch(updateApi + '?' + (new Date().getTime()), options)
    .then(resp => resp.json())
    .then(json => {
      tmpUpdateJson = json
      return tmpUpdateJson
    })
}

// Check the version and jump to the update page if there is an update
export function checkUpdate() {
  getUpdateJson().then(json => {
    if (json.version === App.manifest.version) return
    setTimeout(() => { window.location.hash = '/update' }, 500)
  })
}
Then update checks are performed in main.js
// Priority update
import { checkUpdate } from '@/utils/update'
if (process.env.NODE_ENV !== 'development') checkUpdate()
3. Update
The basic idea is to use Node.js to download the NW package to the directory where the application is located, and replace the original package.nw directly, and restart it for yourself; if the full amount of updates are made, open the download page of the application directly, and let users download and override the installation by themselves.
// Download nw package
export function updatePackage() {
  return new Promise((resolve, reject) => {
    getUpdateJson().then(json => {
      // Full Update
      if (!json.incremental) {
        Shell.openExternal(getSetupApi)
        return reject({ message: 'Please download the latest version and override the installation' })
      }

      // Incremental update
      let packageZip = fs.createWriteStream(tmpNWPath)
      http
        .get(json.filePath, res => {
          if (res.statusCode < 200 || res.statusCode >= 300) return reject({ message: 'Download error, please try again later' })
          res.on('end', () => {
            if (fs.statSync(tmpNWPath).size < 10) return reject({ message: 'Error updating package, please try again later' })
            fs.renameSync(tmpNWPath, appPath)
            resolve(json)
          })
          res.pipe(packageZip)
        })
        .on('error', reject)
    })
  })
}

// Restart yourself
export function restartSelf(waitTime) {
  setTimeout(() => {
    require('child_process').spawn('restart.bat', [], { detached: true, cwd: rootPath })
  }, ~~waitTime || 2000)
}
Here's a little hack. Looking at the code carefully, the students should have found restart.bat. I tried many ways to restart NW.exe and failed after many attempts. I wrote a bat to restart myself.
taskkill /im doudou.exe /f
start .\doudou.exe
exit
If there are other better ways, you are welcome to come. issue Or trust me directly, thank you!
Some students may ask, why not download the exe package directly and then open the boot installation?
I've tried it. When the application is installed in the C: Program Files directory, the administrator's permissions can't write. exe suffix files into.... So, I simply use the browser to open the download page of our application and let the user download it by himself, then install it by himself. Here you should be able to optimize, download to user data directories, or other temporary directories.
4. update page
There's nothing technical on this page, just manual labor. Render the version and update information according to the json obtained by the previous getUpdate json method. Then provide an update button. After clicking the button, execute the update Package method. If it works well, call restartSelf in the then to restart itself.
This is the overall effect.
If it's useful to you, help me order one. star Thank you. Your support is the driving force for me to continue to update.