introduction
To sum up, we have now learned HTML, CSS and JavaScript. Although we have just learned JS, we do not know how JS is combined with HTML and CSS static pages. In fact, JS controls DOM and BOM through web API. Next, we will focus on this part.
1.1. Web API introduction
1.1.1 concept of API
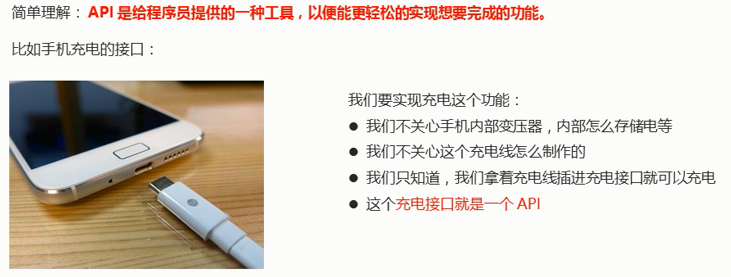
API (Application Programming Interface) is some pre-defined functions, which aims to provide the ability for applications and developers to access a group of routines based on some software or hardware without accessing the source code and understanding the details of its internal working mechanism.
Give an example to explain what an API is.
For example,
There is a function fopen() in C language that can open files on the hard disk. For us, this function is a tool for opening files provided by C language.
There is a function alert() in javascript that can pop up a prompt box on the page. This function is a pop-up box tool provided by js.
These tools (functions) are provided by the programming language, and the internal implementation has been encapsulated. We just need to learn to use these tools flexibly.
1.1.2 concept of Web API
Web API is a set of APIs (BOM and DOM) provided by the browser to operate browser functions and page elements.
At this stage, we mainly explain the common API s for browsers, and mainly do interactive effects for browsers. For example, we want to pop up a warning box in the browser and directly use alert('pop up ')
MDN detailed API: https://developer.mozilla.org/zh-CN/docs/Web/API
Because there are many Web APIs, we call this stage Web APIs.
The Web API here specifically refers to a series of APIs (many functions or object methods) provided by the browser, that is, a series of tools for operating web pages. For example, methods of operating html tags and page addresses.
1.1.3 API and Web API summary
-
API is an interface provided for our programmers to help us realize certain functions. We can use it without worrying about how to implement it internally
-
Web API is mainly aimed at the interface provided by the browser, and mainly aims at the interactive effect of the browser.
-
Web API s generally have inputs and outputs (function parameters and return values), and many web APIs are methods (functions)
-
Learning Web API can be combined with the previous idea of learning built-in object methods
1.2. DOM introduction
1.2.1 what is DOM
The Document Object Model (DOM) is W3C Treatment recommended by the organization Extensible markup language (html or xhtml) standard Programming interface.
W3C has defined a series of DOM interfaces, which can change the content, structure and style of web pages.
DOM is a set of specifications for processing html and xml documents formulated by W3C organization. All browsers follow this set of standards.
1.2.2. DOM tree
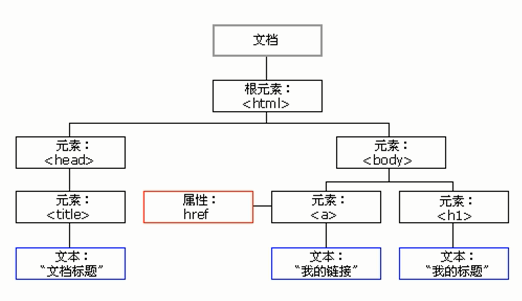
DOM tree, also known as document tree model, maps the document into a tree structure, processes it through node objects, and the processing results can be added to the current page.
- Document: a page is a document, which is represented by document in DOM
- Node: all contents in the web page are nodes (labels, attributes, text, notes, etc.) in the document tree, which are represented by node
- Tag node: all tags in a web page are usually called element nodes, also referred to as "elements", which are represented by element

1.3. Get element
Why get page elements?
For example, if we want to operate a part (show / hide, animation) on the page, we need to obtain the corresponding element of the part before operating it.
1.3.1. Get by ID
Syntax: document.getElementById(id)
Function: according to ID Get element object
 Parameters: id Value, case sensitive string
 Return value: element or object null
Case code
<body>
    <div id="time">2019-9-9</div>
    <script>
        // Because we load the document page from top to bottom, we have to have a label first, so we write the script below the label
        var timer = document.getElementById('time');
        console.log(timer);
        console.log(typeof timer);
        // console.dir prints the element object we returned to better view the properties and methods inside
        console.dir(timer);
    </script>
</body>
1.3.2. Get element by tag name
Syntax: document.getElementsByTagName('Tag name') perhaps element.getElementsByTagName('Tag name')
Function: get the element object according to the tag name
 Parameters: tag names
 Return value: collection of element objects (pseudo array, array elements are element objects)
Case code
<body>
    <ul>
        <li>Know or not know or not, should be waiting for you for a long time 11</li>
        <li>Know or not know or not, should be waiting for you for a long time 22</li>
        <li>Do you know, I should have been waiting for you for a long time 33</li>
        <li>Know or not know or not, should be waiting for you for a long time 44</li>
        <li>Know or not know or not, should be waiting for you for a long time 55</li>
    </ul>
    <ul id="nav">
        <li>Rare words</li>
        <li>Rare words</li>
        <li>Rare words</li>
        <li>Rare words</li>
        <li>Rare words</li>
    </ul>
    <script>
        // 1. The returned is the collection of obtained element objects stored in the form of pseudo array
        var lis = document.getElementsByTagName('li');
        console.log(lis);
        console.log(lis[0]);
        // 2. We want to print the element objects in turn. We can traverse
        for (var i = 0; i < lis.length; i++) {
            console.log(lis[i]);
        }
        // 3. element.getElementsByTagName() can get some tags in this element
        var nav = document.getElementById('nav'); // This gets the nav element
        var navLis = nav.getElementsByTagName('li');
        console.log(navLis);
    </script>
</body>
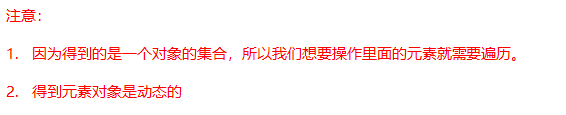
Note: getElementsByTagName() obtains a dynamic collection, that is, when a tag is added to the page, elements are added to the collection.
1.3.3. H5 new element acquisition method

Case code
<body>
<div class="box">Box 1</div>
<div class="box">Box 2</div>
<div id="nav">
<ul>
<li>home page</li>
<li>product</li>
</ul>
</div>
<script>
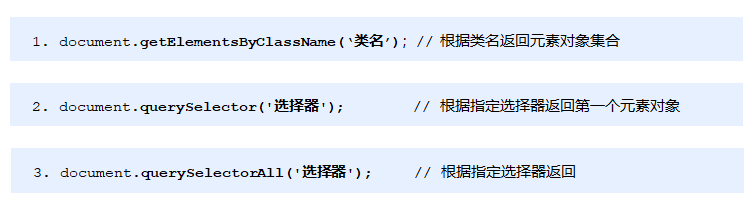
// 1. getElementsByClassName obtains some element collections according to the class name
var boxs = document.getElementsByClassName('box');
console.log(boxs);
// 2. querySelector returns the first element object of the specified selector. Remember that the selector in it needs to be signed box #nav
var firstBox = document.querySelector('.box');
console.log(firstBox);
var nav = document.querySelector('#nav');
console.log(nav);
var li = document.querySelector('li');
console.log(li);
// 3. querySelectorAll() returns the collection of all element objects of the specified selector
var allBox = document.querySelectorAll('.box');
console.log(allBox);
var lis = document.querySelectorAll('li');
console.log(lis);
</script>
</body>
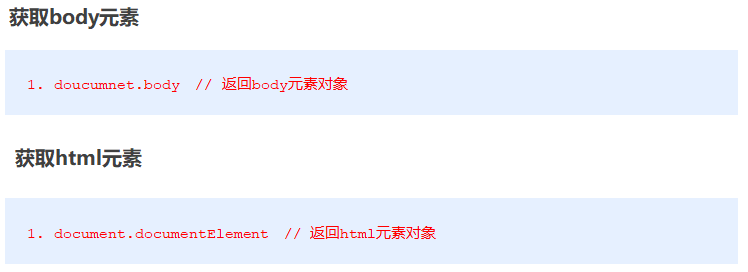
1.3.4 get special elements (body, html)
1.4. Event basis
1.4.1. Event overview
JavaScript enables us to create dynamic pages, and events are behaviors that can be detected by JavaScript.
Simple understanding: trigger response mechanism.
Each element in the web page can generate some events that can trigger JavaScript. For example, we can generate an event when the user clicks a button, and then perform some operations.
1.4.2. Three elements of event
- Event source (who): the element that triggers the event
- Event type (what event): for example, click event
- Event handler (what to do): code to be executed after the event is triggered (function form), event handler
Case code
<body>
    <button id="btn">Tang Bohu</button>
    <script>
        // Click a button to pop up a dialog box
        // 1. An event is an event handler that consists of three parts: an event source, an event type, and an event handler
        //(1) Event source the object whose button the event is triggered
        var btn = document.getElementById('btn');
        //(2) How do event types trigger events, such as onclick, mouse over or keyboard down
        //(3) The event handler is completed by a function assignment
        btn.onclick = function() {
            alert('Point Qiuxiang');
        }
    </script>
</body>
1.4.3. To execute an event

Case code
<body>
    <div>123</div>
    <script>
        // Perform event steps
        // Click the div console output, and I'm selected
        // 1. Get event source
        var div = document.querySelector('div');
        // 2. Binding event registration event
        // div.onclick
        // 3. Add event handler
        div.onclick = function() {
            console.log('I was chosen');
        }
    </script>
</body>
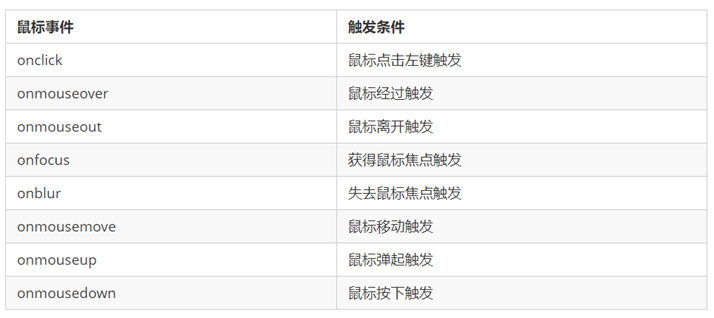
1.4.4. Common mouse events
1.4.5. Three elements of analysis event
-
Drop down menu three elements
-
Close the three elements of advertising
1.5. Operation element
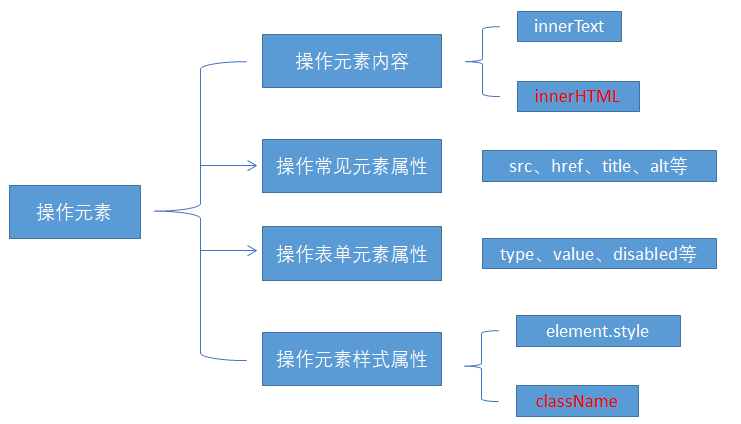
The DOM operation of JavaScript can change the content, structure and style of web pages. We can use DOM operation elements to change the content and attributes of elements. (Note: these operations are implemented through the attributes of the element object)
1.5.1. Change element content (get or set)
innerText change element content
<body>
    <button>Displays the current system time</button>
    <div>At a certain time</div>
    <p>1123</p>
    <script>
        // When we click the button, the text in div will change
        // 1. Get element
        var btn = document.querySelector('button');
        var div = document.querySelector('div');
        // 2. Registration event
        btn.onclick = function() {
            // div.innerText = '2019-6-6';
            div.innerHTML = getDate();
        }
        function getDate() {
            var date = new Date();
            // Let's write a Wednesday, May 1, 2019
            var year = date.getFullYear();
            var month = date.getMonth() + 1;
            var dates = date.getDate();
            var arr = ['Sunday', 'Monday', 'Tuesday', 'Wednesday', 'Thursday', 'Friday', 'Saturday'];
            var day = date.getDay();
            return 'Today is:' + year + 'year' + month + 'month' + dates + 'day ' + arr[day];
        }
    </script>
</body>
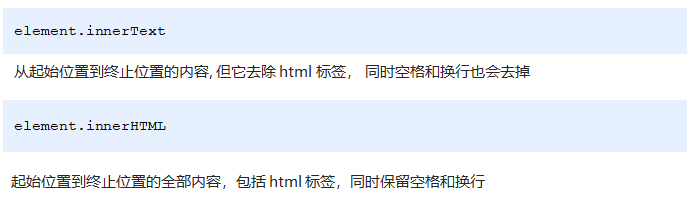
The difference between innerText and innerHTML
- Differences in obtaining content:
innerText removes spaces and line breaks, while innerHTML retains spaces and line breaks
- Differences in setting content:
innerText does not recognize html, but innerHTML does
Case code
<body>
    <div></div>
    <p>
        I am writing
        <span>123</span>
    </p>
    <script>
        // The difference between innerText and innerHTML
        // 1. innerText does not recognize html tags. Non standard removal of spaces and line breaks
        var div = document.querySelector('div');
        // Div.innertext = '< strong > today is: < / strong > 2019';
        // 2. innerHTML recognizes html tags. W3C standard retains spaces and line breaks
        div.innerHTML = '<strong>Today is:</strong> 2019';
        // These two attributes are readable and writable, and you can get the contents of the element
        var p = document.querySelector('p');
        console.log(p.innerText);
        console.log(p.innerHTML);
    </script>
</body>
1.5.2. Attribute operation of common elements

Gets the value of the property
Element object Attribute name
Set the value of the property
Element object Attribute name = value
Case code
<body>
    <button id="ldh">Lau Andy</button>
    <button id="zxy">Xue You Zhang</button> <br>
    <img src="images/ldh.jpg" alt="" title="Lau Andy">
    <script>
        // Modify element attribute src
        // 1. Get element
        var ldh = document.getElementById('ldh');
        var zxy = document.getElementById('zxy');
        var img = document.querySelector('img');
        // 2. Register event handlers
        zxy.onclick = function() {
            img.src = 'images/zxy.jpg';
            img.title = 'Zhang Xueyou Smecta';
        }
        ldh.onclick = function() {
            img.src = 'images/ldh.jpg';
            img.title = 'Lau Andy';
        }
    </script>
</body>
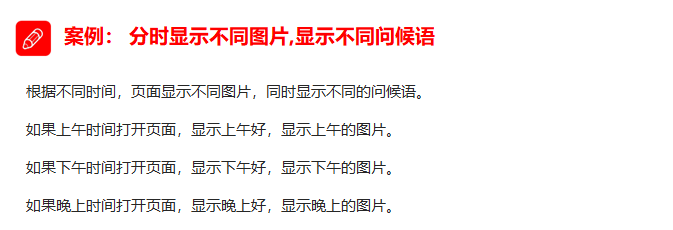
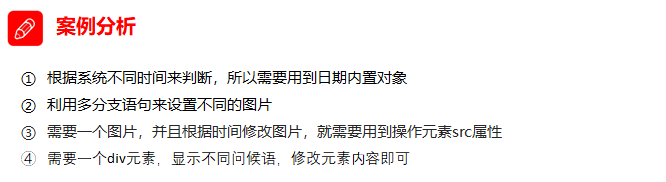
1.5.3. Case: time sharing greetings
1.5.4. Attribute operation of form element

Gets the value of the property
Element object Attribute name
Set the value of the property
Element object Attribute name = value
There are some attributes in the form element, such as disabled, checked and selected. The values of these attributes of the element object are Boolean.
Case code
<body>
    <button>Button</button>
    <input type="text" value="Input content">
    <script>
        // 1. Get element
        var btn = document.querySelector('button');
        var input = document.querySelector('input');
        // 2. Register event handlers
        btn.onclick = function() {
            // The value text content in the form is modified through value
            input.value = 'It was clicked';
            // If you want a form to be disabled, you can no longer click disabled. We want this button to be disabled
            // btn.disabled = true;
            this.disabled = true;
            // this refers to the caller btn of the event function
        }
    </script>
</body>
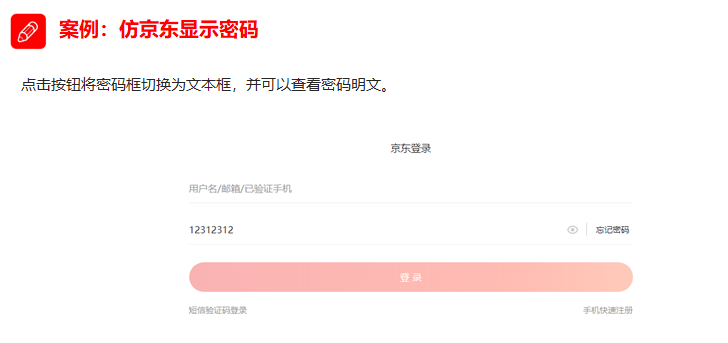
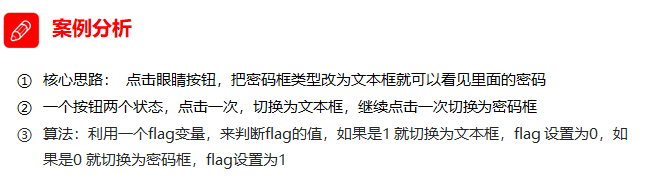
1.5.5. Case: imitation Jingdong display password
1.5.6. Style attribute action
We can modify the size, color, position and other styles of elements through JS.
Common way

Method 1: by operating the style attribute
The style attribute of the element object is also an object!
Element object style. Style attribute = value;

Case code
<body>
    <div>
    </div>
    <script>
    // 1. Get element
    var div = document.querySelector('div');
    // 2. Register event handlers
    div.onclick = function() {
    // The attributes in div.style adopt hump naming method
    this.style.backgroundColor = 'purple';
    this.style.width = '250px';
    }
    </script>
</body>
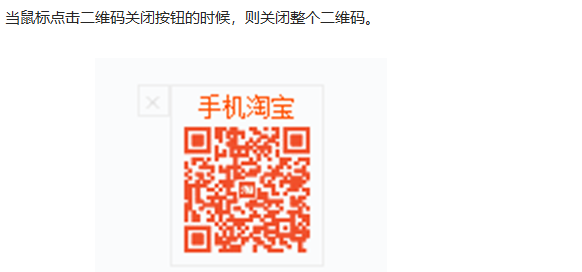
Case: click Taobao to close QR code

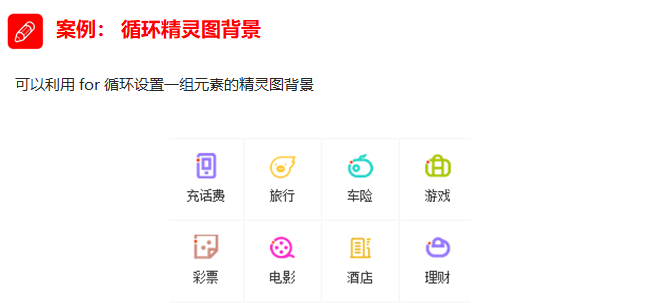
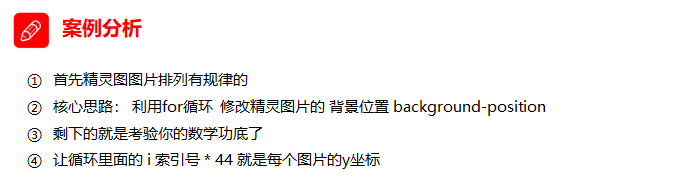
Case: Circular sprite background
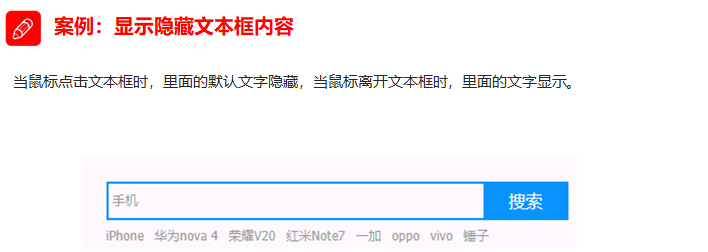
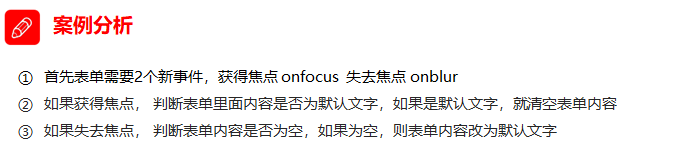
Case: show or hide text box content
Method 2: operate the className attribute
Element object className = value;
Because class is a keyword, all use className.

Case code
<body>
  <div class="first">text</div>
   <script>
   // 1. Use element Style gets and modifies the element style. It is used when there are few styles or simple functions
   var test = document.querySelector('div');
   test.onclick = function() {
   // this.style.backgroundColor = 'purple';
   // this.style.color = '#fff';
   // this.style.fontSize = '25px';
   // this.style.marginTop = '100px';
   // 2. We can change the style of an element by modifying its className, which is suitable for situations with many styles or complex functions
   // 3. If you want to keep the original class name, we can do this multiple class name selector
   // this.className = 'change';
   this.className = 'first change';
   }
   </script>
</body>
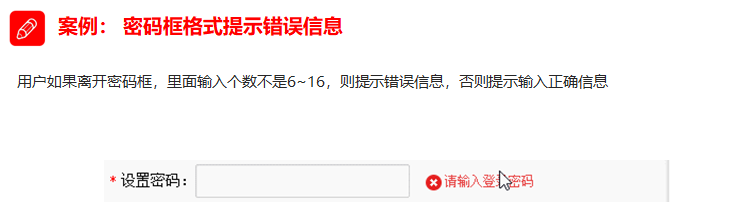
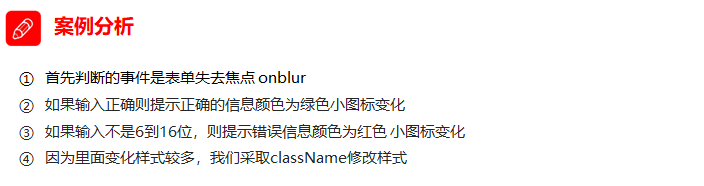
Case: error message in password box format
1.6. Today's summary