3.RabbitMq point-to-point (Direct) mode communication
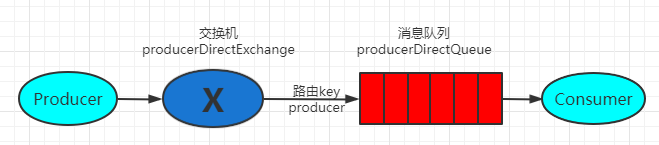
The point-to-point mode adopts the direct connection switch, which is delivered to the corresponding queue according to the routing key carried by the message.
To create the Spring Boot Configuration class used here, first create a directrabbitconfig Configuration class. The Configuration class needs to add @ Configuration annotation to the class name and @ bean injection object instantiation to each function name.
/**
 * @author zzj
 * @date 2021-12-10 19:32:02
 * Create a producer queue
 */
@Configuration
public class DirectRabbitConfig {

}
Let's create a message queue, each
    /**
     *  Message queue
     */
    @Bean
    public Queue producerDirectQueue() {
        // durable: whether to persist. The default value is false. Persistent queue: it will be stored on the disk. It still exists when the message agent restarts. Temporary queue: the current connection is valid
        // exclusive: it is also false by default. It can only be used by the currently created connection, and the queue will be deleted after the connection is closed. This reference takes precedence over durable
        // autoDelete: whether to delete automatically. When no producer or consumer uses this queue, the queue will be deleted automatically.
        //Generally, it's good to set the persistence of the queue. The other two are false by default
        return new Queue("producerDirectQueue",true);
    }
Then create a direct attached switch
    /**
     * DirectExchange
     * Direct connected switch
     * @return
     */
    @Bean
    DirectExchange producerDirectExchange() {
        return new DirectExchange("producerDirectExchange",true,false);
    }
Finally, the queue we created is bound to the direct connected switch through the routing key
    /**
     *  //Binding binds the queue to the switch, and the routing key is producer
     * @return
     */
    @Bean
    Binding bindingDirect() {
        return BindingBuilder.bind(producerDirectQueue()).to(producerDirectExchange()).with("producer");
    }
Through the above steps, we have created a point-to-point communication model.
Next, let's test the model by sending messages. Sending messages is implemented by the controller to facilitate the integration of front-end sending requests. First, create a control class, inject a RabbitTemplate object into it, and use this object to send messages to the switch. call http://ip:8080/sendDirectMessage/yourMessage Interface to send messages.
/**
 * @author zzj
 * @date 2021-12-10 19:38:14
 */
@RestController
public class SendMessageController {

    /**
     * Use the RabbitTemplate, which provides methods such as receive / send, and so on
     * Injection object
     */
    @Resource
    RabbitTemplate rabbitTemplate;

    /**
     * Send message directly
     * @param message Message content
     * @return  Is it successful
     */
    @GetMapping("/sendDirectMessage")
    public String sendDirectMessage(@RequestParam("message")String message) throws JsonProcessingException {
        ObjectMapper mapper = new ObjectMapper();
        String curTime = LocalDateTime.now().format(DateTimeFormatter.ofPattern("yyyy-MM-dd HH:mm:ss"));
        Map<String,Object> map=new HashMap<>();
        map.put("message",message);
        map.put("curTime",curTime);
        //Send the message with the binding key value: TestDirectRouting to the switch TestDirectExchange
        //The preceding segment of the giant pit must be a string, and other types must be disconnected directly...........
        rabbitTemplate.convertAndSend("producerDirectExchange", "producer", mapper.writeValueAsString(map));
        return "1";
    }
}
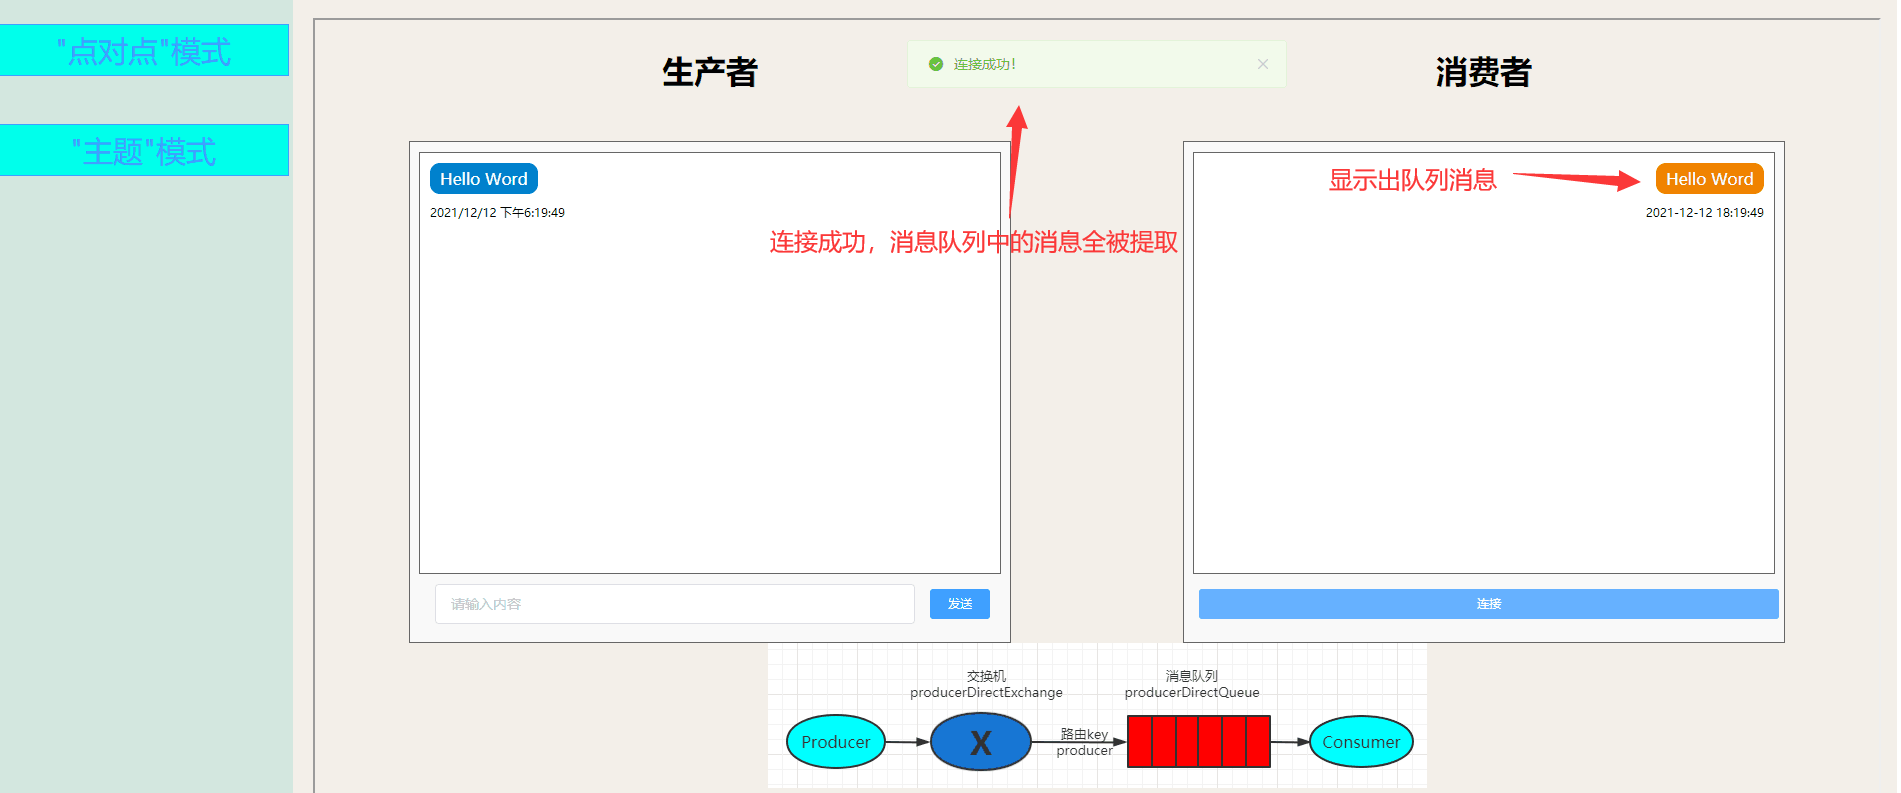
We send "Hello Word"
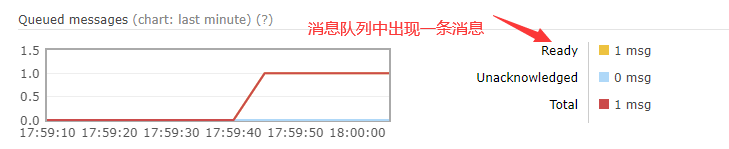
The message appears in the producer directqueue we created.

Here, the producer generates a message, and the consumer is implemented to extract this message. To extract messages, we use the front-end JS to extract messages because it is convenient to display them on the front-end. If you want java code to be extracted quickly through Spring Boot annotation. Next, we use the front end to extract.
The front-end protocol port to be used for front-end extraction is 15674. You need to start the RabbitMQ plug-in in the server and open the firewall of the server to release this port number.
start-up js Connection plug-in
rabbitmq-plugins enable rabbitmq_stomp
rabbitmq-plugins enable rabbitmq_web_stomp_examples
First, other JS libraries that need to be added to the front end are as follows. You can find them on the Internet or import them through cdn
    <!-- stomp Client script for the protocol -->
    <script src="js/stomp.js"></script>
    <!-- SockJS Client script for -->
    <script src="js/sockjs.js"></script>
The general steps are as follows
script type="text/javascript">
    //Create connection
    var ws = new SockJS('http://x.x.x.x:15674/stomp');
    // Get Stomp client object
    var client = Stomp.over(ws);

    // The incoming and outgoing frequency is 0 and is constantly on
    client.heartbeat.outgoing = 0;
    client.heartbeat.incoming = 0;

    // Define connection success callback function
    var on_connect = function (x) {
        //data.body is the received data
        client.subscribe("/amq/queue/yourQueueName", function (data) {
            var msg = data.body;
            console.log(msg)
        });
    };

    // Define callback function on error
    var on_error = function () {
        console.log('error');
    };

    // Connect RabbitMQ
    client.connect('guest', 'guest', on_connect, on_error, '/');
    console.log(">>>connect");

</script>
The sending and receiving effects of the front end are shown below