catalogue
1, Building a RabbitMQ cluster
1. Start multiple RabbitMQ nodes
3, KeepAlived configuration High Availability
Use Docker to build a RabbitMQ cluster, then use HAProxy for load balancing, and finally use KeepAlived to achieve cluster high availability, so as to build a RabbitMQ high availability load balancing cluster.
Why build a highly available load balancing cluster? In a word, the introduction of message queue can realize asynchronous operation, traffic peak shaving, application decoupling and other benefits, but message queue is a double-edged sword after all. With these benefits, it will also reduce the availability and stability of the system. RabbitMQ itself is not distributed (compared with Kafka), so we need to build a RabbitMQ cluster to achieve high availability.
First, let's take a look at what the RabbitMQ highly available load balancing cluster looks like:
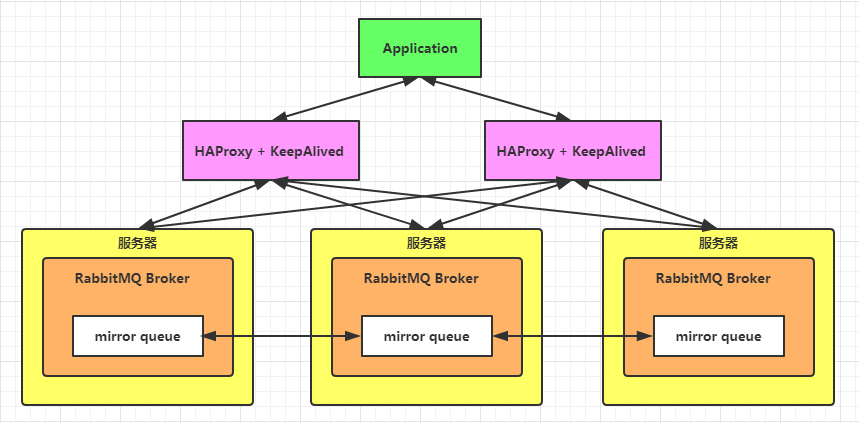
Building a RabbitMQ high availability load balancing cluster using Docker can be divided into three steps:
- Start multiple (three for example) RabbitMQ, build a RabbitMQ cluster, and configure it to mirror mode.
- Use HAProxy for load balancing.
- Use KeepAlived for high availability.
1, Building a RabbitMQ cluster
1. Start multiple RabbitMQ nodes
Start three RabbitMQ nodes using Docker. The target is shown in the following table:
| Server ip | port | hostname | Management interface address |
|---|---|---|---|
| 192.168.16.128 | 5672 | my-rabbit1 | 192.168.16.128:15672 |
| 192.168.16.128 | 5673 | my-rabbit2 | 192.168.16.128:15673 |
| 192.168.16.128 | 5674 | my-rabbit3 | 192.168.16.128:15674 |
Command:
docker run -d --hostname my-rabbit1 --name rabbit1 -p 5672:5672 -p 15672:15672 -e RABBITMQ_ERLANG_COOKIE='rabbitcookie' rabbitmq:3.8.0-beta.4-management

docker run -d --hostname my-rabbit2 --name rabbit2 -p 5673:5672 -p 15673:15672 -e RABBITMQ_ERLANG_COOKIE='rabbitcookie' --link rabbit1:my-rabbit1 rabbitmq:3.8.0-beta.4-management

docker run -d --hostname my-rabbit3 --name rabbit3 -p 5674:5672 -p 15674:15672 -e RABBITMQ_ERLANG_COOKIE='rabbitcookie' --link rabbit1:my-rabbit1 --link rabbit2:my-rabbit2 rabbitmq:3.8.0-beta.4-management
Note: rabbitmq allows communication between Erlang nodes by authenticating Erlang cookie s_ ERLANG_ Cookie must be set to the same.
After startup, use the docker ps command to check the operation and ensure that RabbitMQ has been started.
CONTAINER ID        IMAGE                              COMMAND                  CREATED             STATUS              PORTS                                                                                        NAMES
2d6f612fdc8e        rabbitmq:3.8.0-beta.4-management   "docker-entrypoint..."   5 seconds ago       Up 4 seconds        4369/tcp, 5671/tcp, 15671/tcp, 25672/tcp, 0.0.0.0:5674->5672/tcp, 0.0.0.0:15674->15672/tcp   rabbit3
c410aa73ce68        rabbitmq:3.8.0-beta.4-management   "docker-entrypoint..."   14 seconds ago      Up 14 seconds       4369/tcp, 5671/tcp, 15671/tcp, 25672/tcp, 0.0.0.0:5673->5672/tcp, 0.0.0.0:15673->15672/tcp   rabbit2
ceb28620d7b1        rabbitmq:3.8.0-beta.4-management   "docker-entrypoint..."   24 seconds ago      Up 23 seconds       4369/tcp, 5671/tcp, 0.0.0.0:5672->5672/tcp, 15671/tcp, 25672/tcp, 0.0.0.0:15672->15672/tcp   rabbit1
2. Join the cluster
Selection of memory node and disk node:
Each RabbitMQ node is either a memory node or a disk node. The memory node stores all metadata definitions such as queues, switches, bindings and users in memory; The disk node stores metadata on disk. The single node system only allows nodes of disk type, otherwise all configuration information will be lost after the node is restarted. If the cluster mode is adopted, you can choose to configure at least one node as a disk node and the rest as memory nodes, so as to obtain faster response. Therefore, node 1-bit disk node, node 2 and node 3-bit memory node are configured in this cluster.
The first node in the cluster substitutes the initial metadata into the cluster without being told to join. The second and subsequent nodes will join it and get its metadata. To join the node, you need to enter the Docker container and restart RabbitMQ.
Set node 1:
docker exec -it rabbit1 bash
rabbitmqctl stop_app
rabbitmqctl reset
rabbitmqctl start_app
exit
Set node 2:
docker exec -it rabbit2 bash
rabbitmqctl stop_app
rabbitmqctl reset
rabbitmqctl join_cluster --ram rabbit@my-rabbit1
rabbitmqctl start_app
exit
Set node 3:
docker exec -it rabbit3 bash
rabbitmqctl stop_app
rabbitmqctl reset
rabbitmqctl join_cluster --ram rabbit@my-rabbit1
rabbitmqctl start_app
exit
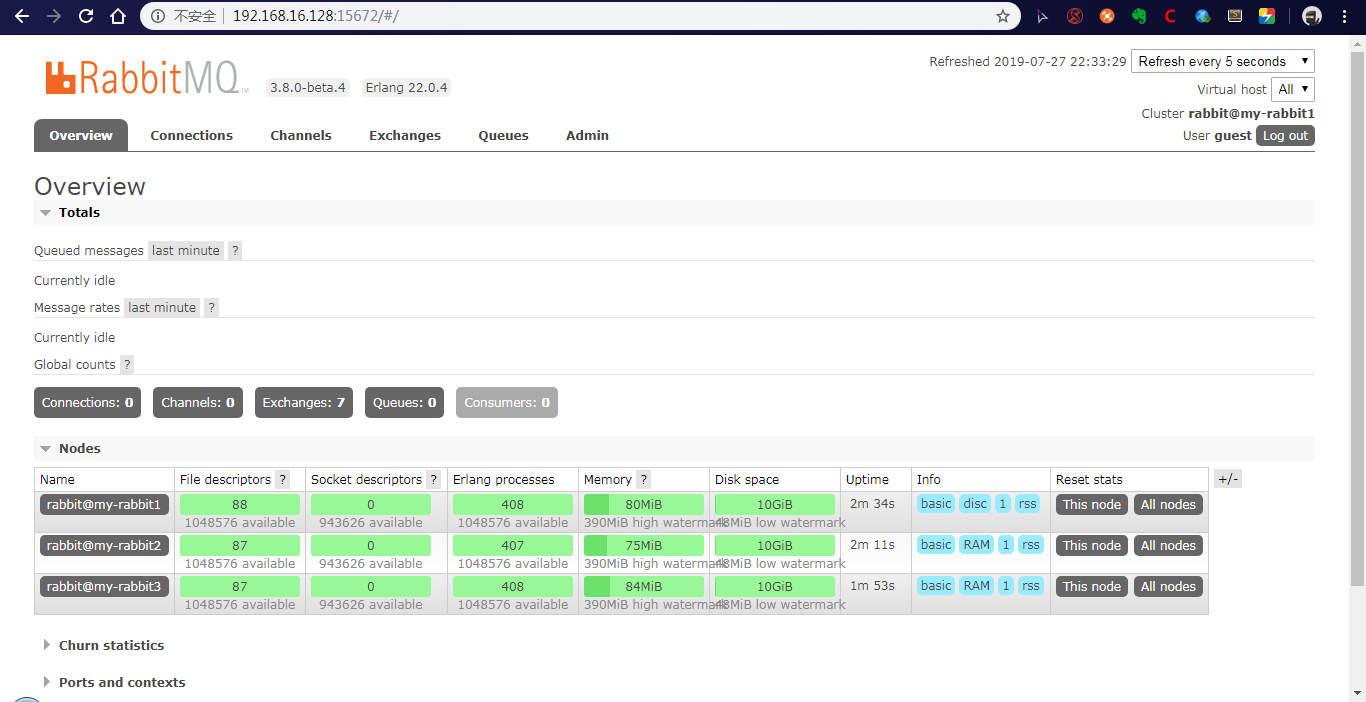
After setting the node, visit 192.168.168 in the browser 16.128:15672,192.168. 16.128:15673 and 192.168 At 16.128:15674, you can see that the RabbitMQ cluster has been created successfully.
3. Configure the image queue
Working principle of mirror queue: in a cluster with non mirror queue, messages will be routed to the specified queue. When configured as a mirror queue, messages will be delivered to the copy of the mirror queue in addition to the corresponding queue according to the routing rules. You can also imagine that there is a fan out switch hidden in the mirror queue, which sends messages to the copy of the mirror queue.
Enter any RabbitMQ node and execute the following command:
rabbitmqctl set_policy ha-all "^" '{"ha-mode":"all"}'Mirror queues can be set. "^" means that all queues are matched, that is, all queues will have backups on each node. In the cluster, you only need to set the image queue on one node, and the setting operation will be synchronized to other nodes.
To view the status of a cluster:
rabbitmqctl cluster_status
2, HAProxy load balancing
The first step is to build a RabbitMQ cluster, which is only the basis for building a highly available load balancing cluster. Next, we will use HAProxy to do load balancing for the RabbitMQ cluster.
Haproxy is a popular cluster scheduling tool. It is a free and open source software written in C language. It provides high availability, load balancing, and application proxy based on TCP and HTTP. There are many similar cluster scheduling tools, such as LVS and Nginx. In comparison, LVS has the best performance, but the construction is relatively complex. The upstream module of Nginx supports the cluster function, but the health check function of cluster nodes is not strong, and the performance is not as good as haproxy.
For the scheduling algorithm, this paper adopts the simplest and most commonly used polling algorithm.
Originally, I wanted to use the Docker method to pull and run the HAProxy image. After tossing for several days, I couldn't start HAProxy, so I used the source code installation method to install HAProxy.
Configure two HAProxy nodes to achieve load balancing:
| Server ip | Port number | Management interface address |
|---|---|---|
| 192.168.16.128 | 8888 | http://192.168.16.128:8888/haproxy |
| 192.168.16.129 | 8888 | http://192.168.16.129:8888/haproxy |
1. Install HAProxy
1. Download
Since kexue is required to download from the official website, baidu cloud link is provided here. Link: Baidu network disk, please enter the extraction code Extraction code: irz6
2. Set haproxy-1.7 8.tar. GZ copy to / opt directory and extract:
tar zxvf haproxy-1.7.8.tar.gz
3. Enter the directory and compile it into an executable file.
After extracting the source code, you need to run make to compile HAProxy into an executable file. If it is in Linux 2 6. If the system is compiled, TARGET=linux26 needs to be set to enable epoll support, which is why it is written in many online blogs. For other UNIX systems, TARGET=generic is directly adopted. The system installed in this paper is CentOS7 and kernel version 3.10.
cd haproxy-1.7.8
make TARGET=generic
After execution, the haproxy executable appears in the directory.
2. Configure HAProxy
HAProxy profile description
The HAProxy configuration file is usually divided into three parts: global, defaults, and listen. Global is the global configuration, defaults is the default configuration, and listen is the application component configuration.
Global is the global configuration part, which belongs to the process level configuration and is usually related to the operating system configuration used.
The defaults configuration item configures default parameters and will be inherited by the application component. If there is no special declaration in the application component, the default configuration parameters will be used.
Take configuring the load balancing of RabbitMQ cluster as an example, and create a new haproxy under the installation directory CFG, enter the following configuration information:
global
  #Log output configuration. All logs are recorded on the local machine and output through local0
  log 127.0.0.1 local0 info
  #maximum connection
  maxconn 10240
  #Run as a daemon
  daemon

defaults
  #Apply global log configuration
  log global
  mode http
  #Timeout configuration
  timeout connect 5000
  timeout client 5000
  timeout server 5000
  timeout check 2000

listen http_front #Customer page of haproxy
  bind 192.168.16.128:8888
  mode http
  option httplog
  stats uri /haproxy
  stats auth admin:123456
  stats refresh 5s
  stats enable

listen haproxy #Name of load balancer
  bind 0.0.0.0:5666 #External virtual port
  option tcplog
  mode tcp
  #polling algorithm
  balance roundrobin
  server rabbit1 192.168.16.128:5672 check inter 5000 rise 2 fall 2
  server rabbit2 192.168.16.128:5673 check inter 5000 rise 2 fall 2
  server rabbit3 192.168.16.128:5674 check inter 5000 rise 2 fall 2
3. Start
Start command:
/opt/haproxy-1.7.8/haproxy -f /opt/haproxy-1.7.8/haproxy.cfg
Verify that the startup is successful:
[root@localhost haproxy-1.7.8]# lsof -i:8888
COMMAND   PID USER   FD   TYPE DEVICE SIZE/OFF NODE NAME
haproxy 45031 root    3u  IPv4 228341      0t0  TCP localhost.localdomain:ddi-tcp-1 (LISTEN)
Access on Browser http://192.168.16.128:8888/haproxy , enter the configured user name and password to log in, and you can see the following screen:

Then in the same way at 192.168 16.129 start a HAProxy on the server.
This completes the load balancing configuration.
3, KeepAlived configuration High Availability
Keepalived is a high-performance server high availability or hot standby solution. Keepalived is mainly used to prevent the occurrence of single point of failure of the server. It can cooperate with the load balancing servers of Nginx, Haproxy and other reverse agents to achieve high availability of the web server. Keepalived is based on VRRP protocol and uses VRRP protocol to realize high availability (HA).
1. KeepAlived installation
The official website of Keepalived downloads the Keepalived installation file. At present, the latest version is: Keepalived-2.0 17.tar. GZ, the download address is Keepalived for Linux.
After downloading, extract, compile and install.
tar zxvf keepalived-2.0.17.tar.gz
cd keepalived-2.0.17
./configure --prefix=/opt/keepalived --with-init=SYSV
#Note:(upstart|systemd|SYSV|SUSE|openrc) #Select the corresponding startup mode according to your system
make
make install
2. KeepAlived configuration
Then add the installed Keepalived to the system service. The detailed steps are as follows:
cp /opt/keepalived/etc/rc.d/init.d/keepalived /etc/init.d/
cp /opt/keepalived/etc/sysconfig/keepalived /etc/sysconfig
cp /opt/keepalived/sbin/keepalived /usr/sbin/
chmod +x /etc/init.d/keepalived
chkconfig --add keepalived
chkconfig keepalived on
#Kept will read / etc / kept / kept by default Conf configuration file
mkdir /etc/keepalived
cp /opt/keepalived/etc/keepalived/keepalived.conf /etc/keepalived/
Next, modify / etc / kept / kept Conf file. The configuration details on the Keepalived Master are as follows:
#Keepalived profile
global_defs {
        router_id NodeA                 #Routing ID, active and standby ID cannot be the same
}

#Custom monitoring script
vrrp_script chk_haproxy {
        script "/etc/keepalived/check_haproxy.sh"
        interval 5
        weight 2
}

vrrp_instance VI_1 {
        state MASTER #The role of kept. Master indicates the master server, and the slave server is set to BACKUP
        interface eth0          #Specify monitoring network card
        virtual_router_id 1
        priority 100            #Priority. The priority on the BACKUP machine should be less than this value
        advert_int 1            #Set the inspection time between active and standby, unit: s
        authentication {        #Define authentication type and password
                auth_type PASS
                auth_pass root123
        }
        track_script {
                chk_haproxy
        }
        virtual_ipaddress {     #VIP addresses, you can set multiple:
                192.168.16.130
        }
}
The configuration in backup is roughly the same as that in Master, but global needs to be modified_ Router for defs {}_ ID, such as NodeB; Secondly, modify VRRP_ instance VI_ state in 1 {} is backup; Finally, set priority to a value less than 100. Note the virtual in Master and backup_ router_ The ID should be consistent. The following is a brief description of the backup configuration:
#Keepalived profile
global_defs {
        router_id NodeB                 #Routing ID, active and standby ID cannot be the same
}

#Custom monitoring script
vrrp_script chk_haproxy {
        script "/etc/keepalived/check_haproxy.sh"
        interval 5
        weight 2
}

vrrp_instance VI_1 {
        state BACKUP
        interface eth0          #Specify monitoring network card
        virtual_router_id 1
        priority 80            #Priority. The priority on the BACKUP machine should be less than this value
        advert_int 1            #Set the inspection time between active and standby, unit: s
        authentication {        #Define authentication type and password
                auth_type PASS
                auth_pass root123
        }
        track_script {
                chk_haproxy
        }
        virtual_ipaddress {     #VIP addresses, you can set multiple:
                192.168.16.130
        }
}
In order to prevent the HAProxy service from hanging up, but the Keepalived is still working normally without switching to Backup, so a script needs to be written to detect the state of the HAProxy service. When the HAProxy service hangs up, the script will automatically restart the HAProxy service. If it fails, close the Keepalived service so that you can switch to Backup to continue working. This script corresponds to the VRRP in the above configuration_ script chk_ The value corresponding to the script of HAProxy {}, / etc / kept / check_ HAProxy. The contents of SH are shown in the code listing.
#!/bin/bash
if [ $(ps -C haproxy --no-header | wc -l) -eq 0 ];then
        haproxy -f /opt/haproxy-1.7.8/haproxy.cfg
fi
sleep 2
if [ $(ps -C haproxy --no-header | wc -l) -eq 0 ];then
        service keepalived stop
fi
After this configuration, use the service kept start command to start 192.168 16.128 and 192.168 The Keepalived service in 16.129 is sufficient. After that, the application of the client can pass 192.168 16.130 use this IP address to connect to the RabbitMQ service.