#########################################################################################
Environmental preparation:
Three virtual machines can be connected to the external network
master
0001: 192.168.10.13
worker
0002: 192.168.10.14
0003: 192.168.10.15
Minimum 2cpu 2G memory, 100G of my virtual machine hard disk configuration
Switch partition swap is disabled for all nodes, firewall iptables is disabled, and disabled selinux is disabled
uname -a kernel requires version 3.08 or above
Docker version: docker 17.12.0-ce kube component version: 1.14.10.0
###########################################################################################
Install docker on all nodes:
Install the necessary software before installing docker
yum install -y yum-utils device-mapper-persistent-data lvm2
Install docker17 12.0yum source
yum-config-manager --add-repo https://download.docker.com/linux/centos/docker-ce.repo
If there is an old version, you need to uninstall and then install docker
yum remove docker docker-common docker-selinux docker-engine
rm -rf /var/lib/docker/*
Check all docker software versions in the warehouse and select the appropriate version to install
yum list docker-ce --showduplicates | sort -r
Install the specified version of docker
yum install docker-ce-17.12.0.ce
Check the docker version after installation
docker --version

Start docker and set the startup self startup
systemctl start docker && systemctl enable docker
################################################################################################
Kubernetes installation is divided into Etcd, kubernetes, Flannel and rancher2 0 several parts.
Install etcd
Add additional yum source: no source of the same version can be found online kubelete1 14.10.0
[root@0001 yum.repos.d]# cat local.repo
[local]
name=local
baseurl=http://foreman.lilinlin.science:8080
gpgcheck=0
enable=1
Install etcd (etcd comes with high availability, which is only installed on the primary node here. Etcd can also be configured on all three nodes to achieve more security)
yum install -y etcd
Configure etcd and modify the configuration file / etc/etcd/etc.conf
#[Member]
#ETCD_CORS=""
ETCD_DATA_DIR="/var/lib/etcd/default.etcd"
#ETCD_WAL_DIR=""
ETCD_LISTEN_PEER_URLS="http://172.29.5.182:2380"
ETCD_LISTEN_CLIENT_URLS="http://172.29.5.182:2379,http://127.0.0.1:2379"
#ETCD_MAX_SNAPSHOTS="5"
#ETCD_MAX_WALS="5"
ETCD_NAME="node01"
#ETCD_SNAPSHOT_COUNT="100000"
#ETCD_HEARTBEAT_INTERVAL="100"
#ETCD_ELECTION_TIMEOUT="1000"
#ETCD_QUOTA_BACKEND_BYTES="0"
#ETCD_MAX_REQUEST_BYTES="1572864"
#ETCD_GRPC_KEEPALIVE_MIN_TIME="5s"
#ETCD_GRPC_KEEPALIVE_INTERVAL="2h0m0s"
#ETCD_GRPC_KEEPALIVE_TIMEOUT="20s"
#
#[Clustering]
ETCD_INITIAL_ADVERTISE_PEER_URLS="http://172.29.5.182:2380"
ETCD_ADVERTISE_CLIENT_URLS="http://172.29.5.182:2379,http://172.29.5.185:2379,http://172.29.5.199:2379"
#ETCD_DISCOVERY=""
#ETCD_DISCOVERY_FALLBACK="proxy"
#ETCD_DISCOVERY_PROXY=""
#ETCD_DISCOVERY_SRV=""
ETCD_INITIAL_CLUSTER="node01=http://172.29.5.182:2380,node02=http://172.29.5.185:2380,node03=http://172.29.5.199:2380"
#ETCD_INITIAL_CLUSTER_TOKEN="etcd-cluster"
#ETCD_INITIAL_CLUSTER_STATE="new"
#ETCD_STRICT_RECONFIG_CHECK="true"
#ETCD_ENABLE_V2="true"
#
#[Proxy]
#ETCD_PROXY="off"
#ETCD_PROXY_FAILURE_WAIT="5000"
#ETCD_PROXY_REFRESH_INTERVAL="30000"
#ETCD_PROXY_DIAL_TIMEOUT="1000"
#ETCD_PROXY_WRITE_TIMEOUT="5000"
#ETCD_PROXY_READ_TIMEOUT="0"
#
#[Security]
#ETCD_CERT_FILE=""
#ETCD_KEY_FILE=""
#ETCD_CLIENT_CERT_AUTH="false"
#ETCD_TRUSTED_CA_FILE=""
#ETCD_AUTO_TLS="false"
#ETCD_PEER_CERT_FILE=""
#ETCD_PEER_KEY_FILE=""
#ETCD_PEER_CLIENT_CERT_AUTH="false"
#ETCD_PEER_TRUSTED_CA_FILE=""
#ETCD_PEER_AUTO_TLS="false"
#
#[Logging]
#ETCD_DEBUG="false"
#ETCD_LOG_PACKAGE_LEVELS=""
#ETCD_LOG_OUTPUT="default"
#
#[Unsafe]
#ETCD_FORCE_NEW_CLUSTER="false"
#
#[Version]
#ETCD_VERSION="false"
#ETCD_AUTO_COMPACTION_RETENTION="0"
#
#[Profiling]
#ETCD_ENABLE_PPROF="false"
#ETCD_METRICS="basic"
#
#[Auth]
#ETCD_AUTH_TOKEN="simple"
Turn on etcd and set auto start
[root@0001 ~]# systemctl start etcd && systemctl enable etcd
Install the specified version of kube components
yum install kubectl-1.14.10 kubelet-1.14.10 kubeadm-1.14.10 -y
Confirm the version after installation
[root@0001 ~]# yum list installed |grep kube
kubeadm.x86_64 1.14.10-0 @local
kubectl.x86_64 1.14.10-0 @local
kubelet.x86_64 1.14.10-0 @local
kubernetes-cni.x86_64 0.7.5-0 @local
Change the cgroup used by docker engine and kubelet to cgroups (it must be changed to the same here, otherwise the master master node will not be found if kubelet reports an error later, resulting in cluster initialization failure!)
Specify the cgroup driver of kubelet:
echo 'Environment="KUBELET_CGROUP_ARGS=–cgroup-driver=cgroupfs"' >> /usr/lib/systemd/system/kubelet.service.d/10-kubeadm.conf
echo "KUBELET_EXTRA_ARGS=–cgroup-driver=cgroupfs" >> /etc/sysconfig/kubelet
Specify the cgroup driver of docker (note the indentation of json file):
cat /etc/docker/daemon.json
{
    "registry-mirrors": ["https://tf72mndn.mirror.aliyuncs.com"],
    "exec-opts": ["native.cgroupdriver=cgroupfs"],
    "storage-driver": "overlay2",
    "storage-opts": ["overlay2.override_kernel_check=true"]
}
Restart the docker service to make the configuration effective
################################################################################################################
Initialize k8s cluster (executed by the master node) kubedm init -- config = kubedm config yaml
cat kubeadm-config.yaml
apiVersion: kubeadm.k8s.io/v1beta1
kind: ClusterConfiguration
kubernetesVersion: v1.14.10
imageRepository: registry.aliyuncs.com/google_containers
apiServer:
  advertiseaddress: 192.168.10.13
  certSANs:
  - 192.168.10.13
controlPlaneEndpoint: "192.168.10.13:6443"
networking:
  podSubnet: "10.42.0.0/16"
etcd:
  external:
    endpoints:
    - http://192.168.10.13:2379
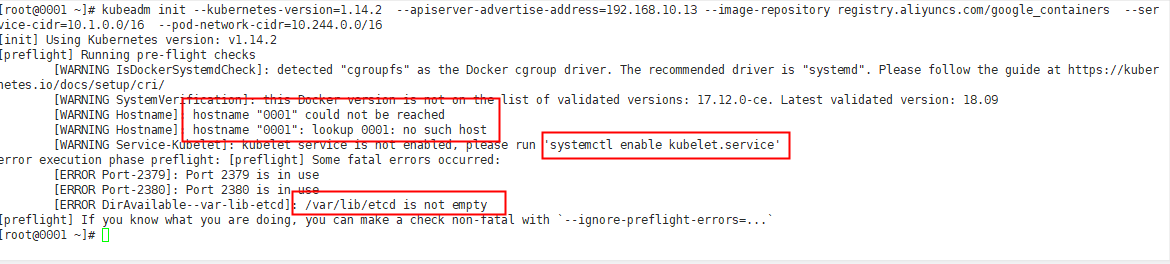
According to the error report, solve it in sequence:

Reinitialize the cluster after modification:
It will take a long time to pull the image. I imported the image of the same version in advance. I want to save the time of pulling the image, but I make an error. I don't know what's going on...
This is the version of the image required by the cluster. You can see whether the downloaded image is consistent:
[root@0001 ~]# kubeadm config images list
I1106 10:17:47.915390   12636 version.go:96] could not fetch a Kubernetes version from the internet: unable to get URL "https://dl.k8s.io/release/stable-1.txt": Get https://storage.googleapis.com/kubernetes-release/release/stable-1.txt: net/http: request canceled while waiting for connection (Client.Timeout exceeded while awaiting headers)
I1106 10:17:47.915528   12636 version.go:97] falling back to the local client version: v1.14.10
k8s.gcr.io/kube-apiserver:v1.14.10
k8s.gcr.io/kube-controller-manager:v1.14.10
k8s.gcr.io/kube-scheduler:v1.14.10
k8s.gcr.io/kube-proxy:v1.14.10
k8s.gcr.io/pause:3.1
k8s.gcr.io/etcd:3.3.10
k8s.gcr.io/coredns:1.3.1
Continue to repeat the steps of initializing the cluster. Kubedm init -- config = kubedm config Yaml, you can see that the cluster has been initialized successfully:
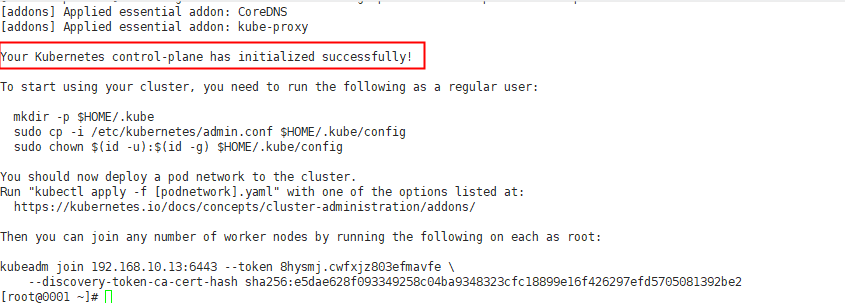
Record this command for adding the worker node later
kubeadm join 192.168.10.13:6443 --token 8hysmj.cwfxjz803efmavfe
–discovery-token-ca-cert-hash sha256:e5dae628f093349258c04ba9348323cfc18899e16f426297efd5705081392be2
Follow the prompts to execute the following three commands in sequence
mkdir -p $HOME/.kube
sudo cp -i /etc/kubernetes/admin.conf $HOME/.kube/config
sudo chown
(
i
d
−
u
)
:
(id -u):
(id−u):(id -g) $HOME/.kube/config
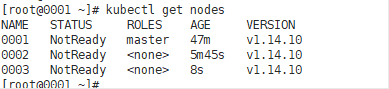
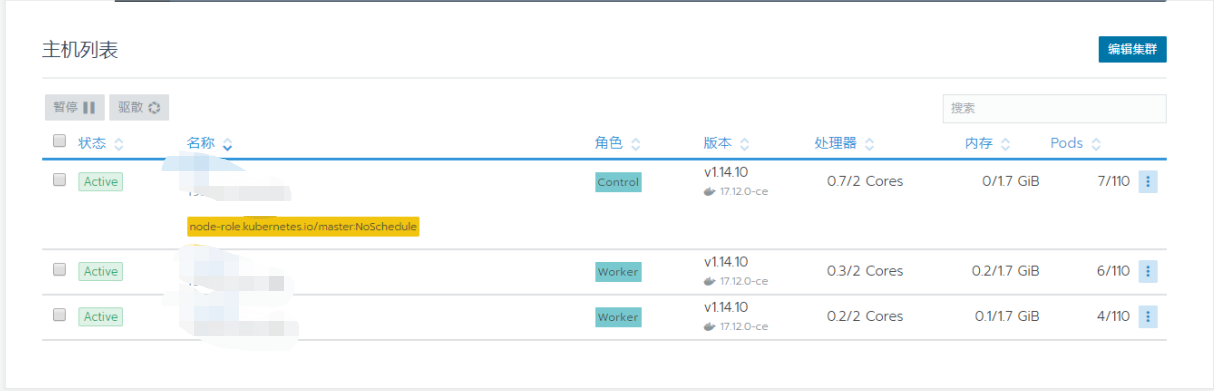
At this time, you can check the cluster status. Because the network plug-in is not installed, the status must be not ready, and there is only one master node

Prepare to join worker node 00020003. Pay attention to synchronize the hosts parsing file of the master node
kube software of the same version is installed on the worker node:
yum install kubectl-1.14.10 kubelet-1.14.10 kubeadm-1.14.10 -y
Set kubelet to start automatically
systemctl enable kubelet
Join the worker node:
kubeadm join 192.168.10.13:6443 --token 8hysmj.cwfxjz803efmavfe \
    --discovery-token-ca-cert-hash sha256:e5dae628f093349258c04ba9348323cfc18899e16f426297efd5705081392be2
report errors:
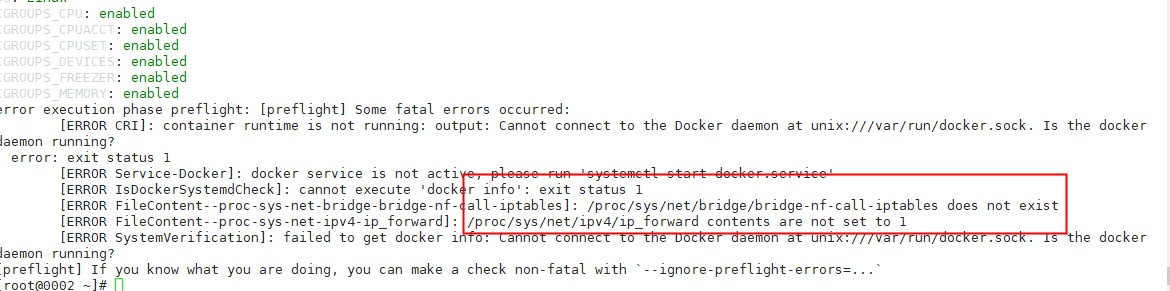
solve:
cat > /etc/sysctl.d/k8s.conf <<EOF
net.ipv4.ip_forward=1
net.bridge.bridge-nf-call-ip6tables = 1
net.bridge.bridge-nf-call-iptables = 1
EOF
Then execute sysctl --system to refresh the configuration and make it effective
Error: the docker is not started. Start the docker and set the startup self startup
Rejoin the worker node:
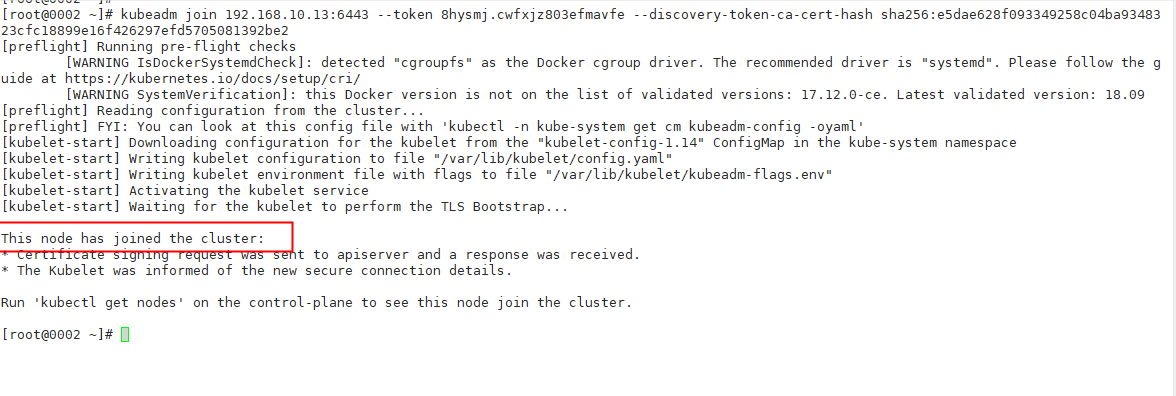
Join successfully.
Add the remaining nodes in the same way:
Configure network plug-in, flannel
Master node execution:
flannel's yaml file can be found online
kubectl apply -f http://xxxxxxx.xxxxxx.com/kube-flannel.yaml
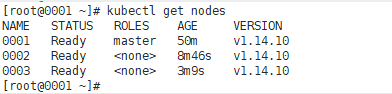
After configuring the flannel, check the node information again. At this time, the status is all ready
The main components are in a healthy state

However, coredns are not ready, which indicates that the current k8s intranet cannot be resolved, and the cluster is in an unhealthy state

Check the status of this pod:
[root@0001 ~]# kubectl describe pod coredns-544d76d978-rb2lj -n kube-system
It can be seen that there is a problem on node 0003, and the other is on node 0002,
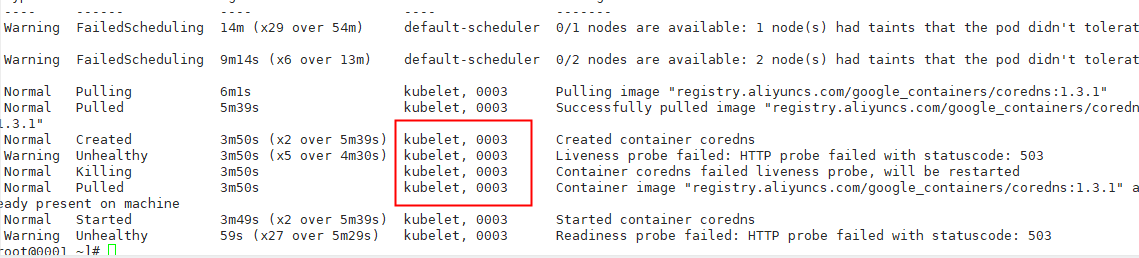
Check that there is no coredns image on 0002 0003. First pull the image of the same version, modify its configuration file, and then delete the pods of the two coredns on the master node 0001 to regenerate a new pod
kubectl edit cm coredns -n kube-system  ###Save after deleting loop
kubectl delete coredns-544d76d978-88gg4 coredns-544d76d978-rb2lj  -n kube-system
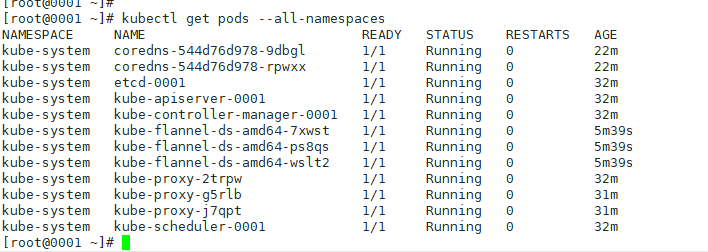
Check again. It's normal
Deploy ingress controller
kubectl apply -f http://xxxxxx.xxxxxxxxx.com/ingress-controller.yaml
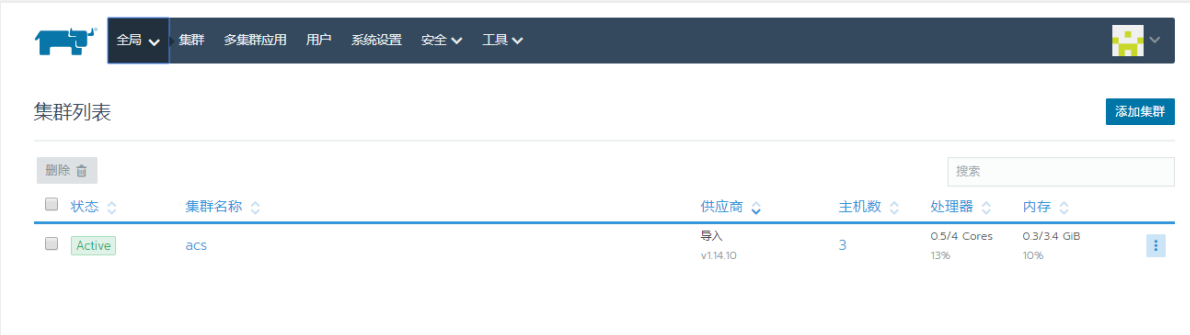
Deploy Rancher service
docker run -d --name rancher --restart=unless-stopped -p 80:80 -p 443:443 -v /opt/rancher:/var/lib/rancher rancher/rancher:v2.3.5
Access rancher and enter the ip port to access the home page:
====================================================================
Note: when deploying flannel, because the flannel file is taken from other places, you need to add flannel The required image in YML is modified to the name of the locally deployed image. The image source is modified according to the situation. If it is not modified, the image will not be pulled.