1, Preconditions
1.1 tool preparation
1.1.1 installation and deployment of automated operation and maintenance tools (Ansible)
Ansible brief introduction
ansible is a new automatic operation and maintenance tool. It is developed based on Python, integrates the advantages of many operation and maintenance tools (puppet, cfengine, chef, func, fabric), and realizes the functions of batch system configuration, batch program deployment, batch operation commands and so on.
Ansible works based on modules and has no batch deployment capability. The real batch deployment is the modules run by ansible, which only provides a framework. It mainly includes:
(1) . connection plugins: responsible for communication with the monitored end;
(2) host inventory: the host of the specified operation, which is the host of monitoring defined in a configuration file;
(3) Various modules, core modules, command modules and user-defined modules;
(4) . with the help of plug-ins, complete the functions of log mail recording;
(5) playbook: when a script executes multiple tasks, the node can run multiple tasks at one time if it is not necessary.
ansible installation
#MAC environment installation command
brew install ansible
In other environments, please practice by yourself. I won't talk about it here!
1.2 environmental preparation
Prepare 4 sets, 2G or more memory, 2-core or more CPU, 30G or more hard disk, physical machine or virtual machine or virtual machine 2, system CentOS 7 x
Login free implementation
Execute locally and send the keys of my computer to all hosts in batches to realize secret free login. The specific script is as follows:
#!/bin/bash
#Bulk copy public key to server
#Remember to execute this command first to generate the public key: SSH keygen
#Server password
password=zss@0418
#The last two ip addresses of the server are disconnected (pay attention to replacing two places -- "10.211.55.xx)
for i in {16,17,18,19}
  do
    expect <<-EOF
    set timeout 5
    spawn ssh-copy-id -i root@10.211.55.$i
    expect {
    "password:" { send "$password\n" }
    }
  interact
  expect eof
EOF
done
Execute script:
sh local_copy_ssh_to_host.sh
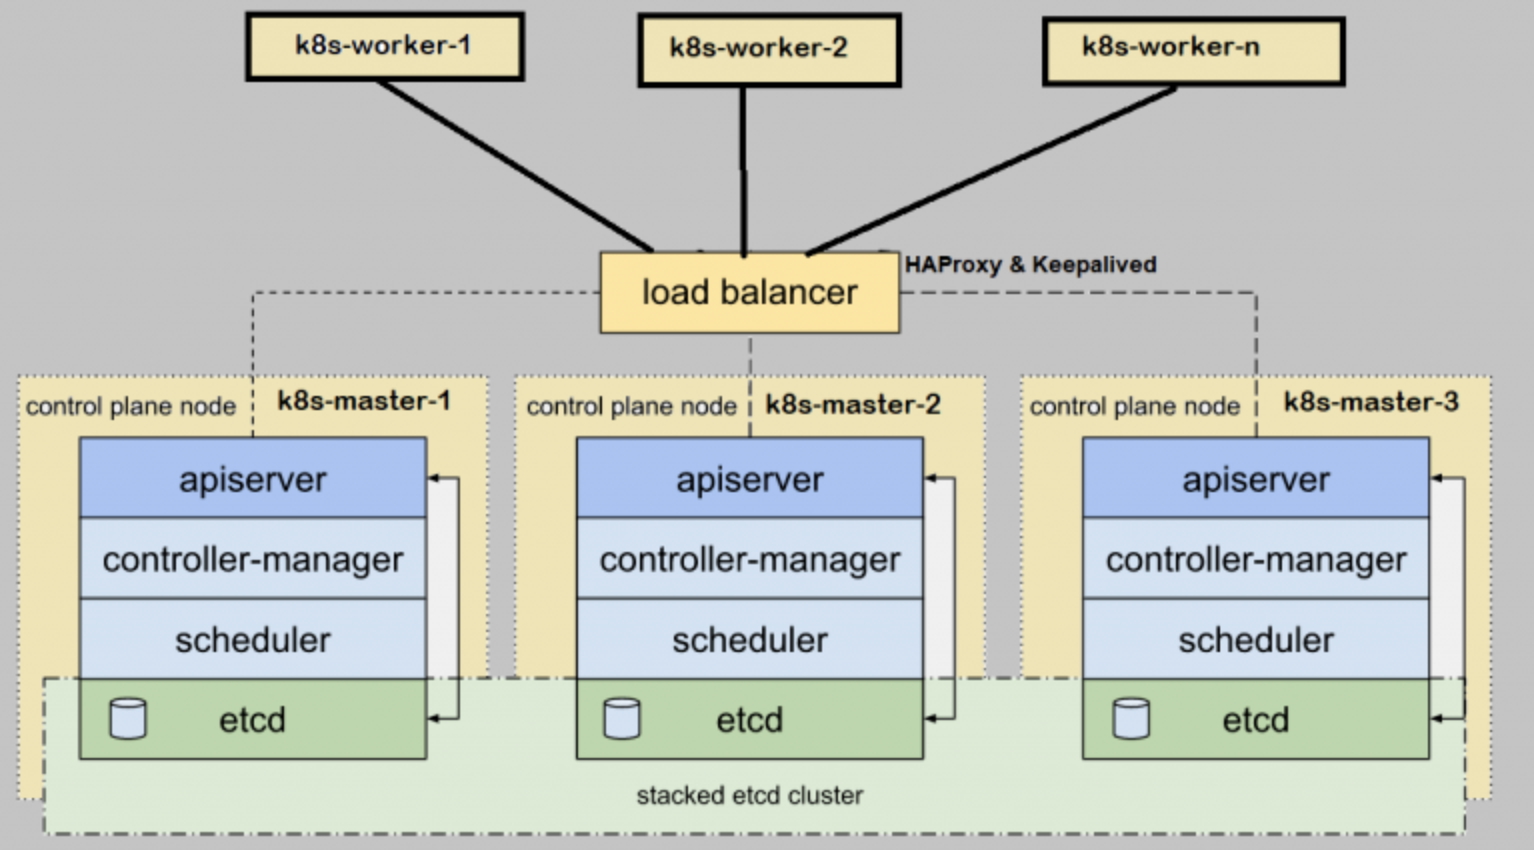
2, System architecture
2.1 architecture requirements preparation
- The minimum requirements for configuring three machines kubedm are given to the master node
- The minimum requirements for configuring three machines kubedm are given to the work node
- In a cluster, a full network connection (public or private) between all computers
- sudo permissions on all machines
- SSH access of each device to all nodes in the system
- Kubedm and kubelet are installed on all machines, and kubectl is optional.
2.3 architecture diagram
3, Deployment method (one of two)
3.1 script one click deployment (relying on Ansible tool)
3.1.1 configure ansible tool hosts
This tool helps me to configure and install docker and k8s component functions in multiple machine environments, reducing manual operations!
After the installation of Ansible automatic operation and maintenance tool, perform the following operations:
#Create directory
mkdir -p /etc/ansible
vi hosts
#Add the following to hosts
[k8smaster]
#Replace with the IP of your own environment
10.211.55.16 hostname=master01
10.211.55.17 hostname=master02
10.211.55.18 hostname=master03
10.211.55.19 hostname=worker01

[k8s:children]
k8smaster

[all:vars]
ansible_ssh_user=root
After completing the above operations, in the provided scripts, we unzip the k8s script package, and then go to the k8s script directory to modify some scripts: the specific steps are as follows:
Find alik8simages SH file modified k8s version:
#!/bin/bash
list='kube-apiserver:v1.21.3
kube-controller-manager:v1.21.3
kube-scheduler:v1.21.3
kube-proxy:v1.21.3
pause:3.4.1
etcd:3.4.13-0
coredns:v1.8.0'
for item in ${list}
  do

    docker pull registry.aliyuncs.com/google_containers/$item && docker tag registry.aliyuncs.com/google_containers/$item k8s.gcr.io/$item && docker rmi registry.aliyuncs.com/google_containers/$item

  done

#Above process
#docker pull registry.aliyuncs.com/google_containers/kube-apiserver:v1.19.5
#docker tag registry.aliyuncs.com/google_containers/kube-apiserver:v1.19.5 k8s.gcr.io/kube-apiserver:v1.19.5
#docker rmi registry.aliyuncs.com/google_containers/kube-apiserver:v1.19.5
Modify the image acceleration address under the docker file
{
    "registry-mirrors": ["https://s2q9fn53.mirror.aliyuncs.com"],
    "exec-opts": ["native.cgroupdriver=systemd"],
    "log-opts": {
        "max-size": "100m"
    }
}
After completing the above operations, let's modify the most important core script k8sinstall YML, involving changes to the k8s version and the IP address of each node
---
- hosts: k8smaster
  gather_facts: no
  vars:
    #master node ip, please pay attention to modification
    - master_ip: 10.211.55.16
    #The k8s version should be modified according to its own version
    - k8s_version: 1.21.3
    #The docker version should be modified according to its own version
    - docker_version: 20.10.0
  tasks:
    - name: set hostname
      shell: |
        hostnamectl set-hostname {{ hostname }}
        if [ ! -d /root/k8s ] ; then mkdir /root/k8s ; fi
        if [ ! -d /etc/docker ] ; then mkdir /etc/docker ; fi
      ignore_errors: True
    - name: config hosts
      shell:
        cmd: |
          cat >> /etc/hosts << EOF
          #Node IP is modified according to its own environment
          10.211.55.15 k8svip
          10.211.55.16 master01
          10.211.55.17 master02
          10.211.55.18 master03
          10.211.55.19 worker01
          EOF
    - name: close firewalld
      service:
        name: firewalld
        state: stopped
        enabled: no
    - name: temp close selinux
      shell: /sbin/setenforce 0
    - name: premanment close selinux
      lineinfile:
        path: /etc/selinux/config
        regexp: '^SELINUX='
        line: SELINUX=disabled
    - name: close swap
      shell: swapoff -a && sed -ri 's/.*swap.*/#&/' /etc/fstab
    - name: install yum_tools
      yum:
        name: yum-utils
    - name: download docker repo
      shell: yum-config-manager --add-repo http://mirrors.aliyun.com/docker-ce/linux/centos/docker-ce.repo
    - name: install docker need tools and docker-ce
      yum:
        name: "{{ packages }}"
      vars:
        packages:
          - device-mapper-persistent-data
          - lvm2
          - ntpdate
          - docker-ce-{{ docker_version }}
    - name: config docker daemon
      copy:
        src: ./etc/docker/daemon.json
        dest: /etc/docker/daemon.json
    - name: start docker
      service:
        name: docker
        state: started
        enabled: yes
    - name: sync time
      shell: "ntpdate time.windows.com"
    - name: set kubernetes yam repo
      shell:
        cmd: |
          cat <<EOF > /etc/yum.repos.d/kubernetes.repo
          [kubernetes]
          name=Kubernetes
          baseurl=https://mirrors.aliyun.com/kubernetes/yum/repos/kubernetes-el7-x86_64/
          enabled=1
          gpgcheck=1
          repo_gpgcheck=1
          gpgkey=https://mirrors.aliyun.com/kubernetes/yum/doc/yum-key.gpg https://mirrors.aliyun.com/kubernetes/yum/doc/rpm-package-key.gpg
          EOF
    - name: install kubernetes
      yum:
        name:
          - kubelet-{{ k8s_version }}
          - kubeadm-{{ k8s_version }}
          - kubectl-{{ k8s_version }}
    - name: start kubelet
      service:
        name: kubelet
        state: started
        enabled: yes
    - name: copy alik8simages.sh
      copy:
        src: ./k8s
        dest: /root/
    - name: pull alik8simages
      shell: bash ./alik8simages.sh
      args:
        chdir: /root/k8s/
    - name: pull flannel
      shell: docker pull quay.io/coreos/flannel:v0.13.1-rc1
After modifying the above configuration, save k8sinstall In the YML file, finally, we execute the following command and wait for multiple machines to complete the execution!
ansible-playbook k8sinstall.yml
3.2 manual deployment
Environment initialization:
#Set the host name according to the plan (run separately on 4 machines)
hostnamectl set-hostname master01
hostnamectl set-hostname master02
hostnamectl set-hostname master03
hostnamectl set-hostname worker01

#On all machines
cat >> /etc/hosts << EOF
10.211.55.15 k8svip
10.211.55.16 master01
10.211.55.17 master02
10.211.55.18 master03
10.211.55.19 worker01
EOF

#Set login free
ssh-keygen -t rsa -P '' -f ~/.ssh/id_rsa &> /dev/null
ssh-copy-id root@master01
ssh-copy-id root@master02
ssh-copy-id root@master03
ssh-copy-id root@worker01


#Turn off the firewall (running on 4 machines)
systemctl stop firewalld && systemctl disable firewalld

#Turn off SELinux (running on 4 machines)
sed -i 's/enforcing/disabled/' /etc/selinux/config && setenforce 0

#Close swap (running on 4 machines)
swapoff -a && sed -ri 's/.*swap.*/#&/' /etc/fstab


#Time synchronization (running on 4 machines)
yum install ntpdate -y && ntpdate time.windows.com
Install Docker
# step 1: install some necessary system tools
sudo yum install -y yum-utils device-mapper-persistent-data lvm2
# Step 2: add software source information
sudo yum-config-manager --add-repo https://mirrors.aliyun.com/docker-ce/linux/centos/docker-ce.repo
# Step 3: update and install docker CE
sudo yum makecache fast
sudo yum -y install docker-ce-20.10.0
# Step 4: start Docker service
sudo systemctl start docker && systemctl enable docker

# be careful:
# The official software source enables the latest software by default. You can obtain the software packages of various versions by editing the software source. For example, the official does not make the software source of the test version available. You can open it in the following ways. Similarly, various test versions can be opened.
# vim /etc/yum.repos.d/docker-ee.repo
#   Change enabled=0 under [docker CE test] to enabled=1
#
# Install the specified version of docker Ce:
# Step 1: find docker CE version:
# yum list docker-ce.x86_64 --showduplicates | sort -r
#   Loading mirror speeds from cached hostfile
#   Loaded plugins: branch, fastestmirror, langpacks
#   docker-ce.x86_64            17.03.1.ce-1.el7.centos            docker-ce-stable
#   docker-ce.x86_64            17.03.1.ce-1.el7.centos            @docker-ce-stable
#   docker-ce.x86_64            17.03.0.ce-1.el7.centos            docker-ce-stable
#   Available Packages
# Step 2: install the specified version of docker Ce: (version, for example, 17.03.0.ce.1-1. EL7. CentOS above)
# sudo yum -y install docker-ce-[VERSION]

# docker image acceleration“ https://s2q9fn53.mirror.aliyuncs.com "It is recommended to log in to alicloud and find this address in the container image service.
# You can modify the daemon configuration file / etc / docker / daemon JSON to use the accelerator
sudo mkdir -p /etc/docker
sudo tee /etc/docker/daemon.json <<-'EOF'
{
  "registry-mirrors": ["https://s2q9fn53.mirror.aliyuncs.com"]
}
EOF
sudo systemctl daemon-reload && sudo systemctl restart docker
Install kubelet, kubedm, kubectl
#Add kubernetes Ali YUM source
cat <<EOF > /etc/yum.repos.d/kubernetes.repo
[kubernetes]
name=Kubernetes
baseurl=https://mirrors.aliyun.com/kubernetes/yum/repos/kubernetes-el7-x86_64/
enabled=1
gpgcheck=1
repo_gpgcheck=1
gpgkey=https://mirrors.aliyun.com/kubernetes/yum/doc/yum-key.gpg https://mirrors.aliyun.com/kubernetes/yum/doc/rpm-package-key.gpg
EOF

yum install -y kubelet-1.21.3 kubeadm-1.21.3 kubectl-1.21.3 && systemctl enable kubelet && systemctl start kubelet
Deploy kubernetes master (only need to run on the first master node)
#Note that before kubedm init, prepare the container required for k8s operation
#The image required by kubernetes can be queried
kubeadm config images list

#Write an sh script to pull down the required image
cat >> alik8simages.sh << EOF
#!/bin/bash
list='kube-apiserver:v1.21.3
kube-controller-manager:v1.21.3
kube-scheduler:v1.21.3
kube-proxy:v1.21.3
pause:3.4.1
etcd:3.4.13-0
coredns:v1.8.0'
for item in ${list}
  do

    docker pull registry.aliyuncs.com/google_containers/$item && docker tag registry.aliyuncs.com/google_containers/$item k8s.gcr.io/$item && docker rmi registry.aliyuncs.com/google_containers/$item

  done
EOF
#Run script Download
bash alik8simages.sh
4, Keep alive + haproxy to build high-end cluster
4.1 installing haproxy kept
Before installation, let's modify the hapoxy and keepalived configurations found in the k8s script script
haproxy.conf script modification
# /etc/haproxy/haproxy.cfg
#---------------------------------------------------------------------
# Global settings
#---------------------------------------------------------------------
global
    log /dev/log local0
    log /dev/log local1 notice
    daemon

#---------------------------------------------------------------------
# common defaults that all the 'listen' and 'backend' sections will
# use if not designated in their block
#---------------------------------------------------------------------
defaults
    mode                    http
    log                     global
    option                  httplog
    option                  dontlognull
    option http-server-close
    option forwardfor       except 127.0.0.0/8
    option                  redispatch
    retries                 1
    timeout http-request    10s
    timeout queue           20s
    timeout connect         5s
    timeout client          20s
    timeout server          20s
    timeout http-keep-alive 10s
    timeout check           10s

#---------------------------------------------------------------------
# apiserver frontend which proxys to the masters
#---------------------------------------------------------------------
frontend apiserver
    bind *:8443
    mode tcp
    option tcplog
    default_backend apiserver

#---------------------------------------------------------------------
# round robin balancing for apiserver
#---------------------------------------------------------------------
backend apiserver
    option httpchk GET /healthz
    http-check expect status 200
    mode tcp
    option ssl-hello-chk
    balance     roundrobin
    	#Configure the master cluster according to its own node IP
        server master01 10.211.55.16:6443 check
        server master02 10.211.55.17:6443 check
        server master03 10.211.55.18:6443 check
        # [...]
        # hostname ip:prot change as needed
Modify keepalived Conf and check_apiserver.sh
check_apiserver.sh configuration note: modify virtual IP: 10.211.55.15, and add execution permission:
chmod +x /etc/keepalived/check_apiserver.sh
keepalived. The conf configuration file mainly modifies the virtual IP and weight, as well as the node name.
check_apiserver.sh
#!/bin/bash
APISERVER_VIP=10.211.55.15
APISERVER_DEST_PORT=6443

errorExit() {
    echo "*** $*" 1>&2
    exit 1
}

curl --silent --max-time 2 --insecure https://localhost:${APISERVER_DEST_PORT}/ -o /dev/null || errorExit "Error GET https://localhost:${APISERVER_DEST_PORT}/"
if ip addr | grep -q ${APISERVER_VIP}; then
    curl --silent --max-time 2 --insecure https://${APISERVER_VIP}:${APISERVER_DEST_PORT}/ -o /dev/null || errorExit "Error GET https://${APISERVER_VIP}:${APISERVER_DEST_PORT}/"
fi
#Remember to give this file execution permission
#chmod +x /etc/keepalived/check_apiserver.sh

#Parameters to be modified
#APISERVER_VIP virtual ip
keepalived.conf
! /etc/keepalived/keepalived.conf
! Configuration File for keepalived
global_defs {
    router_id LVS_DEVEL
}
vrrp_script check_apiserver {
  script "/etc/keepalived/check_apiserver.sh"
  interval 3
  weight -2
  fall 10
  rise 2
}

vrrp_instance VI_1 {
    #Master is configured for the first node and SLAVE is configured for other nodes
    state MASTER
    #Pay attention to modifying the network card
    interface ens33
    virtual_router_id 51
    #weight
    priority 98
    authentication {
        auth_type PASS
        auth_pass 1111
    }
    #Configure virtual IP
    virtual_ipaddress {
        10.211.55.15/24
    }
    track_script {
        check_apiserver
    }
}

#Parameters that need to be modified as needed
#state MASTE/SLAVE
#interface primary network card name
#Virtual id
#priority
#virtual_ipaddress virtual ip
#https://github.com/kubernetes/kubeadm/blob/master/docs/ha-considerations.md#options-for-software-load-balancing
#Execute on master
yum install haproxy keepalived -y
mv /etc/keepalived/keepalived.conf /etc/keepalived/keepalived.conf.bak
mv /etc/haproxy/haproxy.cfg /etc/haproxy/haproxy.cfg.bak

#Copy from local to master host
scp ./etc/haproxy/haproxy.cfg root@10.211.55.16:/etc/haproxy/haproxy.cfg
scp ./etc/keepalived/check_apiserver.sh root@10.211.55.16:/etc/keepalived/check_apiserver.sh
scp ./etc/keepalived/keepalived.conf root@10.211.55.16:/etc/keepalived/keepalived.conf

scp ./etc/haproxy/haproxy.cfg root@10.211.55.17:/etc/haproxy/haproxy.cfg
scp ./etc/keepalived/check_apiserver.sh root@10.211.55.17:/etc/keepalived/check_apiserver.sh
scp ./etc/keepalived/keepalived.conf root@10.211.55.17:/etc/keepalived/keepalived.conf

scp ./etc/haproxy/haproxy.cfg root@10.211.55.18:/etc/haproxy/haproxy.cfg
scp ./etc/keepalived/check_apiserver.sh root@10.211.55.18:/etc/keepalived/check_apiserver.sh
scp ./etc/keepalived/keepalived.conf root@10.211.55.18:/etc/keepalived/keepalived.conf

#Execute on master
systemctl enable keepalived --now
systemctl enable haproxy --now
4.2 initializing k8s clusters
#Initialize k8s cluster
kubeadm init \
--control-plane-endpoint k8svip:8443 \
--kubernetes-version=v1.19.4 \
--service-cidr=10.96.0.0/12 \
--pod-network-cidr=10.244.0.0/16 \
--upload-certs
#Prompt initialized successfully! Indicates successful initialization
Your Kubernetes control-plane has initialized successfully!

To start using your cluster, you need to run the following as a regular user:

  mkdir -p $HOME/.kube
  sudo cp -i /etc/kubernetes/admin.conf $HOME/.kube/config
  sudo chown $(id -u):$(id -g) $HOME/.kube/config

Alternatively, if you are the root user, you can run:

  export KUBECONFIG=/etc/kubernetes/admin.conf

You should now deploy a pod network to the cluster.
Run "kubectl apply -f [podnetwork].yaml" with one of the options listed at:
  https://kubernetes.io/docs/concepts/cluster-administration/addons/

You can now join any number of the control-plane node running the following command on each as root:

  kubeadm join k8svip:8443 --token 1m392j.fyliyc4psna3c96n \
	--discovery-token-ca-cert-hash sha256:b6fcf177cec3dcbd61ede734a651880d399022bb97fe3b6a67897e3987df3a62 \
	--control-plane --certificate-key b09e240c0fd6f85c39b6c9039a2662907681f447c801a62cdb844ee1e82d3ea9

Please note that the certificate-key gives access to cluster sensitive data, keep it secret!
As a safeguard, uploaded-certs will be deleted in two hours; If necessary, you can use
"kubeadm init phase upload-certs --upload-certs" to reload certs afterward.

Then you can join any number of worker nodes by running the following on each as root:

kubeadm join k8svip:8443 --token 1m392j.fyliyc4psna3c96n \
	--discovery-token-ca-cert-hash sha256:b6fcf177cec3dcbd61ede734a651880d399022bb97fe3b6a67897e3987df3a62
Initialize kubectl command
  mkdir -p $HOME/.kube
  sudo cp -i /etc/kubernetes/admin.conf $HOME/.kube/config
  sudo chown $(id -u):$(id -g) $HOME/.kube/config
Add master node command
 kubeadm join k8svip:8443 --token 1m392j.fyliyc4psna3c96n \
	--discovery-token-ca-cert-hash sha256:b6fcf177cec3dcbd61ede734a651880d399022bb97fe3b6a67897e3987df3a62 \
	--control-plane --certificate-key b09e240c0fd6f85c39b6c9039a2662907681f447c801a62cdb844ee1e82d3ea9
Add worker node command
kubeadm join k8svip:8443 --token 1m392j.fyliyc4psna3c96n \
	--discovery-token-ca-cert-hash sha256:b6fcf177cec3dcbd61ede734a651880d399022bb97fe3b6a67897e3987df3a62
4.3 deploy CNI network plug-ins
#Find Kube flannel in the k8s script provided YML file
kubectl apply -f kube-flannel.yml
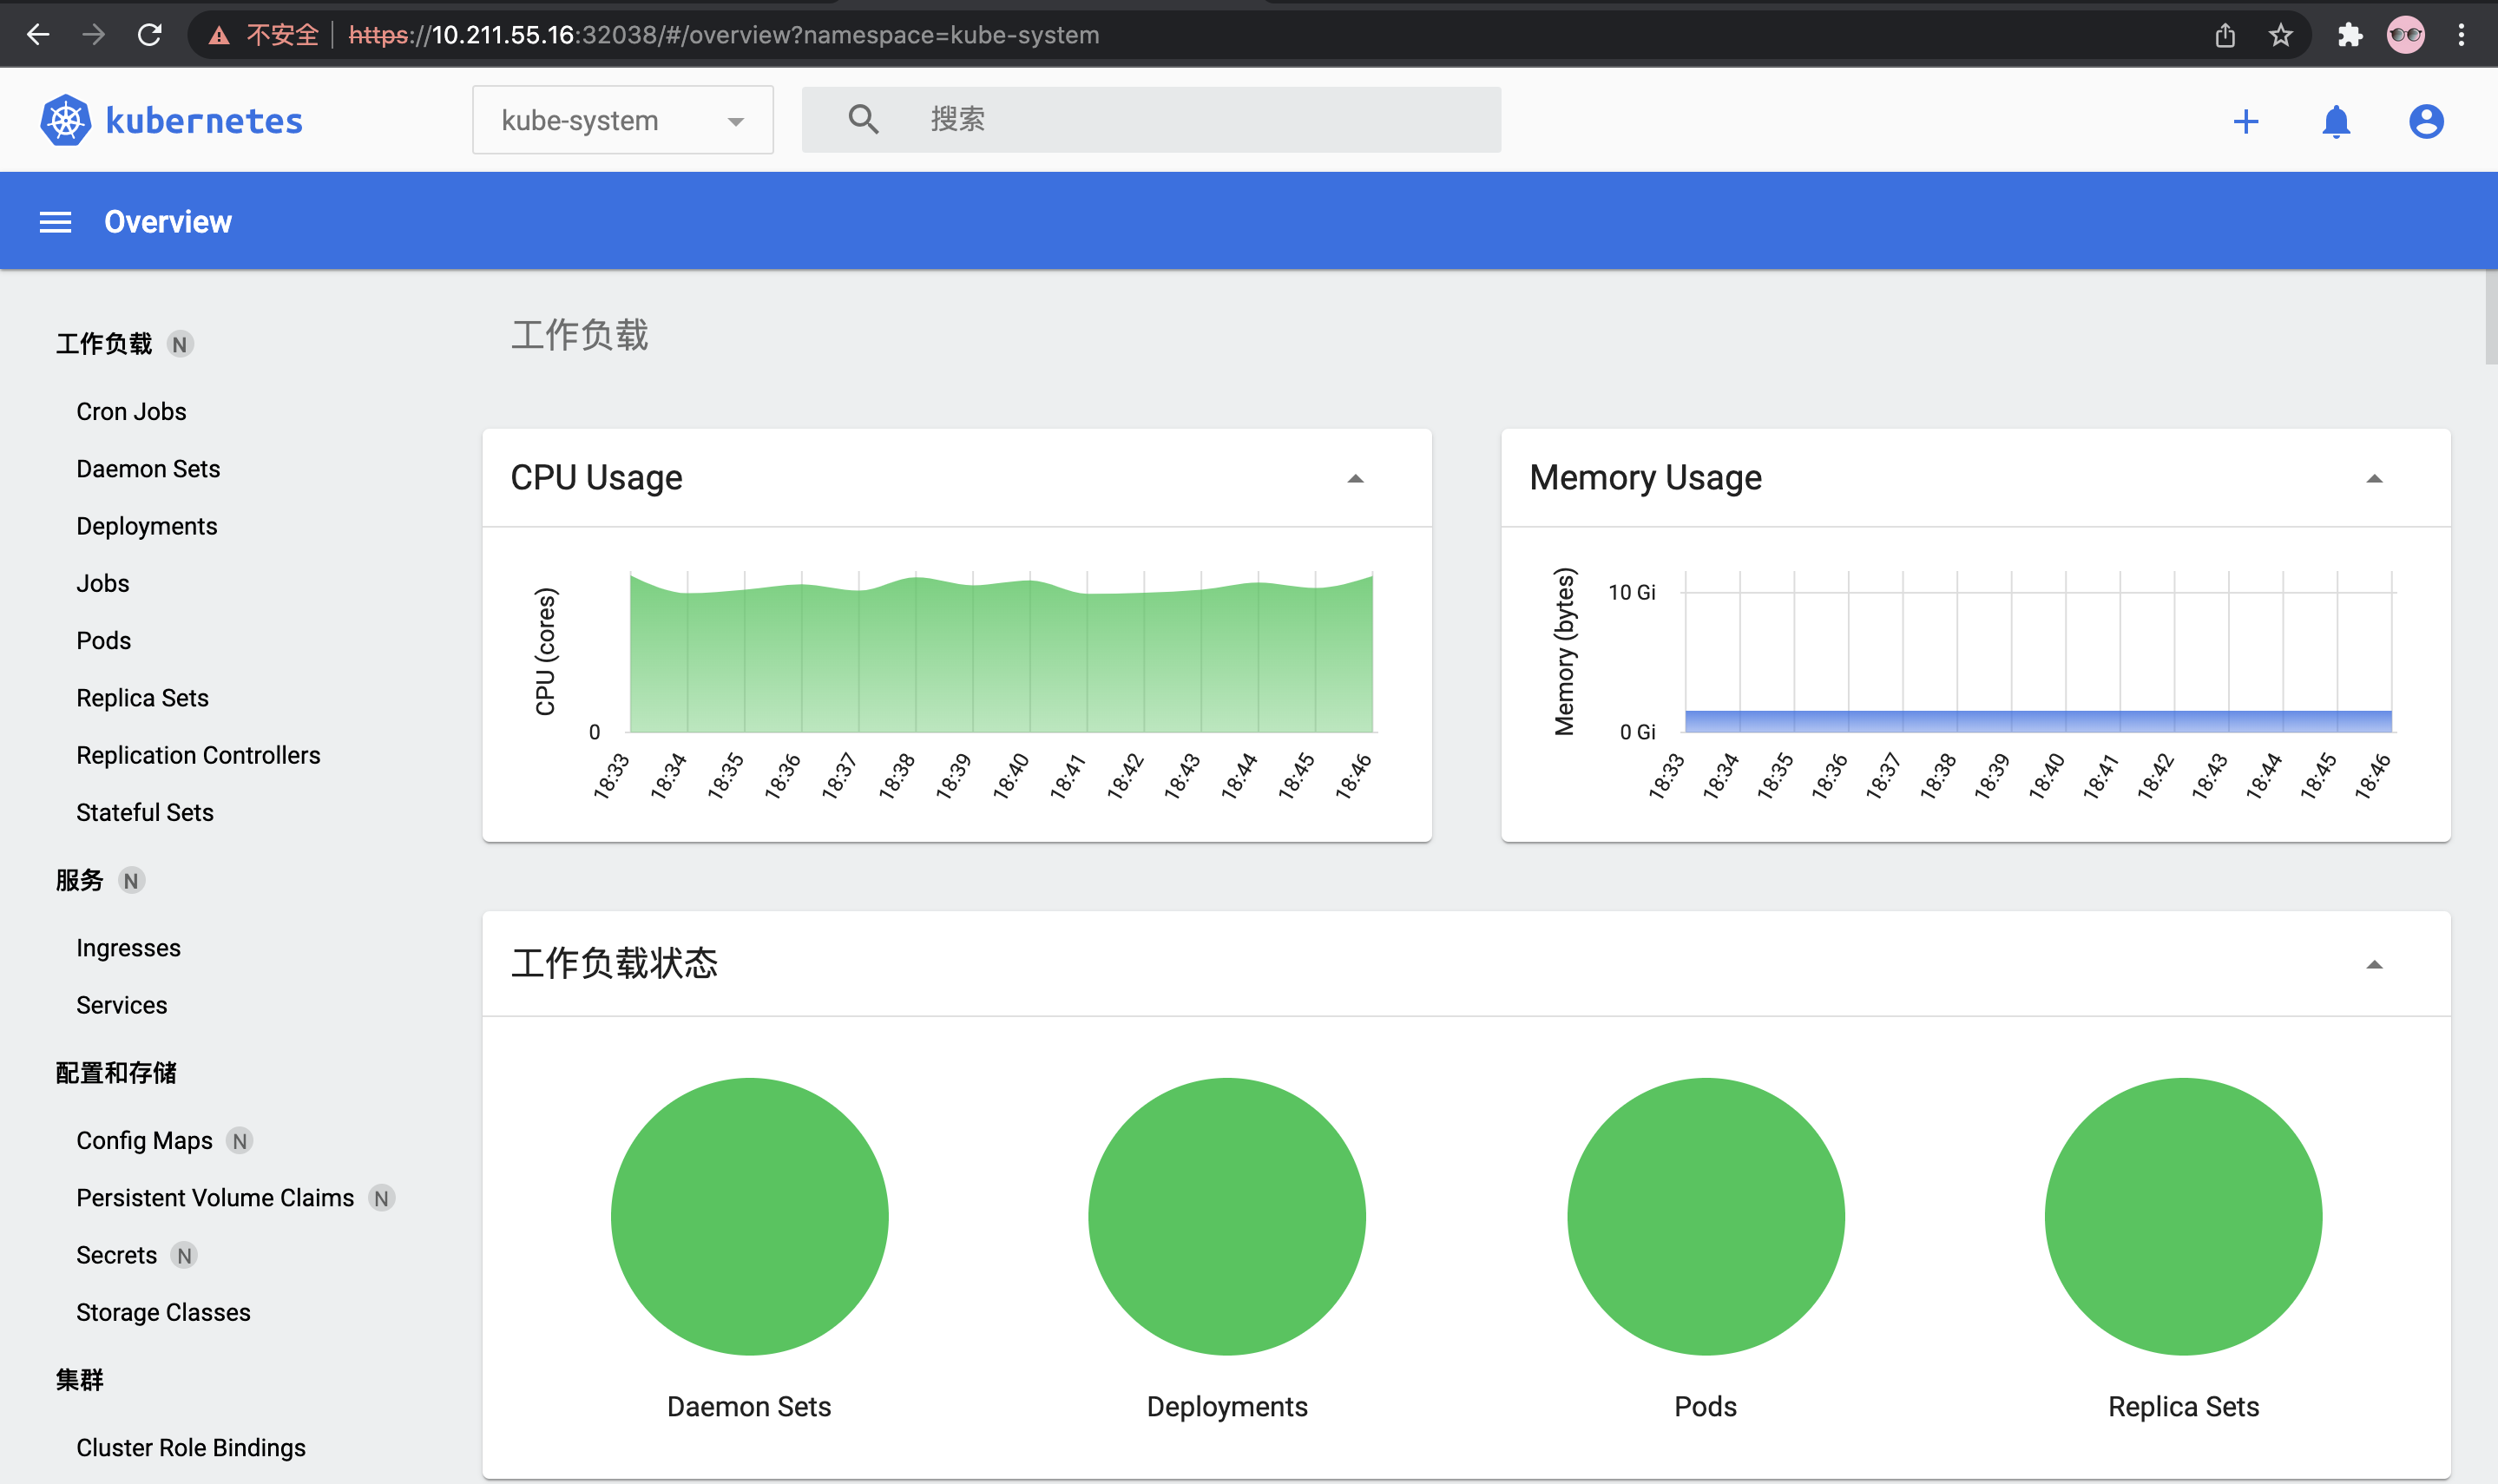
5, Deploy Dashboard UI
Kubernetes Dashboard is the Web user interface provided by kubernetes. Through Dashboard, we can deploy containerized applications to kubernetes cluster, troubleshoot containerized applications and manage cluster resources; You can view the cluster application details through the Dashboard and create or modify a single kubernetes resource (such as Deployments, Jobs, DaemonSets, etc.).
5.1 installing Dashboard UI
- In the k8s script directory, find the image in the dashboard folder SH file to pull the image.
- Deploy recommended YML file
kubectl apply -f recommended.yml
External exposure Dashboard
kubectl -n kubernetes-dashboard edit svc kubernetes-dashboard

#type: ClusterIPs
#Change to
#type: NodePort

#View svc
kubectl -n kubernetes-dashboard get svc
#See port 3xxxx
#https://10.211.55.16:3xxxx
Configure the certificate
#Delete the secret created by default
kubectl delete secret kubernetes-dashboard-certs  -n kubernetes-dashboard
#Recreate the secret, which is mainly used to specify the storage path of the certificate
kubectl create secret generic kubernetes-dashboard-certs --from-file=/etc/kubernetes/pki/ -n kubernetes-dashboard
#Delete the pod of the dashboard, mainly to make it run again and load the certificate
kubectl delete pod -n kubernetes-dashboard --all
Trying to access
https://10.211.55.16:3xxxx
Sign in
#Create service account
kubectl apply -f ./dashboard-adminuser.yaml
#Create a ClusterRoleBinding
kubectl apply -f ./dashboard-ClusterRoleBinding.yaml

#Get token
kubectl -n kubernetes-dashboard describe secret $(kubectl -n kubernetes-dashboard get secret | grep admin-user | awk '{print $1}')
Paste the token to log in and start a happy visit!
5.2 installing Metrics server
Find components under the dashboard directory under the k8s script directory Yaml, and then modify the file content:
#Replace mirror
bitnami/metrics-server:0.4.1
Modify components In the containers - > args section of yaml, add the -- kubelet secure TLS parameter.
# vim components.yaml
    spec:
      containers:
      - args:
        - --cert-dir=/tmp
        - --secure-port=4443
        - --kubelet-preferred-address-types=InternalIP,ExternalIP,Hostname
        - --kubelet-use-node-status-port
        - --kubelet-insecure-tls
Final deployment
kubectl apply -f components.yaml

5.3 accessing Dashboard
6, Problem record
6.1 k8s.gcr.io/coredns:v1.8.0 image pull problem
When kubedm init initializes, the image pull fails. We will k8s gcr. io/coredns:v1. 8.0 remove and then pull again with the following command!
docker pull registry.aliyuncs.com/google_containers/coredns:v1.8.0 && docker tag registry.aliyuncs.com/google_containers/coredns:v1.8.0 k8s.gcr.io/coredns/coredns:v1.8.0 && docker rmi registry.aliyuncs.com/google_containers/coredns:v1.8.0
Note that other nodes do the same!
6.2 failed to add master node
We can use the kubedm reset command to roll back and add again!