Re learn the integrated database development framework of Springboot series - in
- Assignment transformation of java bean
- Consolidate MybatisGenerator operational data
- Integrate mybatisPlus operation database
- Mybatis development best practices summary
- Best practices for facing scenarios
- Scenario 1: adding, deleting, modifying and querying a single table
- Scenario 2: multi query criteria query (or multi table Association query)
- Scenario 3: other scenarios except the above two scenarios
- Best practices for attribute mapping of query results
- Use @ MapperScan instead of @ mapper
- Using the PageHelper paging plug-in
- Put the xxxmapper.java file and xxxmapper.xml file in the same directory
- Multi data source implementation of Spring mybatis
Assignment transformation of java bean
Why do I do java bean assignment conversion
In the actual development process, due to the complexity of the business, it is usually impossible for a model entity to run through the persistence layer, service layer and control layer. It is usually necessary to perform the assignment conversion of entity object java bean.

PO: persistent object, which corresponds to the entity in the database. It is usually used in database data access operations. You can simply think that a PO corresponds to a record in a table in the database. There are only attributes of basic data type and String type (such as int and String) in Po object, which correspond to database fields one by one.
BO: business object. Business object is mainly used to encapsulate business logic into an object. This object may include one or more other objects. Usually, a BO is a combination of multiple pos. for example, after the PO is queried, it needs business processing. During the processing, the properties of the object become more and more complex, including nested arrays, object arrays, etc.
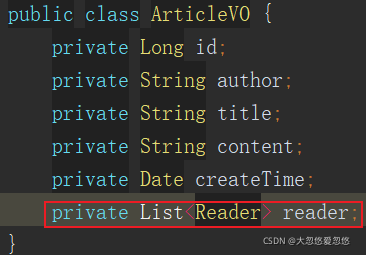
VO: view object, which mainly corresponds to the display structure of the web page, so VO is also the data exchange definition between the front end and the back end.
The following figure shows a VO, which is used to return to the front-end web interface and render the data content:
The following figure is a PO used to access the data of the database table.
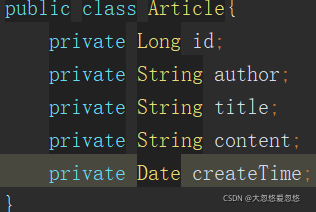
Please pay attention to the difference between the two. An AricleVO contains not only the data of Article, but also the data of Reader readers.
- When you need to insert data into the database, you need to insert Article(PO) and Reader(PO) into the database as po records respectively.
- When you need to return the data and reader information of an article to the page for rendering, you need to query Article(PO) and Reader(PO) from the database, and then convert their combined mapping into AricleVO and return it to the front end.
If your business can use an entity class object, it can run through the persistence layer to the presentation layer. There is no need to do mapping assignment conversion, and there is no need to divide VO, BO and PO. For example, single table data display, modification, and addition.
BeanUtils and Dozer?
The commonly used java bean assignment conversion tools are BeanUtils and Dozer. What would we do if BeanUtils and Dozer didn't help us with the conversion and assignment between objects?
articleVO.setId(article.getId());
articleVO.setAuthor(article.getAuthor());
articleVO.setTitle(article.getTitle());
articleVO.setContent(article.getContent());
articleVO.setCreateTime(article.getCreateTime());
BeanUtils is an automatically integrated java bean automatic conversion tool in Spring Boot (there is also a BeanUtils under the apache project, which specifically refers to the BeanUtils under the Spring package). It is very convenient to use. You can convert article(PO) to articleVO by the following method.
ArticleVO articleVO = new ArticleVO();
BeanUtils.copyProperties(article,articleVO);
Dozer is a tool that can convert entities to entities. As long as the mapping relationship is established, it is like ORM database and entity mapping. Dozer is more powerful than BeanUtils, but BeanUtils has better performance. Therefore, BeanUtils is used for simple attribute assignment transformation of the same name and type, and dozer is used for attribute assignment transformation of complex cascade structure
- Dozer can realize the conversion between attributes of Integer, Long and other basic types and String data types (as Long as the name is the same, the data types can be different). BeanUtils can only assign values between attributes with the same name as the data type.
- Dozer can realize the object assignment of recursive cascade structure, and BeanUtils (under the Spring package) can also
- Dozer can realize complex data conversion relationships, which BeanUtils cannot do through xml configuration
Examples of usage are as follows:
    Mapper mapper = DozerBeanMapperBuilder.buildDefault();
    // article(PO) -> articleVO
    ArticleVO articleVO = mapper .map(article, ArticleVO.class);
This sample code. Convert the Po object article queried from the database into VO object articleVO. In the conversion process, all data with the same name and type are automatically assigned to the member variables of articleVO, except for reader (because there is no reader array data in PO). Does the conversion require mapping between write attributes? no The default is to match according to the attribute name
Introduction of Dozer (6.2.0)
Since version 6.2.0, dozer has officially provided us with dozer spring boot starter, which makes it more convenient for us to use dozer in spring boot.
<dependency>
    <groupId>com.github.dozermapper</groupId>
    <artifactId>dozer-spring-boot-starter</artifactId>
    <version>6.2.0</version>
</dependency>
In actual development, we need not only PO to VO, but also List to List. Write a tool class to realize List to List
public class DozerUtils {

    static Mapper mapper = DozerBeanMapperBuilder.buildDefault();

    public static <T> List<T> mapList(Collection sourceList, Class<T> destinationClass){
        List destinationList = new ArrayList();
        for (Iterator i$ = sourceList.iterator(); i$.hasNext();){
            Object sourceObject = i$.next();
            Object destinationObject = mapper.map(sourceObject, destinationClass);
            destinationList.add(destinationObject);
        }
        return destinationList;
    }
}
Custom type conversion (asymmetric type conversion)
In normal development, the fields with the same name of our VO and PO should be of the same type as far as possible. String attribute - > string attribute, Date attribute - > Date attribute, but it does not rule out that some friends made design mistakes at the beginning
- Do you need String attribute - > date attribute, or do you need to convert ClassA to ClassB? How can we achieve this?
- Or you need to convert createDate to cDate. If the attribute names are different, how to do it.
For example, the following two test model s perform automatic attribute assignment transformation mapping.
@Data
@AllArgsConstructor
public class TestA{
    public String name;
    public String createDate;  //Note that the names and types here are different
}
@Data
@NoArgsConstructor
public class TestB{
public String name;
public Date cDate; //Note that the names and types here are different
}Then, we need to create the transformation correspondence, such as resources / dozer / dozer mapping.xml. XML content looks complex, but its core structure is simple. It is the conversion from class-a to classb. filed is used to define special fields (inconsistent names or types). configuration can be configured globally. Date format is effective for all date string conversions.
<?xml version="1.0" encoding="UTF-8"?>
<mappings xmlns="http://dozermapper.github.io/schema/bean-mapping"
          xmlns:xsi="http://www.w3.org/2001/XMLSchema-instance"
          xsi:schemaLocation="http://dozermapper.github.io/schema/bean-mapping
          http://dozermapper.github.io/schema/bean-mapping.xsd">
    <configuration>
        <date-format>yyyy-MM-dd HH:mm:ss</date-format>
    </configuration>
    <mapping>
        <class-a>com.dhy.bootlaunch.dozer.TestA</class-a>
        <class-b>com.dhy.bootlaunch.dozer.TestB</class-b>
        <field>
            <a>createDate</a>
            <b>cDate</b>
        </field>
    </mapping>

</mappings>
Then notify application.yml of the dozer conversion configuration file for loading and validation
dozer:
  mapping-files: classpath:/dozer/dozer-mapping.xml
When converting from String attribute to Date attribute in such an object, the conversion rule will be automatically applied and no error will be reported.
@RunWith(SpringRunner.class)
@SpringBootTest
public class DozerTests {

    @Test
    public void dozerTests() {
        Mapper mapper = DozerBeanMapperBuilder
                .create().withMappingFiles("dozer/dozer-mapping.xml")
                .build();
        TestA testA = new TestA("kobe","2020-03-08 11:25:25");

        System.out.println(mapper.map(testA,TestB.class));
    }
}
Output:
TestB(name=kobe, cDate=Sun Mar 08 11:25:25 CST 2020)
Problem mapping localDateTime
net.sf.dozer, a dependent dozer, will make an error in converting LocalDateTime, but there will be no problem with com.github.dozermapper, which can be mapped normally through lever affinity testing
Consolidate MybatisGenerator operational data
In order to enhance the functionality and ease of use of Mybatis, there are two commonly used schemes
- Mybatis Genenrator
- Mybatis Plus
In this section, we will introduce the core usage of mybatis generator, and in the next section, we will introduce Mybatis Plus.
Integrate Mybatis
Step 1: introduce maven dependency packages, including mybatis dependent packages and mysql driver packages.
<dependency>
    <groupId>org.mybatis.spring.boot</groupId>
    <artifactId>mybatis-spring-boot-starter</artifactId>
    <version>1.3.2</version>
</dependency>
<dependency>
    <groupId>mysql</groupId>
    <artifactId>mysql-connector-java</artifactId>
</dependency>
Step 2: ensure that there is database connection configuration in application.yml. And configure the storage location of mybatis xml file. The directory location of the xml file configured below is resources/generator.
spring:
  datasource:
    url: jdbc:mysql://192.168.161.3:3306/testdb?useUnicode=true&characterEncoding=utf-8&useSSL=false
    username: test
    password: 4rfv$RFV
    driver-class-name: com.mysql.cj.jdbc.Driver
mybatis:
    mapper-locations: classpath:generator/*.xml
logging:
    level:
com.dhy.bootlaunch: debug- mybatis.mapper-locations indicates where to scan the xml file
Step 3: configure the package scanning path of Mapper class file of Mybatis
@SpringBootApplication
@MapperScan(basePackages = {"com.dhy.boot.launch.generator"})
public class BootLaunchApplication {

    public static void main(String[] args) {
        SpringApplication.run(BootLaunchApplication.class, args);
    }

}
Install the Mybatis generator plug-in
Mybatis generator can automatically help us generate persistence layer code according to database table structure, which can greatly help us improve development efficiency. There are many ways to use mybatis generator, such as:
- Implementation of Mybatis Generator code generation configuration with XML configuration file
- Code generation configuration of Mybatis Generator
- Mybatis Generator code generation configuration through IDEA plug-in
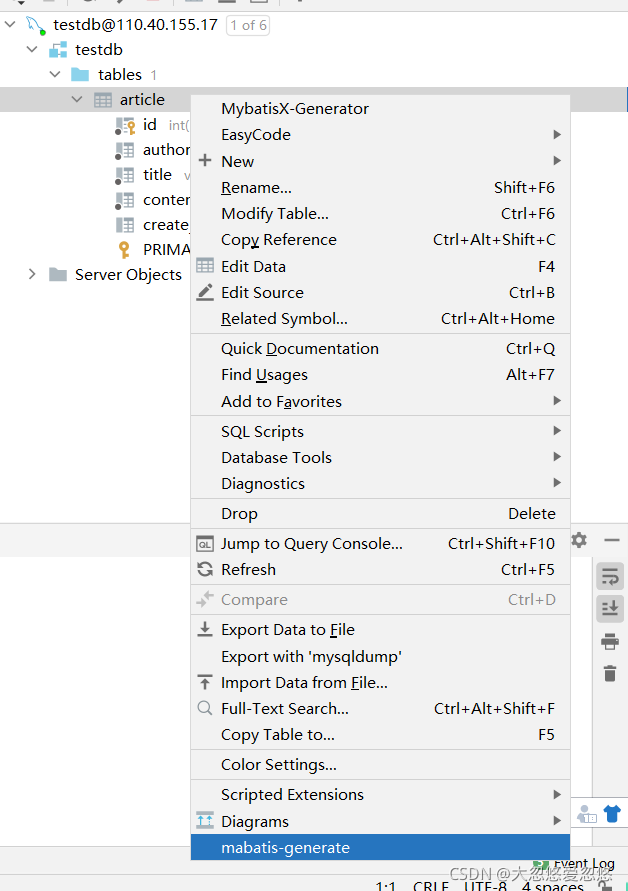
One of the most simple and easy to use is the IDEA plug-in of Mybatis Generator to generate code, which is intuitive, simple and easy to use. In fact, there are many Mybatis Generator plug-ins. The author introduces one I use most often: better Mybatis Generator (free, open source and easy to use)
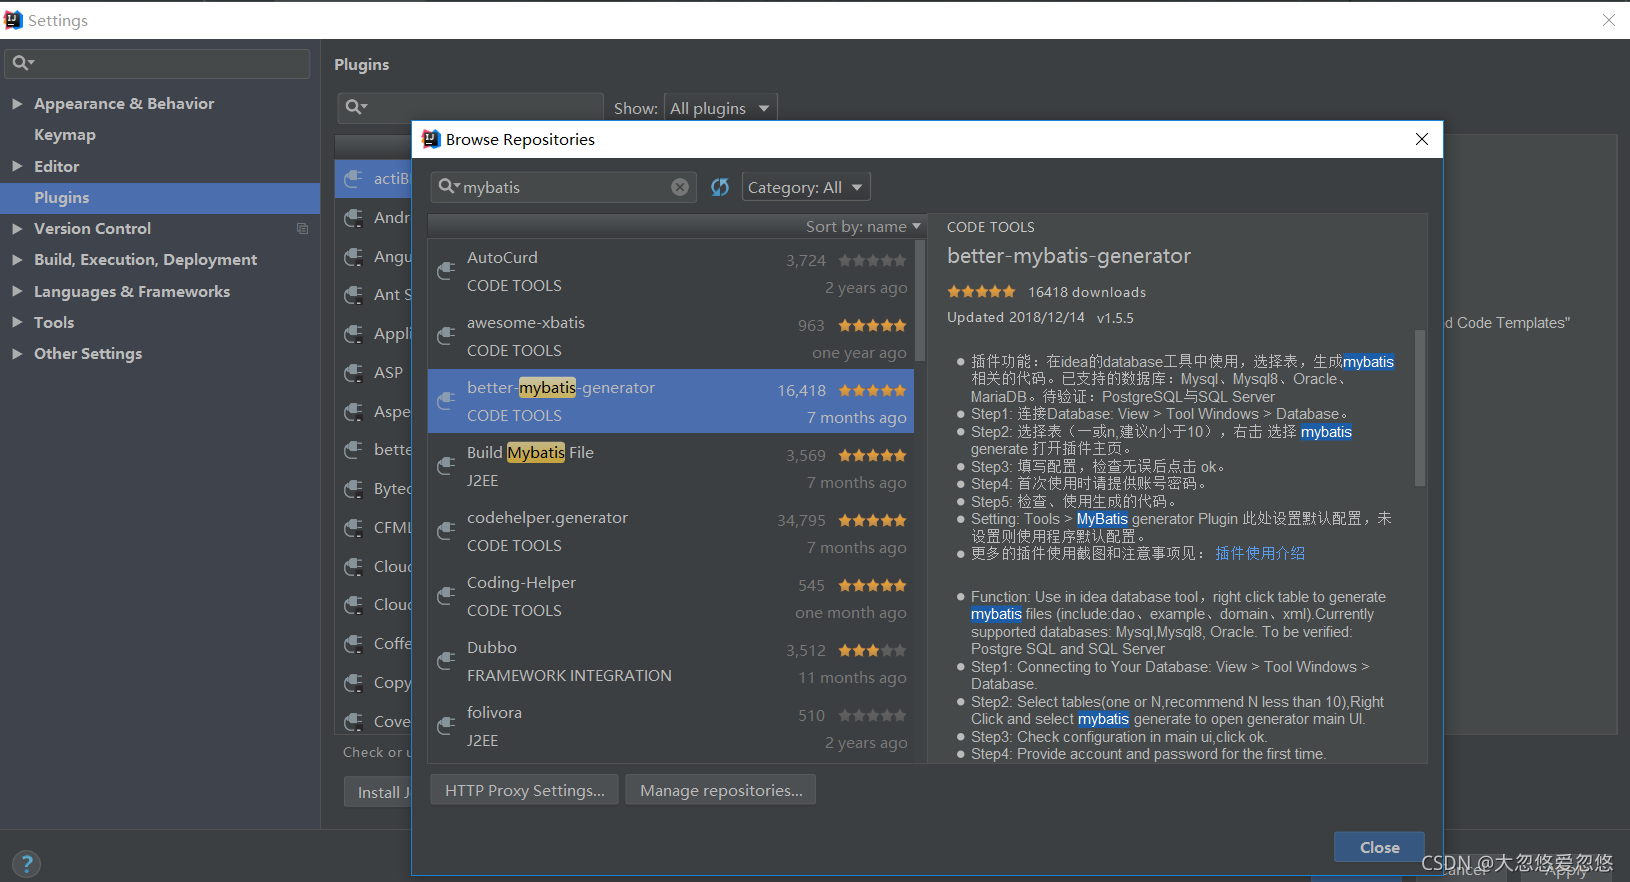
This plug-in will help us generate Mybatis operation interface and entity class definition according to database table structure. It can greatly facilitate our development and reduce the amount of handwritten code. How to install and use plug-ins, please click here?
mybatis code generation configuration details:

This plug-in can help us to automatically produce Mybatis persistence layer code. After the code generation is completed, we can use it directly.
Add, delete, modify and query implementation code
Service layer interface
public interface ArticleRestService {

     void saveArticle(ArticleVO article);

     void deleteArticle(Long id);

     void updateArticle(ArticleVO article);

     ArticleVO getArticle(Long id);

     List<ArticleVO> getAll();
}
Service interface implementation
@Service
public class ArticleMybatisRestService implements ArticleRestService {

    @Resource
    protected Mapper dozerMapper;

    @Resource
    private ArticleMapper articleMapper;  //Code automatically generated by mybatis generator


    //newly added
    @Override
    public void saveArticle(ArticleVO article) {
        Article articlePO = dozerMapper.map(article,Article.class);
        articleMapper.insert(articlePO);  //This method is provided by automatic code generation
    }

    //delete
    @Override
    public void deleteArticle(Long id) {
        articleMapper.deleteByPrimaryKey(id);  //This method is provided by automatic code generation
    }

    //to update
    @Override
    public void updateArticle(ArticleVO article) {
        Article articlePO = dozerMapper.map(article,Article.class);
        articleMapper.updateByPrimaryKeySelective(articlePO);  //This method is provided by automatic code generation
    }

    //query
    @Override
    public ArticleVO getArticle(Long id) {
         //The selectByPrimaryKey method is provided by automatic code generation
        return dozerMapper.map(articleMapper.selectByPrimaryKey(id),ArticleVO.class);
    }

    //Query all
    @Override
    public List<ArticleVO> getAll() {
        List<Article> articles = articleMapper.selectByExample(null);    //This method is provided by automatic code generation
        return DozerUtils.mapList(articles,ArticleVO.class);
    }
}
Test it
According to the Service layer function parameters, modify the Controller code of the control layer, and use postman to test the availability of the interface.
Appendix: instructions for automatic production code
After using the code generation tool, you can see that it helps us automatically generate four kinds of files: (Xxxxxx refers to the name of the database table. If the table name is message, Xxxxxx refers to message)
- Xxxmapper.java, persistence layer api operation interface
- Xxxmapper.xml, dynamic sql configuration file
- The entity classes, POJOs, and Java beans of Xxxxxx correspond to the database table fields one by one
- Xxxexample, database single table operation template. Example can be understood as "condition". It can be used as "query condition", "update condition", "delete condition"!
Development specification:
- The automatically generated code and the file are not allowed to be modified, because the database may be changed and regenerated, resulting in the loss of the modified code.
- In addition, the database table needs to set the primary key. mysql usually sets the id as the primary key and increases automatically. Otherwise, the number of generated codes and methods will be reduced.
public interface MessageMapper {
   //count(*) according to "condition"
    int countByExample(MessageExample example);
    //Delete records according to "conditions"
    int deleteByExample(MessageExample example);
    //Delete records based on table primary key
    int deleteByPrimaryKey(Long id);
    //Insert a complete record, and all the attributes of the record object will be inserted into the database
    int insert(Message record);
    //Insert a record. Only the non empty attributes in the record object are inserted.
    int insertSelective(Message record);
    //Query the list of objects that meet the criteria
    List<Message> selectByExample(MessageExample example);
    //Query objects by primary key
    Message selectByPrimaryKey(Long id);
    //Update the non empty attribute in record to the database according to example
    int updateByExampleSelective(@Param("record") Message record, @Param("example") MessageExample example);
    //Update all attributes in record to the database according to example (all values are overwritten)
    //Once the record attribute is empty and the corresponding database field cannot be empty, an exception occurs
    int updateByExample(@Param("record") Message record, @Param("example") MessageExample example);
    //Update the non empty attribute in record to the database according to the primary key
    int updateByPrimaryKeySelective(Message record);
    //Update all attributes in record to the database according to the primary key (all values are overwritten)
    int updateByPrimaryKey(Message record);
}
How to use example for sql operations? Example means conditional query
The automatically generated code is more suitable for simple sql operations of a single table.
- It is not applicable to multi table Association queries,
- It is not recommended for sql processing with OR, IN and Exists relationships.
Add insert
Create the added object and set the content of the object to be added
  SysUser sysUser = new SysUser();
  sysUser.setUserId(userId);
  sysUser.setUserName(userName);

  int count = userMapper.insertSelective(sysUser);
After writing the above code, we don't need to write SQL to operate the database. The SQL with the same function is as follows:
INSERT INTO sys_user (user_id,user_name)
VALUES (#{userId},#{userName});
Note that there are two insert methods in xxxxmapper, in which insertSelective is selective insertion, that is, the field has value insertion, and the empty field is not processed by sql insertion. The sys_user table has other fields besides user_id and user_name, but they do not appear as the field of insert.
Delete delete
Create a template to delete and set the deletion criteria
SysUserExample userExample = new SysUserExample();
userExample.createCriteria().andUserIdEqualTo(userId)
                            .andUserNameEqualTo(userName);

int count = userMapper.deleteByExample(userExample )
After writing the above code, we don't need to write SQL to operate the database. The SQL with the same function is as follows:
DELETE FROM sys_user
WHERE user_id = #{userId}
AND user_name = #{userName};
Modify update
Create the modified object and set the content of the object to be modified
SysUser sysUser = new SysUser();
sysUser.setUserName(userName);
Create a template to modify the condition and set the modified condition
SysUserExample userExample = new SysUserExample();
userExample.createCriteria().andUserIdEqualTo(userId);

int count = userMapper.updateByExample(sysUser,userExample);
After writing the above code, we don't need to write SQL to operate the database. The SQL with the same function is as follows:
update sys_user
set user_name = #{userName}
where user_id = #{userId}
Simple query
Create a query template and set query criteria
SysUserExample userExample = new SysUserExample();
userExample.createCriteria().andUserIdEqualTo(userId);

//Obtain login information according to query
SysUser myself = userMapper.selectByExample(userExample).get(0);
After writing the above code, we don't need to write SQL to operate the database. The SQL with the same function is as follows:
SELECT id,user_id,user_name,`password`,org_id,role_id, phone,address
FROM sys_user
WHERE user_id = ?;
Integrate mybatisPlus operation database
Spring boot integrated with MybatisPlus
Step 1: introduce mybatis plus boot starter and database driver into the Spring Boot project through maven coordinates. Note: projects that introduce mybatis plus boot starter do not need to introduce mybatis Spring Boot starter
<dependency>
    <groupId>com.baomidou</groupId>
    <artifactId>mybatis-plus-boot-starter</artifactId>
    <version>3.3.2</version>
</dependency>
<dependency>
    <groupId>mysql</groupId>
    <artifactId>mysql-connector-java</artifactId>
</dependency>
Step 2: ensure that there is database connection configuration in application.yml.
spring:
  datasource:
    url: jdbc:mysql://192.168.161.3:3306/testdb?useUnicode=true&characterEncoding=utf-8&useSSL=false
    username: test
    password: 4rfv$RFV
    driver-class-name: com.mysql.cj.jdbc.Driver
Step 3: configure the package scanning path of Mapper class file of Mybatis
@SpringBootApplication
@MapperScan(basePackages = {"com.dhy.boot.launch.generator","com.dhy.boot.launch.mapper"})
public class BootLaunchApplication {

    public static void main(String[] args) {
        SpringApplication.run(BootLaunchApplication.class, args);
    }

}
Mapper inheritance implementation
If we operate the article table in the database, we need to create an entity class according to the structure of the article table.
@Data
public class Article {
    private Long id;

    private String author;

    private String content;

    private String title;

    private Date createtime;
}
Then write an interface ArticleMapper, which inherits from BaseMapper. The generic type is the Article entity class.
public interface ArticleMapper extends BaseMapper<Article> {

}
BaseMapper provides several basic implementations for adding, deleting, modifying and querying by default. Since ArticleMapper inherits from BaseMapper, ArticleMapper can use these methods to operate the article table of the database.
public interface BaseMapper<T> extends Mapper<T> {
    int insert(T entity);

    int deleteById(Serializable id);

    int deleteByMap(@Param("cm") Map<String, Object> columnMap);

    int delete(@Param("ew") Wrapper<T> wrapper);

    int deleteBatchIds(@Param("coll") Collection<? extends Serializable> idList);

    int updateById(@Param("et") T entity);

    int update(@Param("et") T entity, @Param("ew") Wrapper<T> updateWrapper);

    T selectById(Serializable id);

    List<T> selectBatchIds(@Param("coll") Collection<? extends Serializable> idList);

    List<T> selectByMap(@Param("cm") Map<String, Object> columnMap);

    T selectOne(@Param("ew") Wrapper<T> queryWrapper);

    Integer selectCount(@Param("ew") Wrapper<T> queryWrapper);

    List<T> selectList(@Param("ew") Wrapper<T> queryWrapper);

    List<Map<String, Object>> selectMaps(@Param("ew") Wrapper<T> queryWrapper);

    List<Object> selectObjs(@Param("ew") Wrapper<T> queryWrapper);

    <E extends IPage<T>> E selectPage(E page, @Param("ew") Wrapper<T> queryWrapper);

    <E extends IPage<Map<String, Object>>> E selectMapsPage(E page, @Param("ew") Wrapper<T> queryWrapper);
}
MybatisPlus and Mybatis XML
Mybatis plus is only an enhancement of mybatis, so you can still use the syntax of mybatis xml to implement ORM SQL mapping (especially dynamic SQL writing) in projects using mybatis plus.
However, the scanning path configuration needs to be adjusted simply. The original configuration is like this
mybatis:
    mapper-locations: classpath:generator/*.xml
The adjusted configuration is like this
mybatis-plus:
    mapper-locations: classpath:generator/*.xml
Mybatis development best practices summary
Best practices for facing scenarios
mybatis code implementation
- Use the mybatis generator for automatic code generation, or use the MybatisPlus solution
- Implemented in XML
- Implemented using annotations
The above three implementation methods have their own suitable application scenarios, and all three methods can be supported. The following is a summary of different implementation methods in different scenarios based on the author's years of experience in using mybatis
Scenario 1: adding, deleting, modifying and querying a single table
The code generated by mybatis generator or MybatisPlus can complete 90% of single table operations without writing SQL. Very convenient to use!
- This usage is very friendly to developers. Some people say that if you often use this, you will forget how to write SQL. I can definitely answer: No. Because you don't have SQL in your head, you don't understand the code generated by mybatis generator or Mybstis plus.
- However, although this usage is simple and easy to use, it will also cause a problem, that is, the results can be obtained by writing an associated query. Developers tend to use single table query multiple times (because it is easy to write and can be lazy). To be honest, the performance will not necessarily decline, but the code will be very redundant. If the project team wants to avoid this situation, it should specially emphasize the standardization.
- The code automatically generated by Mybatis Generator helps you complete single table operations to the greatest extent. When it comes to association query and inheritance, you should write your own Mybatis file and SQL, but don't change it on the basis of the generated code! Remember!
- If automatic code generation is not suitable for you or your project, it is also convenient to use a third-party enhancement library like mybatis plus.
Scenario 2: multi query criteria query (or multi table Association query)
In web development, there is a typical application scenario: a web table page has multiple query conditions. You can choose to fill in different query conditions to get different query results. Multiple query conditions only fill in a few conditions for query, and other conditions are not filled in.
Facing this scenario, the ORM framework needs to have good support for dynamic SQL (SQL will change according to different incoming parameters), including the convenience of writing. From this point of view, the xml implementation of mybatis is the best.
<?xml version="1.0" encoding="UTF-8" ?>
<!DOCTYPE mapper PUBLIC "-//mybatis.org//DTD Mapper 3.0//EN" "http://mybatis.org/dtd/mybatis-3-mapper.dtd" >
<mapper namespace="com.zimug.StudentMapper" >

<select id="findStudent" resultType="com.zimug.bootlaunch.testdb1.model.Student">
    SELECT STUD_ID AS studId,name,email,dob
    FROM STUDENT
    <trim prefix="WHERE" prefixOverrides="AND|OR" suffixOverrides="AND|OR">
        <if test="stuId != null" >
        AND STUD_ID = #{stuId}
        </if>
        <if test="name != null and name != '' " >
            AND name = #{name}
        </if>
        <if test="email != null and email != '' " >
            AND email= #{email}
        </if>
    </trim>
</select>

</mapper>- When the stuId parameter is empty, and study_ Id = #{stuId} query condition does not exist
- When the name parameter is empty, the AND name = #{name} query condition does not exist, and so on
public interface StudentMapper {
    List<Student> findStudent(@Param("stuId") Integer stuId,
                              @Param("name") String name,
                              @Param("email") String email);
}
In addition, if you do a multi table Association query, using XML is also a good choice without using dynamic SQL. It is much better than string spelling SQL in annotation mode.
Scenario 3: other scenarios except the above two scenarios
In fact, apart from the above two scenarios, there are not many cases left, but you can still give several examples:
For example, there is only insert operation for a single table, so you don't want to generate a complete set of operation code for a single table.
For example: just a temporary intention to write a relatively simple SQL.
public interface AnonStudentMapper {
    @Select("SELECT STUD_ID AS studId, NAME, EMAIL, DOB " +
            "FROM STUDENT " +
            "WHERE STUD_ID=#{studId}")
    List<Student> findStudentById(Integer studId);
}
You can see this method. It's best to have SQL within two or three lines and no nested SQL, otherwise you will fall into the disaster of maintenance!
Best practices for attribute mapping of query results
Use hump mapping result attribute (Convention greater than configuration best practice)
Mybatis provides us with a mapping method. If the attribute naming follows the hump naming method, the data column names follow the underscore naming method. This can be done once and for all. No matter how many SQL queries are written in the future, there is no need to formulate mapping rules separately. Then you can use this method, similar to the following:
- The SQL field user corresponding to the entity class attribute userName_ name;
- The entity class attribute userId corresponds to the SQL field user_id;
In the Spring boot environment, you only need to write such a configuration.
mybatis:
    configuration:
      mapUnderscoreToCamelCase: true
Other implementation methods are very unfriendly. You need to write a query SQL and do a set of mapping configuration.
The first is the attribute mapping example of xml, resultMap
<mapper namespace="data.UserMapper">
        <resultMap type="data.User" id="userResultMap">
                <!-- use id Property to map primary key fields -->
                <id property="id" column="user_id"/>
                <!-- use result Property to map non primary key fields -->
                <result property="userName" column="user_name"/>
        </resultMap>
</mapper>
The second method: annotate @ Results and @ Result
These two annotations correspond to the tags in the XML file:
- @Results corresponds to resultMap
- @Result corresponds to result
These two annotations are applied at the method level, that is, on the mapper method, as follows:
@Select("select * from t_user where user_name = #{userName}")
@Results(
        @Result(property = "userId", column = "user_id"),
        @Result(property = "userName", column = "user_name")
)
User getUserByName(@Param("userName") String userName);
The third method is to complete the mapping through the SQL field alias
@Select("select user_name as userName, user_id as userId from t_user where user_name = #{userName}")
User getUserByName(@Param("userName") String userName);
Use @ MapperScan instead of @ mapper
@SpringBootApplication
@MapperScan(basePackages = {"com.dhy.**.mapper"})
public class DemoMybatisApplication {

    public static void main(String[] args) {
        SpringApplication.run(DemoMybatisApplication.class, args);
    }
}
This will automatically scan all XXXXMapper files under the com.dhy.**.mapper directory and complete automatic injection.
There is no need to add @ Mapper annotation on each Mapper.
As follows, this is not necessary:
@Mapper
public interface DemoMapper {
    @Insert("insert into Demo(name) values(#{name})")
    @Options(keyProperty="id",keyColumn="id",useGeneratedKeys=true)
    public void save(Demo demo);
}
Using the PageHelper paging plug-in
If you use MybatisPlus, use Paging scheme provided by MybatisPlus That's good. It's as simple as this PageHelper, and the use method is almost the same!
Introduce maven dependency package
   <dependency>
            <groupId>com.github.pagehelper</groupId>
            <artifactId>pagehelper-spring-boot-starter</artifactId>
            <version>1.2.10</version>
        </dependency>
For the test case, the following method queries the data on the first page, and each page returns 2 pieces of data
@RunWith(SpringRunner.class)
@SpringBootTest
public class MybatisTest {

    @Resource
    ArticleMapper articleMapper;

    @Test
    public void testPageHelper(){
        // Only the first Mybatis query (Select) method immediately after the PageHelper.startPage method will be paged!!!!
        PageHelper.startPage(1, 2);
        List<Article> articles = articleMapper.selectByExample(null);
        PageInfo<Article> page = PageInfo.of(articles);
        System.out.println(page);
    }
}
Put the xxxmapper.java file and xxxmapper.xml file in the same directory
When we write code, the xxxmapper.java file and the xxxmapper.xml file are usually written together. The creation and modification are almost carried out together. However, according to the agreement between springboot and maven, the java file should be placed under / src/main/java, and the xml file should be placed under the resources directory. In this way, we have to switch directories and find files back and forth. It's very troublesome. You can solve this problem by configuring pom.xml as follows. Through the following configuration, we can put XML files and java files together in the subdirectory under / src/main/java.
   <resources>
        <resource>
            <directory>src/main/java</directory>
            <filtering>false</filtering>
            <includes>
                <include>**/*.xml</include>
            </includes>
        </resource>
        <resource>
            <directory>src/main/resources</directory>
            <filtering>false</filtering>
        </resource>
    </resources>
I don't use this scheme anymore. Although this is my personal habit, many new children who join the project team will have mental problems. Or honestly follow the / src/main/java directory, where only java files are stored, which is the standard requirement of maven.
Multi data source implementation of Spring mybatis
The implementation method of multiple data sources adopted in this section is still the subcontracting strategy (consistent with the previous JPA implementation method of multiple data sources). That is, the operation interface is stored in subcontracting, Spring scans different packages and automatically injects different data sources. This method is simple to implement, and it is also a typical application of the idea of "Convention is greater than configuration".
It should be noted that the implementation method of multiple data sources introduced in this paper is only applicable to our own handwritten mybatis mapper (and Mapper.xml) or the code generated by Mybatis Generator, not Mybatis plus Mapper. Mybatis Plus has its own multi-source implementation scheme, which has been explained on the MP official website. I won't write it here.
Mybaits plus multi data source implementation
Modify application.yml to dual data source
Configure dual data sources in application.yml. The first data source accesses testdb library and the second data source accesses testdb2 library
spring:
  datasource:
    primary:
      jdbc-url: jdbc:mysql://192.168.161.3:3306/testdb?useUnicode=true&characterEncoding=utf-8&useSSL=false
      username: test
      password: 4rfv$RFV
      driver-class-name: com.mysql.cj.jdbc.Driver
    secondary:
      jdbc-url: jdbc:mysql://192.168.161.3:3306/testdb2?useUnicode=true&characterEncoding=utf-8&useSSL=false
      username: test
      password: 4rfv$RFV
      driver-class-name: com.mysql.cj.jdbc.Driver
Master data source configuration
Remove the @ MapperScan annotation on the main entry of the SpringBoot program and move the annotation above the MyBatis special configuration class below.

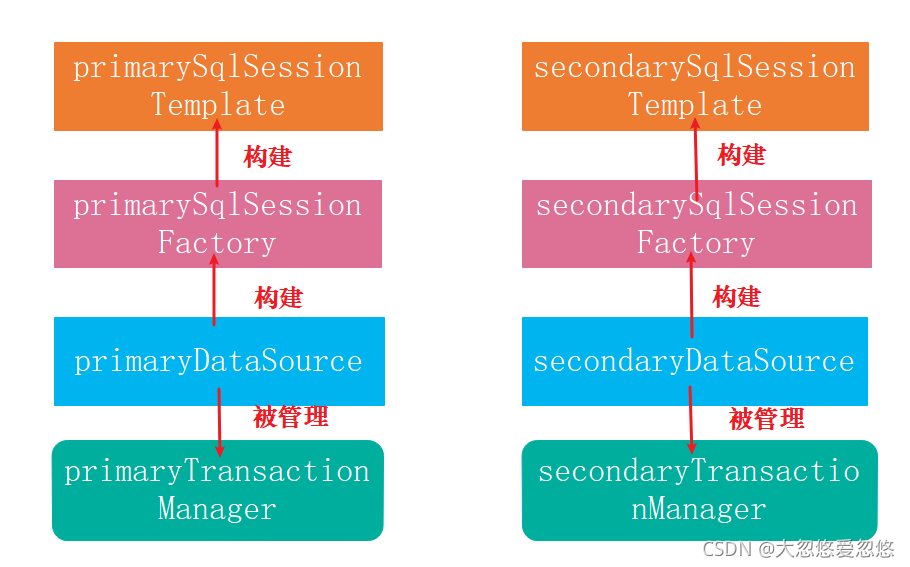
DataSource data source, SqlSessionFactory, TransactionManager, transaction manager and SqlSessionTemplate are configured according to different data sources. The first group is primary and the second group is secondary.
import org.apache.ibatis.session.SqlSessionFactory;
import org.mybatis.spring.SqlSessionFactoryBean;
import org.mybatis.spring.SqlSessionTemplate;
import org.mybatis.spring.annotation.MapperScan;
import org.springframework.beans.factory.annotation.Qualifier;
import org.springframework.boot.context.properties.ConfigurationProperties;
import org.springframework.boot.jdbc.DataSourceBuilder;
import org.springframework.context.annotation.Bean;
import org.springframework.context.annotation.Configuration;
import org.springframework.context.annotation.Primary;
import org.springframework.core.io.support.PathMatchingResourcePatternResolver;
import org.springframework.jdbc.datasource.DataSourceTransactionManager;
import javax.sql.DataSource;
@Configuration
//Data source primary testdb library interface storage directory
@MapperScan(basePackages = "com.dhy.boot.launch.generator.testdb",
sqlSessionTemplateRef = "primarySqlSessionTemplate")
public class PrimaryDataSourceConfig {
@Bean(name = "primaryDataSource")
@ConfigurationProperties(prefix = "spring.datasource.primary") //Data source primary configuration
@Primary
public DataSource primaryDataSource() {
return DataSourceBuilder.create().build();
}
@Bean(name = "primarySqlSessionFactory")
@Primary
public SqlSessionFactory primarySqlSessionFactory(
@Qualifier("primaryDataSource") DataSource dataSource)
throws Exception {
SqlSessionFactoryBean bean = new SqlSessionFactoryBean();
bean.setDataSource(dataSource);
//Set XML file storage location
bean.setMapperLocations(new PathMatchingResourcePatternResolver()
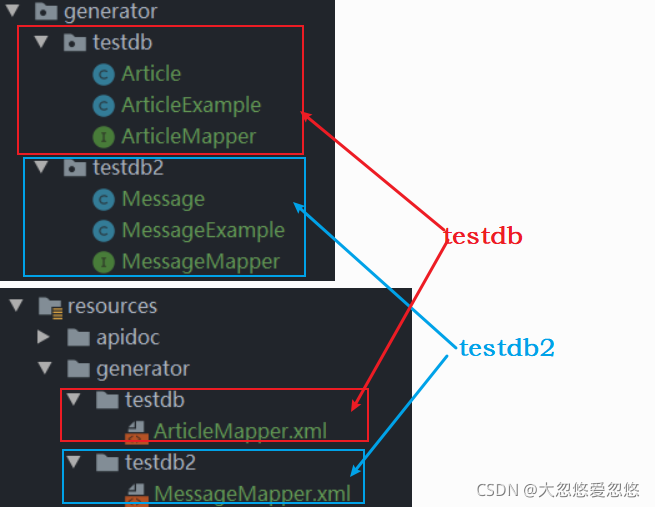
.getResources("classpath:generator/testdb/*.xml")); //Notice the testdb directory here
return bean.getObject();
}
@Bean(name = "primaryTransactionManager")
@Primary
public DataSourceTransactionManager primaryTransactionManager(
@Qualifier("primaryDataSource") DataSource dataSource) {
return new DataSourceTransactionManager(dataSource);
}
@Bean(name = "primarySqlSessionTemplate")
@Primary
public SqlSessionTemplate primarySqlSessionTemplate(
@Qualifier("primarySqlSessionFactory") SqlSessionFactory sqlSessionFactory)
throws Exception {
return new SqlSessionTemplate(sqlSessionFactory);
}
}Second data source configuration
@Configuration
@MapperScan(basePackages = "com.zimug.boot.launch.generator.testdb2",     //Notice the testdb2 directory here
            sqlSessionTemplateRef = "secondarySqlSessionTemplate")
public class SecondaryDataSourceConfig {

    @Bean(name = "secondaryDataSource")
    @ConfigurationProperties(prefix = "spring.datasource.secondary")    //Note the configuration here
    public DataSource secondaryDataSource() {
        return DataSourceBuilder.create().build();
    }

    @Bean(name = "secondarySqlSessionFactory")
    public SqlSessionFactory secondarySqlSessionFactory(
                        @Qualifier("secondaryDataSource") DataSource dataSource)
                        throws Exception {
        SqlSessionFactoryBean bean = new SqlSessionFactoryBean();
        bean.setDataSource(dataSource);
        //Set XML file storage location
        bean.setMapperLocations(new PathMatchingResourcePatternResolver()
                .getResources("classpath:generator/testdb2/*.xml")); //Notice the testdb2 directory here
        return bean.getObject();
    }

    @Bean(name = "secondaryTransactionManager")
    public DataSourceTransactionManager secondaryTransactionManager(
                        @Qualifier("secondaryDataSource") DataSource dataSource) {
        return new DataSourceTransactionManager(dataSource);
    }

    @Bean(name = "secondarySqlSessionTemplate")
    public SqlSessionTemplate secondarySqlSessionTemplate(
                        @Qualifier("secondarySqlSessionFactory") SqlSessionFactory sqlSessionFactory)
                        throws Exception {
        return new SqlSessionTemplate(sqlSessionFactory);
    }

}
test case
Store the automatically generated code (Mapper and entity classes can also be written by yourself) in testdb and testdb2 folders respectively
Testing code at the Service layer
@Override
@Transactional
public ArticleVO saveArticle(ArticleVO article) {
    Article articlePO = dozerMapper.map(article,Article.class);
    articleMapper.insert(articlePO);

    Message message = new Message();
    message.setName("kobe");
    message.setContent("Retired");
    messageMapper.insert(message);

    return article;
}
Write the above code into the service interface, construct article and message objects in the same function, and call Mapper to insert the object data into the database. If the article data is inserted into the article table of the testdb library and the message data is inserted into the message table of the testdb2 library, it means that our multi data source configuration is correct