Re learn the integrated distributed file system of SpringBoot series
- Local file upload and access service
- Introduction to MinIO and model selection
- Installation and basic usage of MinIO
- Java SDK integrating MinIO
- Introduction and architecture description of fastdfs
- brief introduction
- Architecture description
- Benefits:
- Installing fastdfs using docker
- Open the firewall port of the host. The port configured for nginx during the construction of morunchang/fastdfs image is 8888
- Test the installation results
- Develop a custom fastdfs starter
- Test the results of automatic assembly
- Summarize how Starter works:
- Consolidate fastdfs operation file data
Local file upload and access service
The core content of this chapter is to introduce the distributed file system, which is used to store the image, word, excel, pdf and other files of the application. Before introducing the distributed file system, let's introduce the use of native storage to store file resources.
The core implementation process of the two is the same:
Upload files and save files (this section is local disk)
Return the file HTTP access service path to the front end for the effect display after uploading
review
The purpose of the server receiving and uploading is to provide file access services. What are the static resource directories that can provide file access for SpringBoot?
- classpath:/META-INF/resources/ ,
- classpath:/static/ ,
- classpath:/public/ ,
- classpath:/resources/
This is what we introduced in the previous chapter. From here, we can see that the static resources here are under the classpath. Then there is a problem:
- Application file resources cannot be stored separately from project code (have you ever seen code uploaded to github with project file data?)
- Project packaging is difficult. When more and more files are uploaded, the project packaging jar becomes larger and larger.
- Code and file data cannot be stored separately, which means that the backup of file data will become complex
Custom configuration of file upload directory
How to solve the above problems? Don't forget that spring boot gives us the location to configure custom static files using spring.resources.static-locations.
web:
  upload-path: D:/data/

spring:
  resources:
static-locations: classpath:/META-INF/resources/,classpath:/resources/,classpath:/static/,classpath:/public/,file:${web.upload-path}- Configure web.upload-path as a static resource path separated from the project code, that is, the root path for file upload and save
- Configure spring.resources.static-locations. In addition to the default static resource path of Spring Boot, add file: ${web. Upload path} to point to the external file resource upload path. The static resources under this path can directly provide HTTP access services.
The configuration of spring.resources.static-locations overrides the four default static resource configurations of springboot
Controller implementation of file upload
See code Notes for details
@RestController
public class FileUploadController {

  //Bind file upload path to uploadPath
  @Value("${web.upload-path}")
  private String uploadPath;

  SimpleDateFormat sdf = new SimpleDateFormat("yyyy/MM/dd/");

  @PostMapping("/upload")
  public String upload(MultipartFile uploadFile,
                       HttpServletRequest request) throws IOException {

    // In the uploadPath folder, classify and save the uploaded files by date
    // For example: / 2019/06/06/cf13891e-4b95-4000-81eb-b6d70ae44930.png
    String format = sdf.format(new Date());
    File folder = new File(uploadPath + format);
    if (!folder.isDirectory()) {
      folder.mkdirs();
    }

    // Rename the uploaded file to avoid duplicate file names
    String oldName = uploadFile.getOriginalFilename();
    String newName = UUID.randomUUID().toString()
            + oldName.substring(oldName.lastIndexOf("."), oldName.length());


    // file save
    uploadFile.transferTo(new File(folder, newName));

    // Returns the access path of the uploaded file
    //https://localhost:8888/2020/10/18/a9a05df4-6615-4bb5-b859-a3f9bf4bfae0.jpg
    //request.getScheme() returns the protocol used by the current link; For example, the general application returns http;SSL returns https;
    //request.getServerName() can return the name of the server where the current page is located, which is "localhost" in the above example“
    String filePath = request.getScheme() + "://" + request.getServerName()
            + ":" + request.getServerPort() + "/"   + format + newName;
    return filePath;
  }

}
Write a simulated file upload page for testing
Put the upload.html file in the classpath:public directory to provide external access.
<!DOCTYPE html>
<html lang="en">
<head>
    <meta charset="UTF-8">
    <title>Title</title>
</head>
<body>
<form action="/upload" method="post" enctype="multipart/form-data">
    <input type="file" name="uploadFile" value="Please select upload file">
    <input type="submit" value="preservation">
</form>
</body>
</html>
Access the test, click "select file" and save
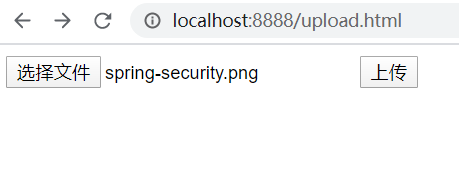
The file is saved to the resource directory specified by web.upload-path on the server

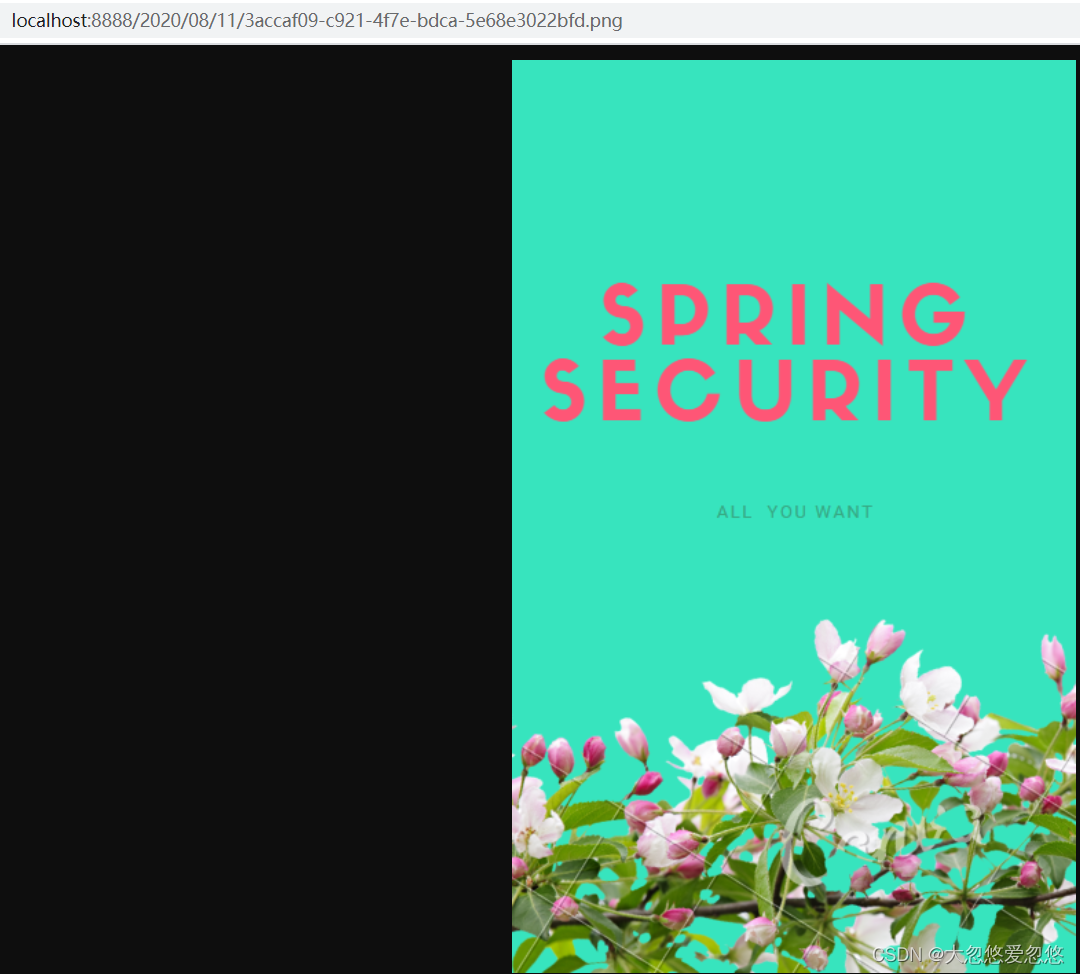
The browser side response results are as follows, and a file HTTP access path is returned:

Using the HTTP access path, the access effect on the browser side is as follows. It proves that our file has been successfully uploaded to the server. If you need to access the image in the future, you can use this HTTP URL.
Introduction to MinIO and model selection
At present, there are many network services available for file storage, such as Alibaba cloud OSS, qiniu cloud, Tencent cloud, etc., but the charges are a little expensive.
Why did you replace FastDFS with MInIO
MinIO is an object storage service based on Apache License v2.0 open source protocol. It is compatible with Amazon S3 cloud storage service interface and is very suitable for storing large-capacity unstructured data, such as pictures, videos, log files, backup data and container / virtual machine images. An object file can be of any size, ranging from a few kb to a maximum of 5T.
Reason 1: complexity of installation and deployment (operation and maintenance)
If you deploy a fastDFS distributed service, you need to have the following knowledge
- linux basic directory operation
- Common distributed master-slave principle
- C language code compilation
- nginx installation and deployment
- Use of nginx plug-in (anti-theft chain)
It's OK to arrange a few programmers to learn the above basic knowledge. The main reason is that the deployment structure of fastdfs is complex. If I don't review it for a long time, I will forget what the complex architecture is.
After I saw the installation process of MinIO and the distributed deployment commands( Distributed MinIO quick start ), more than half of the decision to give up fastDFS has been made.
To put it bluntly: the deployment of fastdfs is just the assembly process of parts. You need to understand the architecture design of fastdfs before you can correctly install and deploy. MinIO is a black box in the installation process. You don't need to pay in-depth attention to its architecture or assemble parts. Basically, it can be used out of the box. Ordinary technicians can participate in the later operation and maintenance.
Reason 2: documentation
I think it has been ten years since I knew fastDFS. There are no official documents. All documents are summarized by XX company or by XX netizens.
From this point of view, fastDFS is really a flop. Of course, when Ali Yuqing did this project, he may not have considered that so many people will use it later. That is, more people use it. In Yu Qing's eyes, he may feel that it is just a small toy developed by himself, and there is no need to continue in-depth operation.
Reason 3: open source project operation organization
fastdfs is a personal project made by Ali Yuqing. It is applied in some Internet start-up companies. It has no official website and is not active. It has six contributors. At present, there are few updates.
MinIO is currently an open source project operated by MinIO.Inc, a company founded in Silicon Valley in 2014. The activity of the community forum is also very good.
Reason 4: UI interface
We all know that fastDFS does not have UI interface by default. Take a look at the interface of MinIO. This interface does not need to be deployed separately and installed together with the server. Out of the box, love, love.
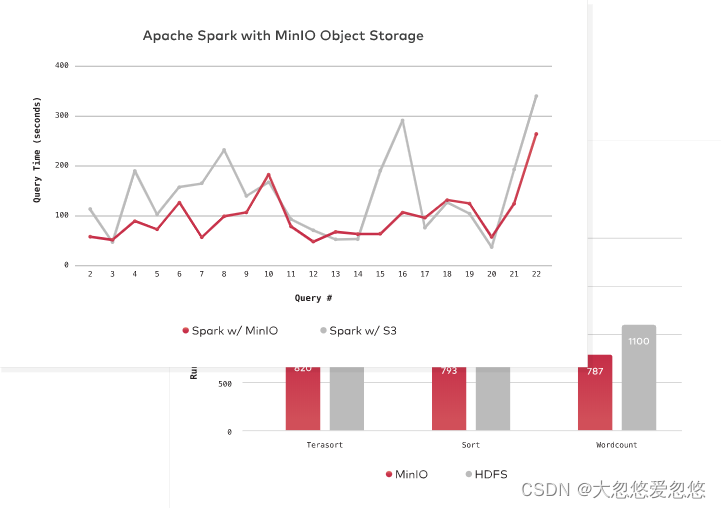
Reason 5: Performance
MinIO claims to be the world's fastest object storage server. On standard hardware, the read / write speed of object storage can reach 183 GB/s and 171 GB/s. About fastDFS, I once wrote 200000 files in a single thread test, a total of 200G, which took about 10 hours. In general, it is difficult to achieve the "so-called" reading and writing speed in G per second of MinIO.
Reason 6: container support
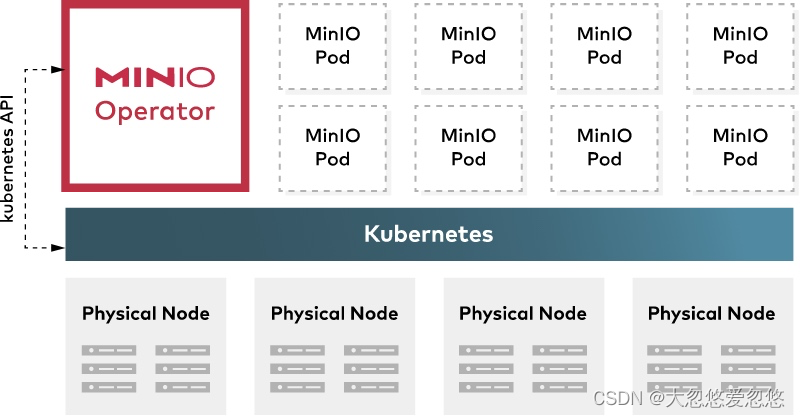
MinIO provides a deep integration scheme with k8s, etcd, docker and other container technologies, which can be said to be born for the cloud environment. This is not available in FastDFS.
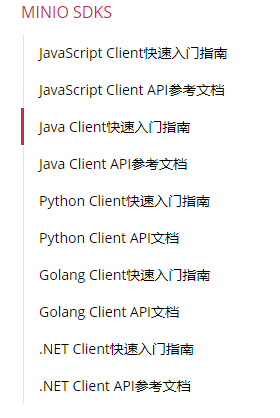
Reason 7: rich SDK support
fastDFS currently provides the C and Java SDK, as well as the PHP extension SDK. The following figure shows the SDK support provided by MinIO, which provides SDKs and documents for almost all mainstream development languages.
Reason 8: AWS S3 standard compatibility
Amazon's S3 API is the de facto standard in the field of object storage. MinIO is a de facto standard for S3 compatibility. It is one of the first standards to adopt API and add support for S3 Select. More than 750 companies, including Microsoft Azure, use MinIO's S3 gateway, which exceeds the sum of other companies in the industry.

what do you mean? That is to say, you are now using MinIO to save costs, when your company grows and becomes rich. If you don't want to operate and maintain the infrastructure yourself, you can store objects on the cloud. As long as the cloud manufacturer supports S3 standards (such as Alibaba cloud OSS, qiniu cloud, etc.), your application doesn't need to be redeveloped.
Installation and basic usage of MinIO
Installing MInIO on a linux server
There are many ways to install MInIO, such as single instance, cluster distributed, docker deployed and k8s supported. Here we will only introduce the simplest installation method: linux single node installation.
Because the main purpose of our course is not to tell you about Minio. The main purpose of our course is to integrate Minio API in Spring Boot application and operate Minio for object storage, that is, the content of the next two sections.
If you want to have an in-depth understanding of MinIO, please visit the official website of MinIO: https://min.io
Download and preparation
Download address: https://min.io/download#/linux
Binary source code installation:
cd /root/minio  //Customize a minio software operation directory
wget https://dl.min.io/server/minio/release/linux-amd64/minio
chmod +x minio
Create minio file storage directory and log directory
mkdir -p /usr/local/data/minio;
mkdir -p /usr/local/logs/minio;
docker installation minio
1. Find the minio image from Docker Hub
docker search minio
Can find the image, and minio/minio ranks first
2.minio installation (using docker)
docker pull minio/minio
Create container and start
docker run --name minio \
-p 9000:9000 \
-p 9090:9090 \
-d --restart=always \
-e "MINIO_ROOT_USER=admin" \
-e "MINIO_ROOT_PASSWORD=admin123" \
-v /usr/local/minio/data:/data \
-v /usr/local/minio/config:/root/.minio \
minio/minio server /data \
--console-address '0.0.0.0:9090'
Note that the console port should be set separately here, otherwise an error will be reported and cannot be accessed
In this installation mode, the MinIO custom Access and Secret keys should override the automatically generated keys of MinIO
Login client (browser): Note - > the port here is the port of the console you set: 9090
The user name and password here is the user name and password set when starting the service: admin admin123:
You can refer to the latest version of the official documentation for docker installation minio
Start MinIO
Save the following contents as * * / root/minio/run.sh * *, and put them in the same directory as the minio download file. And give it execution permission chmod u+x run.sh
#!/bin/bash
export MINIO_ACCESS_KEY=dhy
export MINIO_SECRET_KEY=123456
# The nohup startup service specifies the file storage path / root/data and sets the log file path / root / mini / log
nohup ./minio server /root/data/minio > /root/logs/minio/minio.log 2>&1 &

Open the fire port and provide external services
The default service port of minio is 9000, and the firewall port needs to be opened. The following command is the firewall port opening command of CentOS7:
firewall-cmd --zone=public --add-port=9000/tcp --permanent
firewall-cmd --reload
# Check whether it is open
firewall-cmd --query-port=9000/tcp
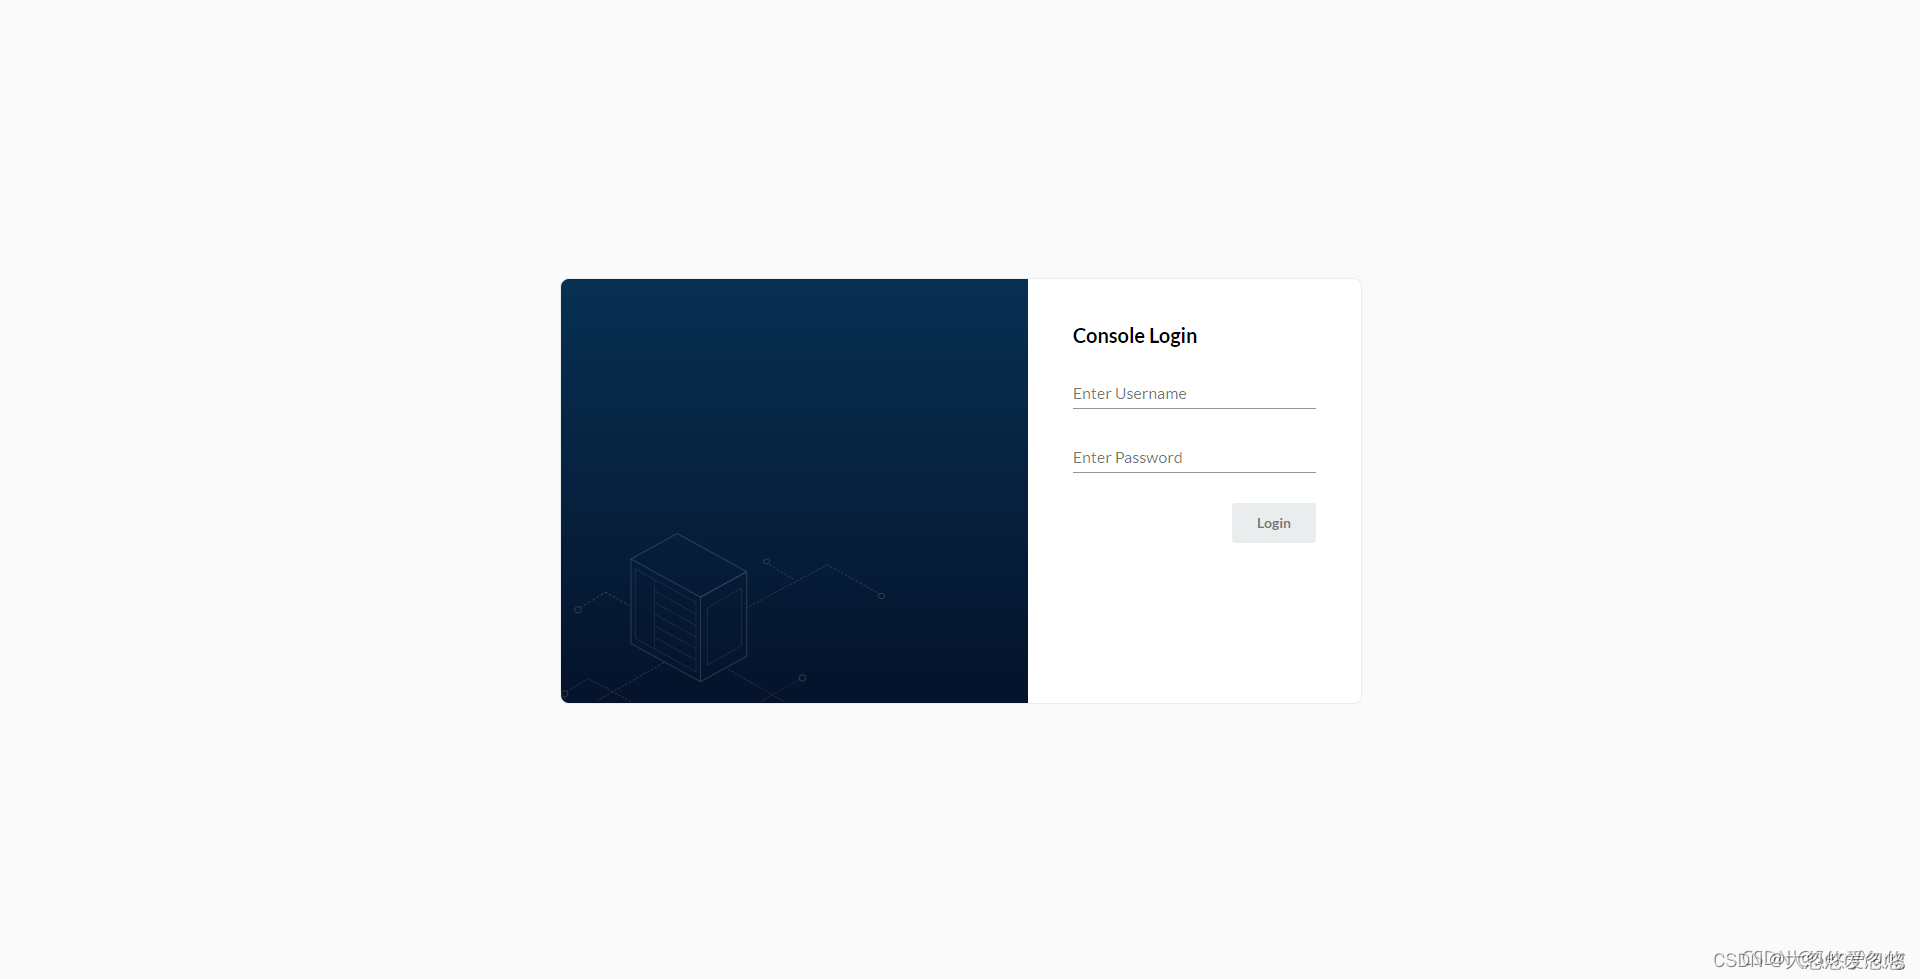
Log in at http: / / virtual machine ip:9000 /. The following figure shows the login interface of MinIO
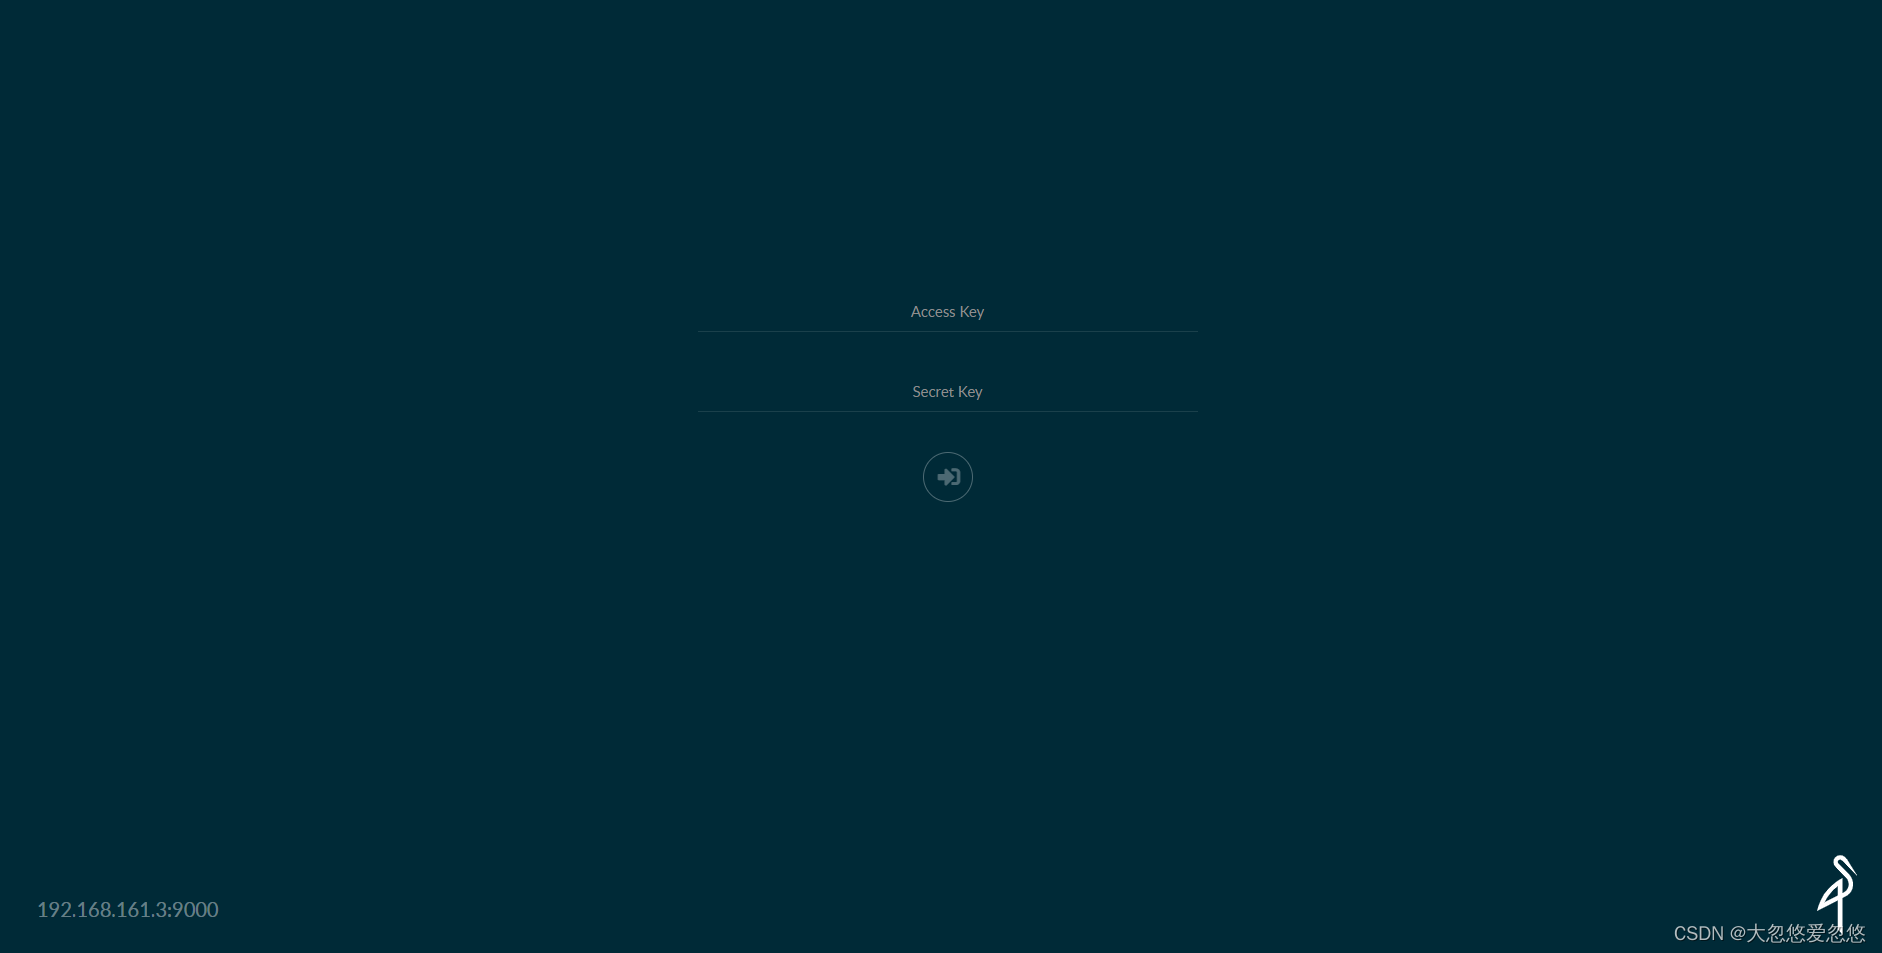
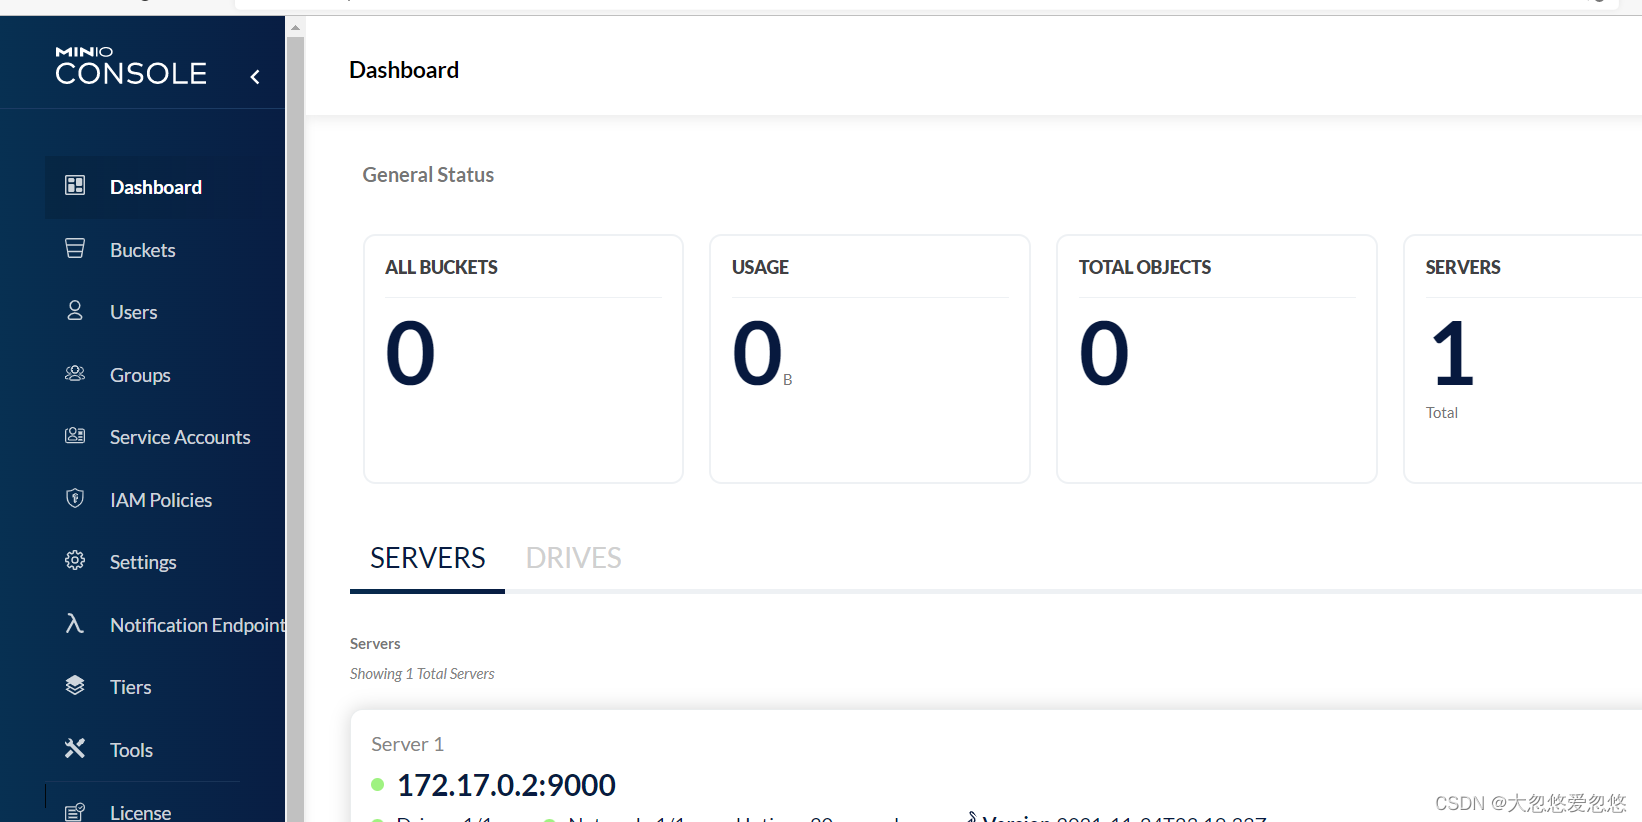
Login user name and password, using MINIO_ACCESS_KEY and mini_ SECRET_ Configuration value of key. Home page after successful login
Basic usage of MinIO system
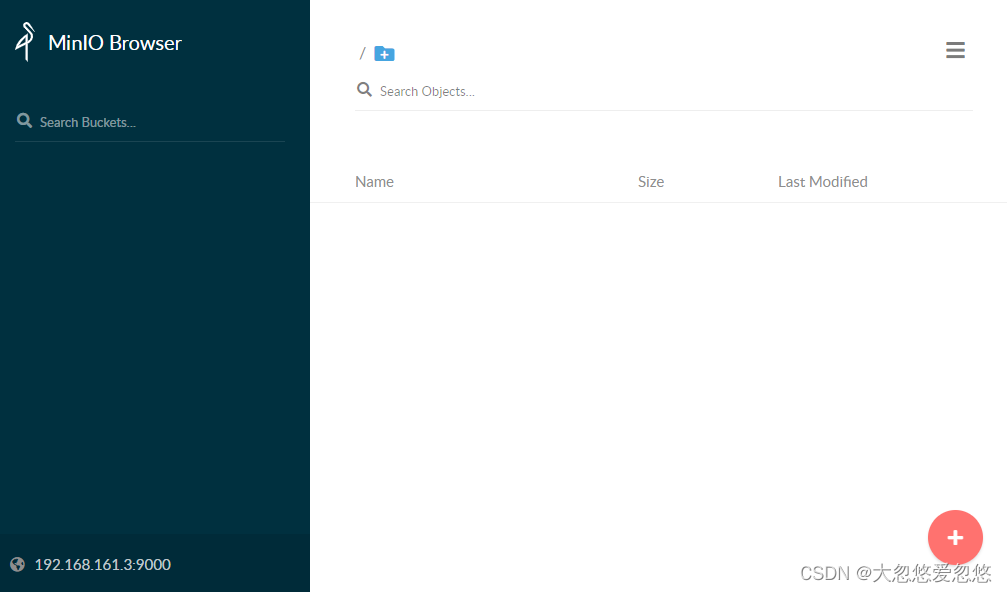
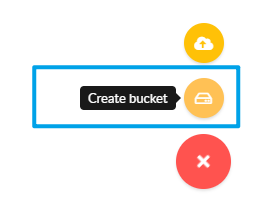
Create bucket
After logging in, click the "red plus sign" in the lower right corner of the browser to create a bucket to store objects. We need to know what a bucket is. To put it bluntly, it is the classification of uploaded object files
- You can create a bucket according to which system this image or other resource files belong to. For example, I create a boot launch bucket for the boot launch application
- You can also create buckets according to the type of resources, such as image, video and audio, which are stored in different buckets
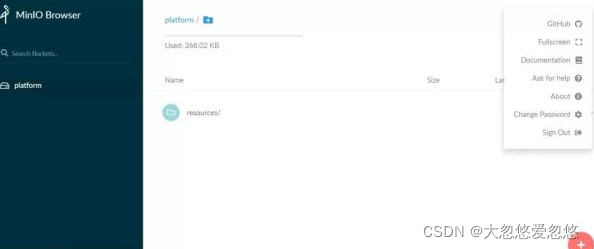
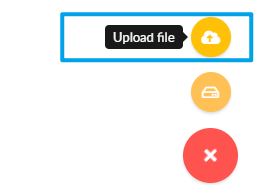
Upload resources
After the bucket is created, we can upload resource file objects to the bucket. Click the button in the figure below
For example, I uploaded a picture of png. After uploading, the display effect in the list is as follows:
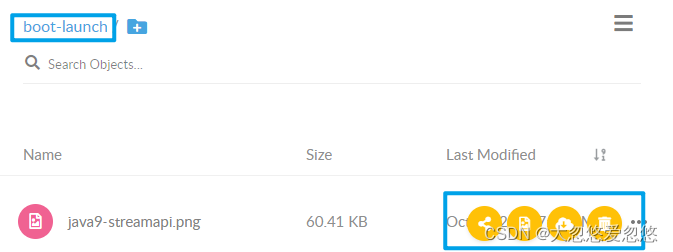
The four buttons behind resources are: resource sharing, preview, download and delete.
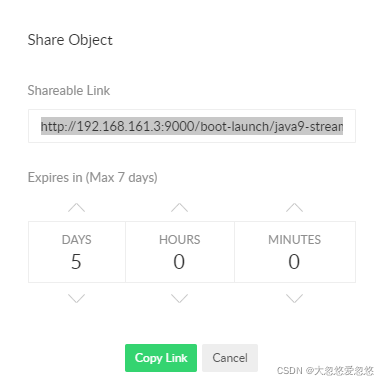
Resource sharing
The default policy of MinIO is that the effective time of shared address is up to 7 days. We can click Copy link to get the resource access link
Permanent resource sharing
The default policy of MinIO is that the effective time of the shared address is up to 7 days. To break this limit, you can set the policy in the bucket.
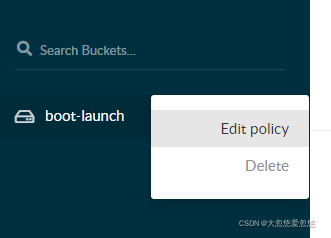
Click the corresponding bucket, edit policy, add policy *. *, Read Only, as follows:
In this way, access is relaxed and there is no time limit. At the same time, you can directly access resources in the format of http://{MINIO_HOST}:{MINIO_PORT}/{bucketName}/{fileName} (no sharing operation is required).
Reference static resources in html files
Through the above settings and operation, MinIO has been completed as a static resource server. You can write an html to reference the static resources in MinIO. The following is the test html. The pictures, videos and audio use the resource address of MinIO.
Format:
<img src="http://${minio_host}: ${minio_port} / image / test. JPG "ALT =" picture ">example:
<img src="http://192.168.161.3:9000 / boot launch / java9 streamapi. PNG "ALT =" picture ">
Java SDK integrating MinIO
Integrate MinIO
pom.xml import:
<dependency>
    <groupId>io.minio</groupId>
    <artifactId>minio</artifactId>
    <version>7.1.0</version>
</dependency>
application.yml, the service information should be consistent with the MinIO service installed in the previous section, so that we can test the connection normally:
# MinIo file server
minio:
  endpoint: http://Server ip:9000
  accessKey: dhy
  secretKey: 123456
MinIoProperties.java configures the entity and loads the properties of the above configuration file into the entity configuration object:
@Data
@ConfigurationProperties(prefix = "minio")
public class MinIOProperties {
    private String endpoint;
    private String accessKey;
    private String secretKey;
}
Write a tool class, which only demonstrates the basic API for you. For more APIs, please refer to the official documentation: https://docs.min.io/cn/java-client-api-reference.html
@Component
@Configuration
@EnableConfigurationProperties({MinIOProperties.class})
public class MinIOTemplate {

    private MinIOProperties minIo;

    public MinIOTemplate(MinIOProperties minIo) {
        this.minIo = minIo;
    }

    private MinioClient instance;

    @PostConstruct //minio operand instantiation
    public void init() {
        instance = MinioClient.builder()
                 .endpoint(minIo.getEndpoint())
                 .credentials(minIo.getAccessKey(), minIo.getSecretKey())
                 .build();
    }

    /**
     * Determine whether the bucket exists
     */
    public boolean bucketExists(String bucketName)
            throws IOException, InvalidKeyException, InvalidResponseException,
            InsufficientDataException, NoSuchAlgorithmException,
            ServerException, InternalException, XmlParserException,
            InvalidBucketNameException, ErrorResponseException {

            return instance.bucketExists(BucketExistsArgs.builder().bucket(bucketName).build());
    }

    /**
     * Create bucket
     */
    public void makeBucket(String bucketName) throws IOException, InvalidResponseException,
            InvalidKeyException, NoSuchAlgorithmException, ServerException,
            ErrorResponseException, XmlParserException, InvalidBucketNameException,
            InsufficientDataException, InternalException, RegionConflictException {

            boolean isExist = this.bucketExists(bucketName);
            if(!isExist) {
                instance.makeBucket(MakeBucketArgs.builder()
                                 .bucket(bucketName)
                                 .build());
            }
    }

    /**
     * File upload
     * @param bucketName  bucket name
     * @param objectName Object name, file name
     * @param filepath File path
     */
    public ObjectWriteResponse putObject(String bucketName, String objectName, String filepath)
            throws IOException, InvalidKeyException, InvalidResponseException,
            InsufficientDataException, NoSuchAlgorithmException, ServerException,
            InternalException, XmlParserException, InvalidBucketNameException, ErrorResponseException {

            return instance.uploadObject(
                         UploadObjectArgs.builder()
                             .bucket(bucketName)
                             .object(objectName)
                             .filename(filepath).build());
    }

    /**
     * File upload
     * @param bucketName bucket name
     * @param objectName Object name, file name
     * @param inputStream File input stream
     */
    public ObjectWriteResponse putObject(String bucketName, String objectName, InputStream inputStream)
            throws IOException, InvalidKeyException, InvalidResponseException,
            InsufficientDataException, NoSuchAlgorithmException, ServerException,
            InternalException, XmlParserException, InvalidBucketNameException, ErrorResponseException {

            return instance.putObject(
                         PutObjectArgs.builder()
                                 .bucket(bucketName)
                                 .object(objectName).stream(
                                 inputStream, -1, 10485760)
                                 .build());

    }

    /**
     * Delete file
     * @param bucketName  bucket name
     * @param objectName  Object name
     */
    public void removeObject(String bucketName, String objectName)
            throws IOException, InvalidKeyException, InvalidResponseException, InsufficientDataException,
            NoSuchAlgorithmException, ServerException, InternalException, XmlParserException,
            InvalidBucketNameException, ErrorResponseException {

            instance.removeObject(RemoveObjectArgs.builder()
                    .bucket(bucketName)
                    .object(objectName)
                    .build());

    }
}
test
@SpringBootTest
public class MinIOTest {

  @Resource
  MinIOTemplate minTemplate;

  //Test create bucket
  @Test
  void testCreateBucket() throws Exception {
    minTemplate.makeBucket("test");
  }

  //Test upload file object
  @Test
  void testPutObject() throws Exception {
    ObjectWriteResponse response = minTemplate.putObject("test",
            "base/dhy.png",
            "C:\\Users\\a\\Pictures\\dhy.png");
    System.out.println(response.object());
  }

  //Test delete file object
  @Test
  void testDeleteObject() throws Exception {
    minTemplate.removeObject("test",
            "base/dhy.png");
  }
}
The first test case creates a bucket named test
The second test case uploads a picture file object "base/dhy.png"
The third test case deletes the image file object "base/dhy.png"
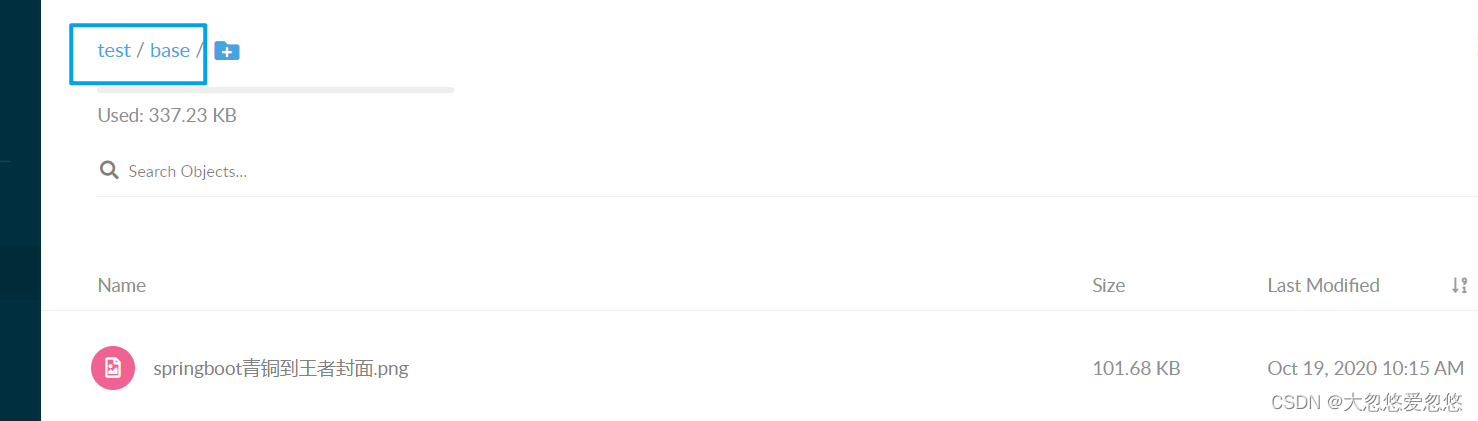
From the above figure, it should be noted that when the file object name contains the folder separator "/", the file directory will be automatically created. As shown in the above figure, the base directory is automatically created when uploading files.
- MinIO does not provide an API for creating file directories. File directories are created with file upload. objectName It can be / temp/xxx.jpg. It can be considered that the temp directory is automatically created.
- MinIO does not provide an API for deleting directories. Deleting all files in the file directory means that the file directory is deleted
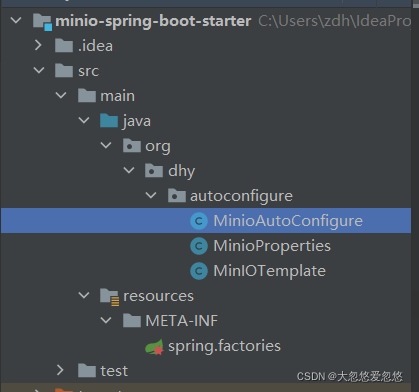
Customize a mini spring boot starter
pom.xml
<?xml version="1.0" encoding="UTF-8"?>
<project xmlns="http://maven.apache.org/POM/4.0.0"
         xmlns:xsi="http://www.w3.org/2001/XMLSchema-instance"
         xsi:schemaLocation="http://maven.apache.org/POM/4.0.0 http://maven.apache.org/xsd/maven-4.0.0.xsd">
    <modelVersion>4.0.0</modelVersion>

    <groupId>org.dhy</groupId>
    <artifactId>minio-spring-boot-starter</artifactId>
    <version>1.0-SNAPSHOT</version>

    <properties>
        <maven.compiler.source>8</maven.compiler.source>
        <maven.compiler.target>8</maven.compiler.target>
    </properties>


<!--    introduce spring boot Parent project-->
    <parent>
        <groupId>org.springframework.boot</groupId>
        <artifactId>spring-boot-starter-parent</artifactId>
        <version>2.0.4.RELEASE</version>
    </parent>

    <dependencies>
<!--        introduce Minio Dependence of -->
        <dependency>
            <groupId>io.minio</groupId>
            <artifactId>minio</artifactId>
            <version>7.1.0</version>
        </dependency>
        <!--        introduce lombok-->
        <dependency>
            <groupId>org.projectlombok</groupId>
            <artifactId>lombok</artifactId>
            <version>RELEASE</version>
            <scope>compile</scope>
        </dependency>
<!--    introduce springboot starter rely on    -->
        <dependency>
            <groupId>org.springframework.boot</groupId>
            <artifactId>spring-boot-starter</artifactId>
        </dependency>
<!--Bind the property values in the configuration class and the corresponding configuration file,Idea There are hints-->
        <dependency>
            <groupId>org.springframework.boot</groupId>
            <artifactId>spring-boot-configuration-processor</artifactId>
            <optional>true</optional>
        </dependency>

    </dependencies>

</project>
Configuration class
@Data
@ConfigurationProperties(prefix = "minio")
public class MinioProperties
{
    private String endpoint;//minio server address, not client address
    private String accessKey;//user name
    private String secretKey;//password
}
minio template class
public class MinIOTemplate {

    private MinioProperties minIo;

    public MinIOTemplate(MinioProperties minIo) {
        this.minIo = minIo;
    }

    private MinioClient instance;

    //Constructor >> @Autowired >> @PostConstruct
    @PostConstruct //minio operand instantiation
    public void init() {
        instance = MinioClient.builder()
                 .endpoint(minIo.getEndpoint())
                 .credentials(minIo.getAccessKey(), minIo.getSecretKey())
                 .build();
    }

    /**
     * Determine whether the bucket exists
     */
    public boolean bucketExists(String bucketName)
            throws IOException, InvalidKeyException, InvalidResponseException,
            InsufficientDataException, NoSuchAlgorithmException,
            ServerException, InternalException, XmlParserException,
            InvalidBucketNameException, ErrorResponseException {

            return instance.bucketExists(BucketExistsArgs.builder().bucket(bucketName).build());
    }

    /**
     * Create bucket
     */
    public void makeBucket(String bucketName) throws IOException, InvalidResponseException,
            InvalidKeyException, NoSuchAlgorithmException, ServerException,
            ErrorResponseException, XmlParserException, InvalidBucketNameException,
            InsufficientDataException, InternalException, RegionConflictException {

            boolean isExist = this.bucketExists(bucketName);
            if(!isExist) {
                instance.makeBucket(MakeBucketArgs.builder()
                                 .bucket(bucketName)
                                 .build());
            }
    }

    /**
     * File upload
     * @param bucketName  bucket name
     * @param objectName Object name, file name
     * @param filepath File path
     */
    public ObjectWriteResponse putObject(String bucketName, String objectName, String filepath)
            throws IOException, InvalidKeyException, InvalidResponseException,
            InsufficientDataException, NoSuchAlgorithmException, ServerException,
            InternalException, XmlParserException, InvalidBucketNameException, ErrorResponseException {

            return instance.uploadObject(
                         UploadObjectArgs.builder()
                             .bucket(bucketName)
                             .object(objectName)
                             .filename(filepath).build());
    }

    /**
     * File upload
     * @param bucketName  bucket name
     * @param objectName Object name, file name
     * @param filepath File path
     * @param contentType File type -- > video / MP4
     */
    public ObjectWriteResponse putObject(String bucketName, String objectName, String filepath,String contentType)
            throws IOException, InvalidKeyException, InvalidResponseException,
            InsufficientDataException, NoSuchAlgorithmException, ServerException,
            InternalException, XmlParserException, InvalidBucketNameException, ErrorResponseException {

        return instance.uploadObject(
                UploadObjectArgs.builder()
                        .bucket(bucketName)
                        .object(objectName)
                        .filename(filepath)
                        .contentType(contentType)
                        .build());
    }


    /**
     * File upload
     * @param bucketName bucket name
     * @param objectName Object name, file name
     * @param inputStream File input stream
     */
    public ObjectWriteResponse putObject(String bucketName, String objectName, InputStream inputStream)
            throws IOException, InvalidKeyException, InvalidResponseException,
            InsufficientDataException, NoSuchAlgorithmException, ServerException,
            InternalException, XmlParserException, InvalidBucketNameException, ErrorResponseException {

            return instance.putObject(
                         PutObjectArgs.builder()
                                 .bucket(bucketName)
                                 .object(objectName).stream(
                                 inputStream, -1, 10485760)
                                 .build());

    }

    /**
     * Delete file
     * @param bucketName  bucket name
     * @param objectName  Object name
     */
    public void removeObject(String bucketName, String objectName)
            throws IOException, InvalidKeyException, InvalidResponseException, InsufficientDataException,
            NoSuchAlgorithmException, ServerException, InternalException, XmlParserException,
            InvalidBucketNameException, ErrorResponseException {

            instance.removeObject(RemoveObjectArgs.builder()
                    .bucket(bucketName)
                    .object(objectName)
                    .build());

    }
}
minio auto assembly class
//minio auto assembly class
@Configuration
//@EnableConfigurationProperties is equivalent to injecting classes that use @ ConfigurationProperties.
@EnableConfigurationProperties({MinioProperties.class})
//The current configuration class takes effect only when there is no bean of MinioAutoConfigure type
@ConditionalOnMissingBean(type ="org.dhy.autoconfigure")
public class MinioAutoConfigure
{
    private final MinioProperties minIo;

    @Autowired
    public MinioAutoConfigure(MinioProperties minIo)
    {
        this.minIo=minIo;
    }

    @Bean
    @ConditionalOnMissingBean
    public MinIOTemplate minIOTemplate()
    {
        return new MinIOTemplate(minIo);
    }

}
spring.factories
org.springframework.boot.autoconfigure.EnableAutoConfiguration=\
org.dhy.autoconfigure.MinioAutoConfigure
gitee warehouse address
https://gitee.com/DaHuYuXiXi/mini
Introduction and architecture description of fastdfs
brief introduction
- FastDFS is a lightweight open source distributed file system.
- FastDFS mainly solves the problems of large-capacity file storage and high concurrent access, and realizes load balancing during file access.
- FastDFS implements software RAID and can use cheap IDE hard disk for storage
- Support online capacity expansion of storage server
- Only one file with the same content is saved to save disk space
- FastDFS is especially suitable for large and medium-sized websites to store resource files (such as pictures, documents, audio, video, etc.)
Architecture description
- Tracker: manages clusters. Trackers can also implement clusters. Each tracker node has equal status. Collect the status of Storage clusters.
- Storage: the actual saved file storage is divided into multiple groups, and the saved files are different between each group. Each group can have multiple members,
The internal contents of group members are the same, the status of group members is the same, and there is no concept of master-slave.

Description nginx + fileid (file path), http access
Benefits:
- Decoupling file management from specific business applications, multiple applications can share a set of fastDFS clusters and be divided into different groups
- For image access, you only need to give the HTTP URL to the browser. nginx provides access services.
- It is convenient for unified backup. Multiple storage in a group is the backup of each other
- The pressure of image browsing and file downloading can be distributed to nginx services. The application can concentrate on business.
- Thumbnails, anti-theft chains, etc
Installing fastdfs using docker
install
Pull image
# docker pull delron/fastdfs
Using default tag: latest
latest: Pulling from delron/fastdfs
43db9dbdcb30: Pull complete
85a9cd1fcca2: Pull complete
c23af8496102: Pull complete
e88c36ca55d8: Pull complete
492fed9ec7f3: Pull complete
0c1d41dbb2bd: Pull complete
99b513124929: Pull complete
bf3f5901a13d: Pull complete
88bf4f57c2c5: Pull complete
Digest: sha256:f3fb622783acee7918b53f8a76c655017917631c52780bebb556d29290955b13
Status: Downloaded newer image for delron/fastdfs
Create a native storage directory
rm -fR /home/docker/fastdfs/{tracker,storage}
mkdir /home/docker/fastdfs/{tracker,storage}  -p
Start tracker
docker run -d \
--network=host \
--name tracker \
-v /home/docker/fastdfs/tracker:/var/fdfs \
delron/fastdfs tracker
Start storage
docker run -d \
--network=host \
--name storage \
-e TRACKER_SERVER=192.168.161.3:22122 \
-v /home/docker/fastdfs/storage:/var/fdfs \
-e GROUP_NAME=group1  \
delron/fastdfs storage
Open the firewall port of the host. The port configured for nginx during the construction of morunchang/fastdfs image is 8888
firewall-cmd --zone=public --add-port=22122/tcp --permanent
firewall-cmd --zone=public --add-port=23000/tcp --permanent
firewall-cmd --zone=public --add-port=8888/tcp --permanent
firewall-cmd --reload
# Check whether it is open
firewall-cmd --query-port=22122/tcp
firewall-cmd --query-port=23000/tcp
firewall-cmd --query-port=8888/tcp
Test the installation results
The FastDFS installation package comes with a client program. You can use this command-line client to upload and download files.
Execute command on host
3.1 upload files (files in containers)
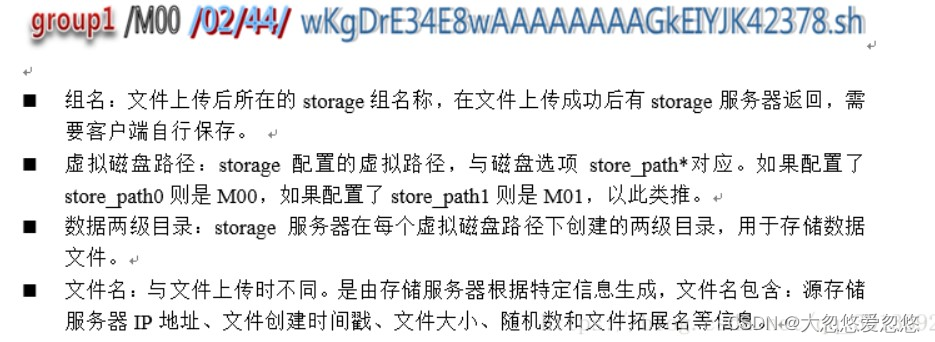
# docker exec -i storage /usr/bin/fdfs_upload_file /etc/fdfs/client.conf ./README
group1/M00/00/00/wKgBW10lZHCAC8TaAAAAMT6WPfM3645854
3.2 viewing fastdfs file system information
# docker exec -i storage fdfs_file_info /etc/fdfs/client.conf group1/M00/00/00/wKgBW10lZHCAC8TaAAAAMT6WPfM3645854
source storage id: 0
source ip address: 192.168.1.91
file create timestamp: 2019-07-10 04:07:12
file size: 49
file crc32: 1050033651 (0x3E963DF3)
3.3 when downloading files, they will not be downloaded to the host computer. Go to the container to see them
# docker exec -i storage fdfs_download_file /etc/fdfs/client.conf group1/M00/00/00/wKgBW10lZHCAC8TaAAAAMT6WPfM3645854
3.4 viewing cluster status
# docker exec -i storage fdfs_monitor /etc/fdfs/storage.conf
Develop a custom fastdfs starter
Main functions
- Realize the automatic assembly of FastDFSClientUtil and properties (i.e. how to develop a custom spring boot starter)
- Join connection thread pool management (non key)
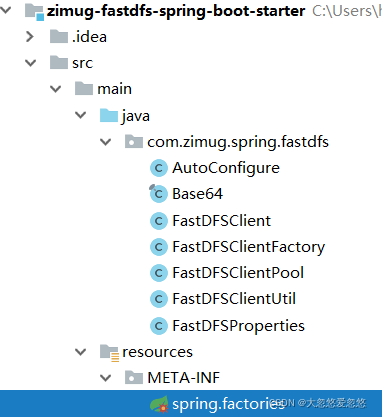
Realize the automatic assembly of FastDFSClientUtil and properties
In fact, you need to implement a starter yourself
1. Step 1: maven dependency
<?xml version="1.0" encoding="UTF-8"?>

<project xmlns="http://maven.apache.org/POM/4.0.0" xmlns:xsi="http://www.w3.org/2001/XMLSchema-instance"
  xsi:schemaLocation="http://maven.apache.org/POM/4.0.0 http://maven.apache.org/xsd/maven-4.0.0.xsd">
  <modelVersion>4.0.0</modelVersion>

  <groupId>com.dhy.spring</groupId>
  <artifactId>dhy-fastdfs-spring-boot-starter</artifactId>
  <version>1.0.0</version>

  <properties>
    <project.build.sourceEncoding>UTF-8</project.build.sourceEncoding>
    <maven.compiler.source>1.8</maven.compiler.source>
    <maven.compiler.target>1.8</maven.compiler.target>
  </properties>

  <parent>
    <groupId>org.springframework.boot</groupId>
    <artifactId>spring-boot-starter-parent</artifactId>
    <version>2.0.4.RELEASE</version>
  </parent>


  <dependencies>

    <dependency>
      <groupId>org.springframework.boot</groupId>
      <artifactId>spring-boot-configuration-processor</artifactId>
      <optional>true</optional>
    </dependency>

    <dependency>
      <groupId>org.springframework.boot</groupId>
      <artifactId>spring-boot-autoconfigure</artifactId>
    </dependency>


   <dependency>
      <groupId>net.oschina.zcx7878</groupId>
      <artifactId>fastdfs-client-java</artifactId>
      <version>1.27.0.0</version>
    </dependency>

    <dependency>
      <groupId>org.apache.commons</groupId>
      <artifactId>commons-pool2</artifactId>
      <version>2.0</version>
    </dependency>

  </dependencies>
</project>
Note that the function of spring boot configuration processor is to generate spring-configuration-metadata.json during compilation. This file is mainly used by IDE for prompt.
For example, in intellij idea, when the configuration attribute related to this jar is in application.yml, you can use ctlr + left mouse button, and the IDE will jump to the class where you configure this attribute.
Fastdfs client Java and Commons pool2 don't worry about them. They both implement fastdfs function and connection pool, which has nothing to do with automatic assembly
2. Step 2: fastdfs attribute class
@ConfigurationProperties(prefix = "dhy.fastdfs")
public class FastDFSProperties {

    private Integer connect_timeout = 5;
    private Integer network_timeout = 30;
    private String charset = "UTF-8";
    private List<String> tracker_server = new ArrayList<>();
    private Integer max_total;
    private Boolean http_anti_steal_token = false;
    private String http_secret_key = "";
    private Integer http_tracker_http_port = 8987;
    //The following is not actually a fastdfs attribute. To facilitate practical use, the user-defined attribute represents the http address of nginx
    private String httpserver;

    public Integer getHttp_tracker_http_port() {
        return http_tracker_http_port;
    }

    public void setHttp_tracker_http_port(Integer http_tracker_http_port) {
        this.http_tracker_http_port = http_tracker_http_port;
    }

    public Boolean getHttp_anti_steal_token() {
        return http_anti_steal_token;
    }

    public void setHttp_anti_steal_token(Boolean http_anti_steal_token) {
        this.http_anti_steal_token = http_anti_steal_token;
    }

    public String getHttp_secret_key() {
        return http_secret_key;
    }

    public void setHttp_secret_key(String http_secret_key) {
        this.http_secret_key = http_secret_key;
    }

    public Integer getMax_total() {
        return max_total;
    }

    public void setMax_total(Integer max_total) {
        this.max_total = max_total;
    }

    public String getHttpserver() {
        return httpserver;
    }

    public void setHttpserver(String httpserver) {
        this.httpserver = httpserver;
    }

    public List<String> getTracker_server() {
        return tracker_server;
    }

    public void setTracker_server(List<String> tracker_server) {
        this.tracker_server = tracker_server;
    }

    public Integer getConnect_timeout() {
        return connect_timeout;
    }

    public void setConnect_timeout(Integer connect_timeout) {
        this.connect_timeout = connect_timeout;
    }

    public Integer getNetwork_timeout() {
        return network_timeout;
    }

    public void setNetwork_timeout(Integer network_timeout) {
        this.network_timeout = network_timeout;
    }

    public String getCharset() {
        return charset;
    }

    public void setCharset(String charset) {
        this.charset = charset;
    }
}
Step 3: automatic assembly configuration class
/**
 * To achieve the ultimate goal, FastDFSClientUtil is automatically injected into Spring for external use
* Usage: @ Resource, @ Autowired
 */
@Configuration
//Only when there are these three classes under the classpath can automatic assembly be performed
@ConditionalOnClass(value = {FastDFSClientFactory.class,FastDFSClientPool.class,FastDFSClientUtil.class,})
//@EnableConfigurationProperties is equivalent to injecting classes that use @ ConfigurationProperties.
@EnableConfigurationProperties(FastDFSProperties.class)
public class FastDFSAutoConfigure {

    private final FastDFSProperties properties;

    @Autowired
    public AutoConfigure(FastDFSProperties properties) {
        this.properties = properties;
    }

    @Bean
    @ConditionalOnMissingBean //When there is no FastDFSClientUtil, the FastDFSClientUtil is injected into Spring as a Bean
    FastDFSClientUtil fastDFSClientUtil (){
        return new FastDFSClientUtil(properties);
    }

}
The last step is to create a spring.factories file under resources/META-INF /. The contents are as follows:
org.springframework.boot.autoconfigure.EnableAutoConfiguration=\
com.dhy.spring.fastdfs.AutoConfigure
If there are multiple autoconfiguration classes, use commas to separate line breaks
Test the results of automatic assembly
application.yml
dhy:
fastdfs:
  httpserver: http://192.168.1.91:80/
  connect_timeout: 5
  network_timeout: 30
  charset: UTF-8
  tracker_server:
    - 192.168.1.91:22122
  max_total: 50
  http_anti_steal_token:false
  http_secret_key:
Summarize how Starter works:
Spring Boot Scan items on startup JAR Package, looking for containing spring.factories Document JAR package
 according to spring.factories Configuration loading AutoConfigure class
 according to @Conditional The condition of annotation is automatically configured and Bean injection Spring Context
Consolidate fastdfs operation file data
Integrating fastdfs
Introducing maven dependent coordinates
git clone after this project, install locally and import
     <dependency>
            <groupId>com.dhy.spring</groupId>
            <artifactId>dhy-fastdfs-spring-boot-starter</artifactId>
            <version>1.0.0</version>
        </dependency>
Add the following configuration in application.yml:
dhy:
  fastdfs:
    httpserver: http://192.168.161.3:8888 / # this is not fastdfs attribute, but after filling in, you will get the complete http file access path when using FastDFSClientUtil
    connect_timeout: 5
    network_timeout: 30
    charset: UTF-8
    tracker_server: # The tracker_server can be configured as an array
      - 192.168.161.3:22122
    max_total: 50
    http_anti_steal_token: false # If there is an anti-theft chain, this is true
    http_secret_key: # There is an anti-theft chain. Fill in secret_key here
Mode of use
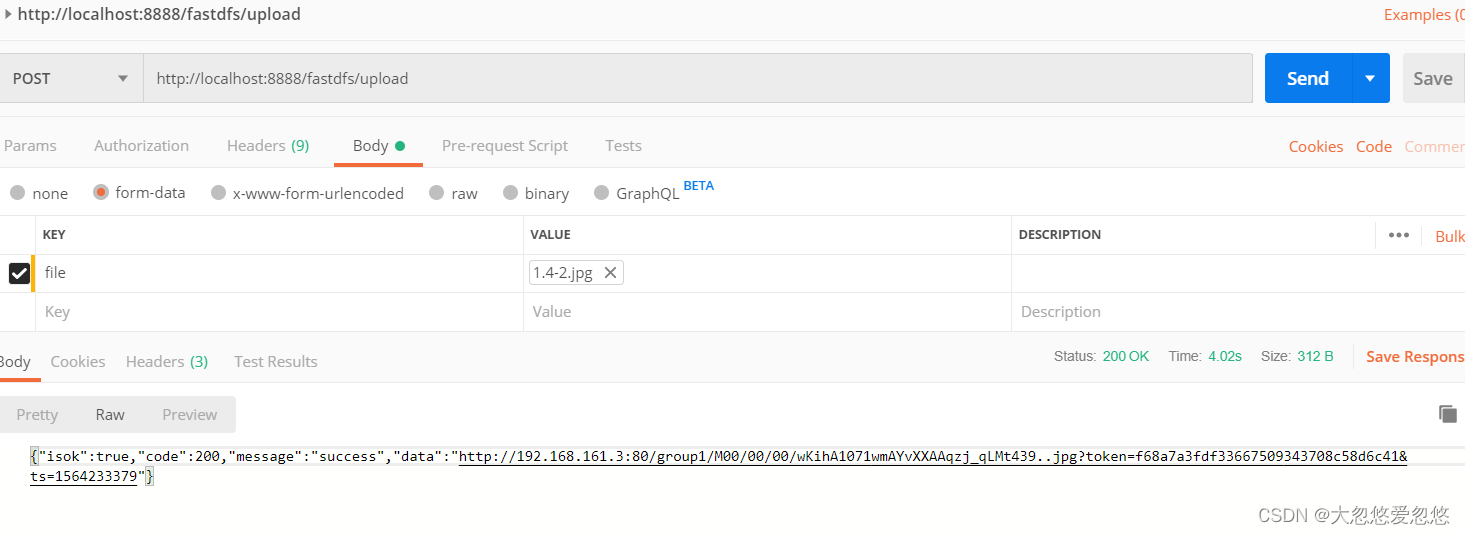
 // Upload, download and delete using the methods provided by fastDFSClientUtil
    @Resource
    FastDFSClientUtil fastDFSClientUtil;
Test it
@Controller
@RequestMapping("fastdfs")
public class FastdfsController {

    @Resource
    private FastDFSClientUtil fastDFSClientUtil;

    @PostMapping("/upload")
    @ResponseBody
    public AjaxResponse upload(@RequestParam("file") MultipartFile file) {

        String fileId;
        try {
            String originalfileName = file.getOriginalFilename();
            fileId = fastDFSClientUtil.uploadFile(file.getBytes(),originalfileName.substring(originalfileName.lastIndexOf(".")));
            return AjaxResponse.success(fastDFSClientUtil.getSourceUrl(fileId));
        } catch (Exception e) {
            throw new CustomException(CustomExceptionType.SYSTEM_ERROR,"File upload to image server failed");
        }
    }


    @DeleteMapping("/delete")
    @ResponseBody
    public AjaxResponse upload(@RequestParam String fileid) {
        try {
            fastDFSClientUtil.delete(fileid);
        } catch (Exception e) {
            throw new CustomException(CustomExceptionType.SYSTEM_ERROR,"File deletion failed");
        }
       return  AjaxResponse.success();
    }


}
postman file upload configuration: