In the previous document, mysql master-slave databases were deployed through docker:
Deploy mysql master-slave architecture in docker mode_ Repair Baron's blog - CSDN blog
This paper introduces how to connect and use mysql master-slave database in java code to realize the separation of reading and writing.
| mybatis-plus | Persistence layer framework |
|---|---|
| sharding-jdbc | shardingsphere, one of the three core suites, is positioned as a plug-in used on the client. It can realize the functions of reading and writing separation, database and table. |
Introduction to shardingsphere
The three core suites of shardingsphere are: sharding JDBC, sharding proxy and sharding sidecar
At present, sharding JDBC and sharding proxy are more important. Sharding JDBC is used more.
Sharding JDBC: it is a plug-in that provides services in the form of jar package, so it can be used directly after being introduced by the client.
Basic principle: it will rewrite your SQL, then request the database and merge the results, so as to realize the functions of separation of reading and writing, database and table. The text uses {sharding JDBC.
Sharding proxy: positioned as a middleware. It can be understood that it is disguised as a MySQL database. When the client uses it, it does not connect to the actual mysql, but instead to the sharding proxy. The implementation of read-write separation and database and table separation is left to sharding proxy, which does not need to be paid attention to in the client code. It needs to be deployed separately.
Introducing maven dependency
<!-- mysql-connector -->
<dependency>
	<groupId>mysql</groupId>
	<artifactId>mysql-connector-java</artifactId>
	<version>8.0.22</version>
</dependency>
<!-- mybatis-plus -->
<dependency>
	<groupId>com.baomidou</groupId>
	<artifactId>mybatis-plus-boot-starter</artifactId>
	<version>3.4.1</version>
</dependency>
<!-- sharding-jdbc -->
<dependency>
	<groupId>org.apache.shardingsphere</groupId>
	<artifactId>sharding-jdbc-spring-boot-starter</artifactId>
	<version>4.1.1</version>
</dependency>
Among them, springboot uses 2.5 X version.
Configure master-slave data sources
The more important thing of read-write separation is the configuration of master-slave data sources, which can be easily realized through shardingsphere:
spring:
  shardingsphere:
    # Data source configuration
    datasource:
      names: master,slave
      master:
        type: com.zaxxer.hikari.HikariDataSource
        driver-class-name: com.mysql.cj.jdbc.Driver
        jdbc-url: jdbc:mysql://127.0.0.1:3311/test?useUnicode=true&serverTimezone=Asia/Shanghai&characterEncoding=UTF-8
        username: root
        password: 123456
      slave:
        type: com.zaxxer.hikari.HikariDataSource
        driver-class-name: com.mysql.cj.jdbc.Driver
        jdbc-url: jdbc:mysql://127.0.0.1:3312/test?useUnicode=true&serverTimezone=Asia/Shanghai&characterEncoding=UTF-8
        username: root
        password: 123456
    # Set master-slave polling policy
    masterslave:
      name: masterslave
      load-balance-algorithm-type: round_robin
      master-data-source-name: master
      slave-data-source-names: slave
    # Print SQL
    props:
      sql:
        show: true
Well, it's actually over here. You can start using it. It's quite simple!
Note: the data source name here should not be marked with strange symbols (for example, the middle line is not OK), otherwise it will not be resolved!
Test read write separation
1) Write Mapper
Don't talk about creating tables and writing entity classes. Paste Mapper code. Because mybatis plus is used, there is no need to write any code. It is empty:
@Mapper
@Repository
public interface ItemMapper extends BaseMapper<Item> {

}
2) Test read data
@Test
void get() {
	Item item = itemMapper.selectById(1);
	System.out.println(JSON.toJSONString(item));
}
The result is obvious. The slave library is used:

3) Test write data
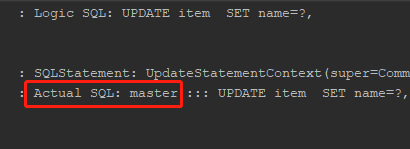
@Test
void update() {
	Item item = new Item();
	item.setId(3);
	item.setName("Springboot Source code");
	item.setUnitPrice(54);
	item.setStock(31);
	itemMapper.updateById(item);
}
The result is also obvious. The master library is used:
Of course, the master library will also be used for insert and delete operations.