Summary
RecyclerView, which provides a plug-in experience, highly decoupled, exceptionally flexible, achieves various effects by setting up its different Layout Manager, ItemDecoration, and ItemAnimator
- To control its display, use Layout Manager, the layout manager
- To control the interval between Items (plottable), use ItemDecoration
- To control the addition and deletion of Item animation, please use Item Animator
- Want to control clicks, press events, and write it yourself
Basic use
public class MainActivity extends AppCompatActivity {
    RecyclerView recyclerView;
    MyAdapter adapter;
    List<String> data;

    @Override
    protected void onCreate(Bundle savedInstanceState) {
        super.onCreate(savedInstanceState);
        setContentView(R.layout.activity_main);
        init();
        recyclerView = (RecyclerView)findViewById(R.id.recycler);
        adapter = new MyAdapter(data,this);
        recyclerView.setLayoutManager(new LinearLayoutManager(this));
        //Setting up Layout Manager
        recyclerView.setAdapter(adapter);
        //Setting up the adapter
    }

    private  void init(){
        data = new ArrayList<>();
        for (int i = 'A'; i < 'z'; i++)
        {
            data.add("" + (char) i);
        }
    }

}


public class MyAdapter extends RecyclerView.Adapter<MyAdapter.myHolder> {
    List<String> data ;
    Context context;
    public MyAdapter(List<String> data, Context context) {
        this.data =data;
        this.context = context;

    }

    @Override
    public void onBindViewHolder(myHolder holder, int position) {
            holder.textView.setText(data.get(position));
        Log.d("onBind","aaaaaaaaaaa");
    }

    @Override
    public int getItemCount() {
        return data.size();
    }

    @Override
    public myHolder onCreateViewHolder(ViewGroup parent, int viewType) {
        myHolder holder = new myHolder(LayoutInflater.from(context).
                inflate(R.layout.recycleritem,parent,false));
        Log.d("onCreate","bbbbbbbbb");
        return holder;

    }

    class  myHolder extends RecyclerView.ViewHolder{
        TextView textView;
        public myHolder(View itemView) {
            super(itemView);
            textView = (TextView) itemView.findViewById(R.id.text);
        }
    }

}
The first time item is created, onCreateViewHolder is called first and onBindViewHolder is called again. In sliding, onBingViewHolder is always called as long as it is not created again.
With regard to other:
mRecyclerView = findView(R.id.id_recyclerview);
//Setting up Layout Manager
mRecyclerView.setLayoutManager(layout);
//Setting up adapter
mRecyclerView.setAdapter(adapter)
//Set Item to add and remove animations
mRecyclerView.setItemAnimator(new DefaultItemAnimator());
//Adding partition lines
mRecyclerView.addItemDecoration(new DividerItemDecoration(
                getActivity(), DividerItemDecoration.HORIZONTAL_LIST));
See the effect of the above example: 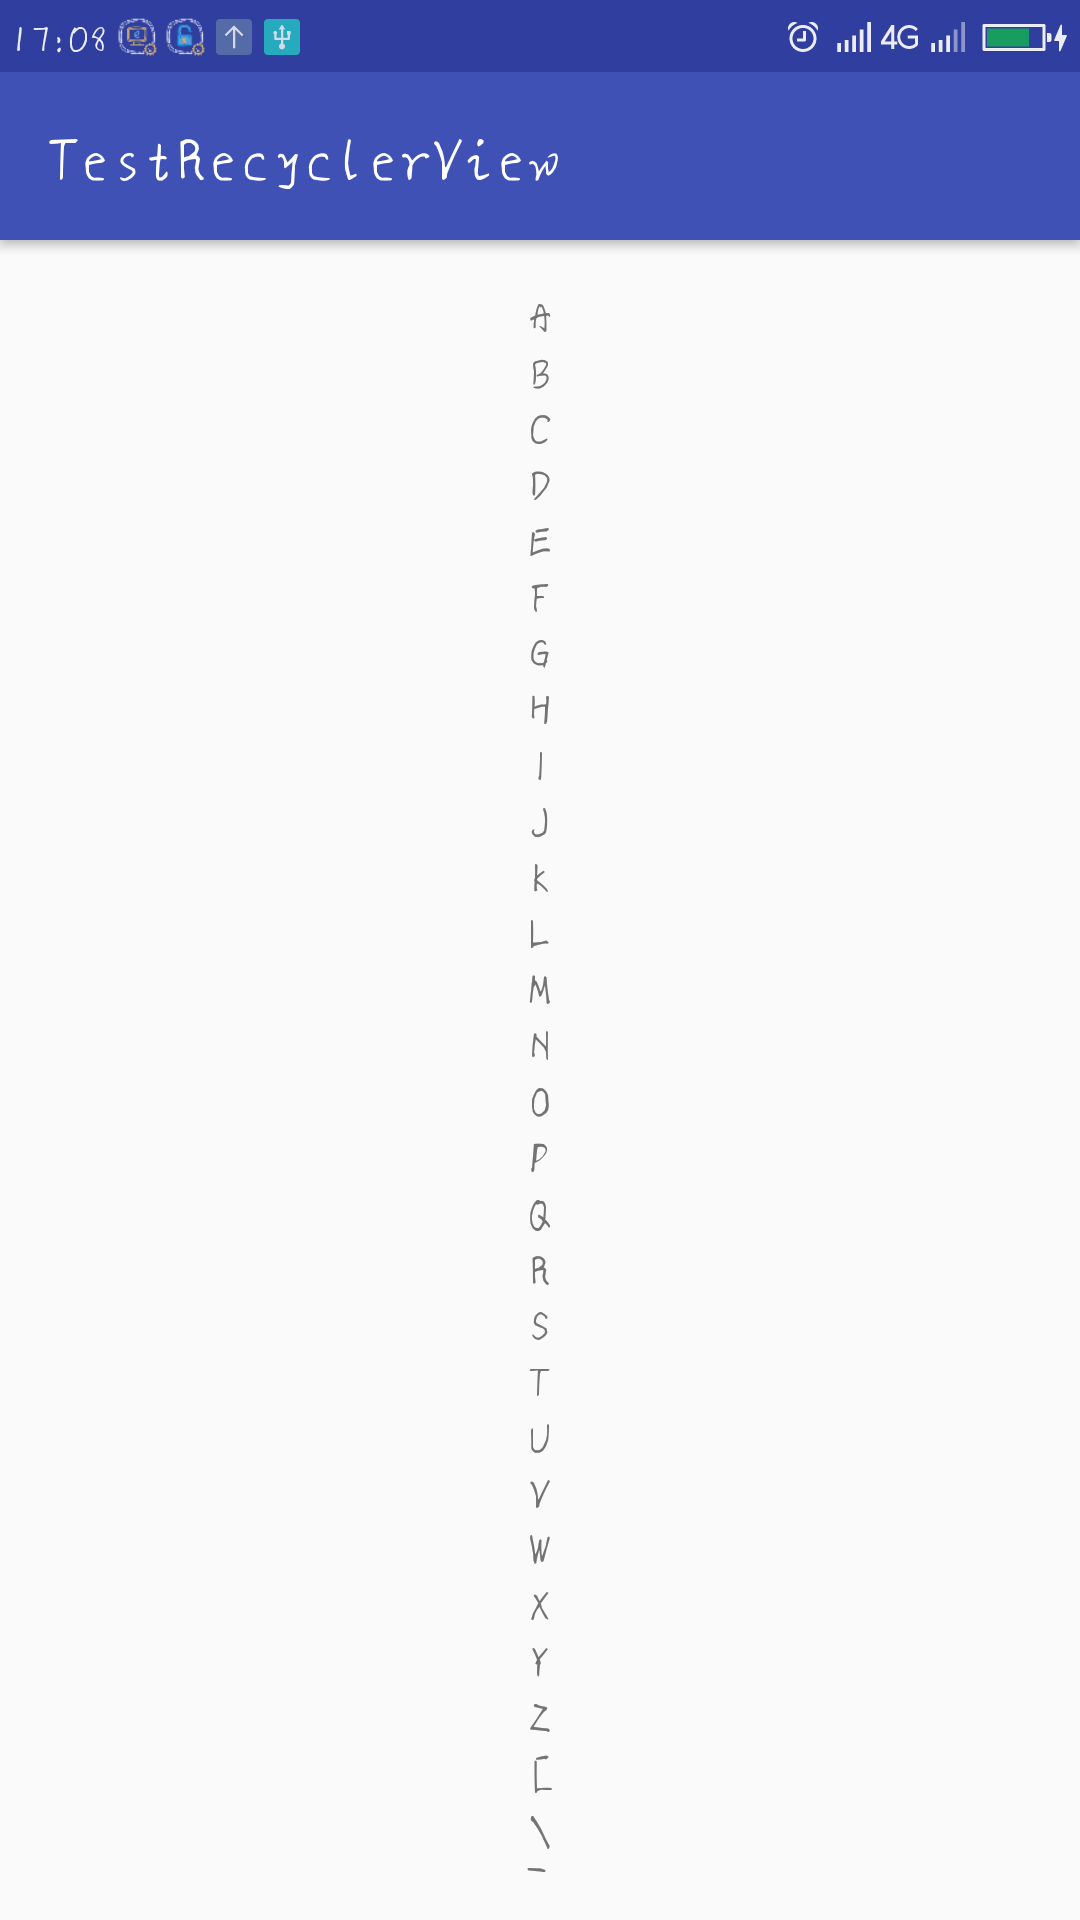
It's ugly to feel that there should be a dividing line between item s, but RecyclerView doesn't support such attributes as divider.
We can add splitters by adding mRecyclerView.addItemDecoration().
The parameter of this method is RecyclerView.ItemDecoration, which is an abstract class. At present, there is no official default implementation class.
This kind of source code:
public static abstract class ItemDecoration {

public void onDraw(Canvas c, RecyclerView parent, State state) {
            onDraw(c, parent);
 }


public void onDrawOver(Canvas c, RecyclerView parent, State state) {
            onDrawOver(c, parent);
 }

public void getItemOffsets(Rect outRect, View view, RecyclerView parent, State state) {
            getItemOffsets(outRect, ((LayoutParams) view.getLayoutParams()).getViewLayoutPosition(),
                    parent);
}

@Deprecated
public void getItemOffsets(Rect outRect, int itemPosition, RecyclerView parent) {
            outRect.set(0, 0, 0, 0);
 }
When we call the recyclerview.addItemDecoration () method to add decoration, Recycler draws decorator when it draws, i.e. calls the onDraw and onDrawOver methods of this class:
- The onDraw method precedes drawChildern
- After drawing Childern, we usually choose to copy one.
- getItemOffset can set a certain offset for each Item by outRect.set (), which mainly draws Decorator for users.
Here is an example:
public class DividerItemDecaration extends RecyclerView.ItemDecoration {

    private static final int[] ATTRS = new int[]{
            android.R.attr.listDivider
    };
    public  static  final  int HORIZONTAL_LIST = LinearLayoutManager.HORIZONTAL;
    public  static  final  int VERTICAL_LIST = LinearLayoutManager.VERTICAL;

    private Drawable divider;
    private int orientation;

    public DividerItemDecaration(Context context,int orientation) {
    //Take the default list divider property
        final TypedArray a = context.obtainStyledAttributes(ATTRS);
       //Get this property
        divider = a.getDrawable(0);
        a.recycle();
        setOrientation(orientation);

    }

    public void setOrientation(int orientation){
        if(orientation != HORIZONTAL_LIST && orientation != VERTICAL_LIST){
            throw  new IllegalArgumentException("invalid orientation");

        }

        this.orientation = orientation;
    }

    @Override
    public void onDraw(Canvas c, RecyclerView parent, RecyclerView.State state) {
        if(orientation == VERTICAL_LIST){
            drawVertical(c,parent);
        }else {
            drawHorizontal(c,parent);
        }

    }

    public void drawVertical(Canvas c,RecyclerView parent){
        final  int left = parent.getPaddingLeft();
        final  int riht  = parent.getWidth()-parent.getPaddingRight();

        final int childCount = parent.getChildCount();
        for(int i  = 0;i<childCount;i++){
            final View child = parent.getChildAt(i);

            final  RecyclerView.LayoutParams params = (RecyclerView.LayoutParams)
                                       child.getLayoutParams();
            final int top  = child.getBottom()+params.bottomMargin;
            final  int bottom = top +divider.getIntrinsicHeight();
            divider.setBounds(left,top,riht,bottom);
            divider.draw(c);

        }
    }

    public void drawHorizontal(Canvas c, RecyclerView parent) {
        final int top = parent.getPaddingTop();
        final int bottom = parent.getHeight() - parent.getPaddingBottom();

        final int childCount = parent.getChildCount();
        for (int i = 0; i < childCount; i++) {
            final View child = parent.getChildAt(i);
            final RecyclerView.LayoutParams params = (RecyclerView.LayoutParams) child
                    .getLayoutParams();
            final int left = child.getRight() + params.rightMargin;
            final int right = left + divider.getIntrinsicHeight();
            divider.setBounds(left, top, right, bottom);
            divider.draw(c);
        }
    }

    @Override
    public void getItemOffsets(Rect outRect, View view, RecyclerView parent, RecyclerView.State state) {
    //Is it upward or left?
        if(orientation == VERTICAL_LIST){
            outRect.set(0,0,0,divider.getIntrinsicHeight());
        }else {
            outRect.set(0,0,divider.getIntrinsicWidth(),0);
        }
    }
}
Effect: 
The implementation class reads Android.R.attr.listDivider in the system topic as a line of division between Item s, and supports both horizontal and vertical directions.
After getting the list divider, the value of this property is a Drawable, and in getItemOffsets, outRect sets the drawing range. Drawing is implemented in onDraw
Then add in the original code:
mRecyclerView.addItemDecoration(new DividerItemDecoration(this,
DividerItemDecoration.VERTICAL_LIST));
The partition line is the default of the system. We can find the use of this property in theme.xml and change it.
<resources>

    <!-- Base application theme. -->
    <style name="AppTheme" parent="Theme.AppCompat.Light.DarkActionBar">
        <!-- Customize your theme here. -->
        <item name="colorPrimary">@color/colorPrimary</item>
        <item name="colorPrimaryDark">@color/colorPrimaryDark</item>
        <item name="colorAccent">@color/colorAccent</item>
        <item name="android:listDivider">@drawable/divider</item>
    </style>

</resources>
Find an item in style called android: list Divider
Then write a drawable for yourself
<?xml version="1.0" encoding="utf-8"?>
<shape xmlns:android="http://schemas.android.com/apk/res/android"
    android:shape="rectangle" >

    <gradient
        android:centerColor="#ff00ff00"
        android:endColor="#ff0000ff"
        android:startColor="#ffff0000"
        android:type="linear" />
    <size android:height="4dp"/>

</shape>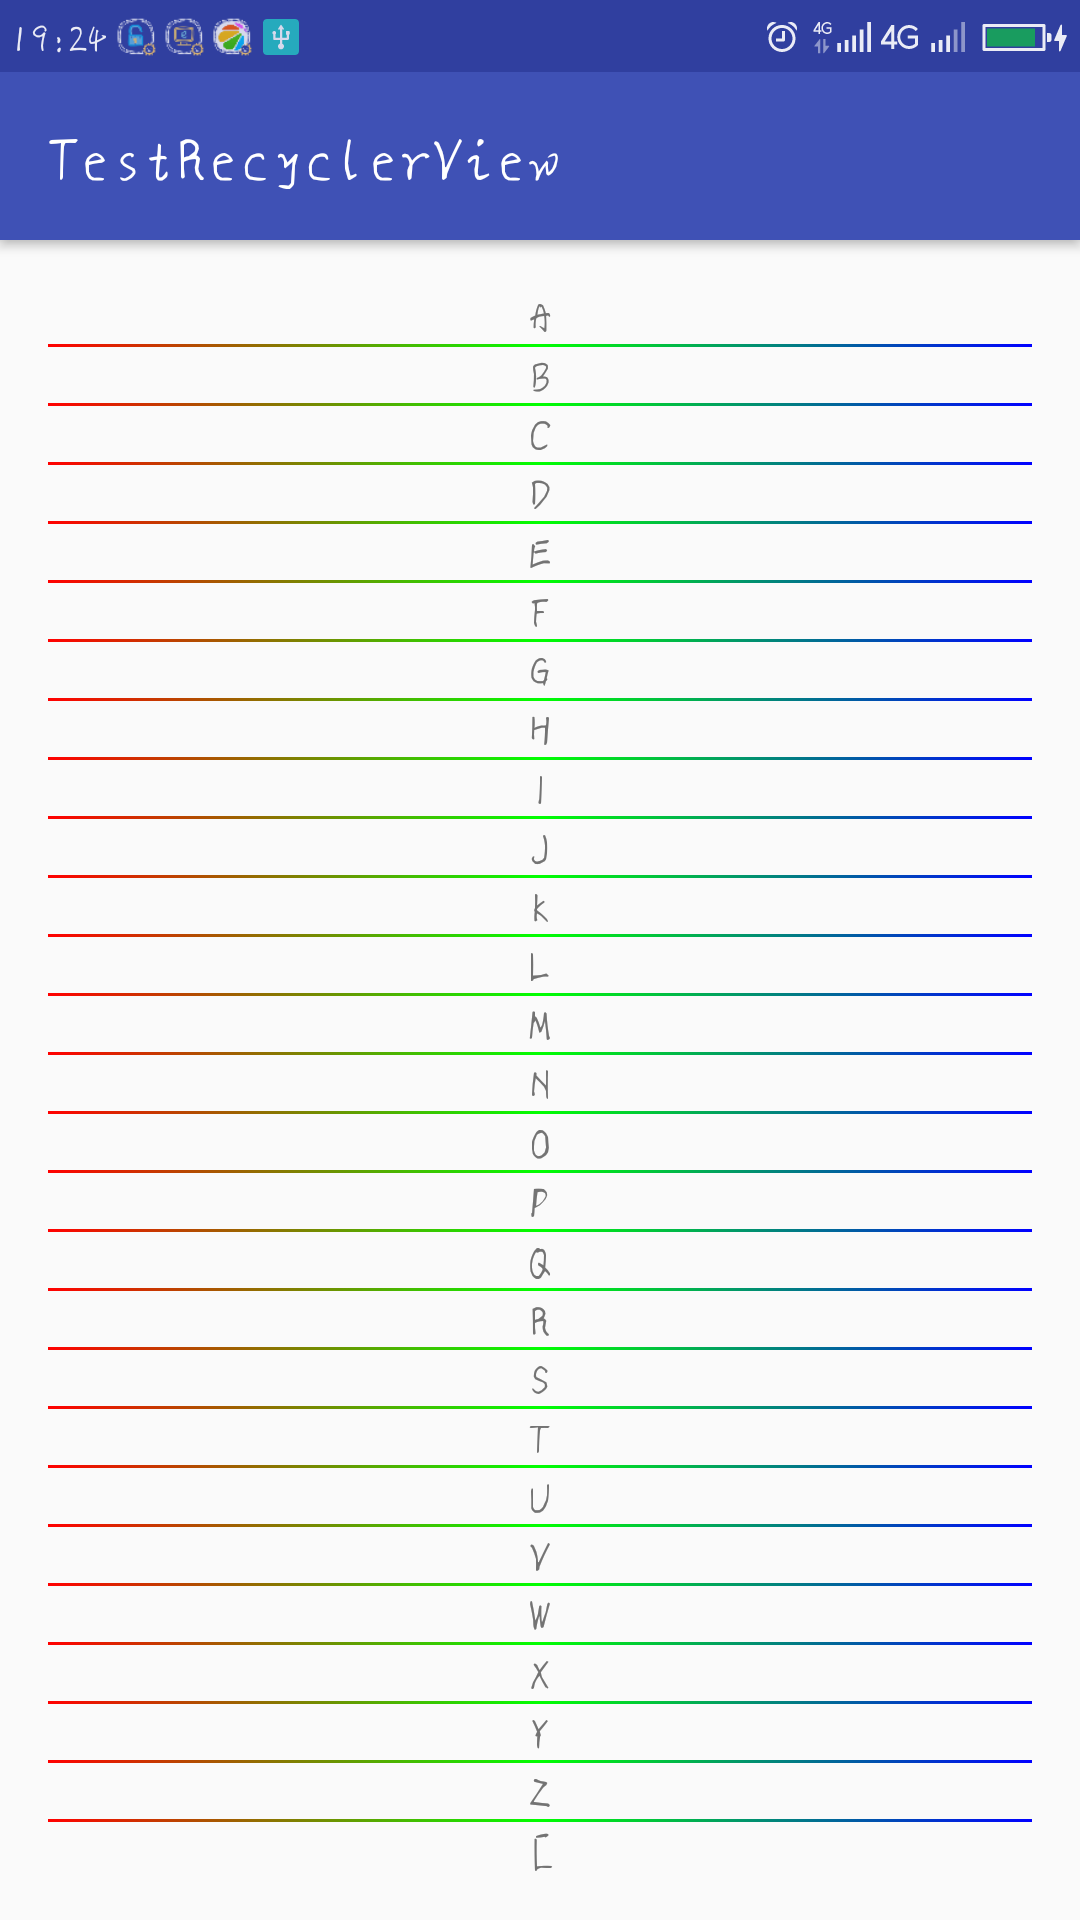
LayoutManager
The above example is implemented by using the default Linear Layout Manager
RecyclerView.LayoutManager, an abstract class, provides three implementation classes:
- Linear LyaoutManager Linear Layout Supports Horizontal and Longitudinal Layout
- GridLayout Manager Grid Layout
- Staggered Grid Layout Manager Falls Flow Layout
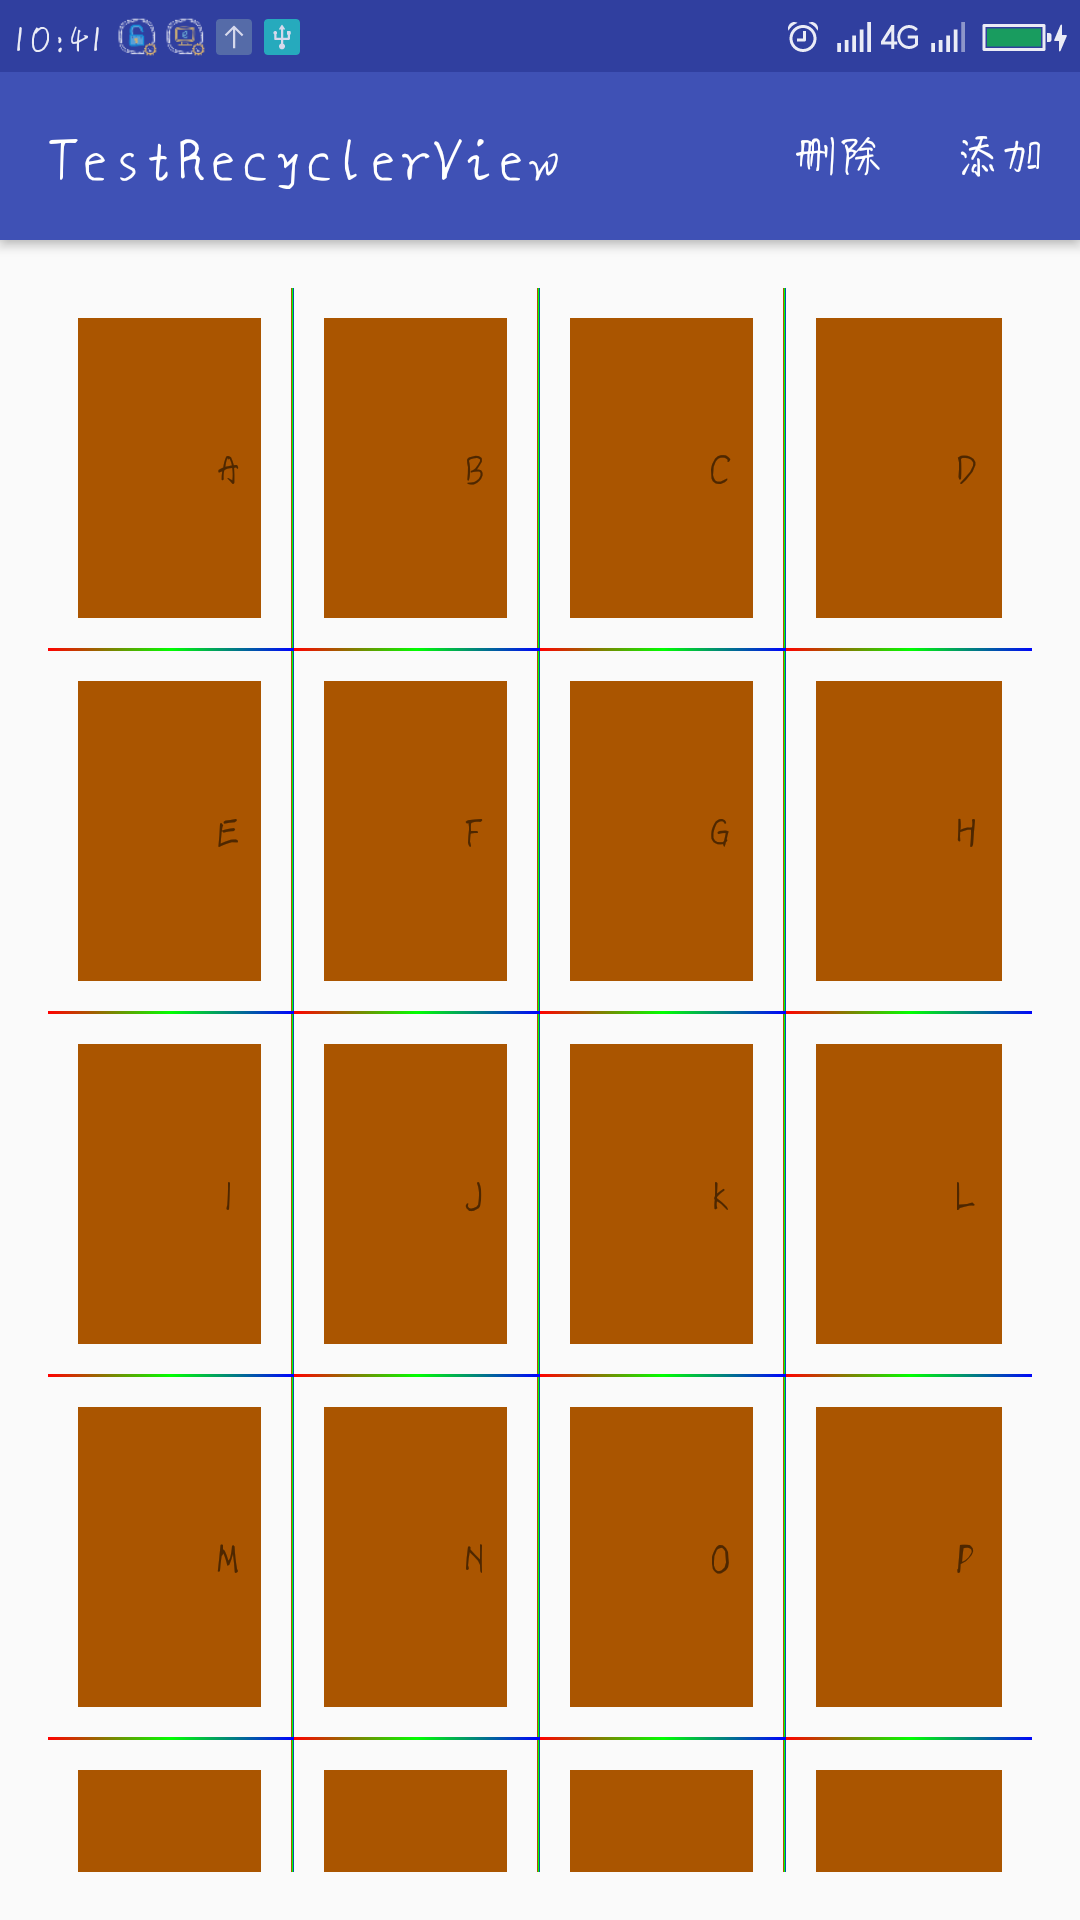
GridLayoutManager
mRecyclerView.setLayoutManager(new GridLayoutManager(this,4));Rewrite the divider for this
public class DividerGridItemDecoration extends RecyclerView.ItemDecoration
{

    private static final int[] ATTRS = new int[] { android.R.attr.listDivider };
    private Drawable mDivider;

    public DividerGridItemDecoration(Context context)
    {
        final TypedArray a = context.obtainStyledAttributes(ATTRS);
        mDivider = a.getDrawable(0);
        a.recycle();
    }

    @Override
    public void onDraw(Canvas c, RecyclerView parent, State state)
    {

        drawHorizontal(c, parent);
        drawVertical(c, parent);

    }

    private int getSpanCount(RecyclerView parent)
    {
        // Column number
        int spanCount = -1;
        LayoutManager layoutManager = parent.getLayoutManager();
        if (layoutManager instanceof GridLayoutManager)
        {

            spanCount = ((GridLayoutManager) layoutManager).getSpanCount();
        } else if (layoutManager instanceof StaggeredGridLayoutManager)
        {
            spanCount = ((StaggeredGridLayoutManager) layoutManager)
                    .getSpanCount();
        }
        return spanCount;
    }

    public void drawHorizontal(Canvas c, RecyclerView parent)
    {
        int childCount = parent.getChildCount();
        for (int i = 0; i < childCount; i++)
        {
            final View child = parent.getChildAt(i);
            final RecyclerView.LayoutParams params = (RecyclerView.LayoutParams) child
                    .getLayoutParams();
            final int left = child.getLeft() - params.leftMargin;
            final int right = child.getRight() + params.rightMargin
                    + mDivider.getIntrinsicWidth();
            final int top = child.getBottom() + params.bottomMargin;
            final int bottom = top + mDivider.getIntrinsicHeight();
            mDivider.setBounds(left, top, right, bottom);
            mDivider.draw(c);
        }
    }

    public void drawVertical(Canvas c, RecyclerView parent)
    {
        final int childCount = parent.getChildCount();
        for (int i = 0; i < childCount; i++)
        {
            final View child = parent.getChildAt(i);

            final RecyclerView.LayoutParams params = (RecyclerView.LayoutParams) child
                    .getLayoutParams();
            final int top = child.getTop() - params.topMargin;
            final int bottom = child.getBottom() + params.bottomMargin;
            final int left = child.getRight() + params.rightMargin;
            final int right = left + mDivider.getIntrinsicWidth();

            mDivider.setBounds(left, top, right, bottom);
            mDivider.draw(c);
        }
    }

    private boolean isLastColum(RecyclerView parent, int pos, int spanCount,
            int childCount)
    {
        LayoutManager layoutManager = parent.getLayoutManager();
        if (layoutManager instanceof GridLayoutManager)
        {
            if ((pos + 1) % spanCount == 0)// If it's the last column, you don't need to draw the right.
            {
                return true;
            }
        } else if (layoutManager instanceof StaggeredGridLayoutManager)
        {
            int orientation = ((StaggeredGridLayoutManager) layoutManager)
                    .getOrientation();
            if (orientation == StaggeredGridLayoutManager.VERTICAL)
            {
                if ((pos + 1) % spanCount == 0)// If it's the last column, you don't need to draw the right.
                {
                    return true;
                }
            } else
            {
                childCount = childCount - childCount % spanCount;
                if (pos >= childCount)// If it's the last column, you don't need to draw the right.
                    return true;
            }
        }
        return false;
    }

    private boolean isLastRaw(RecyclerView parent, int pos, int spanCount,
            int childCount)
    {
        LayoutManager layoutManager = parent.getLayoutManager();
        if (layoutManager instanceof GridLayoutManager)
        {
            childCount = childCount - childCount % spanCount;
            if (pos >= childCount)// If it's the last line, you don't need to draw the bottom.
                return true;
        } else if (layoutManager instanceof StaggeredGridLayoutManager)
        {
            int orientation = ((StaggeredGridLayoutManager) layoutManager)
                    .getOrientation();
            // Staggered Grid Layout Manager and scroll vertically
            if (orientation == StaggeredGridLayoutManager.VERTICAL)
            {
                childCount = childCount - childCount % spanCount;
                // If it's the last line, you don't need to draw the bottom.
                if (pos >= childCount)
                    return true;
            } else
            // Staggered Grid Layout Manager and scroll horizontally
            {
                // If it's the last line, you don't need to draw the bottom.
                if ((pos + 1) % spanCount == 0)
                {
                    return true;
                }
            }
        }
        return false;
    }

    @Override
    public void getItemOffsets(Rect outRect, int itemPosition,
            RecyclerView parent)
    {
        int spanCount = getSpanCount(parent);
        int childCount = parent.getAdapter().getItemCount();
        if (isLastRaw(parent, itemPosition, spanCount, childCount))// If it's the last line, you don't need to draw the bottom.
        {
            outRect.set(0, 0, mDivider.getIntrinsicWidth(), 0);
        } else if (isLastColum(parent, itemPosition, spanCount, childCount))// If it's the last column, you don't need to draw the right.
        {
            outRect.set(0, 0, 0, mDivider.getIntrinsicHeight());
        } else
        {
            outRect.set(0, 0, mDivider.getIntrinsicWidth(),
                    mDivider.getIntrinsicHeight());
        }
    }
}
Note that at first, the line on my left can't be drawn, but by default, it's OK because the drawing under my drawable file doesn't specify width. After specifying width, OK.
<shape xmlns:android="http://schemas.android.com/apk/res/android"
    android:shape="rectangle"
    >
    <gradient
        android:startColor="#ffff0000"
        android:centerColor="#ff00ff00"
        android:endColor="#ff0000ff"
        android:type="linear"/>
    <size android:height="1dp"
        android:width="1dp"
        />


</shape>
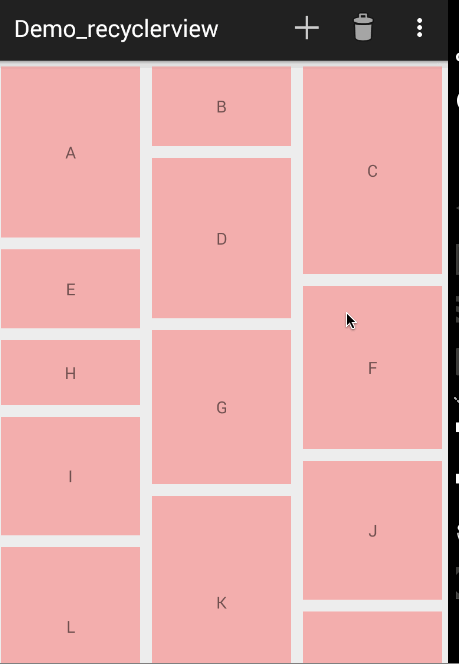
StaggeredGridLayoutManager
recyclerView.setLayoutManager(new StaggeredGridLayoutManager(4, StaggeredGridLayoutManager.VERTICAL));
This is the same as the above, but the second parameter passes an orientation, if the input is Staggered Grid LayoutManager. VERTICAL, which represents how many columns; if the input is Staggered Grid LayoutManager. HORIZONTAL, which represents how many rows.
If changed to:
recyclerView.setLayoutManager(new StaggeredGridLayoutManager(4,
        StaggeredGridLayoutManager.HORIZONTAL));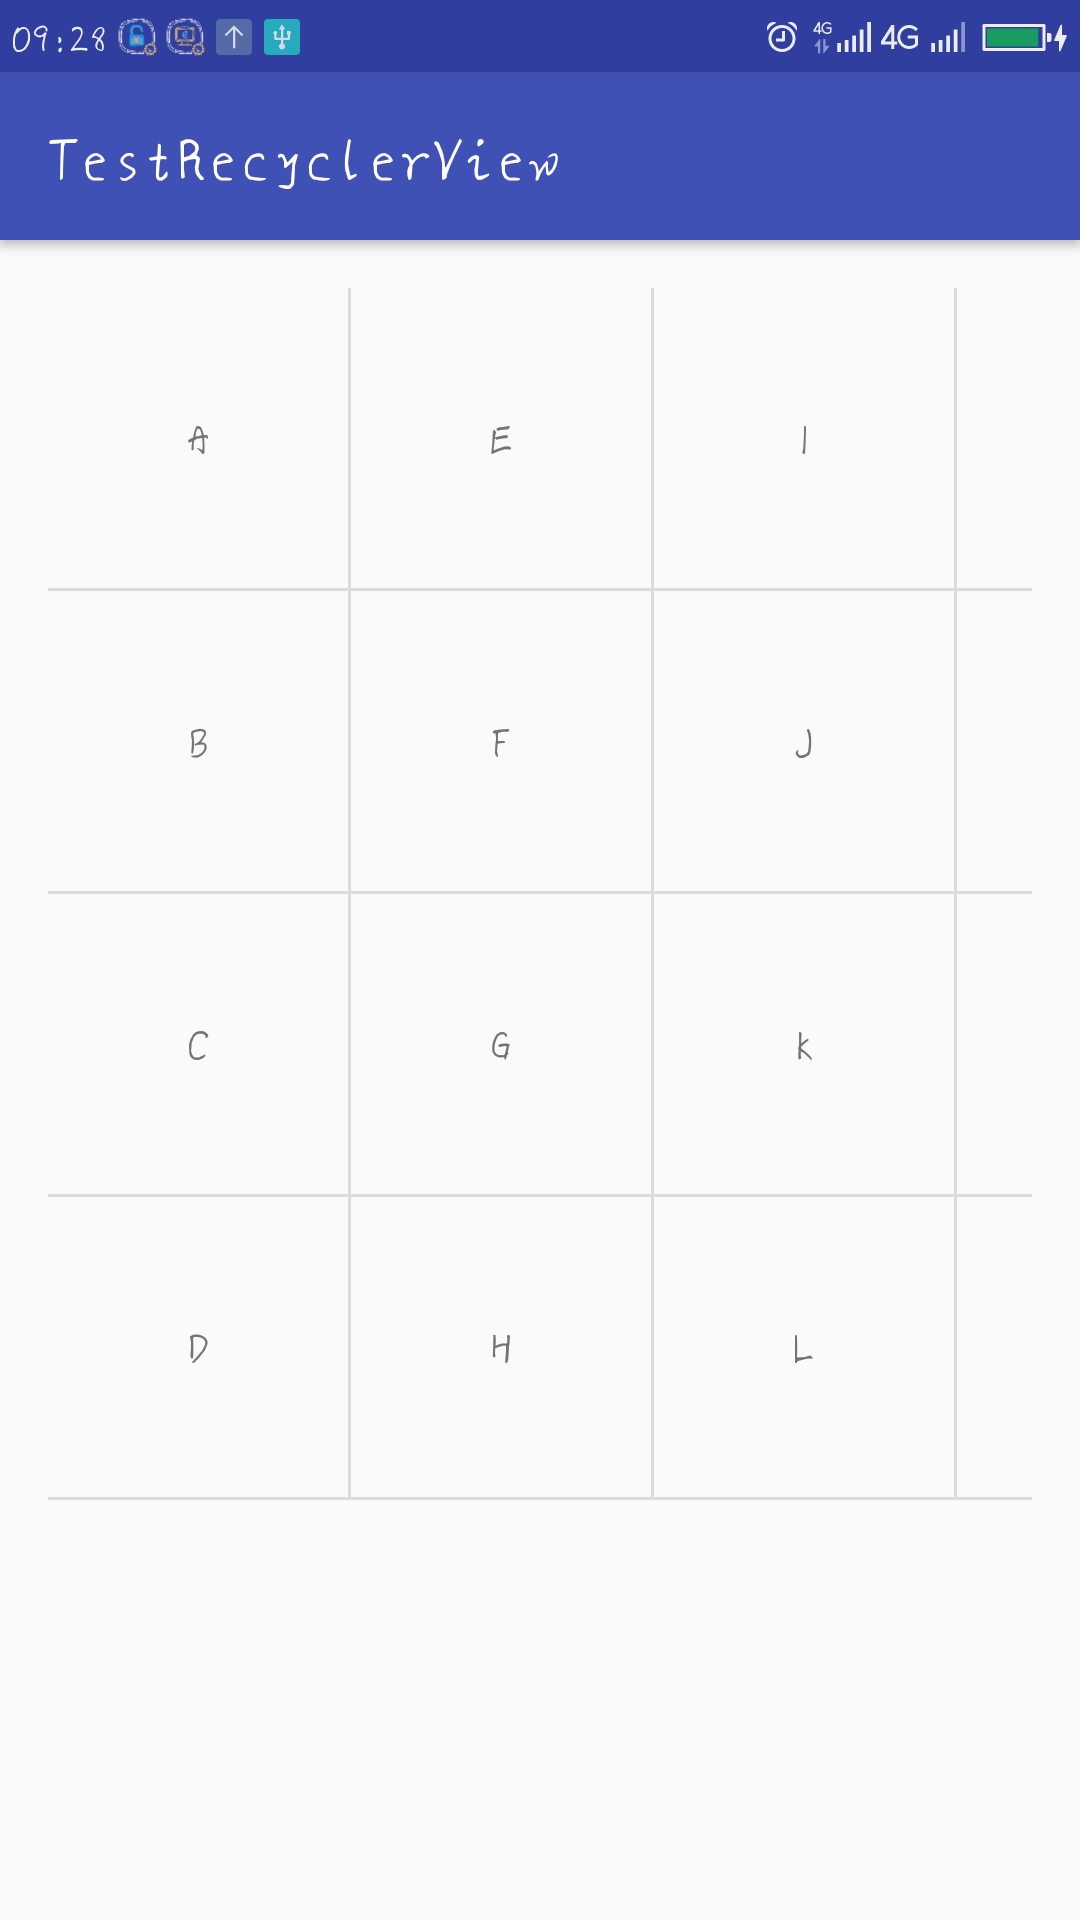
It can slide left and right.
We're all fixed heights.
Now we can only blame onBindViewHolder for setting a random height for our Item.
    @Override
    public void onBindViewHolder(myHolder holder, int position) {
            holder.textView.setText(data.get(position));
        LinearLayout.LayoutParams params = (LinearLayout.LayoutParams) holder.textView.getLayoutParams();
        params.height = size[position%6];

    }
ItemAnimator
ItemAnimator is also an abstract class. Fortunately, the system provides us with a default implementation class.
With the default implementation, when Item is added and removed, adding animation is easy.
// Setting up item animation
recyclerView.setItemAnimator(new DefaultItemAnimator());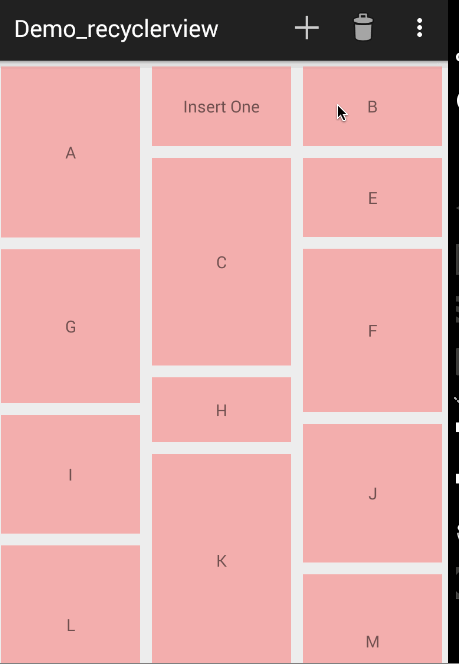
If it is GridLayoutManger: 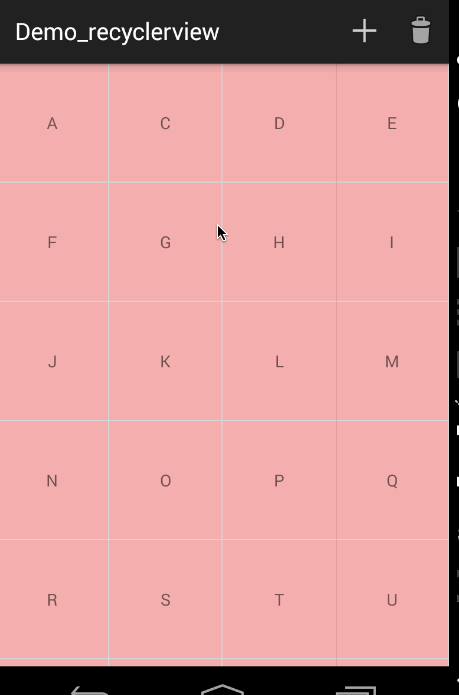
Note that updating the dataset here is not using adapter.notifyDataSetChanged() but
Notify Item Inserted (position) and notify Item Removed (position)
Add two methods for adapter:
public void addData(int position) {
        mDatas.add(position, "Insert One");
        notifyItemInserted(position);
    }

    public void removeData(int position) {
            mDatas.remove(position);
        notifyItemRemoved(position);
    }
Click MenuItem in Main to trigger:
 @Override
    public boolean onCreateOptionsMenu(Menu menu)
    {
        getMenuInflater().inflate(R.menu.main, menu);
        return super.onCreateOptionsMenu(menu);
    }

    @Override
    public boolean onOptionsItemSelected(MenuItem item)
    {
        switch (item.getItemId())
        {
        case R.id.id_action_add:
            mAdapter.addData(1);
            break;
        case R.id.id_action_delete:
            mAdapter.removeData(1);
            break;
        }
        return true;
    }
Click and LingClick
recyclerview does not provide ClickListener and LongClickListener
But we can add it ourselves.
I chose to provide callbacks through adapter
First, define an interface and method in Adaptet
    public interface onItemClickListener{
        void onClick(int position);
        void LongClivk(int position);
    }

    public void SetOnItmeClickListener(onItemClickListener listener){
        this.listener = listener;
    }
Then set up onClickListener and OnLongClickListener for each Item in onBindViewHolder
 @Override
    public void onBindViewHolder(final myHolder holder, int position) {
            holder.textView.setText(data.get(position));
        LinearLayout.LayoutParams params = (LinearLayout.LayoutParams) holder.textView.getLayoutParams();
        params.height = size[position%6];
        if(listener != null){
            holder.itemView .setOnClickListener(new View.OnClickListener() {
                @Override
                public void onClick(View v) {

                    listener.onClick(holder.getLayoutPosition());
                }
            });

            holder.itemView.setOnLongClickListener(new View.OnLongClickListener() {
                @Override
                public boolean onLongClick(View v) {
                    listener.LongClivk(holder.getLayoutPosition());
                    return false;
                }
            });
        }

    }
Then set Listener in MainActivity
  adapter.SetOnItmeClickListener(new MyAdapter.onItemClickListener() {
            @Override
            public void onClick(int position) {
                Toast.makeText(MainActivity.this,"onClick",Toast.LENGTH_SHORT).show();
            }

            @Override
            public void LongClivk(int position) {
                adapter.remove(position);
            }
        });
At the beginning, I was full of question marks for drawing the dividing line, and I came down to analyze myself. Take drawing the horizontal dividing line as an example:
 public void drawVertical(Canvas c,RecyclerView parent){
        final  int left = parent.getPaddingLeft();
        final  int riht  = parent.getWidth()-parent.getPaddingRight();

        final int childCount = parent.getChildCount();
        for(int i  = 0;i<childCount;i++){
            final View child = parent.getChildAt(i);

            final  RecyclerView.LayoutParams params = (RecyclerView.LayoutParams)
                                       child.getLayoutParams();
            final int top  = child.getBottom()+params.bottomMargin;
            final  int bottom = top +divider.getIntrinsicHeight();
            divider.setBounds(left,top,riht,bottom);
            divider.draw(c);
            Log.d("wnw",String.valueOf(top)+"  "+String.valueOf(bottom)+"  "+String.valueOf(left)+
                    "   "+String.valueOf(riht) );

        }
    }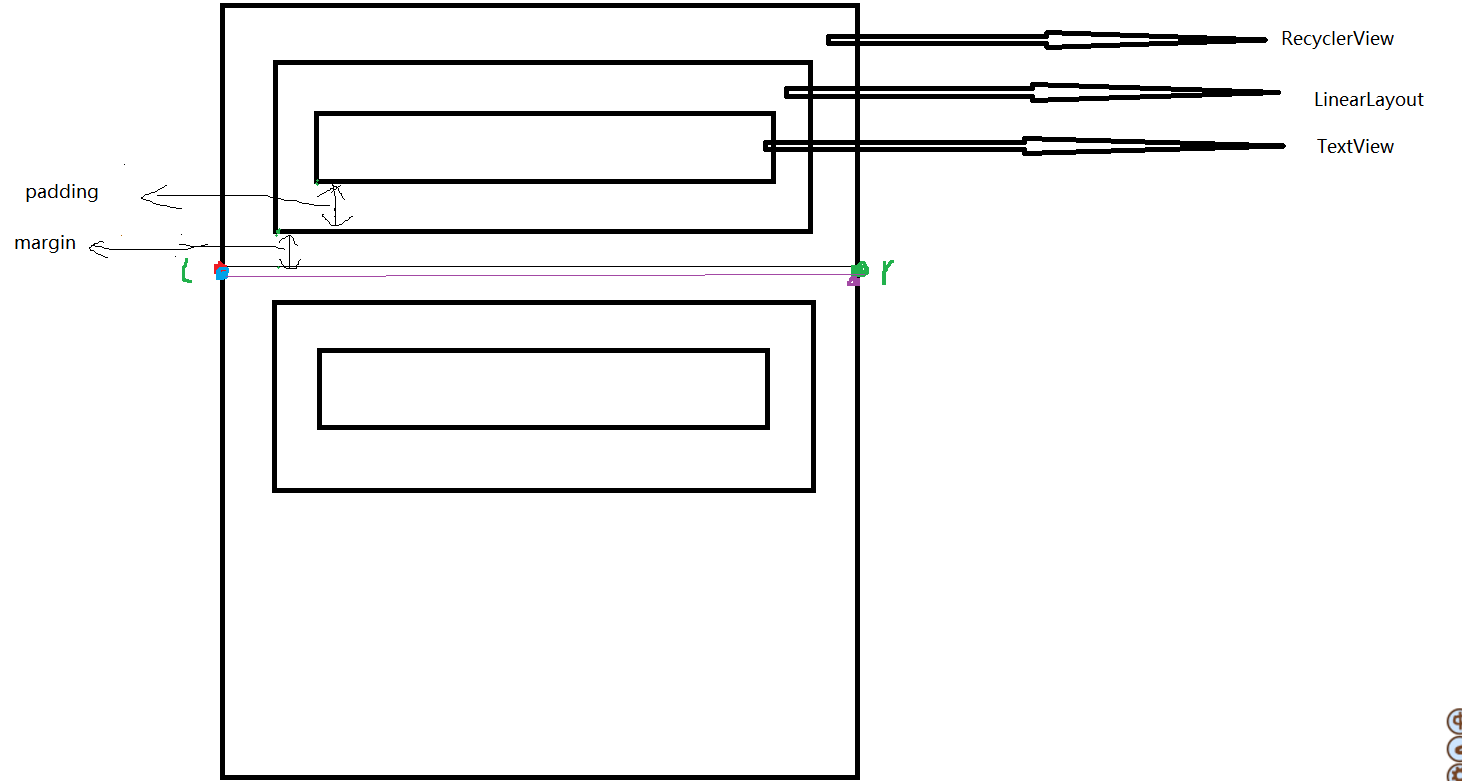
final View child = parent.getChildAt(i); you get the entire layout of LinearLayout.
left is the red dot in the picture. I just roughly drew a position. right is the green dot.
The points on the two X axes have been determined, and now the Y axes have been determined.
The length of top is actually the length of margin in the graph, so the left (top) of the first upper left corner of the rectangle is determined.
Bottom is the height of top plus the partition line, so the right bottom of the rectangle is determined. In this way, the position and size of the line drawing are also determined.
Then we use getItemOffsets () to move the entire LinearLayout layout up to the height of the partition line, so that we have the space to draw the partition line, and we can draw it.
Reference to:
http://blog.csdn.net/lmj623565791/article/details/45059587;
This article is from: [Zhang Hongyang's blog]