For reprinting, please indicate the source: http://blog.csdn.net/binbinqq86/article/details/54427505
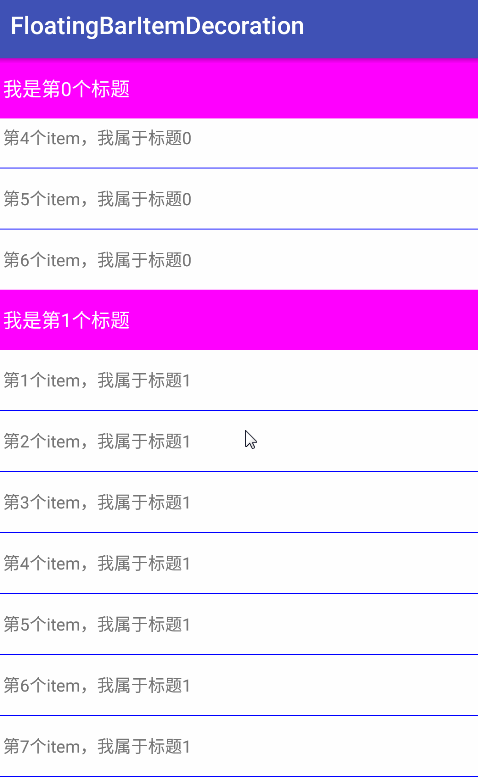
Regarding the use of RecyclerView, I believe that everyone is familiar with it, and the powerful function has already convinced many developers. This article mainly explains the implementation of the suspended header grouping list of the contact list effect, first of all, the effect diagram:
The general idea is to use the itemType of RecyclerView to distinguish the header from the underlying sub-data and adopt different layout. Additionally, the rolling monitor of RecyclerView is used to realize the moving, hiding and displaying of the suspended header. The main idea of this article is to start with ItemDecoration. Speaking of this, I think you should have an eyebrow in your heart. If you are not familiar with ItemDecoration, you can read my first two articles:
Code first:
@Override
    public void getItemOffsets(Rect outRect, View view, RecyclerView parent, RecyclerView.State state) {
        super.getItemOffsets(outRect, view, parent, state);
        int pos=parent.getChildViewHolder(view).getAdapterPosition();
        if(keys.containsKey(pos)){//Set aside head offset
            outRect.set(0,mTitleHeight,0,0);
        }else{
            outRect.set(0,dividerHeight,0,0);
        }
}- 1
- 2
- 3
- 4
- 5
- 6
- 7
- 8
- 9
- 10
- 1
- 2
- 3
- 4
- 5
- 6
- 7
- 8
- 9
- 10
First of all, according to the position of the current view, it is necessary to leave a gap between the dividing line and the header of the title bar.
Then the onDraw method draws the partition line and Title bar, and looks at the code:
private void drawVertical(Canvas c, RecyclerView parent){
        int left = parent.getPaddingLeft();
        int right = parent.getWidth() - parent.getPaddingRight();
        int top=0;
        int bottom=0;
        for (int i = 0; i < parent.getChildCount(); i++) {
            View child=parent.getChildAt(i);
            final RecyclerView.LayoutParams params = (RecyclerView.LayoutParams) child.getLayoutParams();
            if(!keys.containsKey(params.getViewLayoutPosition())){
                //Draw ordinary partition lines
                top=child.getTop()-params.topMargin-dividerHeight;
                bottom=top+dividerHeight;
                mDivider.setBounds(left, top, right, bottom);
                mDivider.draw(c);
            }else{
                //Head painting
                top=child.getTop()-params.topMargin-mTitleHeight;
                bottom=top+mTitleHeight;
                c.drawRect(left,top,right,bottom,mBackgroundPaint);
                float x=TypedValue.applyDimension(TypedValue.COMPLEX_UNIT_DIP,10,mContext.getResources().getDisplayMetrics());
                float y=bottom - (mTitleHeight - mTextHeight) / 2 - mTextBaselineOffset;//Computational text baseLine
                c.drawText(keys.get(params.getViewLayoutPosition()),x,y,mTextPaint);
            }
        }
}- 1
- 2
- 3
- 4
- 5
- 6
- 7
- 8
- 9
- 10
- 11
- 12
- 13
- 14
- 15
- 16
- 17
- 18
- 19
- 20
- 21
- 22
- 23
- 24
- 25
- 1
- 2
- 3
- 4
- 5
- 6
- 7
- 8
- 9
- 10
- 11
- 12
- 13
- 14
- 15
- 16
- 17
- 18
- 19
- 20
- 21
- 22
- 23
- 24
- 25
canvas.drawText method is used. Here we need to pay attention to the calculation of y coordinates. Text drawing is based on the baseLine. Friends who do not know can go online to consult the relevant knowledge. This paper will not focus on the explanation.
Finally, the implementation of onDrawOver method, which is mainly used to draw the top level of RecyclerView, so that when the list scrolls, the title bar can be drawn, so that it looks like it has been suspended at the top of the page. The main difficulty is to judge the collision between the two groups of Title bar. Look at the code below:
@Override
    public void onDrawOver(Canvas c, RecyclerView parent, RecyclerView.State state) {
        super.onDrawOver(c, parent, state);
        if(!showFloatingHeaderOnScrolling){
            return;
        }
        int firstVisiblePos=((LinearLayoutManager)parent.getLayoutManager()).findFirstVisibleItemPosition();
        if(firstVisiblePos==RecyclerView.NO_POSITION){
            return;
        }
        String title=getTitle(firstVisiblePos);
        if(TextUtils.isEmpty(title)){
            return;
        }
        boolean flag=false;
        if(getTitle(firstVisiblePos+1)!=null&&!title.equals(getTitle(firstVisiblePos+1))){
            //Explanation is the last element in the current group, but it does not necessarily collide
            View child=parent.findViewHolderForAdapterPosition(firstVisiblePos).itemView;
            if(child.getTop()+child.getMeasuredHeight()<mTitleHeight){
                //Further collision detection
                c.save();//Save the current state of the canvas
                flag=true;
                c.translate(0,child.getTop()+child.getMeasuredHeight()-mTitleHeight);//Negative represents upward
            }
        }
        int left = parent.getPaddingLeft();
        int right = parent.getWidth() - parent.getPaddingRight();
        int top=parent.getPaddingTop();
        int bottom=top+mTitleHeight;
        c.drawRect(left,top,right,bottom,mBackgroundPaint);
        float x=TypedValue.applyDimension(TypedValue.COMPLEX_UNIT_DIP,10,mContext.getResources().getDisplayMetrics());
        float y=bottom - (mTitleHeight - mTextHeight) / 2 - mTextBaselineOffset;//Computational text baseLine
        c.drawText(title,x,y,mTextPaint);
        if(flag){
            //Restore the canvas to its initial state
            c.restore();
        }
}- 1
- 2
- 3
- 4
- 5
- 6
- 7
- 8
- 9
- 10
- 11
- 12
- 13
- 14
- 15
- 16
- 17
- 18
- 19
- 20
- 21
- 22
- 23
- 24
- 25
- 26
- 27
- 28
- 29
- 30
- 31
- 32
- 33
- 34
- 35
- 36
- 37
- 38
- 1
- 2
- 3
- 4
- 5
- 6
- 7
- 8
- 9
- 10
- 11
- 12
- 13
- 14
- 15
- 16
- 17
- 18
- 19
- 20
- 21
- 22
- 23
- 24
- 25
- 26
- 27
- 28
- 29
- 30
- 31
- 32
- 33
- 34
- 35
- 36
- 37
- 38
Notice in the fourth line that I added a variable to control whether the effect of suspending the head is needed or not. If not, I return directly, only the effect of the grouping list. The getTitle method is mainly used to get the title of each item. Collision detection is based on the comparison between the first visible element and the next one, that is, line 16 of the code. If the titles of the two elements are different, it means that they belong to different groups. The title bar is about to collide, of course. This detection is not enough, but also needs to be judged by the height of item and the height of title bar combined with the getTop value of item, so that the canvas can be moved, resulting in the effect that the title bar is pushed up next, and the moving canvas needs to be restored below.