Features of 0.RecyclerView
1.LayoutManager class
Class 2.Adapter
3.ViewHolder class
4. Configure different LayoutManager
5. Configure click event for item
6. Insert and delete data in recyclerview
.
.
.
Properties of 0.RecyclerView:
- Flexible and configurable
- Item s that can be customized and reused
- Highly decoupled
.
.
1.LayoutManager class:
The LayoutManager class is an abstract class. Android provides us with three implementation classes for us to use:
1.1 linearlayoutmanager: linear layout manager.
LinearLayoutManager provides us with some API s that allow us to operate more richly on presentation effects.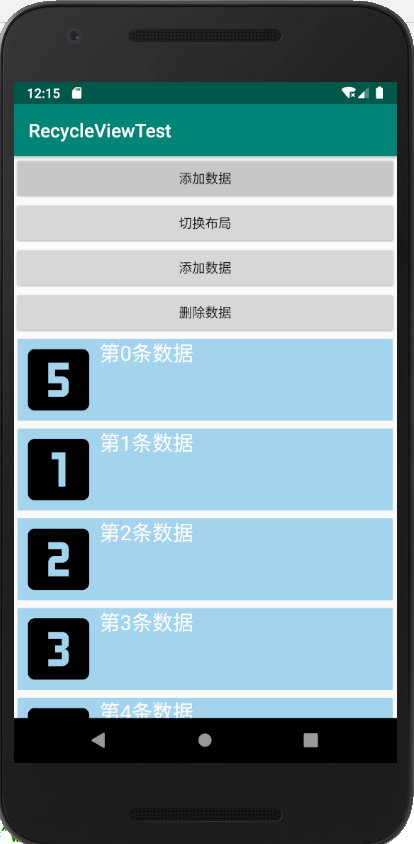
1.2GridLayoutManager: grid layout manager
We can pass in its number of columns in its constructor.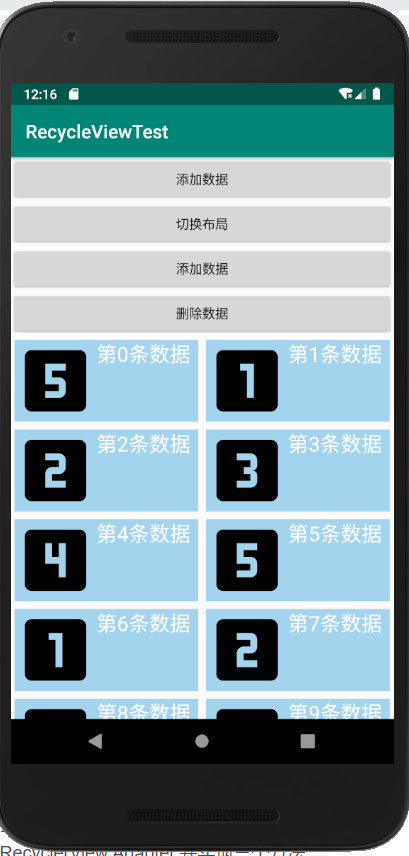
1.3StaggeredGridLayoutManager: Waterfall layout manager
ItemView with the same width and different height.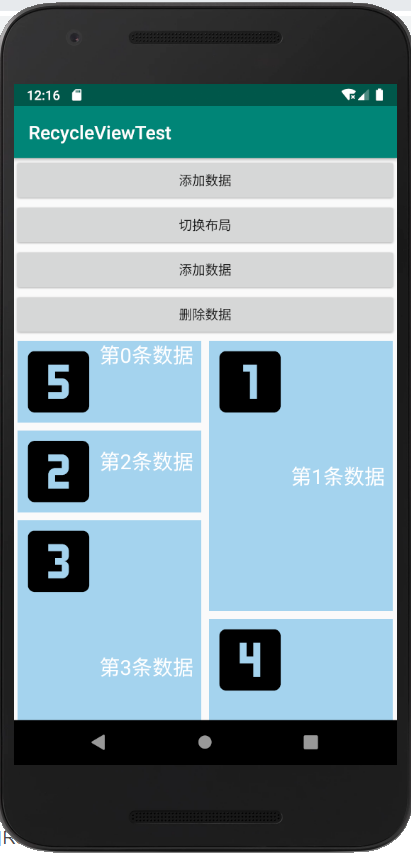
Determines whether the RecyclerView style is linear, grid or waterfall.
Class 2.Adapter
It is used to deal with the relationship between view and data. It is generally used in combination with ViewHolder.
Each Adapter must inherit from RecyclerView.Adapter. And implement three methods:
**onCreateViewHolder: * * create ViewHolder and return
    //Create and return the ViewHolder required in the generic
    @NonNull
    @Override
    public MyViewHolder onCreateViewHolder(@NonNull ViewGroup parent, int viewType) {
        return new MyViewHolder(LayoutInflater.from(context).inflate(R.layout.itemlayout,parent,false));
    }
**onBindViewHold: * * put data in ViewHolder
 //Data binding through ViewHolder
    @Override
    public void onBindViewHolder(@NonNull MyViewHolder holder, final int position) {
    //Initialize the control instance held by ViewHolder
        holder.mIv.setImageResource(getIcon(position));
        holder.mTv.setText(dataSource.get(position));

//Set dynamic height for waterfall layout
        if (recyclerView.getLayoutManager().getClass() == StaggeredGridLayoutManager.class)
        {
            //If the current layout asks waterfall flow layout, set random height
            LinearLayout.LayoutParams params = new LinearLayout.LayoutParams(ViewGroup.LayoutParams.MATCH_PARENT,getRandomHight());
            holder.mTv.setLayoutParams(params);
        }
        else
        {
        //Otherwise, set the normal width and height
            LinearLayout.LayoutParams params = new LinearLayout.LayoutParams(ViewGroup.LayoutParams.MATCH_PARENT,ViewGroup.LayoutParams.WRAP_CONTENT);
            holder.mTv.setLayoutParams(params);
        }

        if (addDataPosition == position)
        {
            holder.mItemView.setBackgroundColor(Color.RED);
        }
        holder.mItemView.setOnClickListener(new View.OnClickListener() {
            @Override
            public void onClick(View view) {
                //Call back method of interface
                if (onItemClickListener!=null)
                {
                    onItemClickListener.onItemClick(position);
                }
            }
        });

    }
**getItermCount: * * returns the number of display lists
This method directly returns the size of the data source (usually a List)
3.ViewHolder class:
Contains an instance of ItemView. You can create a control instance in ItemView in ViewHolder, and initialize the control instance through the findViewById method of ItemView.
  // MyViewHolder is an internal class. The code is as follows:

    class  MyViewHolder extends RecyclerView.ViewHolder
    {
        View mItemView;//To get ItemView
        ImageView mIv;//
        TextView mTv;

        public MyViewHolder(@NonNull View itemView) {
            super(itemView);
             mIv = itemView.findViewById(R.id.iv);
             mTv = itemView.findViewById(R.id.tv);
             mItemView = itemView;
        }
    }
4. Configure different LayoutManager
4.1LinearLayoutManager:
//The LinearLayoutManager constructor has a context parameter
  LinearLayoutManager linearLayoutManager = new LinearLayoutManager(this);
        //If you want to arrange the data horizontally
        linearLayoutManager.setOrientation(LinearLayoutManager.HORIZONTAL);
        //If you want to arrange the data in reverse order
        linearLayoutManager.setReverseLayout(true);
        //Set up layout manager for recyclerView
        mRecyclerView.setLayoutManager(linearLayoutManager);
4.2GridLayoutManager:
//The GridLayoutManager constructor has two parameters, which are the number of columns of online Context and grid layout
 GridLayoutManager gridLayoutManager = new GridLayoutManager(MainActivity.this ,2);
 mRecyclerView.setLayoutManager(gridLayoutManager);
4.3 StaggeredGridLayoutManager:
//The stacgeredgridlayoutmanager constructor has two parameters, the number of columns and the layout direction

 StaggeredGridLayoutManager staggeredGridLayoutManager = new StaggeredGridLayoutManager(2,StaggeredGridLayoutManager.VERTICAL);
mRecyclerView.setLayoutManager(staggeredGridLayoutManager);
In order to make the waterfall layout feel layered, you need to set it in the Adapter
 stay onBindViewHolder Add the following code to the
 if (recyclerView.getLayoutManager().getClass() == StaggeredGridLayoutManager.class)
        {
            //If the current layout asks waterfall flow layout, set random height
            LinearLayout.LayoutParams params = new LinearLayout.LayoutParams(ViewGroup.LayoutParams.MATCH_PARENT,getRandomHight());
            holder.mTv.setLayoutParams(params);
        }
        //Get a random value
 private int getRandomHight()
    {
        return (int )(Math.random()*1000);
    }
5. Configure click event for item
5.1 declare interface
//This interface can be placed in the Adapter class
interface OnItemClickListener
    {
        void onItemClick(int position);
    }
5.2 declare an interface variable in ViewHolder and configure a set method
 public void setOnItemClickListener(MyRecyclerViewAdapter.OnItemClickListener onItemClickListener) {
        this.onItemClickListener = onItemClickListener;
    }
5.3 configure the click event of the item in the onBindViewHolder method and call back the method in the interface in the click event
 holder.mItemView.setOnClickListener(new View.OnClickListener() {
            @Override
            public void onClick(View view) {
                //Call back method of interface
                if (onItemClickListener!=null)
                {
                    onItemClickListener.onItemClick(position);
                }
            }
        });
5.4
Call the set method in adapter to configure the click event implementation interface
 myRecyclerViewAdapter.setOnItemClickListener(new MyRecyclerViewAdapter.OnItemClickListener() {
            @Override
            public void onItemClick(int position) {
                Toast.makeText(MainActivity.this,"The first"+position+"Data is clicked",Toast.LENGTH_SHORT).show();
            }
        });
6. Insert and delete data in recyclerview
6.1 there are two methods to add data and delete data in adapter:
//Add data
   public void addData(int position)
    {
        addDataPosition = position;
        dataSource.add(position,"Inserted data");//dataSource is a list array
        notifyItemInserted(position);//Set data increase and update
        notifyItemRangeChanged(position,dataSource.size()-position);//Set data subscript update
    }
    //Delete data
    public void deleteData(int position)
    {
        addDataPosition = -1;
        dataSource.remove(position);
        notifyItemRemoved(position);
        notifyItemRangeChanged(position,dataSource.size()-position);
    }
This is all about the basic use of RecyclerView. If you can't get out of the door, you can learn more. I wish you all peace and security.

