catalogue
1, Redis master-slave replication
1.2 role of master-slave replication
1.3 Redis master-slave replication process
1.4 set up Redis master-slave replication
Modify redis configuration file (Master node operation)
Modify redis configuration file (Slave node operation)
1.5 verify the master-slave effect
Modify Redis configuration file (all node operations)
3.2 data fragmentation of Redis cluster
Master-slave replication: master-slave replication is the basis of highly available Redis. Sentinels and clusters achieve high availability on the basis of master-slave replication. Master-slave replication mainly realizes multi machine backup of data, load balancing for read operation and simple fault recovery. Defects: failure recovery cannot be automated; write operation cannot be load balanced; storage capacity is limited by a single machine.
Sentry: Based on master-slave replication, sentry realizes automatic fault recovery. Defect: the write operation cannot be load balanced: the storage capacity is limited by a single machine: the sentinel cannot automatically fail over the slave node. In the read-write separation scenario, the failure of the slave node will lead to the unavailability of the read service, and additional monitoring and switching operations need to be performed on the slave node.
Cluster: through cluster, Redis solves the problem that the write operation cannot be load balanced and the storage capacity is limited by a single machine, and realizes a relatively perfect high availability scheme.
1, Redis master-slave replication
1.1 definitions
Master-Slave replication refers to copying the data of one Redis server to other Redis servers. The former becomes the master and the latter is called Slave: data replication is one-way, and there can only be master-Slave nodes.
By default, each Redis server is the master node, and a master node can have multiple slave nodes (or no slave nodes), but a slave node can only have one master node.
1.2 role of master-slave replication
- Data redundancy: master-slave replication realizes the hot backup of data, which is a way of data redundancy other than persistence.
- Fault recovery: when the master node has problems, the slave node can provide services to achieve rapid fault recovery; In fact, it is a kind of redundancy of services.
- Load balancing: on the basis of master-slave replication, combined with read-write separation, the master node can provide write services, and the slave node can provide read services (that is, the application connects to the master node when writing Redis data, and the application connects to the slave node when reading Redis data), sharing the server load; Especially in the scenario of less writing and more reading, the concurrency of Redis server can be greatly improved by sharing the reading load among multiple slave nodes.
- High availability cornerstone: in addition to the above functions, master-slave replication is also the basis for sentinels and clusters to implement. Therefore, master-slave replication is the basis for Redis high availability.
1.3 Redis master-slave replication process
- Step 1: if a Slave machine process is started, it will send a "sync command" command to the Master machine to request synchronous connection.
- Step 2: whether it is the first connection or reconnection, the Master machine will start a background process to save the data snapshot to the data file (execute rdb operation). At the same time, the Master will record all commands to modify the data and store them in the data file.
- Step 3: after the background process completes the cache operation, the mate machine will send the data file to the Slave machine. The Slave machine will save the data file to the hard disk and then load it into memory. Then the Master machine will send all operations of modifying the data to the Slave machine. If the Slave goes down due to failure, it will automatically reconnect after it returns to normal.
- Step 4: after the Master machine receives the connection from the Slave machine, it sends its complete data file to the Slave machine. If Mater receives synchronization requests from multiple Slave machines at the same time, the Master will start a process in the background to save the data file, and then send it to all Slave machines to ensure that all Slave machines are normal.
1.4 set up Redis master-slave replication
Experimental environment
| host | operating system | IP address | Installation package |
| Master | CentOS7 | 192.168.130.50 | redis-5.0.7.tar.gz |
| Slave1 | CentOS7 | 192.168.130.250 | redis-5.0.7.tar.gz |
| Slave2 | CentOS7 | 192.168.130.110 | redis-5.0.7.tar.gz |

Install redis
systemctl stop firewalld
setenforce 0
yum install -y gcc gcc-c++ make
cd /opt
tar zxvf redis-5.0.7.tar.gz

cd /opt/redis-5.0.7/
make && make PREFIX=/usr/local/redis install

cd /opt/redis-5.0.7/utils
./install_server.sh
......
#After four times of press enter, enter manually, and input correctly at one time
Please select the redis executable path [] /usr/local/redis/bin/redis-server

ln -s /usr/local/redis/bin/* /usr/local/bin/
https://blog.csdn.net/weixin_62466637/article/details/123088369?spm=1001.2014.3001.5502
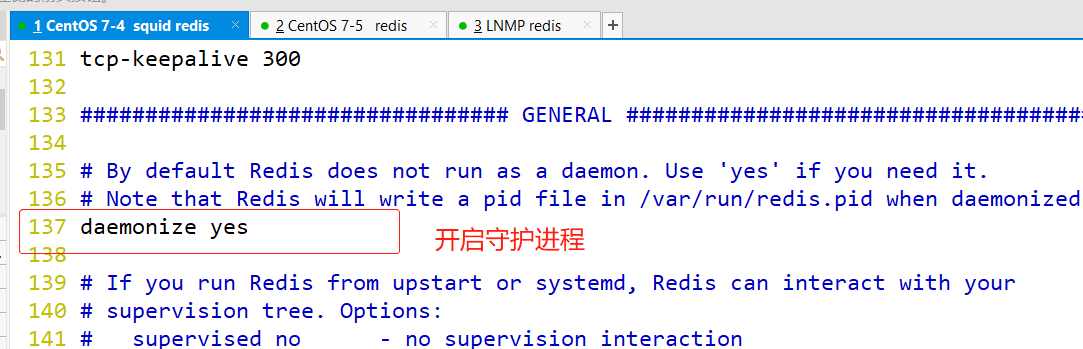
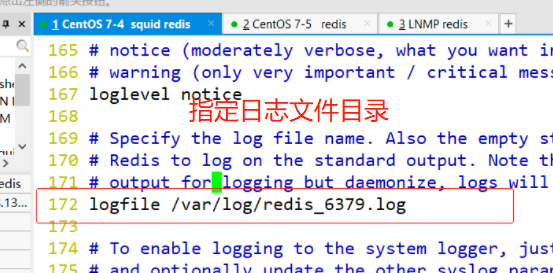
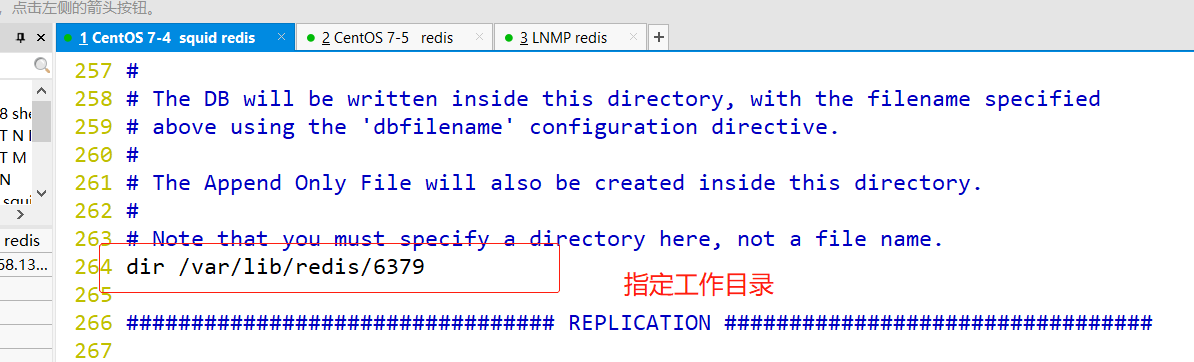
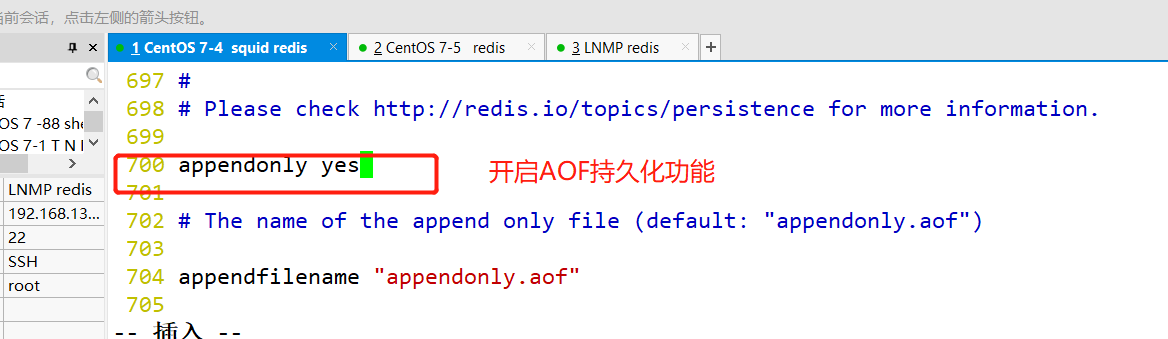
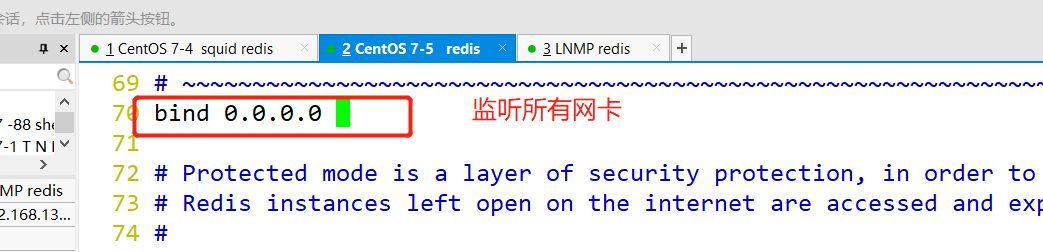
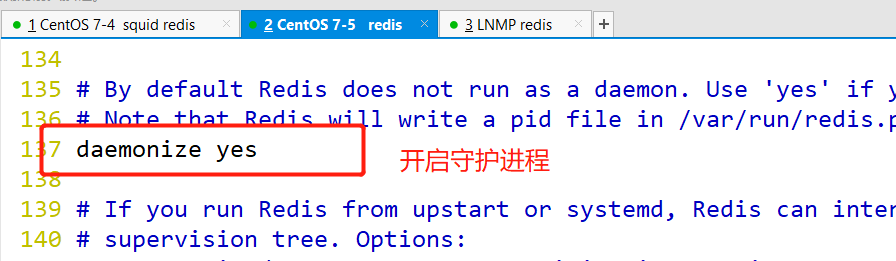
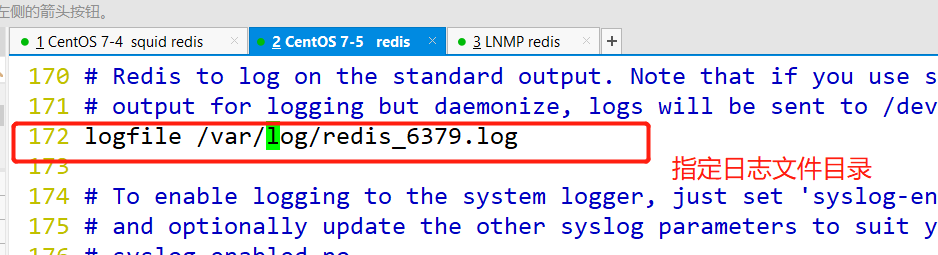
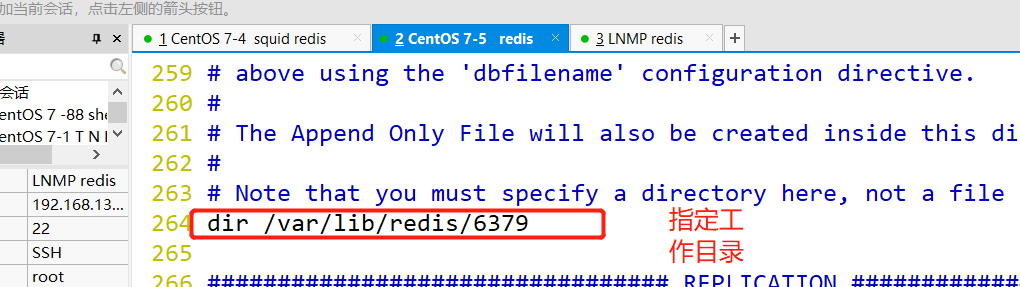
Modify redis configuration file (Master node operation)
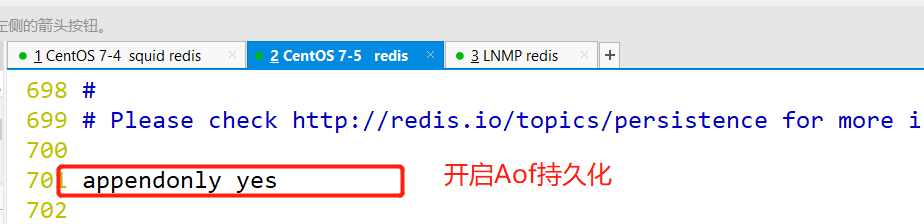
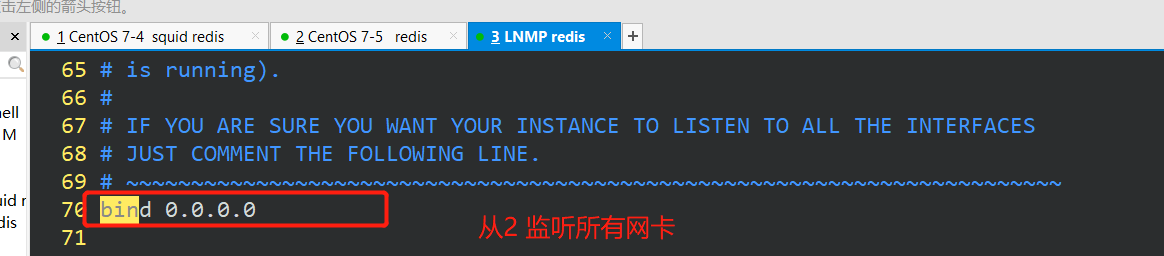
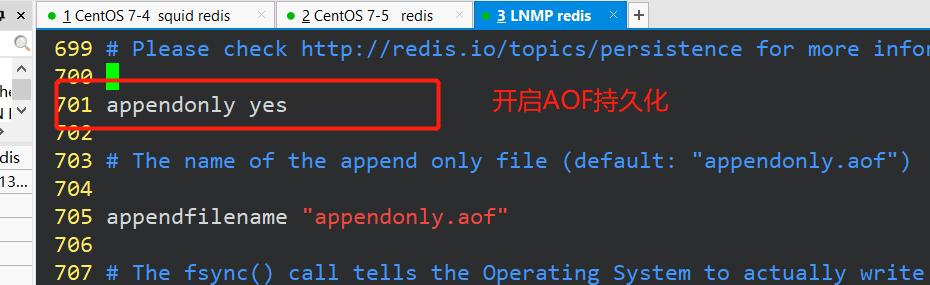
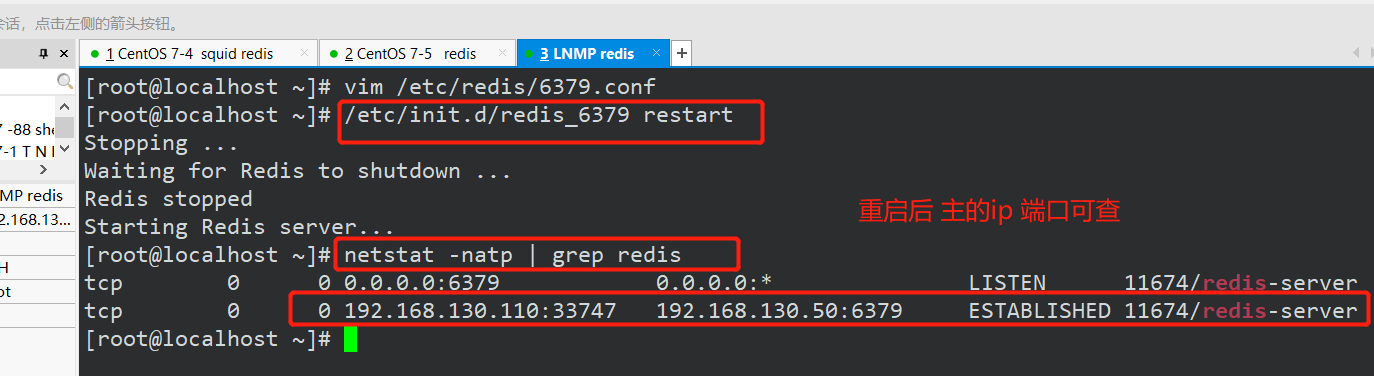
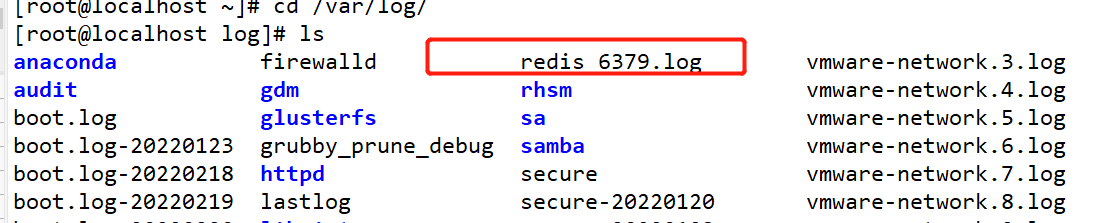
vim /etc/redis/6379.conf
#Line 70, modify the bind item, and listen to all network segments with 0.0.0.0
bind 0.0.0.0
#Line 137, start the daemon
daemonize yes
#172 line, specify the log file directory
logfile /var/log/redis_6379.log
#Line 264, specify the working directory
dir /var/lib/redis/6379
#700 lines, enable AOF persistence function
appendonly yes

/etc/init.d/redis_6379 restart


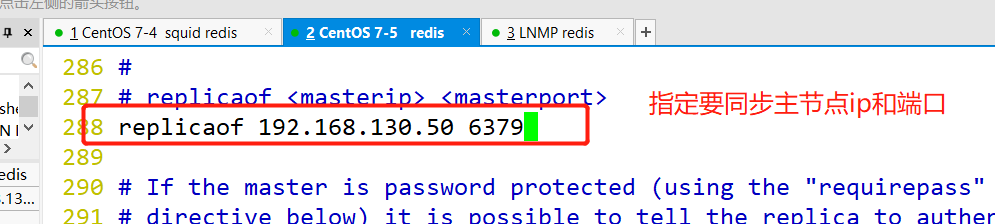
Modify redis configuration file (Slave node operation)
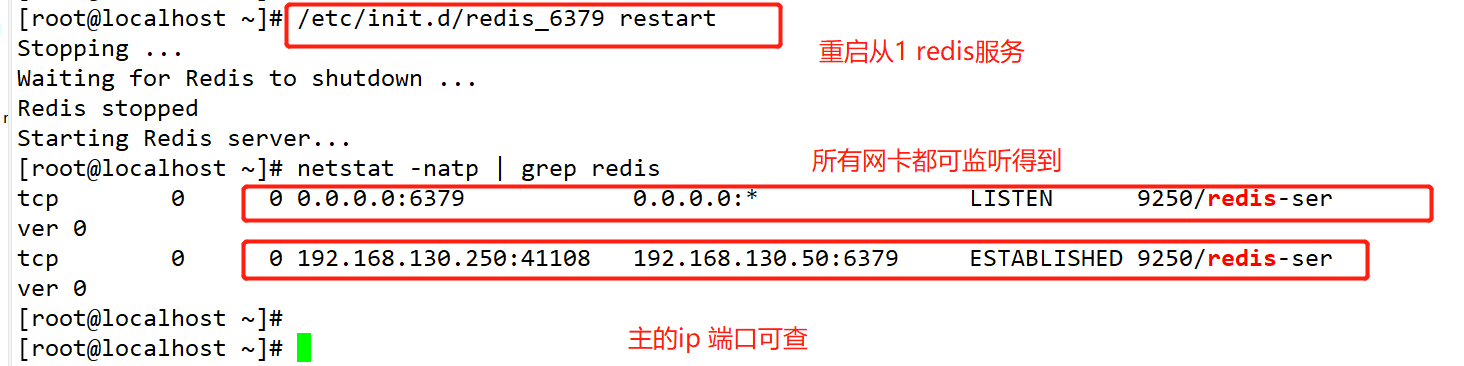
vim /etc/redis/6379.conf
#Line 70, modify the bind item, 0.0.0.0 monitor all network cards
bind 0.0.0.0
#Line 137, start the daemon
daemonize yes
#172 line, specify the log file directory
logfile /var/log/redis_6379.log
#264 line, specify working directory
dir /var/lib/redis/6379
#Line 288, specifying the IP and port of the Master node to be synchronized
replicaof 192.168.163.10 6379
#700 lines, enable AOF persistence function
appendonly yes

/etc/init.d/redis_6379 restart
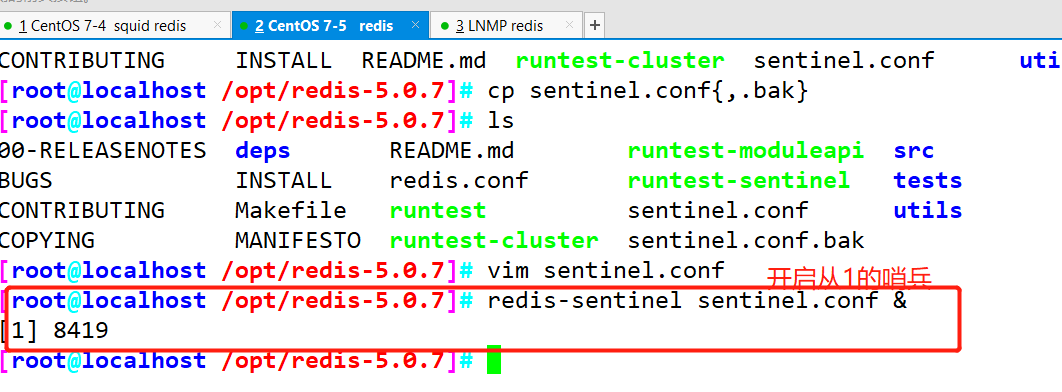
From 1
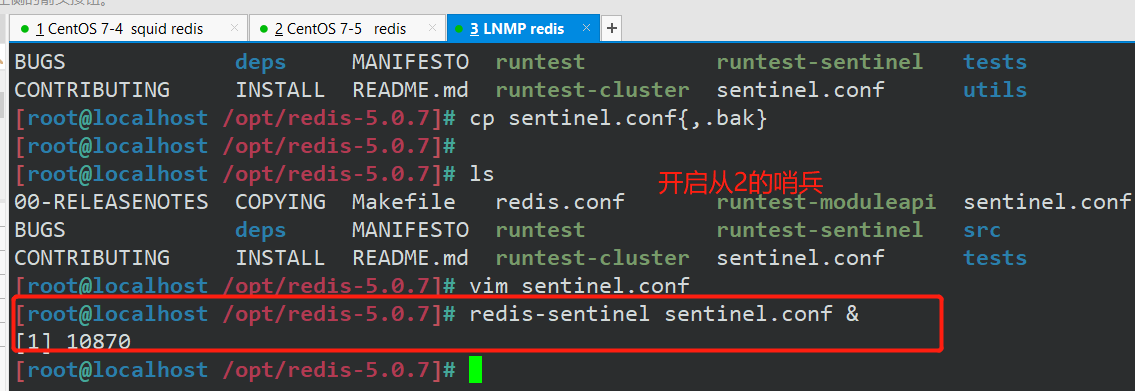
From 2

1.5 verify the master-slave effect
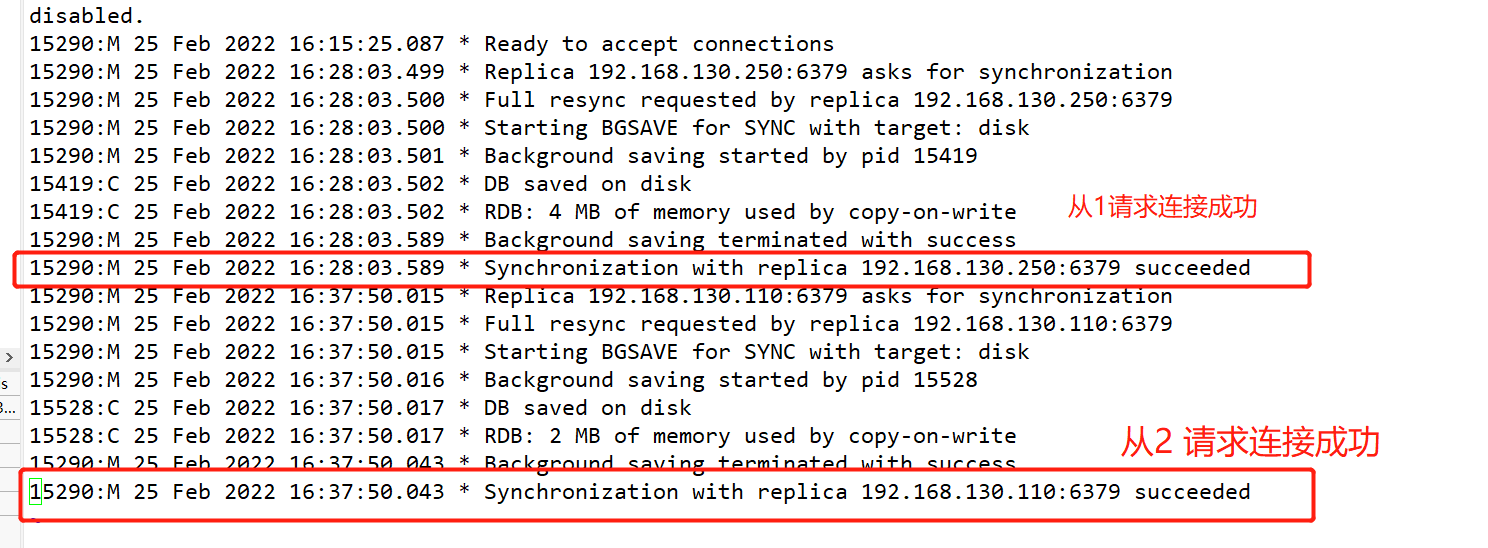
- View logs on the Master node
tail -f /var/log/redis_6379.log
Replica 192.168.80.11:6379 asks for synchronization
Replica 192.168.80.12:6379 asks for synchronization
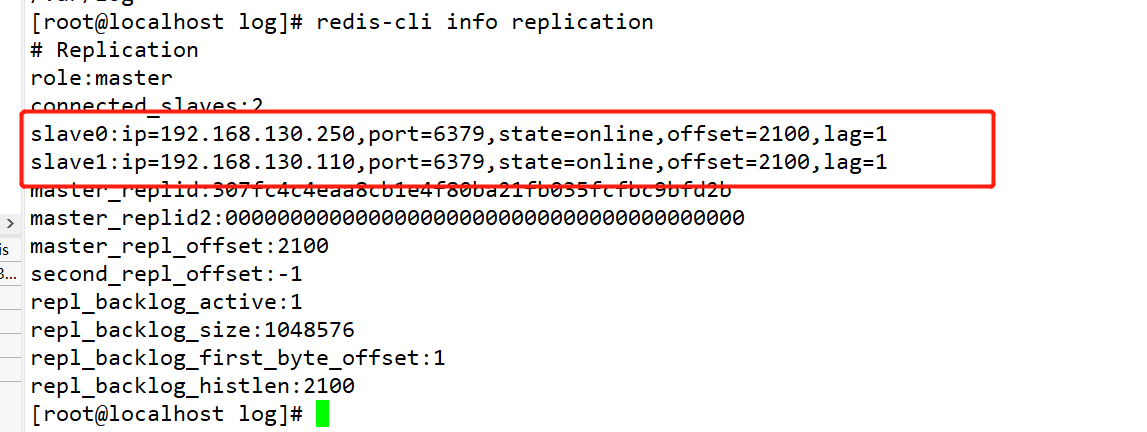
- Verify the slave node on the Master node
redis-cli info replication
# Replication .
role :master
connected_ slaves:2
3lave0:ip=192.168.80.11, port=6379, state=online, offset=1246, lag=0
3lave1:ip=192.168. 80.12, port=6379, state=online, offset=1246, lag=1
Verifiable
Lord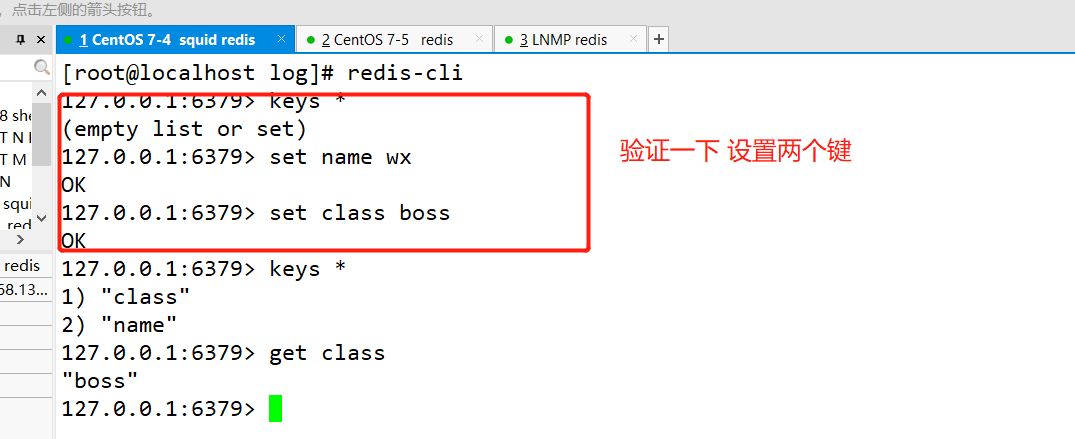
From 1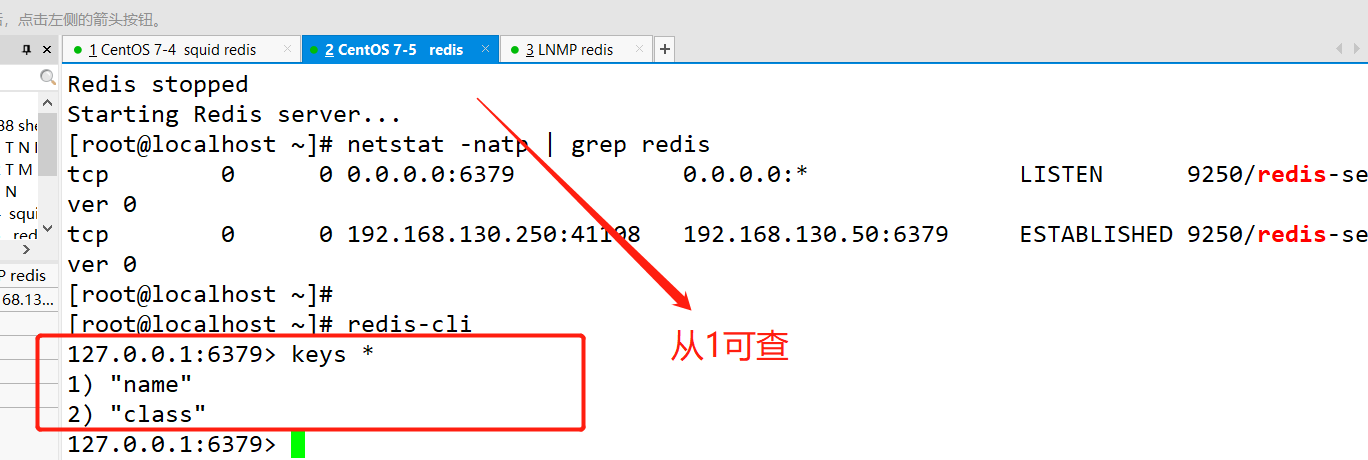
From 2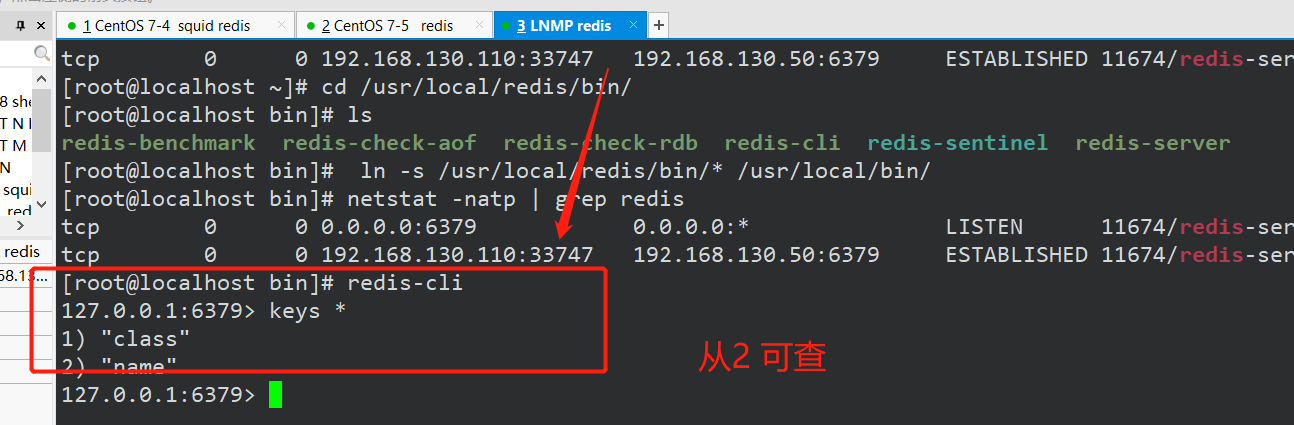
2, Sentinel mode
Sentinel mode story
The method of master-slave switching technology is: when the server goes down, a slave needs to be manually switched to the host, which requires manual intervention, which is not only time-consuming and laborious, but also makes the service unavailable for a period of time. In order to solve the shortcomings of master-slave replication, there is a sentinel mechanism.
Core function of sentinel: Based on master-slave replication, sentinel introduces automatic failover of master-slave nodes.
2.1 role of sentry mode
- Monitoring: the Sentry will constantly check whether the master node and slave node are working normally.
- Automatic failover: when the master node cannot work normally, the Sentry will start the automatic failover operation. It will upgrade one of the slave nodes of the failed master node to a new master node, and change other slave nodes to copy the new master node.
- Notification (reminder): the sentinel can send the result of failover to the client.
2.2 structure of sentry mode
The sentinel structure consists of two parts, sentinel node and data node:
- Sentinel node: the sentinel system consists of one or more sentinel nodes. Sentinel nodes are special redis nodes and do not store data.
- Data node: both master node and slave node are data nodes.
2.3. Failover mechanism

1. The sentinel node regularly monitors and finds out whether the master node has failed
Each sentinel node will send a ping command to the master node, slave node and other sentinel nodes every 1 second for heartbeat detection. If the master node does not reply within a certain time range or replies to an error message, the Sentry will think that the master node has been offline subjectively (unilaterally). When more than half of the sentinel nodes think that the master node is offline subjectively, it will be offline objectively.
2. When the master node fails, the sentinel node will implement the election mechanism through the Raft algorithm (election algorithm), and jointly elect a sentinel node as the leader to handle the failover and notification of the master node. Therefore, the number of clusters running sentinels shall not be less than 3 nodes.
3. The leader sentinel node performs failover. The process is as follows:
- Upgrade a -- slave node to a new master node, and let other slave nodes point to the new master node:
- If the original master node is restored and becomes a slave node, and points to the new master node:
- Notify the client that the master node has been replaced
It should be noted that the concept of objective offline is unique to the master node: if the slave node and sentry node fail, there will be no subsequent objective offline and failover operations after being subjectively offline by the sentry.
The start of sentry depends on the master-slave mode, so you must install the master-slave mode before doing sentry mode.
2.4 build redis sentinel mode
Environment configuration
| host | operating system | IP address | Installation package |
| Master | CentOS7 | 192.168.130.50 | redis-5.0.7.tar.gz |
| Slave1 | CentOS7 | 192.168.130.250 | redis-5.0.7.tar.gz |
| Slave2 | CentOS7 | 192.168.130.110 | redis-5.0.7.tar.gz |
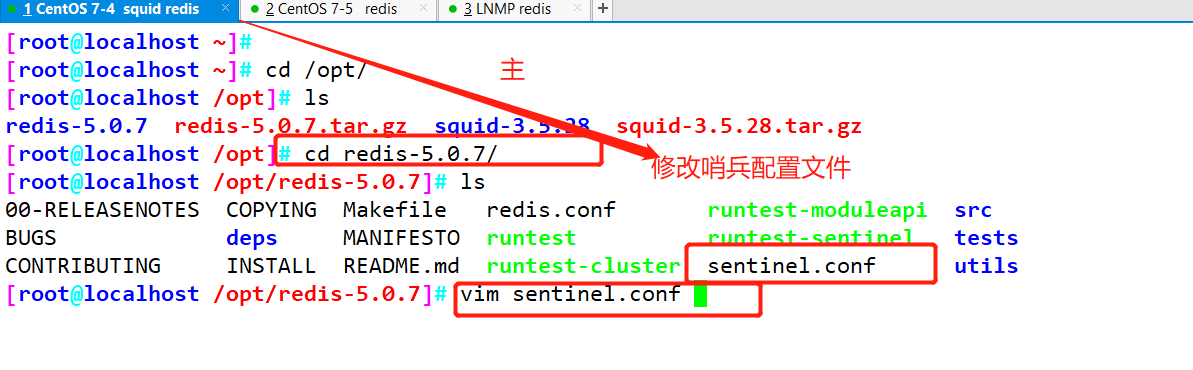
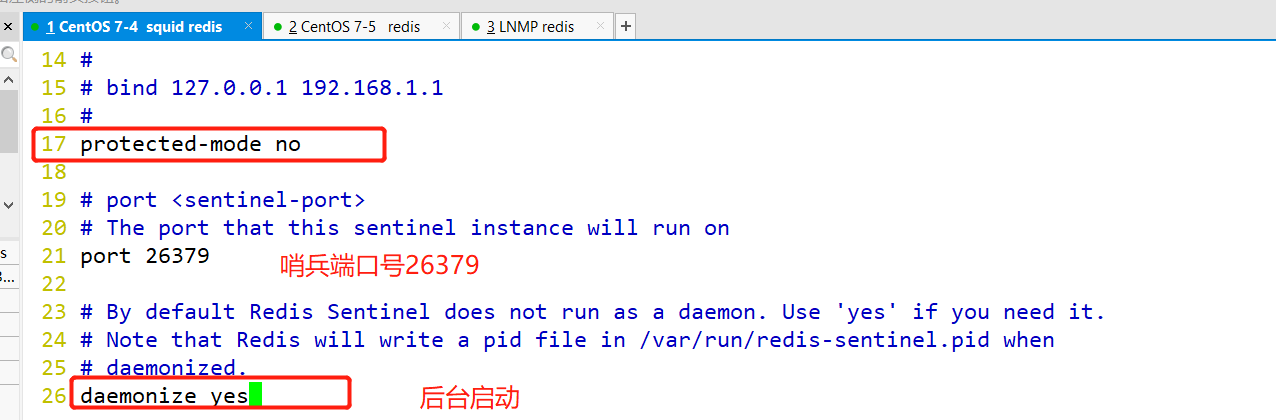
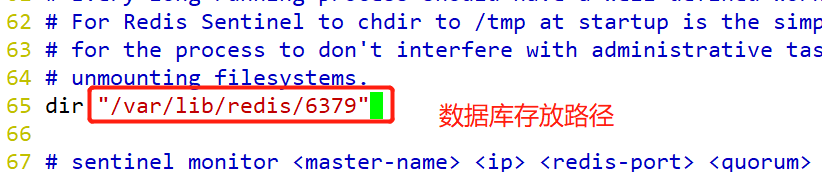
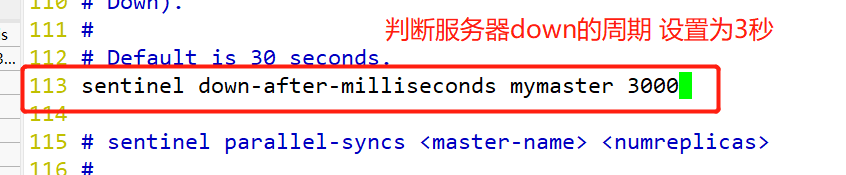
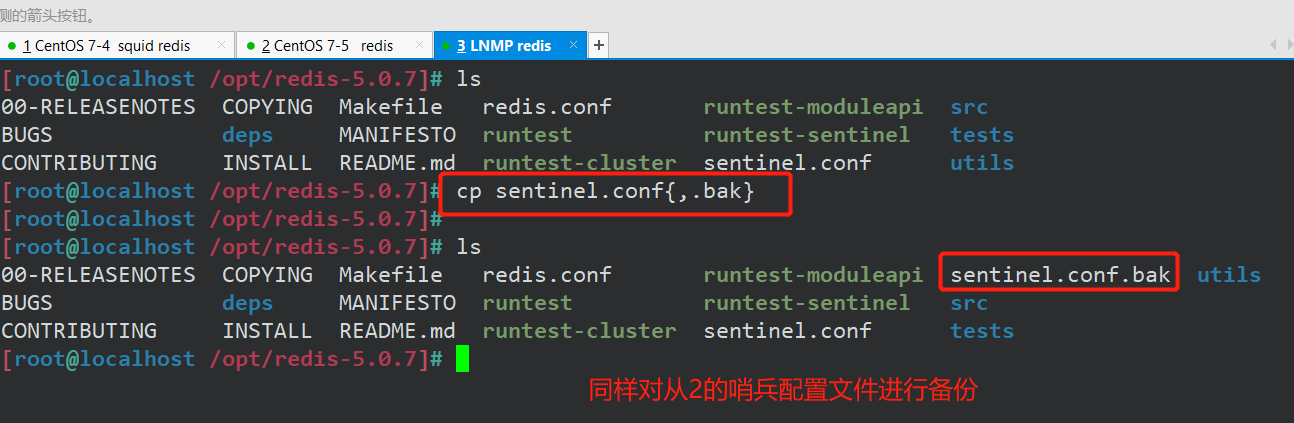
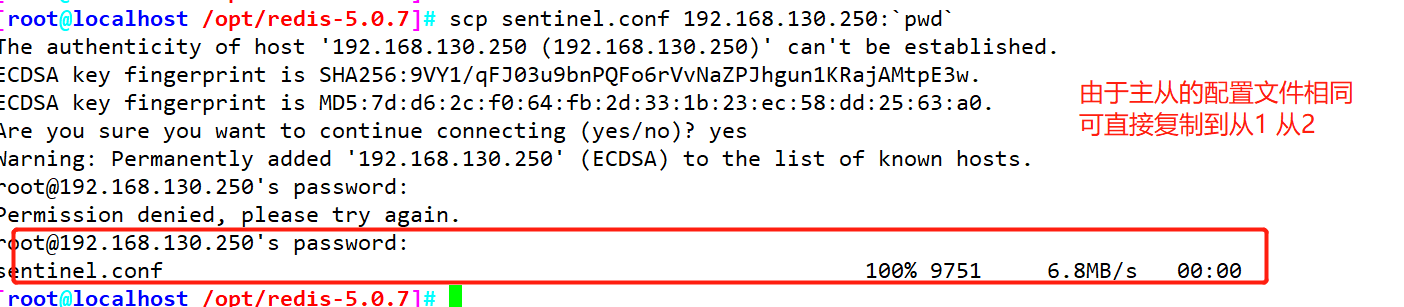
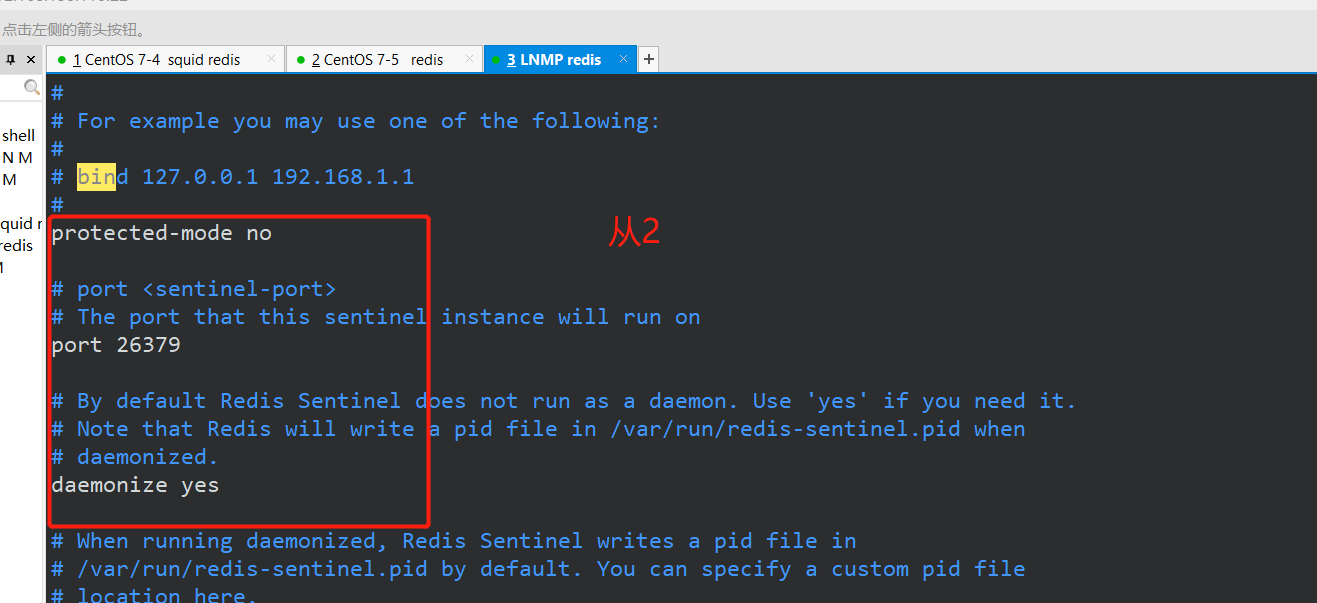
Modify Redis configuration file (all node operations)
tmp generally stores temporary files
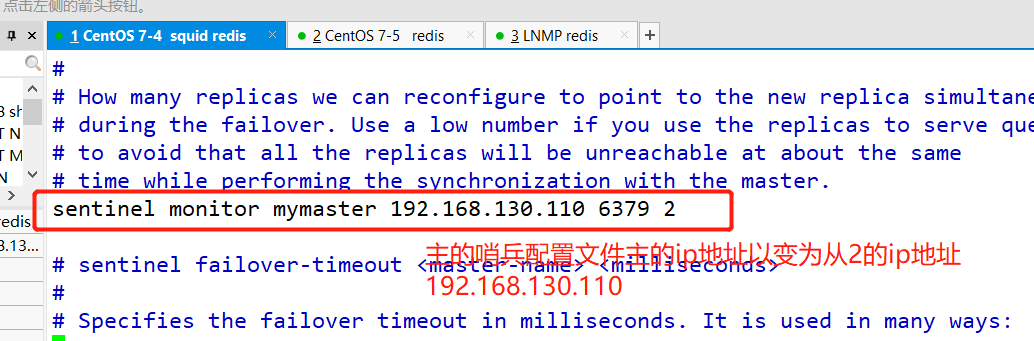
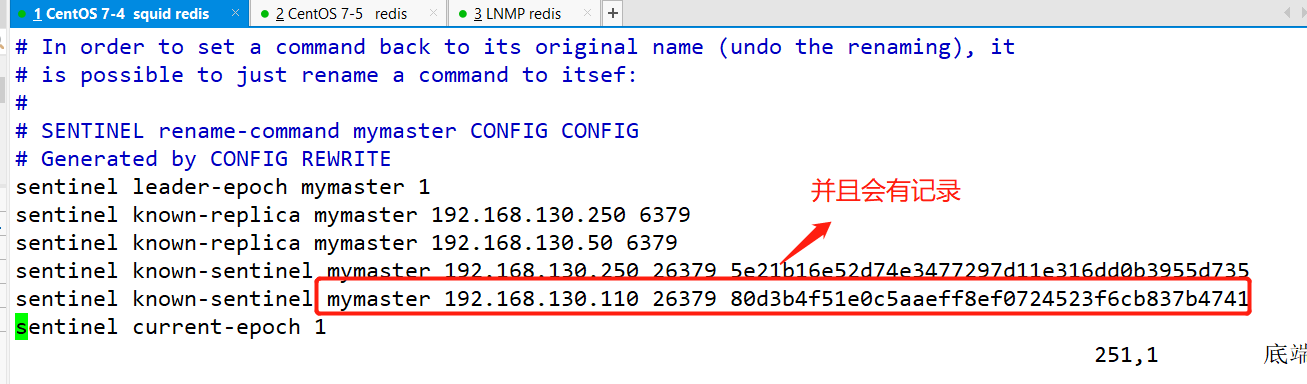
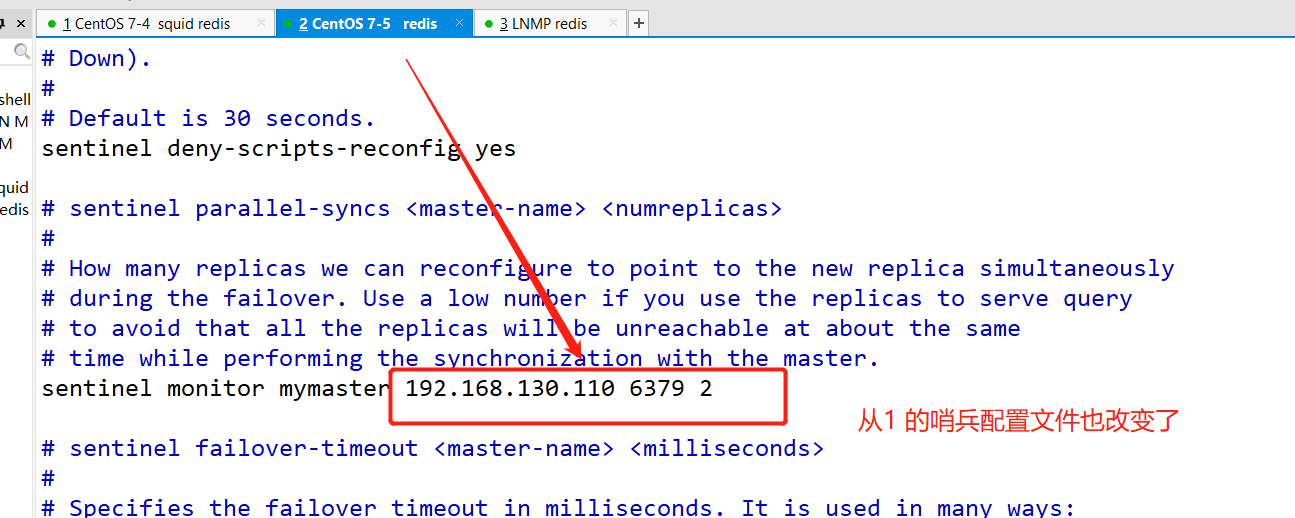
vim /opt/redis-5.0.7/sentinel.conf
#Line 17, turn off protection mode
protected-mode no
#Line 21, the default listening port of Redis sentry
port 26379
#Line 26, specify sentinel as the background startup
daemonize yes
#Line 36, specify the log storage path
logfile "/var/log/sentinel.log"
#Line 65, specify the storage path of the database
dir "/var/lib/redis/6379"
#In line 84, modify and specify the sentinel node to monitor the master node 192.168.163.10:6379. The name of the master node is mymaster. The meaning of the last 2 is related to the fault determination of the master node: at least two sentinel nodes need to agree to determine the failure of the master node and carry out failover
sentinel monitor mymaster 192.168.163.10 6379 2
#In line 113, determine the time period of server down. The default is 30000 milliseconds (30 seconds)
sentinel down-after-milliseconds mymaster 30000
#146 lines, the maximum timeout time of the failed node is 180000 (180 seconds)
sentinel failover-timeout mymaster 180000


From 1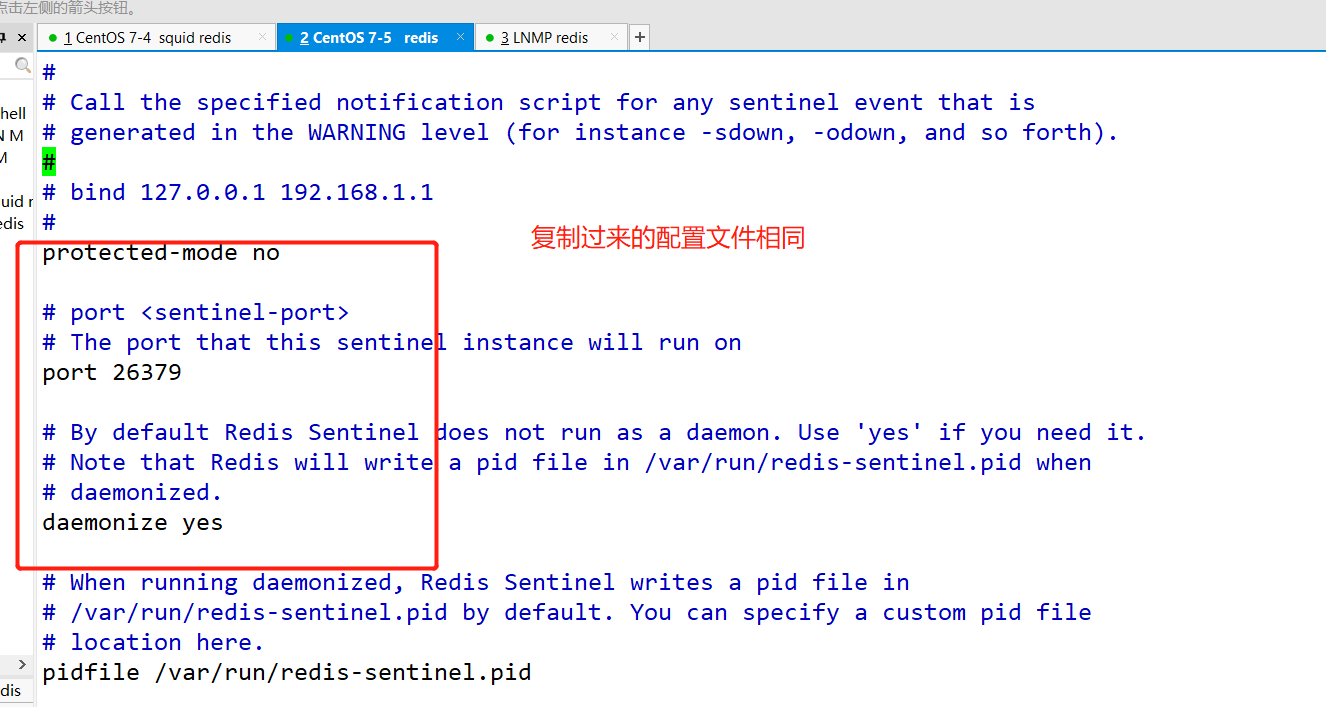
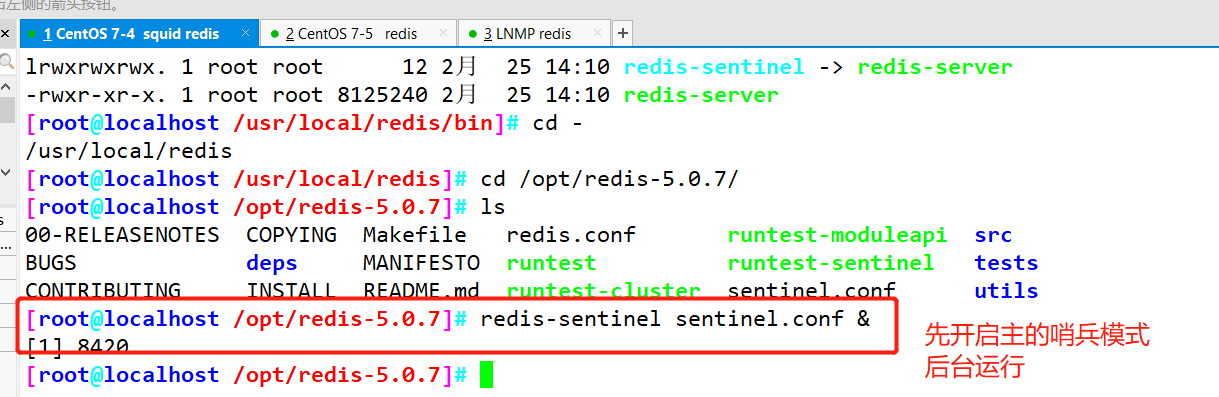
Start sentinel mode
Start the master first, and then start the slave
cd /opt/redis-5.0.7/
redis-sentinel sentinel.conf &
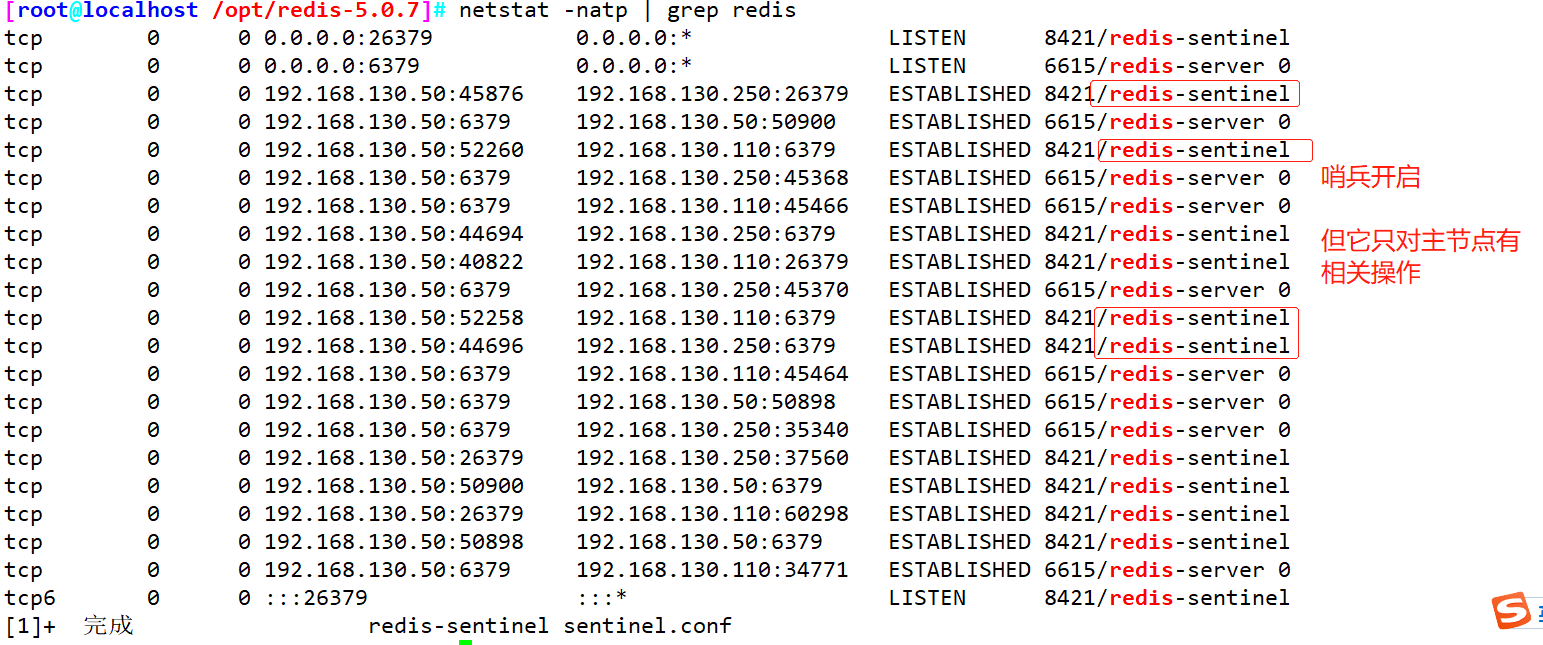
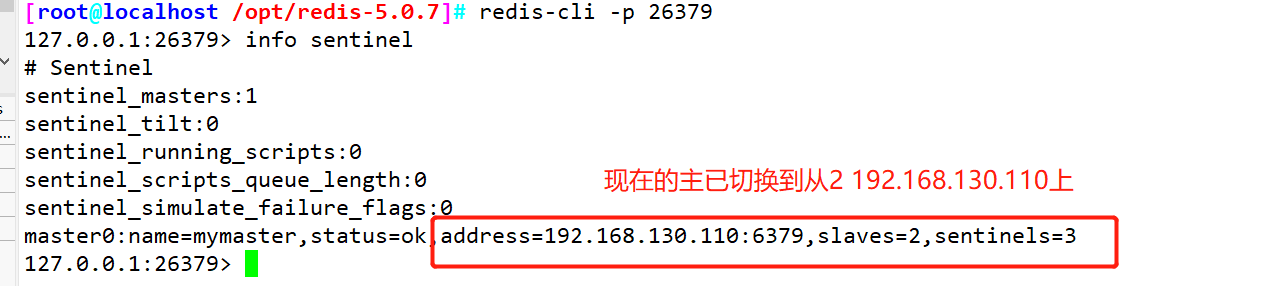
View sentry information
redis-cli -P 26379 info Sentinel
# Sentinel
sentinel_ masters:1
sentinel_ tilt:0
sentinel_ running_ scripts: 0
sentinel_ scripts_ queue_ length:0
sentinel_ simulate failure_ flags:0
master0 : name-mymaster, status=ok, address=192.168.80.10:6379, slaves=2, sentinels=3
fault simulation
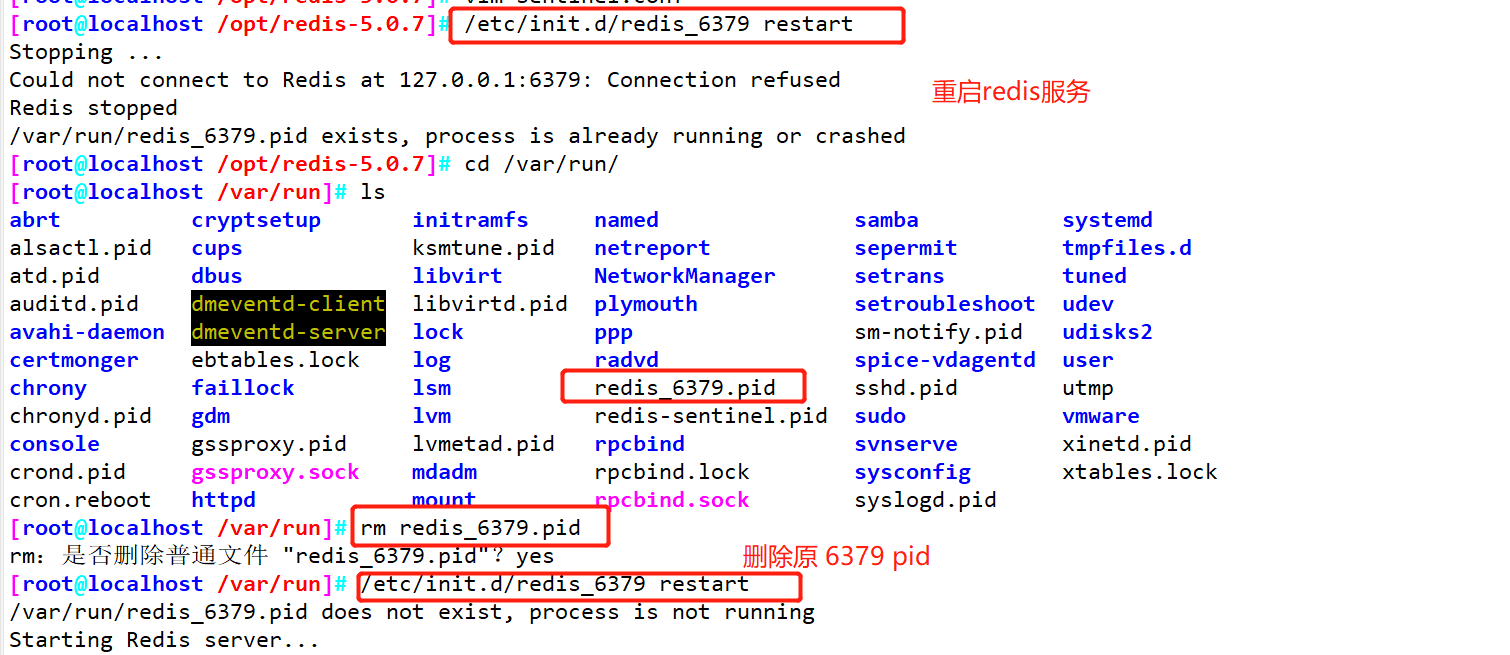
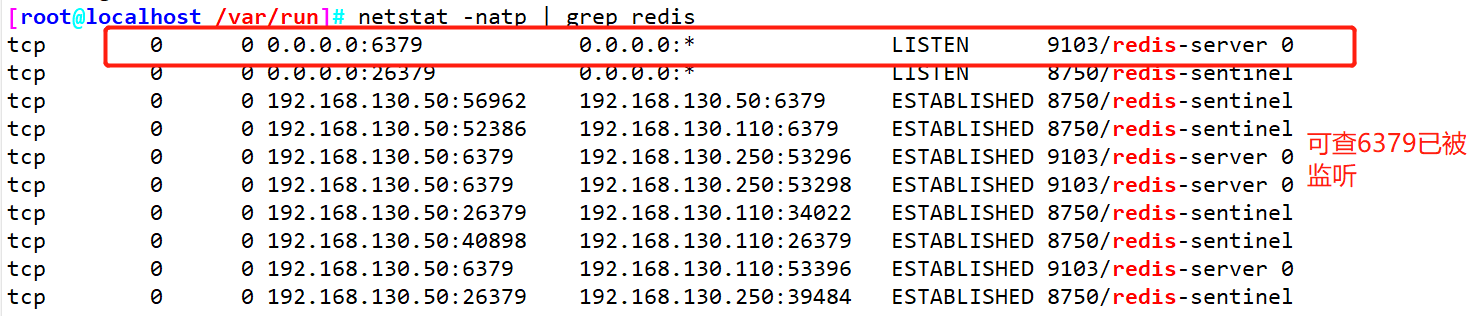
#View redis server process number
ps aux | grep redis
root      46451  0.1  0.4 156404  7776 ?        Ssl  09:17   0:04 /usr/local/redis/bin/redis-server 0.0.0.0:6379
root      46884  0.2  0.4 153844  7744 ?        Ssl  09:54   0:01 redis-sentinel *:26379 [sentinel]
root      46999  0.0  0.0 112676   984 pts/2    R+   10:04   0:00 grep --color=auto redis


#Kill the process number of redis server on the Master node and simulate the failure
kill -9 46451			#The process number of redis server on the Master node
The viewing process number is 6615

Verification results
tail -f /var/log/sentinel.log
#-------Log information------------
46884:X 03 Mar 2021 10:05:26.128 # +failover-end master mymaster 192.168.163.10 6379
46884:X 03 Mar 2021 10:05:26.128 # +switch-master mymaster 192.168.163.10 6379 192.168.163.20 6379
46884:X 03 Mar 2021 10:05:26.129 * +slave slave 192.168.163.30:6379 192.168.163.30 6379 @ mymaster 192.168.163.20 6379
46884:X 03 Mar 2021 10:05:26.129 * +slave slave 192.168.163.10:6379 192.168.163.10 6379 @ mymaster 192.168.163.20 6379
46884:X 03 Mar 2021 10:05:56.177 # +sdown slave 192.168.163.10:6379 192.168.163.10 6379 @ mymaster 192.168.163.20 6379

redis-cli -p 26379 INFO Sentinel
If the outdated master fails to start, it will switch to 192.168.130.110 (from 2)
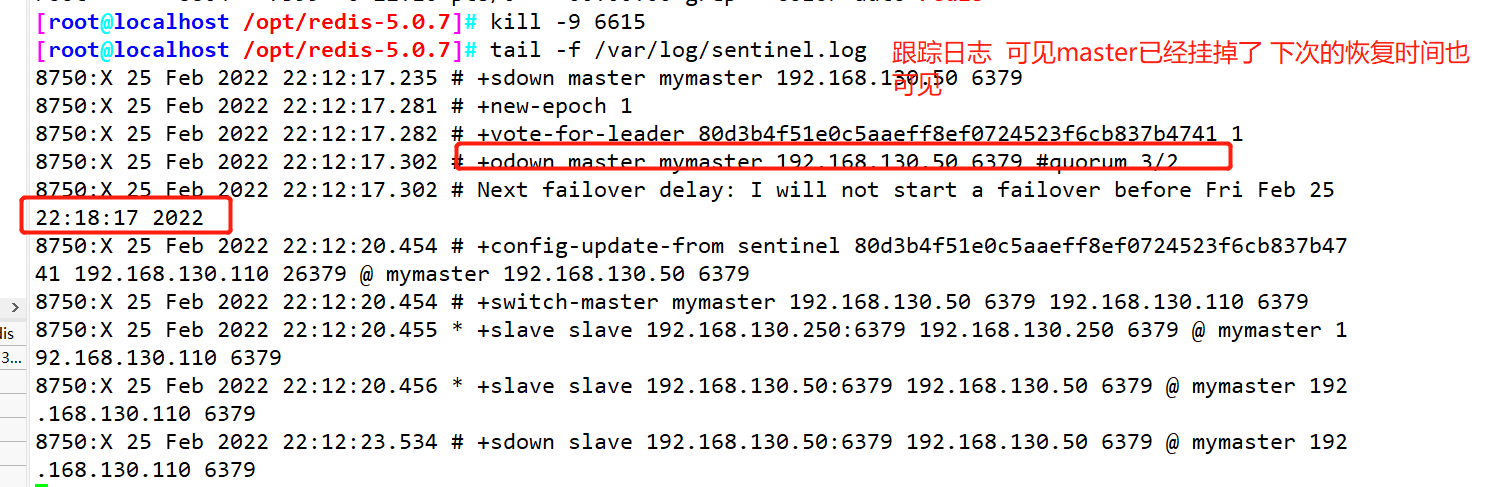
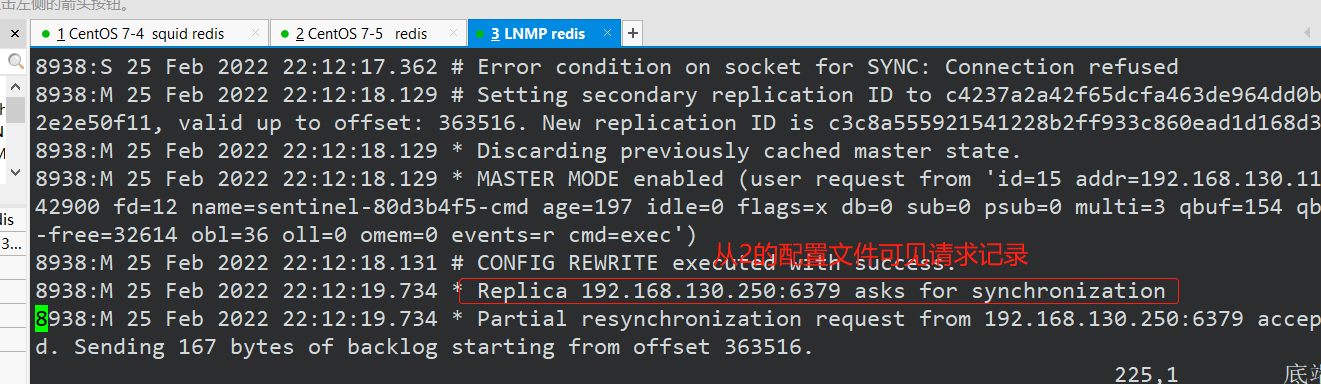

At this time, the original master node becomes the current slave node and sends a request to the current master node (after verifying that the original master node is reconnected, it will become a slave node)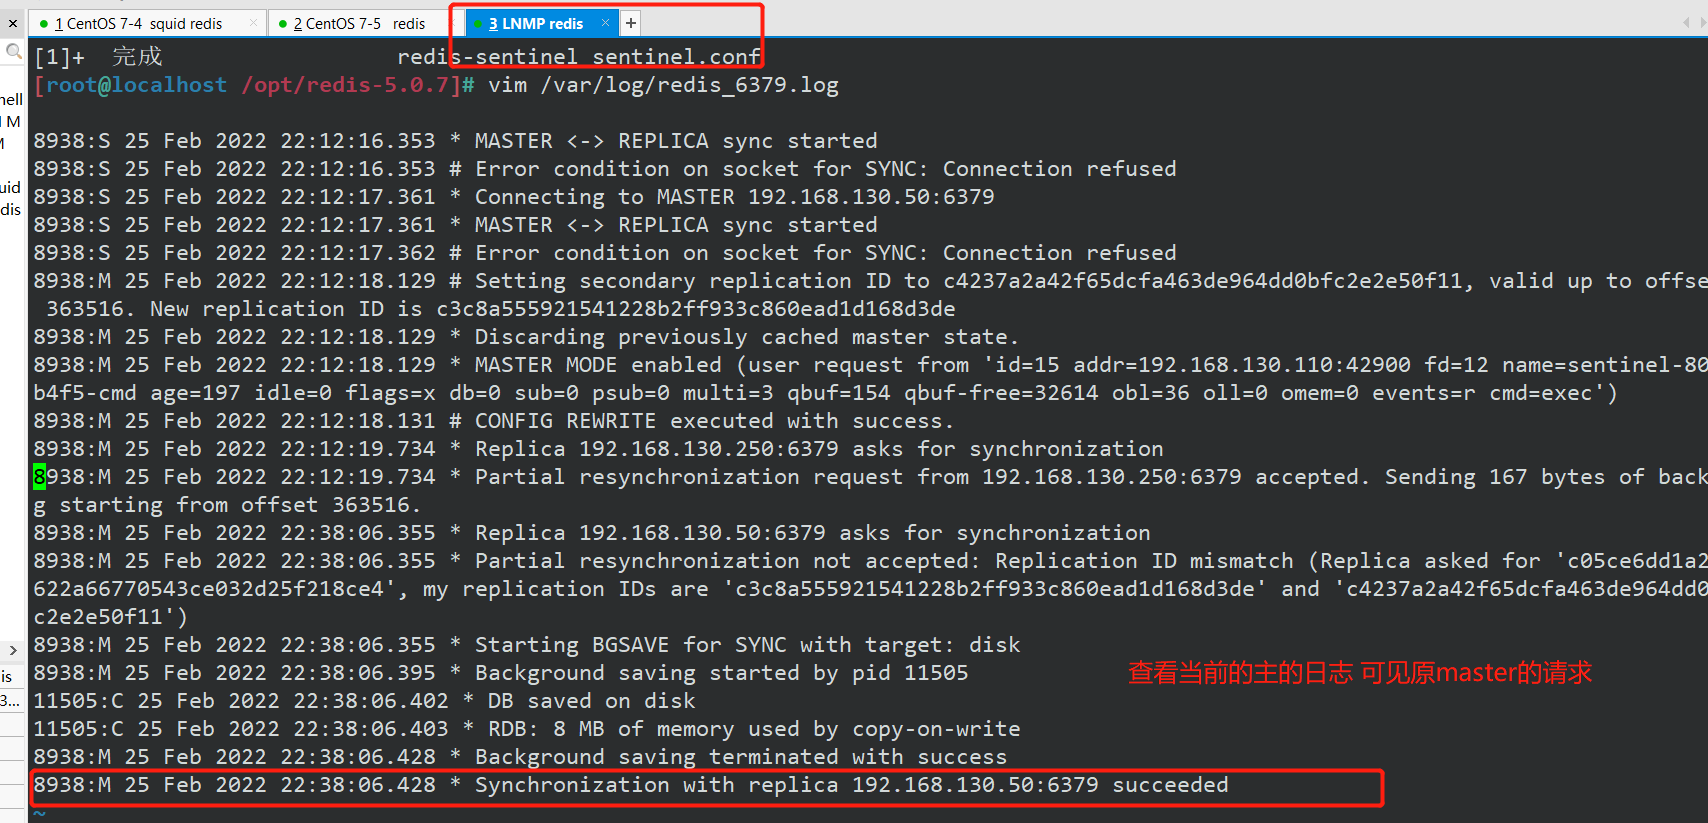
3, Redis cluster mode
3.1 role of cluster
Data partition
- Data partition (or data fragmentation) is the core function of the cluster.
- The cluster distributes data to multiple nodes. On the one hand, it breaks through the limitation of Redis single machine memory size and greatly increases the storage capacity; On the other hand, each master node can provide external read and write services, which greatly improves the response ability of the cluster.
- The problem of limited memory size of Redis stand-alone is mentioned when introducing persistence and master-slave replication; For example, if the stand-alone memory is too large, the fork operations of bgsave and bgrewriteaof may lead to the blocking of the master process. In the master-slave environment, the slave node may be unable to provide services for a long time when the host switches. In the full replication phase, the replication buffer of the master node may overflow.
High availability
- The cluster supports master-slave replication and automatic failover of the master node (similar to sentinel); When any node fails, the cluster can still provide external services.
3.2 data fragmentation of Redis cluster
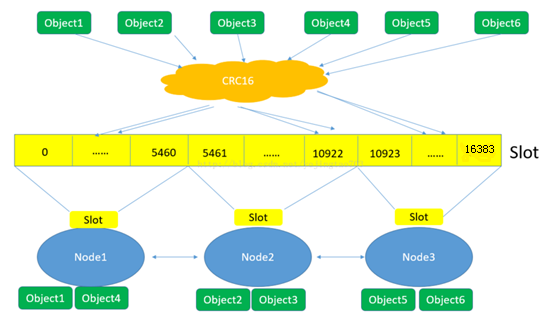
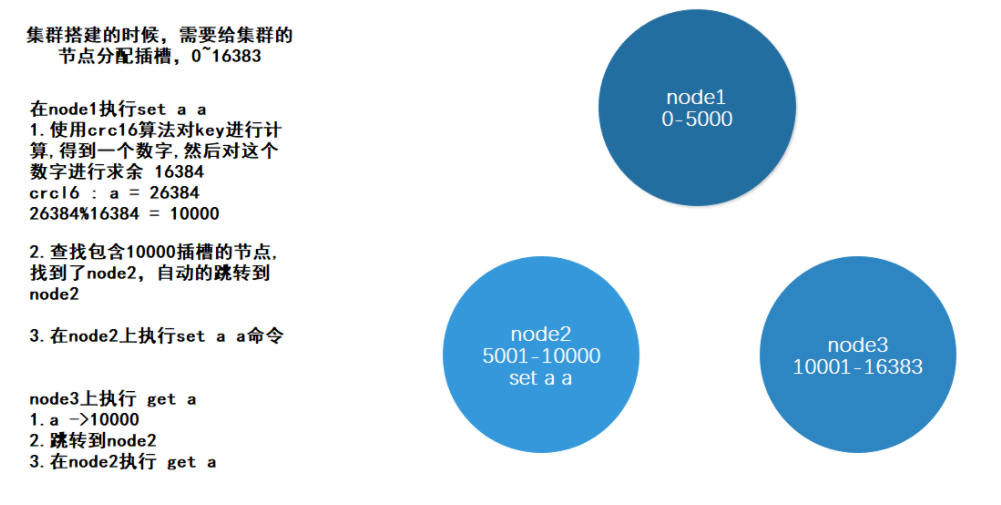
- Redis cluster introduces the concept of hash slot
- Redis cluster has 16384 hash slots (No. 0-16383)
- Each node of the cluster is responsible for a part of the hash slot
- After each Key is verified by CRC16, it takes the remainder of 16384 to determine which hash slot to place. Through this value, it finds the node corresponding to the corresponding slot, and then directly and automatically jumps to the corresponding node for access operation
Take a cluster composed of three nodes as an example
 node A Contains hash slots 0 to 5460
 node B Contains hash slots 5461 to 10922
 node C Contains hash slots 10923 to 16383
Redis Master-slave replication model of cluster
 There are in the cluster A,B,C Three nodes, if node B If it fails, the whole cluster will be short of 5461-10922 This range of slots cannot be used.
Add a slave node for each node A1,B1,C1 There are three in the whole cluster Master Nodes and three slave Node composition, in node B After failure, cluster election B1 The master node with bit continues to serve. When B and B1 After all failures, the cluster will not be available
3.3 build redis cluster mode
redis clusters generally need 6 nodes, 3 master and 3 slave. Here, all nodes are simulated on the same server.
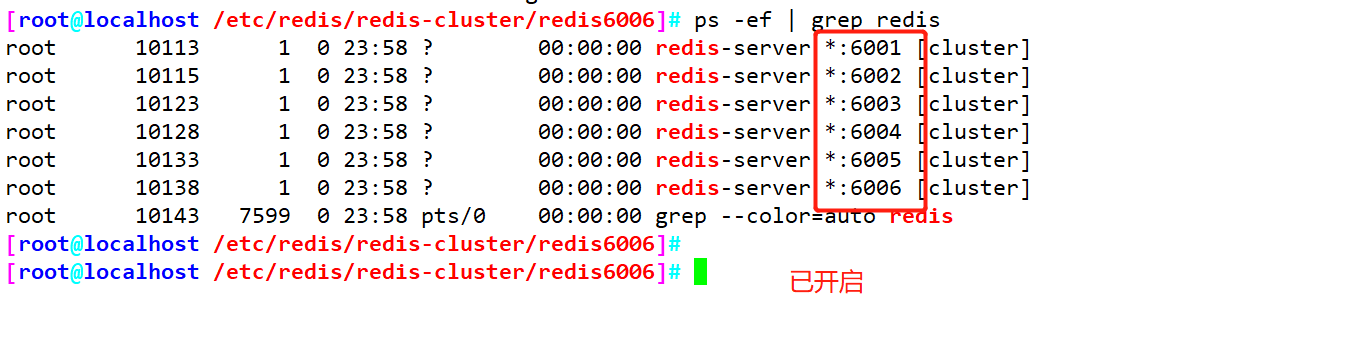
Distinguish by port number: three master node port numbers: 6001 / 6002 / 6003, corresponding slave node port numbers: 6004 / 6005 / 6006.
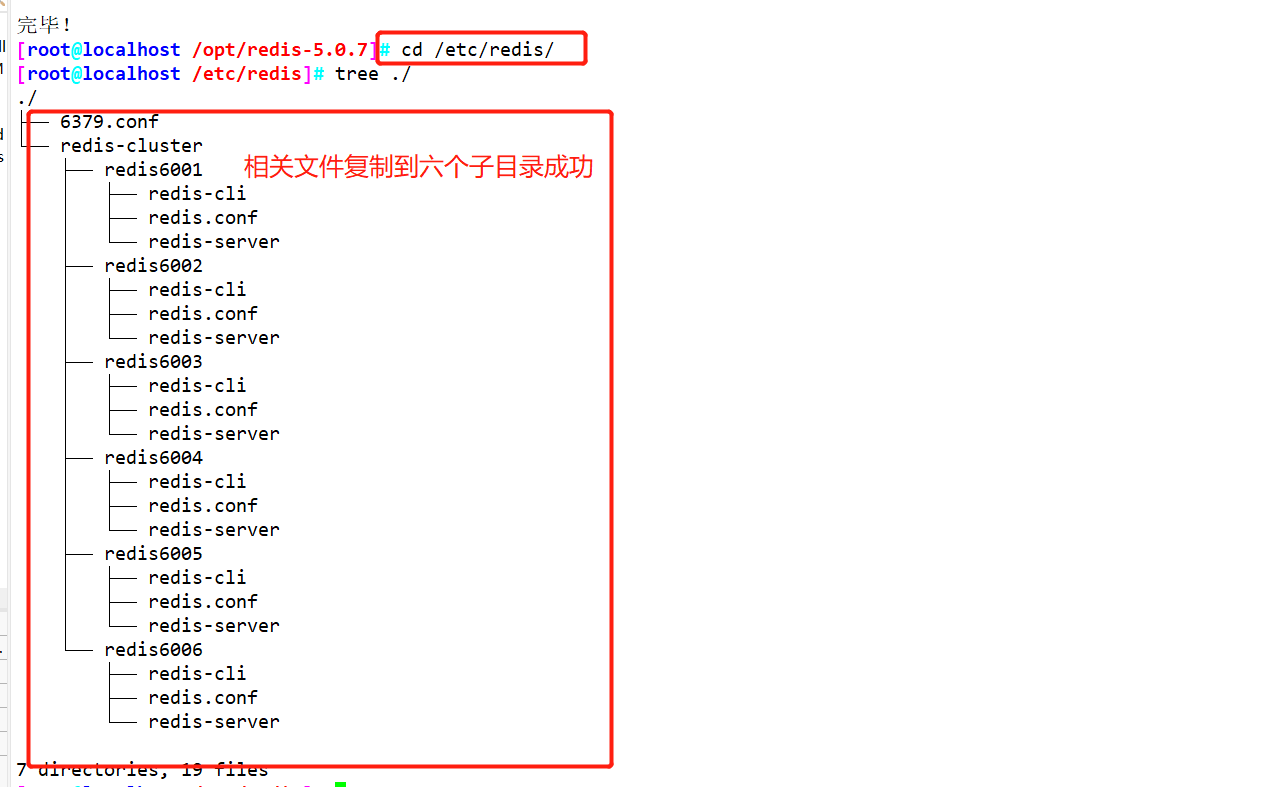
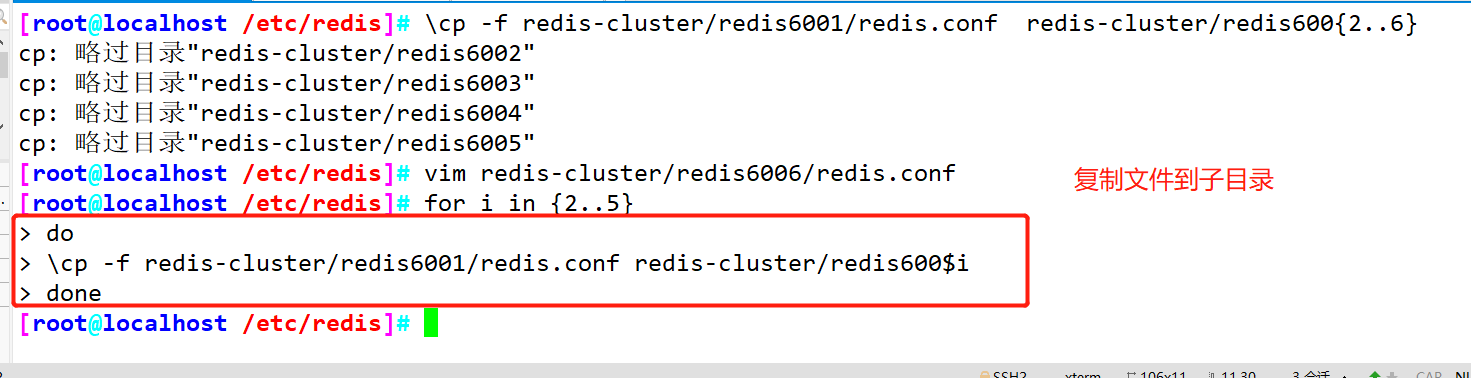
Create and copy files
#Create a file. The file name should be created according to the port to facilitate the difference
cd /etc/redis/
mkdir -p redis-cluster/redis600{1..6}

for i in {1..6}
do
cp /opt/redis-5.0.7/redis.conf /etc/redis/redis-cluster/redis6001
cp /opt/redis-5.0.7/src/redis-cli /opt/redis-5.0.7/src/redis-server /etc/redis/redis-cluster/redis6001/
done


Turn on Clustering
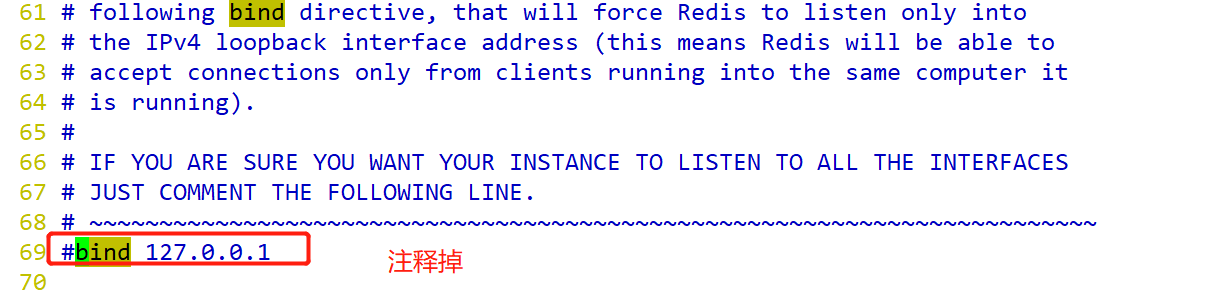
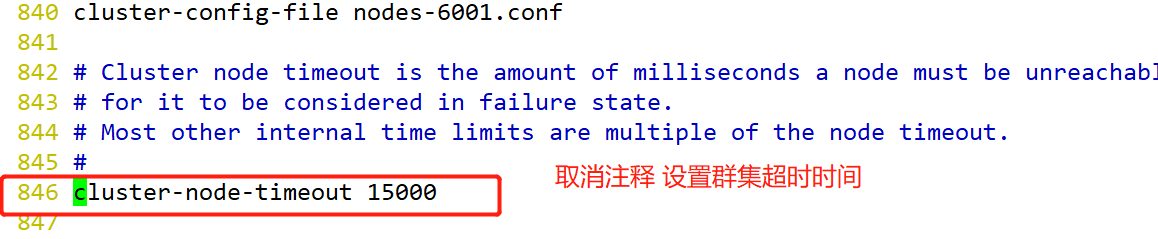
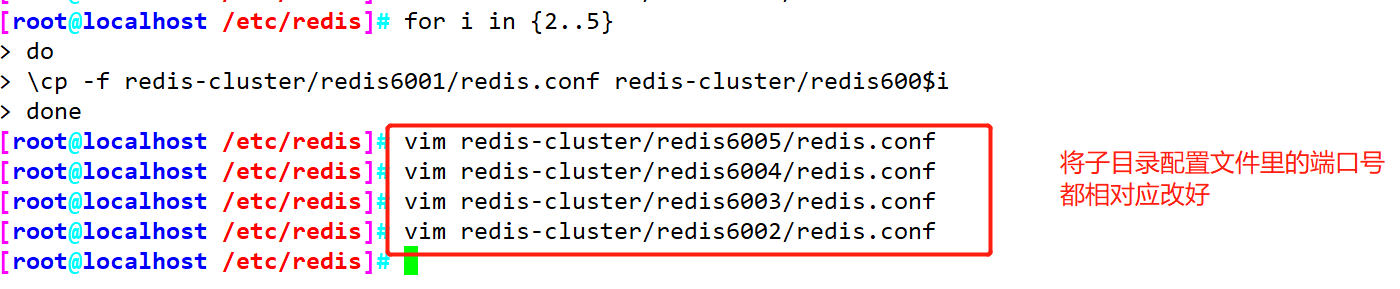
#The configuration files of the other five folders are modified by analogy. Note that the six ports are different.
cd /etc/ redis/ redis-cluster/ redis6001
vim redis. conf
#bind 127.0.0.1       #Line 69, comment out the bind item, and listen to all network cards by default
protected - mode no       #Line 88, modify, turn off protection mode
port 6001             #Line 92, modify, redis listening port,
daemonize yes          #Line 136, start the daemon and start it as an independent process
cluster-enabled yes          #Line 832, uncomment and turn on the cluster function
cluster-config- file nodes- 6001. conf       #Line 840, uncomment, cluster name, file setting
cluster- node-t imeout 15000       #Line 846, uncomment the cluster timeout setting
appendonly yes                 #Line 700, modify and enable AOF persistence


Enable redis node
Enter the six folders respectively and execute the command: redis-server redis.conf ,To start redis node
cd /etc/redis/ redis-cluster/ redis6001
redis-server redis . conf

for d in {1..6}
do
cd /etc/redis/redis-cluster/redis600$i
redis-server redis . conf
done

ps -ef | grep redis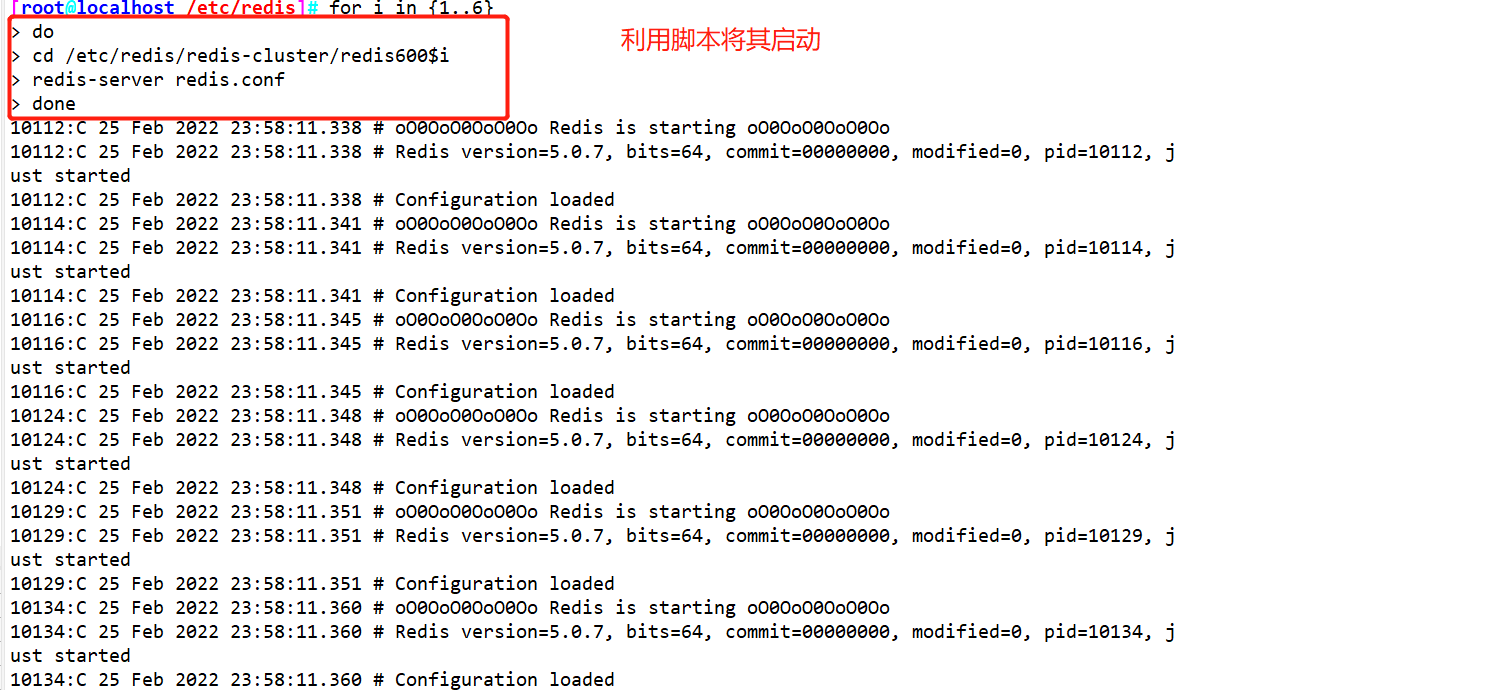
Start cluster
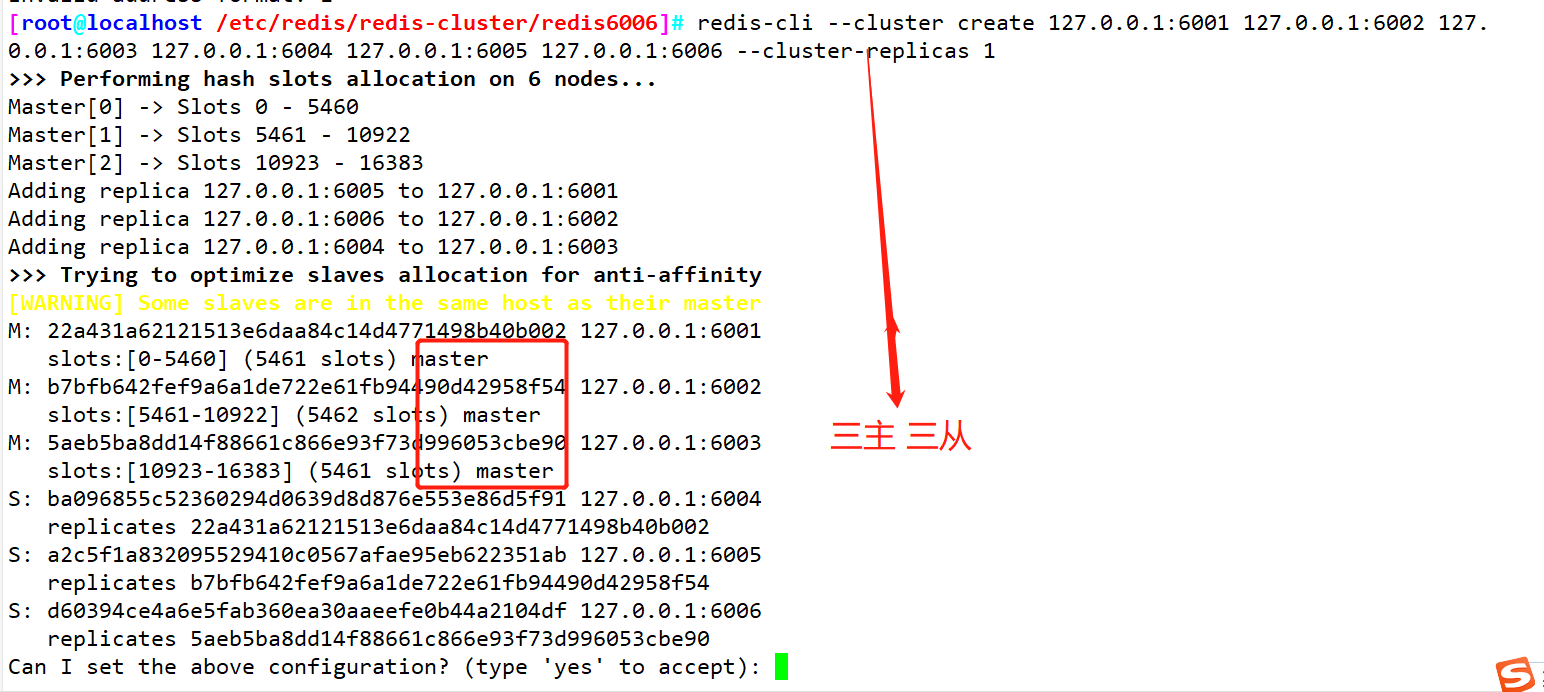
redis-cli --cluster create 127.0.0.1:6001 127.0.0.1:6002 127.0.0.1:6003 127.0.0.1:6004 127.0.0.1:6005 127.0.0.1:6006 --cluster-replicas 1

#The six instances are divided into three groups, with one master and one slave in each group. The front is the master node and the back is the slave node. You need to enter yes to create the next interaction.
--replicas 1 Indicates that each master node has 1 slave node.

Test cluster
redis-cli -P 6001 -C #Add the - c parameter and the nodes can jump to each other
127.0.0.1:6001> cluster slots #View the hash slot number range of the node
1) 1) (integer) 5461
2) (integer) 10922 #Hash slot number range
3) 1) "127.0.0.1"
2) (integer) 6003 #Primary node IP and port number
3)" fdca66192221 6dd69a63a7c9d3c4540cd6baef44"
4) 1) "127.0.0.1"
2) (integer) 6004 #Slave node IP and port number
3) " a2c0c32af f0f38980accd2b63d6d952812e44740"
2) 1) (integer) 0
2) (integer) 5460 .
3) 1) "127.0.0.1"
2) (integer) 6001
3) "0e5873747a2e26bdc935bc7 6c2ba fb19d0a54b11"
4) 1) "127.0.0.1"
2) (integer) 6006
3) "8842ef5584a85005e135fd0ee59e5a0d67b0cf8e"
3) 1) (integer) 10923
2) (integer) 16383
3) 1)"127.0.0.1"
2) (integer) 6002
3)"816ddaa3d14 69540b2f fbcaaf9aa86764 6846b30"
4) 1) "127.0.0.1"
2) (integer) 6005
3) "f847077bfe67224 66e96178ae8cbb09dc8b4d5eb"
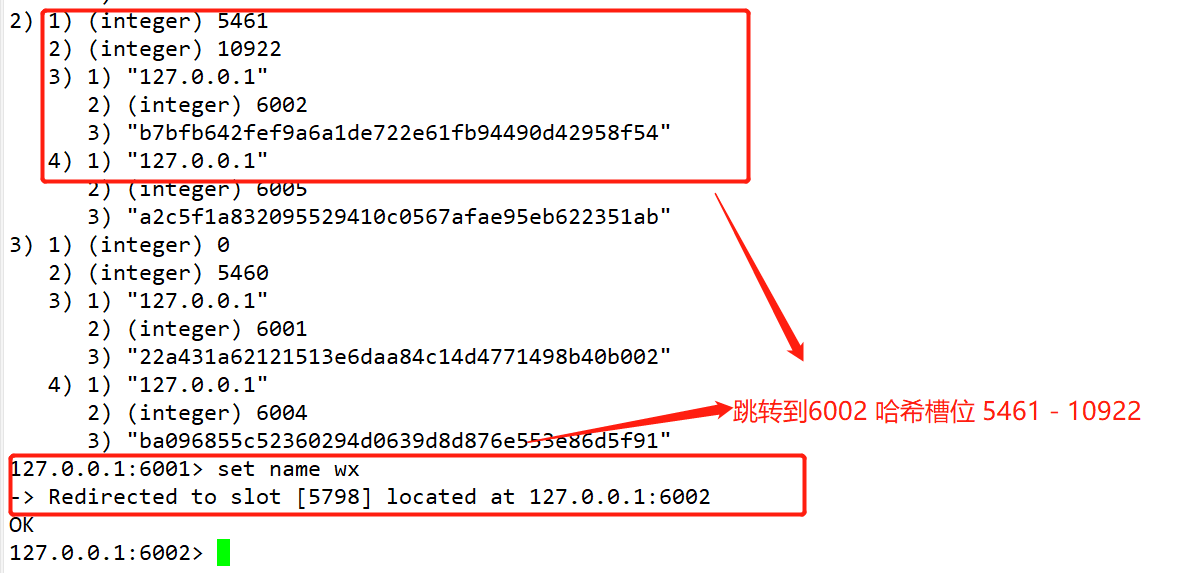
127.0.0.1:6001> set name zhangsan
-> Redirected to slot [5798] located at 127.0.0.1: 6003
OK
127.0.0.1:6001> cluster keyslot name #View the slot number of the name key
redis-cli -P 6004 -c .
127.0.0.1:6004> keys * #The corresponding slave node also has this data, but other nodes do not
1) "name"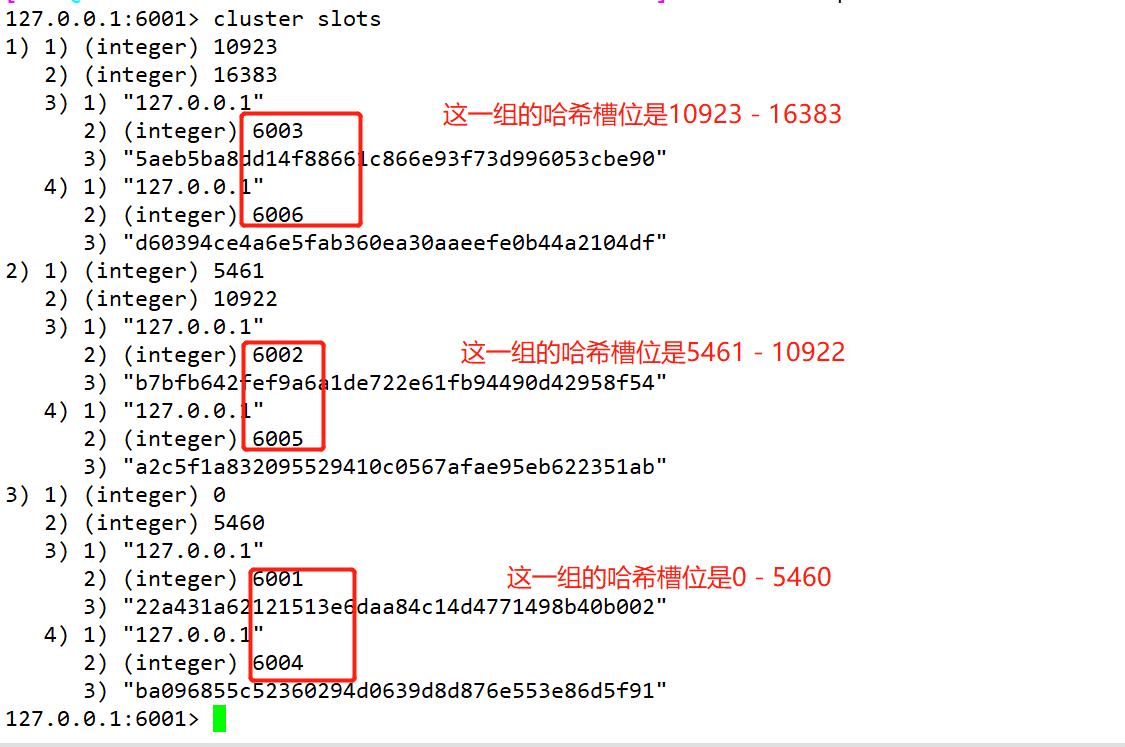
The master node has read-write permission, but the slave node only has copy permission
