Docker installation Redis
Create a Redis network
docker network create redis
Run redis container
docker run --name master-redis \
--net redis \
-v C:\Users\Administrator\Desktop\redis\data:/data \
-v C:\Users\Administrator\Desktop\redis\conf:/usr/local/etc/redis \
-d redis redis-server /usr/local/etc/redis/redis.conf
Use scaffold connection
docker run -it --net redis --rm redis redis-cli -h master-redis
Basic concepts
redis is a non relational database that stores key value pair data in memory. Each key value pair is composed of objects. The key is always a string object, and the value can be one of string object, list object, hash object, collection object and ordered collection object.
Switch database
select <number>
View database size
dbsize
clear database
flushdb
Empty all databases
flushall
Key operation
View all keys
keys *
Determine whether a key exists
exitsts <key>
View key types
type <key>
Delete key
del <key>
Expiration time
expire <key> <seconds> #Set the expiration time of the key
persist <key> #Remove key expiration time
ttl <key> #Check the expiration time
data type
| type | Type value | function |
|---|---|---|
| string | String, integer, or floating point number | Performs an operation on an entire string or part of a string Performs a self increment or self decrement operation on an integer or floating point number |
| list | A linked list. Each node of the linked list contains a string | Push or pop elements from both ends of the linked list Trim the linked list according to the offset Read single or multiple elements Find or remove elements based on values |
| set | An unordered collector containing string s, each element is unique | Add, get, and remove individual elements Check whether an element exists in the collection Calculate intersection, union and difference sets Get elements randomly from the collection |
| hash | Unordered hash table containing key value pairs | Add, get, and remove a single key value pair Get all key value pairs |
| zset | An ordered mapping between string members and floating-point scores. The order of elements is determined by the size of the score | Add, get, and delete individual elements Get the element according to the score range or member |
string
String is binary safe, which means that string can contain any type of data. The value of a string can store up to 512M bytes. The bottom layer of string is a string with dynamic capacity expansion. Each capacity expansion will be expanded by half. When it reaches 1m, it will only be expanded by 1m each time.
Add data
set <key> <value>
setrange <key> <start> <value> #Set the substring from start to value
get data
get <key>
getrange <key> <from> <to> #Substring
Delete data
del <key>
Self increasing
incr <key>
incrby <key> <amount>
Self subtraction
decr <key>
decrby <key> <amount>
Add
append <key> <appendValue>
list
List is a simple string list. It is sorted according to the insertion order. You can add an element to the head or tail of the list. A list can contain 223-1 elements at most. Its bottom layer is a two-way linked list.
Add data
lpush <key> <item>...
rpush <key> <item>...
Delete data
lpop <key>
blpop <key> <timeout> #In timeout, if there is a value on the left side of the queue, a message will pop up
rpoplpush <srcKey> <destKey> #Pop up the rightmost element from srcKey and add it to the leftmost end of destKey
brpoplpush <srcKey> <destKey> <timeout>
rpop <key>
brpop <key> <timeout>
Get data by index
lindex <key> <index>
Get elements by range
lrange <key> <from> <to>
Cutting
ltrim <key> <from> <to> # Only the elements between from and to are retained
set
Set is an unordered string collection. A set can contain 223-1 elements at most. At the bottom of it is a hash table.
Add data
sadd <key> <item>...
get data
smembers <key> #Get all data
srandmember <key> <count> #Get count elements
Checks whether the given element is in the set
sismember <key> <item>
Delete data
srem <key> <item>
spop <key> #Random deletion
Returns the number of elements in a set
scard <key>
mobile data
smove <srcKey> <destKey> <item> #If srckey contains an item, move it to destKey
combination
sdiff <key> <key>... #Returns the data in the first key but no other key
sdiffstore <destKey> <key> <key>...
sinter <key> <key>... #Returns the data that exists in the key at the same time
sinterstore <destKey> <key> <key>...
sunion <key> <key>... #Returns an element that exists in at least one key
sunionstore <destKey> <key> <key>...
hash
Hash is a hash of key value pairs without hash. A hash can contain up to 223-1 elements. At the bottom of it is a hash table.
Add data
hset <key> <itemKey> <itemValue>
hmset <key> (<itemKey> <itemValue>)... #Set multiple data at the same time
get data
hget <key> <itemKey> #Get specified data
hmget <key> <itemKey>... #Gets the value of multiple keys
hgetall <key> #Get all data
Delete if present
hdel <key> <itemKey>
Returns the number of elements in the hash
hlen <key>
Check whether the given element is in the hash
hexists <key> <itemKey>
Get all keys / values
hkeys <key>
hvals <key>
hgetall <key>
zset
zset is similar to set. The difference is that each zset member is associated with a score, which is used to rank the members in the ordered set from the lowest score to the highest score.
Add data
zadd <key> (<score> <item>)...
get data
zrange <key> <from> <to>
zrangebyscore <key> <from> <to>
zrevrabgebyscore <key> <from> <to>
Delete data
zrem <key> <item>
zremrangebyrank <key> <from> <to> #Remove data ranked between < from > and < to >
zremrangebyscore <key> <min> <max> #Remove data with a score between min and max
Returns the number of elements in the zset
zcard <key>
zcount <key> <max> <min> #Returns data with a score between max and min
Modify score
zincrby <key> <increment> <item>
Return ranking
zrank <key> <item> #Return the ranking of item
zrevrank <key> <item>
Return score
zscore <key> <item> #Return the score of item
Persistence
RDB(Redis DataBase)
RDB persistence can snapshot your data at a specified time interval. When it is restored, it reads the snapshot file directly into memory. RDB is a compact single file. When saving RDB files, the only thing the parent process needs to do is fork out a child process. The next work is done by the child process. The parent process does not need to do other IO operations. Therefore, RDB persistence can maximize the performance of redis. However, when the data set is large, the process of fork is very time-consuming. The most fatal thing is that if redis goes down before the save time, the data during this time will be lost.
bgsave
Bgsave instruction can save a snapshot. The difference between bgsave instruction and save instruction is that its saving process occurs in the background, while the saving process of save instruction occurs in the foreground. Therefore, save instruction will block the request of the client.
bgsave
Configure RDB on
If the following configurations are added to the configuration file, Redis will start counting after the last snapshot is created. When the condition of "1000 writes in 60 seconds" is met, the bgsave instruction will be automatically triggered.
save 60 1000
dbfilename dump.rdb
dir /data/
The dir option is used to specify the directory where RDB files and AOF files are stored.
Validate RDB file
The following command can verify whether the RDB file has errors, but it cannot recover the RDB file, so multiple backups should be reserved for important snapshots.
docker exec master-redis redis-check-rdb <dump.rdb>
AOF(append only file)
Aof persistence records every write operation to the server. When the server restarts, these commands will be re executed to recover the original data. The AOF file is a log file that is only appended. You can use different append strategies to add content to the AOF file. This process is processed by the background thread. The main thread will try its best to process the client request. In case of failure, the data of up to 1 second will be lost. Redis can automatically rewrite the AOF in the background when the volume of the AOF file becomes too large. The rewritten new AOF file contains the minimum command set required to recover the current data set. And the whole rewrite operation is absolutely safe. However, the volume of AOF file is larger than RDB file, and the speed of AOF may be slower than RDB according to different append strategies. Two persistence methods can be enabled at the same time. In this case, when redis restarts, AOF files will be loaded first to recover the original data, because normally, the data set saved in AOF files is more complete than that saved in RDB files.
Configure AOF on
appendonly yes
appendfsync everysec
The appendfsync options are as follows:
- always: every Redis write command should be written to the hard disk synchronously
- everysec: performs synchronization once per second
- no: let the operating system decide how to synchronize
AOF compression
To solve the problem of increasing AOF file size, you can use the bgrewriteaop instruction to rewrite the AOF file, or you can automatically trigger the instruction through the following configuration:
auto-aof-rewrite-percentage 100
auto-aof-rewrite-min-size 64mb
The above configuration means that if the volume of the AOF file is greater than 64MB and the volume of the AOF file is 100% larger than that after the last rewrite, the bgrewriteaop instruction will be triggered.
Validate AOF file
The following commands can verify whether there are errors in the AOF file. If the -- fix option is specified, redis will repair the AOF file. The repair process is also very simple. Redis scans the entire AOF file, looks for incorrect commands, and then deletes the first error command and all commands after the command.
docker exec master-redis redis-check-aof [--fix] <appendonly.aof>
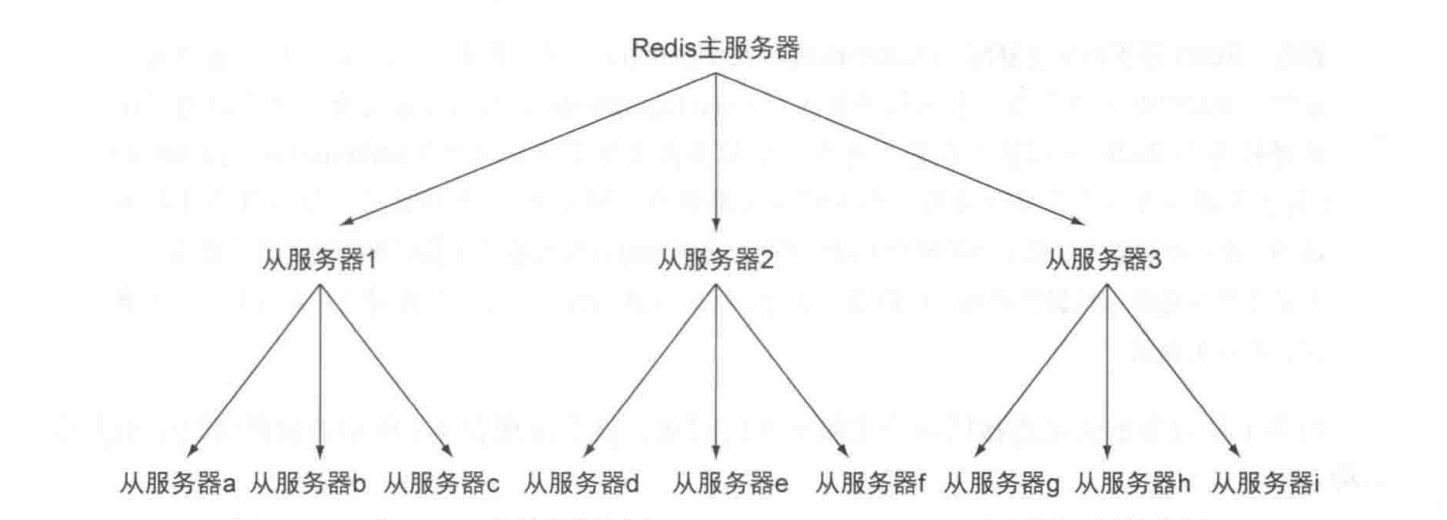
Master slave replication
Master slave replication refers to copying data from one Redis server to other Redis servers. Then the slave server can be responsible for reading requests, so as to reduce the burden of the master service, and the master server can focus on processing write requests. The slave server will connect to the master server according to the IP address and port number given in the following configuration.
slaveof <host> <port>
For a running slave server, you can use the slvaeof no one command to stop the slave server from copying. You can also use the slaveof < host > < port > command to copy a new master server from the server.
Replication process
| step | Operation of master server | Operations from the server |
|---|---|---|
| 1 | Wait for the command to enter | Connect to the primary server and send the sync command |
| 2 | Execute bgsave and use the buffer to record all commands executed after bgsave | According to the configuration options, decide whether to continue to use the existing data (if any) to process the client's command request or return an error to the client sending the request |
| 3 | After bgsave is executed, send the snapshot file to the slave server, and continue to use the buffer to record the executed write commands during sending | Discard all old data (if any) and start loading the snapshot file from the master server |
| 4 | After sending the snapshot file, start sending the write command stored in the buffer to the slave server | Finish interpreting the snapshot file and start accepting the command request as usual |
| 5 | The write command stored in the buffer has been sent; from now on, each time a write command is executed, the same write command will be sent to the slave server | Execute all write commands from the master server stored in the buffer; and from now on, receive and execute each write command from the master server |
Fault repair
When a primary server stops running due to a fault, it needs to be repaired.
Specify a new master server for the slave server
- When performing a save operation from the server: save
- Copy the dump.rdb file from the server to the new master server
- Start the new master server
- Tell the slave server the IP and port number of the new master server: slave of < host > < port >
- Restart slave server
Promote from server to primary server
This method step is similar to the previous method.
sentry
Sentry is used to manage multiple Redis servers. Sentry itself is a runnable program, which has the following three tasks:
- Monitoring: the Sentry will constantly check whether the master server and slave server are running normally.
- Reminder: when a server problem is detected, the sentinel can send a notification to the administrator or other applications through the API.
- Automatic fault migration: when a master server cannot work normally, the Sentry will upgrade one of the slave servers of the failed master server to a new master server through the voting protocol, and change other slave servers of the failed master server to copy the new master server; when the client tries to connect to the failed master server, the Redis cluster will also return the new master server to the client Server address, so that the cluster can use the new master server instead of the failed server.
Open the sentry
Create a sentinel.conf configuration file in the data volume
sentinel monitor <master-redis> <127.0.0.1> <6379> <2>
sentinel down-after-milliseconds mymaster 60000
sentinel failover-timeout mymaster 180000
sentinel parallel-syncs mymaster 1
Run sentinel
docker exec master-redis redis-sentinel /usr/local/etc/redis/sentinel.conf
Sentinel cluster
A sentinel can connect with multiple other sentinels, and each sentinel can check each other's availability and exchange information. It is not necessary to set the addresses of other sentinels for each sentinel running, because sentinels can automatically find other sentinels monitoring the same master server through the publish and subscribe function, which is sent to the channel Inel: Hello sends information. Similarly, it is not necessary to manually list all slave servers under the master server, because sentinels can obtain the information of all slave servers by asking the master server. Their working steps are as follows:
- Each sentinel will send a message to the sentinel:hello channel of all master servers and slave servers monitored by it every two seconds through the publish and subscribe function. The message contains the Sentinel's IP address, port number and PID.
- Each sentinel subscribes to the sentinel:hello channel of all the master and slave servers it monitors to find sentinels that have not appeared before. When a sentinel finds a new sentinel, it will add the new sentinel to a list, which saves the known sentinels and monitors all other sentinels of the same master server.
- The information sent by the sentry also includes the complete current configuration of the primary server. If one sentry contains an older configuration of the primary server than that sent by another sentry, the Sentry will be upgraded to the new configuration immediately.
- Before adding a new sentinel to the list of monitoring master servers, the sentinel will check whether the list already contains sentinels with the same running ID or address as the sentinel to be added. If so, the sentinel will first remove those sentinels with the same running ID or address in the list, and then add a new Sentinel.
Subjective offline and objective offline
SDOWN refers to the offline judgment made by a single sentinel instance on the server. ODOWN It refers to the subjective judgment made by multiple sentinel instances on the same server. The objective offline is only applicable to the primary server. For the secondary server, sentinels do not need to negotiate before judging them as offline. As long as a sentinel finds that a primary server has entered the objective offline state, the sentinel may be selected by other sentinels and the failed primary server Servers perform automatic failover operations. They work in the following steps:
- Each sentinel sends a ping command once per second to the master server, slave server and other sentinel instances it knows.
- If a server takes longer than the value specified in the down after milliseconds option to reply to the ping command, the instance will be marked as offline by the sentinel.
- If a master server is marked as subjective offline, all sentinels monitoring the master server should confirm that the master server has indeed entered the subjective offline state once a second.
- If a master server is marked as subjective offline and a sufficient number of sentinels agree with this judgment within the specified time range, the master server is marked as objective offline.
- In general, each Sentry will send info commands to all master and slave servers it knows every 10 seconds. When a master server is marked as objectively offline by the sentinel, the frequency of the sentinel sending info commands to all slave servers of the offline master server will be changed from once in 10 seconds to once per second.
- When not enough sentinels agree that the primary server has been offline, the objective offline status of the primary server will be removed. When the master server returns a valid reply to the sentry's ping command again, the subjective offline status of the master server will be removed.
Failover
The process of failover is as follows:
- It is found that the primary server has entered the objective offline state.
- Select a main sentry in the sentry cluster.
- If the election fails, try to be elected again after twice the set failover timeout. If the election is successful, perform the following steps.
- Select a slave server and upgrade it to the master server.
- Send the slaveof no one command to the selected slave server to make it become the master server.
- The updated configuration is propagated to all other sentinels through the publish and subscribe function, and other sentinels update their own configuration.
- Send the slaveof command to the slave servers of the offline master server to copy the new master server.
- When all slave servers have started replicating the new master server, the lead sentry terminates the failover operation.
Sentry profile
Specify the Redis server to monitor
sentinel monitor <redisName> <host> <port> <number>
	#redisName: redis server name
	#Host and port: the port number and IP address of the host
	#number: specifies how many sentry consents are required to determine the failure of this host
Specifies the number of milliseconds required for the sentinel to believe that the server is disconnected
If the server does not return a reply to the ping command sent by the sentry within a given number of milliseconds, or returns an error, the sentry marks the server as offline.
sentinel down-after-milliseconds <redisName> <millisecond>
Specifies the maximum number of slave servers that can synchronize the new master server at the same time during failover
sentinel failover-timeout <redisName> <count>
Docker builds Redis cluster
Create two slave server profiles in the data volume
#Configuration content
slaveof master-redis 6379
Run two more slave servers
docker run --name worker1-redis \
--net redis \
-v C:\Users\Administrator\Desktop\redis\conf:/usr/local/etc/redis \
-d redis redis-server /usr/local/etc/redis/worker1-redis.conf
docker run --name worker2-redis \
--net redis \
-v C:\Users\Administrator\Desktop\redis\conf:/usr/local/etc/redis \
-d redis redis-server /usr/local/etc/redis/worker2-redis.conf
Create a sentinel profile in the data volume
sentinel monitor master-redis master-redis 6379 2
sentinel down-after-milliseconds master-redis 60000
sentinel failover-timeout master-redis 180000
sentinel parallel-syncs master-redis 2
Enter each Redis server and start the sentry
docker exec master-redis redis-sentinel /usr/local/etc/redis/sentinel.conf
affair
In Redis, the multi instruction is used to start a transaction. Starting from the input of the multi instruction, the input instructions will enter the instruction queue in turn, but will not be executed. After entering exec, Redis will execute all the instructions in the instruction queue in turn. In the process of forming a queue, you can clear the instruction list and give up the transaction by using the dsscard instruction.
Error in transaction
The following two errors may occur when using Redis transactions:
- An instruction queue error occurred before using the exec instruction.
- An instruction execution error occurred after using the exec instruction.
In the first case, all instructions in the instruction queue are not executed and the transaction is discarded. In the second case, executing the wrong instruction will not affect the execution of other normal instructions, and the transaction will not be rolled back. Therefore, Redis does not support rollback.
Optimistic lock
The watch instruction enables the exec instruction to execute conditionally. Transactions can only be executed when all monitored keys have not been changed:
watch <key>
When the exec instruction is called, the monitoring of all keys will be cancelled whether the transaction is successfully executed or not.
When other clients modify the locked key, the transaction of the current client will fail. When the client disconnects, the client's monitoring of the key will also disappear. Of course, you can also use the following command to manually disable the monitoring of all keys by a transaction:
unwatch
Publish and subscribe
subscribe
subscribe <channelName>...
unsubscribe <channelName>...
psubscribe <pattern>...
punsubscribe <pattern>...
release
publish <channekName> <message>
Redis profile
################################## INCLUDES ###################################
Can contain multiple profiles
# include /path/to/local.conf
# include /path/to/other.conf
################################## NETWORK #####################################
binding IP
#bind 127.0.0.1 -::1
 Protection mode
#protected-mode no
 Default port
#port 6379
################################# GENERAL #####################################
Open as daemon
#daemonize yes
 log level
# Specify the server verbosity level.
# This can be one of:
# debug (a lot of information, useful for development/testing)
# verbose (many rarely useful info, but not a mess like the debug level)
# notice (moderately verbose, what you want in production probably)
# warning (only very important / critical messages are logged)
#loglevel notice
 Log file name
#logfile ""
Default number of databases
#databases 16
################################ SNAPSHOTTING  ################################
If there is one in 3600 seconds key If it is modified, it is persisted
# save 3600 1
# save 300 100
# save 60 10000
 Persistence error. Do you want to continue working
#stop-writes-on-bgsave-error yes
 Compress persistent files
#rdbcompression yes
 Are persistent files checked
#rdbchecksum yes
 Directory where persistent files are saved
#dir ./
################################## SECURITY ###################################
redis password
# requirepass foobared