First, let's look at Redis
1. Introduction to Redis
Redis is completely open source, free of charge, complies with BSD protocol, and is a high-performance key-value database.
Redis and other key - value caching products have three features:
- Redis supports data persistence, can save data in memory in disk, and can be loaded again when restarted for use.
- Redis not only supports simple key-value data, but also provides storage of list, set, zset, hash and other data structures.
- Redis supports backup of data, i.e. master-slave mode.
2.Redis Advantage
- Excellent performance - Redis reads 110,000 times per second and writes 81,000 times per second.
- Rich data types - Redis supports Strings, Lists, Hashes, Sets and Ordered Sets data type operations for binary cases.
- Atomic - All operations of Redis are atomic, and Redis also supports atomic execution after several operations are merged.
- Rich features - Redis also supports publish/subscribe, notification, key expiration, and so on.
3. What's the difference between Redis and other key-value storage?
Redis has a more complex data structure and provides atomic operations on them, which is an evolutionary path different from other databases. Redis data types are based on basic data structures and transparent to programmers without additional abstraction.
Redis runs in memory but can be persisted to disk, so memory needs to be weighed when reading and writing different data sets at high speed, because the amount of data can not be larger than hardware memory. Another advantage of in-memory databases is that compared with the same complex data structure on disk, it is very simple to operate in memory, so Redis can do many things with high internal complexity. At the same time, in terms of disk format, they are compact and appended, because they do not need random access.
II. Installation of Redis
1. Installation of Redis
Redis was developed in c language.
Installing redis requires a compilation environment in C language. If there is no gcc, it needs to be installed online. yum install gcc-c + +
Download redis online:
wget http://download.redis.io/releases/redis-3.0.2.tar.gzInstallation steps:
First step: redis source package uploaded to linux system.
Step 2: Decompress redis.
Step 3: Compile. Enter the redis source directory. make
Step 4: Installation. make install PREFIX=/usr/local/redis
The PREFIX parameter specifies the installation directory for redis. General software installed in / usr/local directory
2.Redis Startup
The start-up of redis can be divided into two types:
Front-end startup: Start redis-server directly under redis installation directory
[root@localhost bin]# ./redis-server Background startup:
Return / root/redis-3.0.0/redis.conf to / usr/local/redis/bin directory
[root@localhost redis-3.0.0]# cp redis.conf /usr/local/redis/bin/Modify the configuration file:
Change daemonize no to yes to allow back-end startup
[root@localhost bin]# ./redis-server redis.confStart up and see the redis process:
[root@localhost bin]# ps aux|grep redis
3. Connect Redis
[root@localhost bin]# ./redis-cli The default connection localhost runs redis service on port 6379.
Specify connection:
[root@localhost bin]# ./redis-cli -h 192.168.25.153 -p 6379- h: Address of the connected server
- p: Port number of service
Turn off redis:
[root@localhost bin]# ./redis-cli shutdownIII. Introduction to Redis Structure
1.Redis Five Data Types
String: key-value
All data in Redis is strings. Commands are case-insensitive, and key s are case-insensitive. Redis is single-threaded. Redis is not suitable for storing large data, because large data processing will affect the access speed of subsequent data.
Basic commands:
set, get sets and fetches a Key's Value value
incr: integer atom plus one (generating id)
decr: Integer atom minus one
Appnd: append a value to Key
Hash: key-fields-values
For a map, there is also a key-value in the map.
Use hash to categorize key s.
Basic commands:
Hset: Add content to hash
Hget: Get content from hash
String and Hash are commonly used as caches and are used more often.
List: Repeatable in order
Basic commands:
192.168.73.0:6379> lpush list1 a b c d
(integer) 4
192.168.73.0:6379> lrange list1 0 -1
1) "d"
2) "c"
3) "b"
4) "a"
192.168.73.0:6379> rpush list1 1 2 3 4
(integer) 8
192.168.73.0:6379> lrange list1 0 -1
1) "d"
2) "c"
3) "b"
4) "a"
5) "1"
6) "2"
7) "3"
8) "4"
192.168.73.0:6379>
192.168.73.0:6379> lpop list1
"d"
192.168.73.0:6379> lrange list1 0 -1
1) "c"
2) "b"
3) "a"
4) "1"
5) "2"
6) "3"
7) "4"
192.168.73.0:6379> rpop list1
"4"
192.168.73.0:6379> lrange list1 0 -1
1) "c"
2) "b"
3) "a"
4) "1"
5) "2"
6) "3"
192.168.73.0:6379>
Set: Elements are out of order and cannot be repeated
Basic commands:
192.168.73.0:6379> sadd set1 a b c c c d
(integer) 4
192.168.73.0:6379> smembers set1
1) "b"
2) "c"
3) "d"
4) "a"
192.168.73.0:6379> srem set1 a
(integer) 1
192.168.73.0:6379> smembers set1
1) "b"
2) "c"
3) "d"
192.168.73.0:6379>
SortedSet (zset): Sequential, not repeatable
Basic commands:
192.168.73.0:6379> zadd zset1 2 a 5 b 1 c 6 d
(integer) 4
192.168.73.0:6379> zrange zset1 0 -1
1) "c"
2) "a"
3) "b"
4) "d"
192.168.73.0:6379> zrem zset1 a
(integer) 1
192.168.73.0:6379> zrange zset1 0 -1
1) "c"
2) "b"
3) "d"
192.168.73.0:6379> zrevrange zset1 0 -1
1) "d"
2) "b"
3) "c"
192.168.73.0:6379> zrange zset1 0 -1 withscores
1) "c"
2) "1"
3) "b"
4) "5"
5) "d"
6) "6"
192.168.73.0:6379> zrevrange zset1 0 -1 withscores
1) "d"
2) "6"
3) "b"
4) "5"
5) "c"
6) "1"
192.168.73.0:6379>
There are also several commands for Redis key. Write them together.
expire key second: Set the expiration time of key
ttl key: Check the expiry date of key
persist key: the expiration time for clearing the key. Key persistence.
192.168.73.0:6379> expire Hello 100
(integer) 1
192.168.73.0:6379> ttl Hello
(integer) 77
2.Redis persistence scheme
All data in Redis is stored in memory.
Rdb: Snapshot format, which periodically saves the current time data in memory to disk. Redis supports persistence schemes by default.
aof form: append only file. Add, delete and modify all commands for redis database operation. Save it to a file. When the database is restored, all commands can be executed once.
Configure in the redis.conf configuration file.
Rdb configuration: 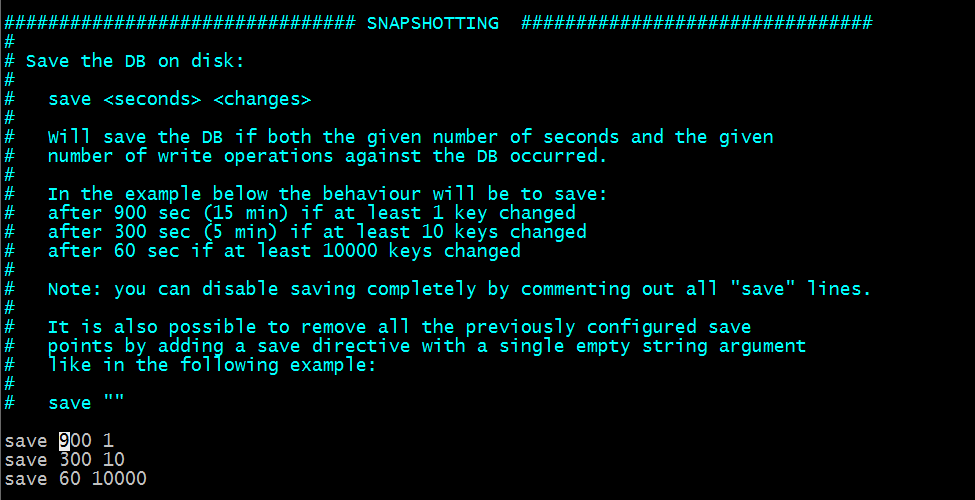
Configuration in the form of Aof:

Both persistence schemes are open at the same time and can be used to restore the database.
After introducing the Redis foundation, let's talk about the Redis cluster.
IV. Redis Cluster
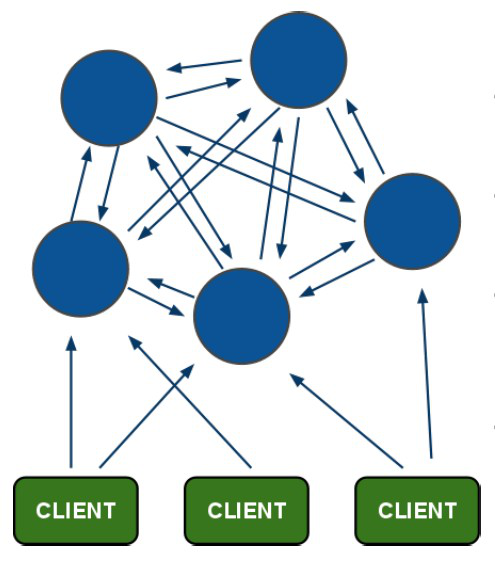
1. Structure of Redis Cluster
redis-cluster architecture diagram
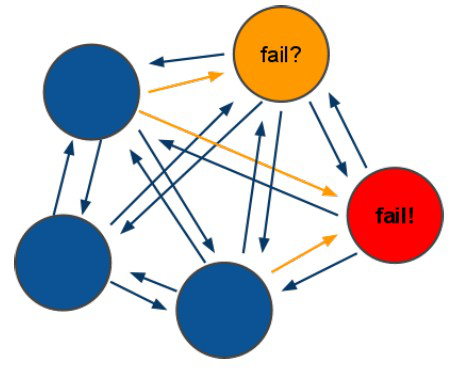
redis-cluster voting: fault tolerance
Architectural details:
(1) All redis nodes are interconnected (PING-PONG mechanism), and binary protocol is used to optimize transmission speed and bandwidth.
(2) Node fail takes effect only when more than half of the nodes in the cluster detect failures.
(3) Client is directly connected to redis node without intermediate proxy layer. Client does not need to connect all nodes in the cluster, and can connect any available node in the cluster.
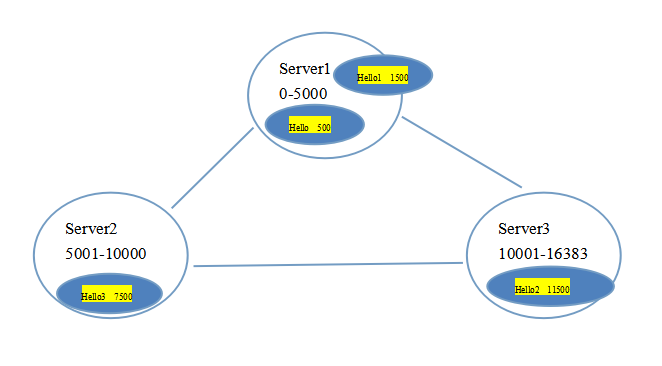
(4)redis-cluster maps all physical nodes to [0-16383]slot, and cluster maintains node <-> slot <-> value.
Redis slot: There are 16384 hash slots in Redis cluster. When a key-value needs to be placed in Redis cluster, redis first calculates a result for key using crc16 algorithm, and then calculates the remainder of the result for 16384, so that each key corresponds to a hash slot numbered between 0 and 16383, and redis maps hash slot to no according to the number of nodes roughly equal. Same node.
2. Building Redis Cluster
There should be at least three nodes in the edis cluster. To ensure the high availability of the cluster, a backup machine is needed for each node.
Redis clusters require at least six servers.
Build pseudo-distributed. You can run six redis instances with one server. Port numbers 7001-7006 of redis need to be modified
1. Use ruby scripts to build clusters. ruby's runtime environment is required.
Install ruby
yum install ruby
yum install rubygems
2. Install packages used by ruby scripts.
[root@localhost ~]# gem install redis-3.0.0.gem
Successfully installed redis-3.0.0
1 gem installed
Installing ri documentation for redis-3.0.0...
Installing RDoc documentation for redis-3.0.0...
[root@localhost ~]#

[root@localhost ~]# cd redis-3.0.0/src
[root@localhost src]# ll *.rb
-rwxrwxr-x. 1 root root 48141 Apr  1  2015 redis-trib.rb
3. Modify Redis configuration file
You need to open Redis's cluster permissions 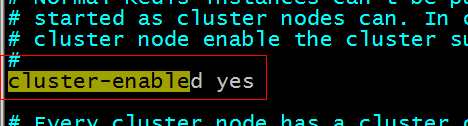
Then modify the instance ports of each Redis separately
Port s are 7001-7006, respectively.
4. Start each redis instance.
5. Use ruby scripts to build clusters.
./redis-trib.rb create --replicas 1 192.168.73.0:7001 192.168.73.0:7002 192.168.73.0:7003 192.168.73.0:7004 192.168.73.0:7005 192.168.73.0:7006Build a successful interface:
[root@localhost redis-cluster]# ./redis-trib.rb create --replicas 1 192.168.73.0:7001 192.168.73.0:7002 192.168.73.0:7003 192.168.73.0:7004 192.168.73.0:7005  192.168.73.0:7006
>>> Creating cluster
Connecting to node 192.168.73.0:7001: OK
Connecting to node 192.168.73.0:7002: OK
Connecting to node 192.168.73.0:7003: OK
Connecting to node 192.168.73.0:7004: OK
Connecting to node 192.168.73.0:7005: OK
Connecting to node 192.168.73.0:7006: OK
>>> Performing hash slots allocation on 6 nodes...
Using 3 masters:
192.168.73.0:7001
192.168.73.0:7002
192.168.73.0:7003
Adding replica 192.168.73.0:7004 to 192.168.73.0:7001
Adding replica 192.168.73.0:7005 to 192.168.73.0:7002
Adding replica 192.168.73.0:7006 to 192.168.73.0:7003
Manually create a script to close the cluster:
[root@localhost redis-cluster]# vim shutdow-all.sh
redis01/redis-cli -p 7001 shutdown
redis01/redis-cli -p 7002 shutdown
redis01/redis-cli -p 7003 shutdown
redis01/redis-cli -p 7004 shutdown
redis01/redis-cli -p 7005 shutdown
redis01/redis-cli -p 7006 shutdown
[root@localhost redis-cluster]# chmod u+x shutdow-all.sh
6. Test Connection Cluster
Redis-cli connects the cluster.
[root@localhost redis-cluster]# redis01/redis-cli -p 7002 -c- c: The redis cluster represents the connection
5. Using Redis in java environment
1.Redis client Jedis uses
First, add the Redis client Jedis-dependent jar package to the project
<!-- Redis Client -->
            <dependency>
                <groupId>redis.clients</groupId>
                <artifactId>jedis</artifactId>
            </dependency>
Connect to stand-alone version, using JedisPool connection pool
Step 1: Create a JedisPool object. You need to specify the ip and port of the server.
Step 2: Get the Jedis object from JedisPool.
Step 3: Use Jedis to operate redis servers.
Step 4: Close the jedis object after the operation, and recycle the resources from the connection pool.
Step 5: Close the JedisPool object.
@Test
    public void testJedisPool() throws Exception {
        // Step 1: Create a JedisPool object. You need to specify the ip and port of the server.
        JedisPool jedisPool = new JedisPool("192.168.73.0", 6379);
        // Step 2: Get the Jedis object from JedisPool.
        Jedis jedis = jedisPool.getResource();
        // Step 3: Use Jedis to operate redis servers.
        jedis.set("jedis", "test");
        String result = jedis.get("jedis");
        System.out.println(result);
        // Step 4: Close the jedis object after the operation, and recycle the resources from the connection pool.
        jedis.close();
        // Step 5: Close the JedisPool object.
        jedisPool.close();
Connect to the cluster version using the JedisCluster object
Step 1: Use the JedisCluster object. A Set parameter is required. List of Redis nodes.
Step 2: Operate redis directly using the JedisCluster object. A singleton exists in the system.
Step 3: Print the results
Step 4: Close the JedisCluster object before the system closes.
@Test
public void testJedisCluster() throws Exception {
// Step 1: Use the JedisCluster object. A Set parameter is required. List of Redis nodes.
Set nodes = new HashSet<>();
nodes.add(new HostAndPort("192.168.73.0", 7001));
nodes.add(new HostAndPort("192.168.73.0", 7002));
nodes.add(new HostAndPort("192.168.73.0", 7003));
nodes.add(new HostAndPort("192.168.73.0", 7004));
nodes.add(new HostAndPort("192.168.73.0", 7005));
nodes.add(new HostAndPort("192.168.73.0", 7006));
JedisCluster jedisCluster = new JedisCluster(nodes);
// Step 2: Operate redis directly using the JedisCluster object. A singleton exists in the system.
jedisCluster.set("hello", "100");
String result = jedisCluster.get("hello");
// Step 3: Print the results
System.out.println(result);
// Step 4: Close the JedisCluster object before the system closes.
jedisCluster.close();
}
2. Add caching to business logic
Interface Packaging
The commonly used method of operating redis extracts an interface and creates two implementation classes corresponding to the stand-alone version and the cluster version respectively.
1. Interface definition
public interface JedisClient {

    String set(String key, String value);
    String get(String key);
    Boolean exists(String key);
    Long expire(String key, int seconds);
    Long ttl(String key);
    Long incr(String key);
    Long hset(String key, String field, String value);
    String hget(String key, String field);
    Long hdel(String key, String... field);
}
2. Single-machine version implementation class (connection pool)
public class JedisClientPool implements JedisClient {
@Autowired
private JedisPool jedisPool;

@Override
public String set(String key, String value) {
    Jedis jedis = jedisPool.getResource();
    String result = jedis.set(key, value);
    jedis.close();
    return result;
}

@Override
public String get(String key) {
    Jedis jedis = jedisPool.getResource();
    String result = jedis.get(key);
    jedis.close();
    return result;
}

@Override
public Boolean exists(String key) {
    Jedis jedis = jedisPool.getResource();
    Boolean result = jedis.exists(key);
    jedis.close();
    return result;
}

@Override
public Long expire(String key, int seconds) {
    Jedis jedis = jedisPool.getResource();
    Long result = jedis.expire(key, seconds);
    jedis.close();
    return result;
}

@Override
public Long ttl(String key) {
    Jedis jedis = jedisPool.getResource();
    Long result = jedis.ttl(key);
    jedis.close();
    return result;
}

@Override
public Long incr(String key) {
    Jedis jedis = jedisPool.getResource();
    Long result = jedis.incr(key);
    jedis.close();
    return result;
}

@Override
public Long hset(String key, String field, String value) {
    Jedis jedis = jedisPool.getResource();
    Long result = jedis.hset(key, field, value);
    jedis.close();
    return result;
}

@Override
public String hget(String key, String field) {
    Jedis jedis = jedisPool.getResource();
    String result = jedis.hget(key, field);
    jedis.close();
    return result;
}

@Override
public Long hdel(String key, String... field) {
    Jedis jedis = jedisPool.getResource();
    Long result = jedis.hdel(key, field);
    jedis.close();
    return result;
}
}
3. Cluster version implementation class
public class JedisClientCluster implements JedisClient {

    @Autowired
    private JedisCluster jedisCluster;

    @Override
    public String set(String key, String value) {
        return jedisCluster.set(key, value);
    }

    @Override
    public String get(String key) {
        return jedisCluster.get(key);
    }

    @Override
    public Boolean exists(String key) {
        return jedisCluster.exists(key);
    }

    @Override
    public Long expire(String key, int seconds) {
        return jedisCluster.expire(key, seconds);
    }

    @Override
    public Long ttl(String key) {
        return jedisCluster.ttl(key);
    }

    @Override
    public Long incr(String key) {
        return jedisCluster.incr(key);
    }

    @Override
    public Long hset(String key, String field, String value) {
        return jedisCluster.hset(key, field, value);
    }

    @Override
    public String hget(String key, String field) {
        return jedisCluster.hget(key, field);
    }

    @Override
    public Long hdel(String key, String... field) {
        return jedisCluster.hdel(key, field);
    }
}
Next, we have the integrated configuration of redis for our omnipotent spring
applicationContext-redis.xml
<?xml version="1.0" encoding="UTF-8"?>
<beans xmlns="http://www.springframework.org/schema/beans"
    xmlns:context="http://www.springframework.org/schema/context" xmlns:p="http://www.springframework.org/schema/p"
    xmlns:aop="http://www.springframework.org/schema/aop" xmlns:tx="http://www.springframework.org/schema/tx"
    xmlns:xsi="http://www.w3.org/2001/XMLSchema-instance"
    xsi:schemaLocation="http://www.springframework.org/schema/beans http://www.springframework.org/schema/beans/spring-beans-4.2.xsd
    http://www.springframework.org/schema/context http://www.springframework.org/schema/context/spring-context-4.2.xsd
    http://www.springframework.org/schema/aop http://www.springframework.org/schema/aop/spring-aop-4.2.xsd http://www.springframework.org/schema/tx http://www.springframework.org/schema/tx/spring-tx-4.2.xsd
    http://www.springframework.org/schema/util http://www.springframework.org/schema/util/spring-util-4.2.xsd">
    <context:annotation-config />
    <!-- redis Stand-alone version
    <bean id="jedisPool" class="redis.clients.jedis.JedisPool">
        <constructor-arg name="host" value="192.168.25.175"></constructor-arg>
        <constructor-arg name="port" value="6379"></constructor-arg>
    </bean>
    <bean id="jedisClientPool" class="com.jedis.JedisClientPool"></bean>
    -->
    <!-- redis Cluster Edition -->
    <bean id="jedisCluster" class="redis.clients.jedis.JedisCluster">
        <constructor-arg>
            <set>
                <bean class="redis.clients.jedis.HostAndPort">
                    <constructor-arg name="host" value="192.168.25.175">
                    </constructor-arg>
                    <constructor-arg name="port" value="7001"></constructor-arg>
                </bean>
                <bean class="redis.clients.jedis.HostAndPort">
                    <constructor-arg name="host" value="192.168.25.175">
                    </constructor-arg>
                    <constructor-arg name="port" value="7002"></constructor-arg>
                </bean>
                <bean class="redis.clients.jedis.HostAndPort">
                    <constructor-arg name="host" value="192.168.25.175">
                    </constructor-arg>
                    <constructor-arg name="port" value="7003"></constructor-arg>
                </bean>
                <bean class="redis.clients.jedis.HostAndPort">
                    <constructor-arg name="host" value="192.168.25.175">
                    </constructor-arg>
                    <constructor-arg name="port" value="7004"></constructor-arg>
                </bean>
                <bean class="redis.clients.jedis.HostAndPort">
                    <constructor-arg name="host" value="192.168.25.175">
                    </constructor-arg>
                    <constructor-arg name="port" value="7005"></constructor-arg>
                </bean>
                <bean class="redis.clients.jedis.HostAndPort">
                    <constructor-arg name="host" value="192.168.25.175">
                    </constructor-arg>
                    <constructor-arg name="port" value="7006"></constructor-arg>
                </bean>
            </set>
        </constructor-arg>
    </bean>
    <bean id="jedisClientCluster" class="com.jedis.JedisClientCluster"></bean>
</beans>
When used, the switch between stand-alone version and cluster version can be realized by annotating the common interface JedisClient with @AutoWired.
@Test
    public void testJedisClient() throws Exception {
        //Initialize Spring container
        ApplicationContext applicationContext = new ClassPathXmlApplicationContext("classpath:spring/applicationContext-*.xml");
        //Get the JedisClient object from the container
        JedisClient jedisClient = applicationContext.getBean(JedisClient.class);
        jedisClient.set("first", "100");
        String result = jedisClient.get("first");
        System.out.println(result);


    }
This is the end of the introduction of Redis. Later, Solr and others will be introduced. There are some mistakes. I hope your predecessors will make more corrections.