Master-slave architecture
Create one master and two slave folders.
mkdir master slave1 slave2
Copy etc / redis / redis The conf files are stored in three folders.
cp /etc/redis/redis.conf /master
cp /etc/redis/redis.conf /slave1
cp /etc/redis/redis.conf /slave2
Modify the configuration in turn
Set the master port number to 7000, slave1 port number to 7001, and slave2 port number to 7002
Modify the bind in master, slave1 and slave2 to 0.0 zero
Find slaveof from slave1 and slave2 configuration files

After uncommenting, the bind of the master is filled in the first data, and the port number of the master is filled in the second data
salveof 0.0.0.0 7000
After configuration, use the following code to open ports 7000, 7001 and 7002 in turn
reids-server master/redis.conf
reids-server slave1/redis.conf
reids-server slave2/redis.conf
Open the three pages to enter master, slave1 and slave2 respectively
redis-cli =p 7000 --raw
redis-cli =p 7001 --raw
redis-cli =p 7002 --raw

At this time:
After the master node writes successfully, the data will be synchronized to the two slave nodes.
The slave on ports 7001 and 7002 becomes read-only and cannot be written.
Even if the Master goes down, the slave node cannot temporarily replace the master node for write operations.
In order to realize that after the Master goes down, a new node can replace the master for write operations, there is a sentinel mechanism
Sentinel mechanism
When the master node goes down, a slave node will be automatically selected to replace the master node for read and write operations.
Create sentinel Conf file, add a line
sentinel monitor Name the sentinel (self named) master node ip How many votes are required for the port number of the primary node (odd number)
example: sentinel monitor mymaster 0.0.0.0 7000 1
For the last item, sentinel has its own algorithm. When the master node goes down, sentinel will elect a new master node from the slave node. The final number represents how many votes are needed to pass the election. You must write an odd number.
Install redis Sentinel
apt install redis-sentinel
Use after installation:
redis-sentinel /master/sentinel.conf
Enter sentinel
Open the three nodes master, slave1 and slave2 according to the master-slave settings in the previous section. Run at this time
redis-cli -p 7000 shutdown
Turn off the current master node to simulate downtime.
At this time, the sentinel will wait for the response of the master node, which defaults to 15 seconds. If you need to change the time, add it in the configuration file
sentinel down-after-milliseconds mymaster 5000
It means that the election will be triggered if the master node fails to respond for 5 seconds.
Test in redis
Open three nodes, open sentry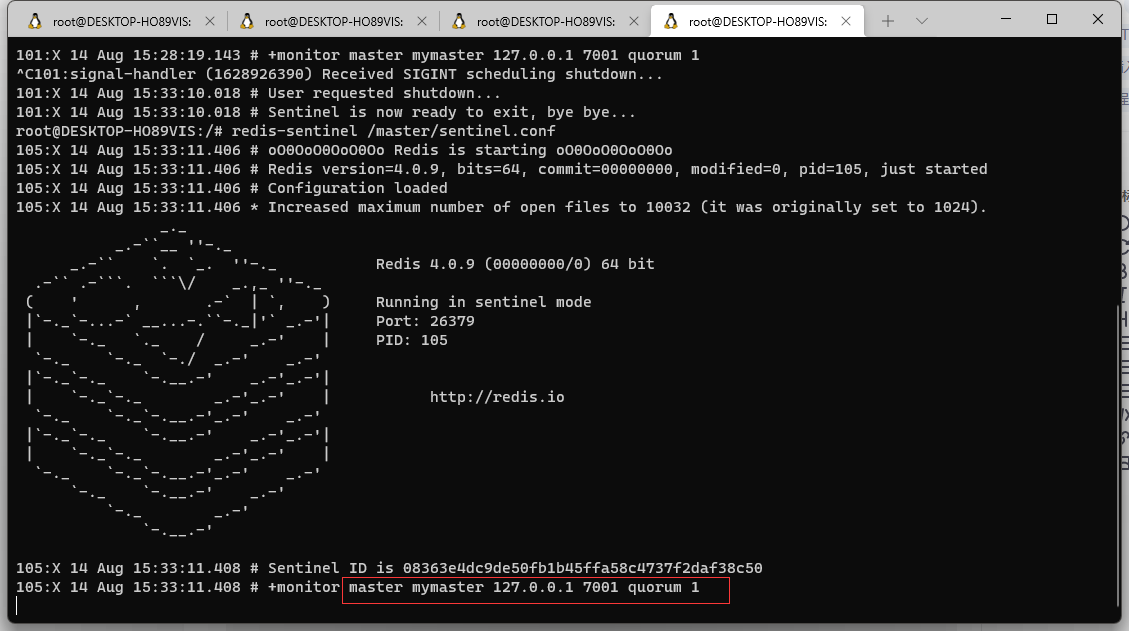
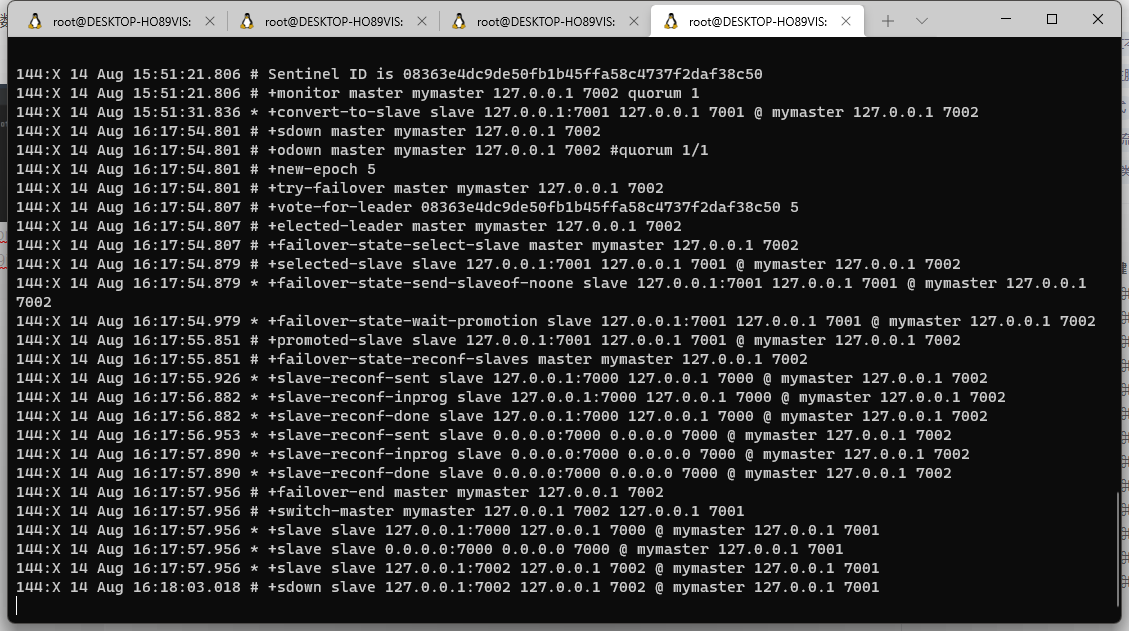
You can see at the bottom that the current primary node is the node corresponding to port number 7001. Now I close port 7001.

At this point, you can see that port 7002 is selected as the current primary node through the sentinel mechanism of redis.
Let's test it in springboot
Add a sentence under port in the sentinel configuration file
bind 0.0.0.0
Indicates that a remote connection is open
In the springboot configuration file, change the port number in the configuration with the sentinel election
#Single node
spring.redis.host=127.0.0.1
spring.redis.port=6379
spring.redis.database=0
redis dependency:
<!--redis-->
<dependency>
    <groupId>org.springframework.boot</groupId>
    <artifactId>spring-boot-starter-data-redis</artifactId>
</dependency>
application.properties
server.port=8080

#Single node
spring.redis.host=127.0.0.1
spring.redis.port=6379
spring.redis.database=0

spring.datasource.username=root
spring.datasource.password=123456
spring.datasource.url=jdbc:mysql://localhost:3306/test?useSSL=false&useUnicode=true&characterEncoding=utf-8&serverTimezone=GMT%2B8
spring.datasource.driver-class-name=com.mysql.cj.jdbc.Driver

#Enable L2 cache
mybatis-plus.configuration.cache-enabled=true

#Open log
mybatis-plus.configuration.log-impl=org.apache.ibatis.logging.stdout.StdOutImpl
Emp entity class
@Data
@AllArgsConstructor
@NoArgsConstructor
public class Emp implements Serializable {
    private int id;
    private String occ;
}
EmpMapper
@Mapper
//Enable cache
@CacheNamespace(implementation = RedisCache.class,eviction = RedisCache.class)
@CacheNamespaceRef(EmpMapper.class)
Turn on transaction support
//@Transactional(propagation = Propagation.SUPPORTS)
@EnableTransactionManagement
public interface EmpMapper extends BaseMapper<Emp> {
}
ApplicationUtil get spring factory
@Component
public class ApplicationUtil implements ApplicationContextAware {

    //Get spring factory data
    private static ApplicationContext applicationContext;

    @Override
    public void setApplicationContext(ApplicationContext applicationContext) throws BeansException {
        this.applicationContext=applicationContext;
    }

    //Gets the method in the factory and returns
    public static Object getBean(String beanName){
        return applicationContext.getBean(beanName);
    }
}
RedisCache implements the Cache interface
public class RedisCache implements Cache {

    //Put in cached namespace com tan. UserMapper. UserMapper"
    private final String id;
    private RedisTemplate redisTemplate;
    public RedisCache(String id) {
        this.id = id;
    }

    @Override
    public String getId() {
        return this.id;
    }

    //Cache put value
    @Override
    public void putObject(Object o, Object o1) {
        //Obtain the redisTemplate through the applicationContext factory tool class
        getRedisTemplate();
        redisTemplate.opsForHash().put(id.toString(), getKeyToMD5(o.toString()), o1);
    }

    //Get data from redis
    @Override
    public Object getObject(Object o) {
        getRedisTemplate();
        return redisTemplate.opsForHash().get(id.toString(), getKeyToMD5(o.toString()));
    }

    //Deletes the cache according to the o specified
    @Override
    public Object removeObject(Object o) {

        return null;
    }

    //Delete all caches
    @Override
    public void clear() {
        getRedisTemplate();
        redisTemplate.delete(id);
    }

    @Override
    public int getSize() {
        getRedisTemplate();
        return  redisTemplate.opsForHash().size(id).intValue();
    }

    @Override
    public ReadWriteLock getReadWriteLock() {
        return null;
    }

    //Prevent code redundancy
    private void getRedisTemplate(){
        if (null == redisTemplate){
            redisTemplate = (RedisTemplate) ApplicationUtil.getBean("redisTemplate");
            redisTemplate.setKeySerializer(new StringRedisSerializer());
            redisTemplate.setHashKeySerializer(new StringRedisSerializer());
        }
    }

    //Unified key format
    private String getKeyToMD5(String key){
        return DigestUtils.md5DigestAsHex(key.getBytes());
    }
}
Test class
@SpringBootTest
class JedisApplicationTests {

    @Autowired
    private EmpMapper empMapper;

    @Test
    public void test1(){
        empMapper.insert(new Emp(1,"Finance Department"));
    }
}
Let's test with redis single node configuration first:
#Single node
spring.redis.host=127.0.0.1
spring.redis.port=6379
spring.redis.database=0

You can see the prompt that data cannot be written from the slave node, which proves that the current configuration cannot use redis to write after the primary node goes down.
Now you need to dynamically change the nodes that can write according to the sentinel election:
#Get nodes according to sentinel election
#master is the name of the sentry
#nodes is the current master node address and sentinel port
spring.redis.sentinel.master=mymaster
spring.redis.sentinel.nodes=127.0.0.1:26379
After modification, run the program again and report an error: the data already exists.
This is because I just ran an insert operation. Errors in the cache will not affect the data stored in mysql. Delete the corresponding data in mysql and run again:

Run successfully.
Now I shut down the current master node 7002, and then test it after the sentry selects a new master node.

You can see that the current master node is 7001, and the springboot still obtains the master node that can perform write operations from the current sentinel.