1, Redis persistence
RDB snapshot
By default, redis saves the in memory database snapshot in the name dump RDB binary file. Redis can be set (save N M) to automatically save the dataset (the whole memory at the current time) as an RDB file when the condition of "at least M changes to the dataset in N seconds" is met. You can also enter the redis client and manually execute the command save or bgsave to immediately generate dump RDB snapshot file (the default storage path is dump.rdb). If you need to turn off RDB snapshots, you only need to turn redis. Net save 60 10000 and other configuration comments of conf file
- When save generates RDB snapshot, Redis operation command in progress will be blocked
- Bgsave * * the default persistent file mechanism, copy on write (COW) mechanism, will not block the Redis operation command in progress** With the help of the copy on write (COW) technology provided by the operating system, Redis can still process write commands normally while generating snapshots. The bgsave subprocess is generated by the main thread fork and can share all the memory data of the main thread. After the subprocess starts reading the memory data and writing to the RDB file, if there is a new operation command, it will be executed in memory, and then a new copy of the data will be generated and written to the RDB file. In this process, the main thread can still modify the original data.
| command | save | bgsave |
|---|---|---|
| IO type | synchronization | asynchronous |
| Whether to block other redis commands | yes | No (there will be temporary blocking when the build child process calls the fork function) |
| Complexity | O(n) | O(n) |
| advantage | No additional memory consumption | Do not block client commands |
| shortcoming | Blocking client commands | fork subprocess is required, which consumes memory |
- **Advantages of RDB snapshot: * * * * small file size and fast data recovery
- Disadvantages of RDB snapshot: if Redis is down due to some reasons, the server will lose the data recently written and not saved to the snapshot**
AOF persistence (append only file)
Aof persistence is to append each modified instruction record to the file appendonly Aof (write to os cache first and fsync to disk at regular intervals). On redis Conf (appendonly yes, appendfilename "appendonly.aof"), the same as RDB snapshot, the default storage path is / data / 3306 / appendonly aof
This operation has three configuration items:
appendfsync always: Every time a new command is appended to AOF File is executed once fsync ,Very slow and very safe
appendfsync everysec: Per second fsync Once, fast enough, and only 1 second of data will be lost in case of failure
appendfsync no: never fsync ,Give the data to the operating system for processing. Faster and less secure options
The recommended (and default) measure is fsync once per second. This fsync strategy can take into account both speed and security
**Aof Rewriting: * * some commands in AOF are useless. For example, to accumulate a data item, it is not necessary to record the accumulated records each time. AOF can be rewritten to the last SET command automatically. AOF also has two default configurations
# The aof file will not be rewritten automatically until it reaches 64M at least. The file is too small and the recovery speed is very fast, so rewriting is of little significance
# auto‐aof‐rewrite‐min‐size 64mb
# If the aof file size has increased by 100% since the last rewriting, the rewriting is triggered again
# auto‐aof‐rewrite‐percentage 100
- **Advantages of AOF: * * * * data security is higher than RDB
- Disadvantages of AOF: the volume is too large when there are too many commands, the speed of recovering data is slow, and the security is determined according to the policy**
| command | RDB | AOF |
|---|---|---|
| boot priority | low | High (safer) |
| File volume | Small | large |
| Recovery speed | fast | slow |
| Data security | Easy to lose data | Determined by strategy |
Redis 4.0 hybrid persistence
During AOF rewriting, instead of simply converting memory data into RESP commands and writing them into AOF files, the memory before rewriting is processed as RDB snapshot, and the contents of RDB snapshot and the incremental AOF command to modify memory data are written into a new AOF file. The new file is not appendonly at first Aof, the name will not be changed until the new AOF file is rewritten, the original AOF file will be overwritten, and the replacement of the old and new AOF files will be completed. The start configuration command is as follows (AOF must be started first):
# aof‐use‐rdb‐preamble yes
Redis data backup strategy
- Write crontab scheduled scheduling script, copy a backup of rdb or aof to a directory every hour, and only keep the backup of the last 48 hours
- Keep a copy of the data of the current day every day and back it up to a directory. You can keep the backup of the last month
- Every time you copy a backup, delete the old backup
- Copy a copy of the backup on the current machine to other machines every night to prevent damage to the machine
Note: a persistent file will be made automatically before stopping Redis. When Redis is restarted, if there are RDB or AOF files in the directory, the data will be automatically restored to Redis
2, Redis master-slave architecture
The master node writes data, backs up data from the slave node, and can also perform some read operations to relieve the pressure on the master node. The master-slave architecture needs to write its own code to allocate the read and write operations to the corresponding master and slave nodes. If it is a sentry or cluster architecture, it can be distributed automatically.

Construction steps of master-slave architecture:
 1,Copy a copy of the master node redis.conf file

 2.modify redis.conf Related configuration
 port 6380 #Use port from node
 pidfile /var/run/redis_6380.pid #Write the pid process number into the pidfile configuration file
 logfile "6380.log" #log file
 dir /usr/local/redis‐5.0.1/data/6380 #Specify data storage directory
 protected-mode no #Turn off the protection mode and enable it to be accessed only by this machine
 # Comment out bind, which binds the current network card and its ip. It indicates which network card ip the client runs to access. The intranet generally does not need to be configured
 # bind 127.0.0.1

 3.Configure master-slave replication
 replicaof 192.168.56.10 6379 #Copy data from redis of 6379. Before Redis 5.0, slaveof was used
 replica‐read‐only yes # Configure slave node read only

 4.Start slave node
 redis‐server redis.conf

 5.Connect slave node
 redis‐cli ‐p 6380

 #If you need to configure more slave nodes, you can continue to copy a configuration file and add it
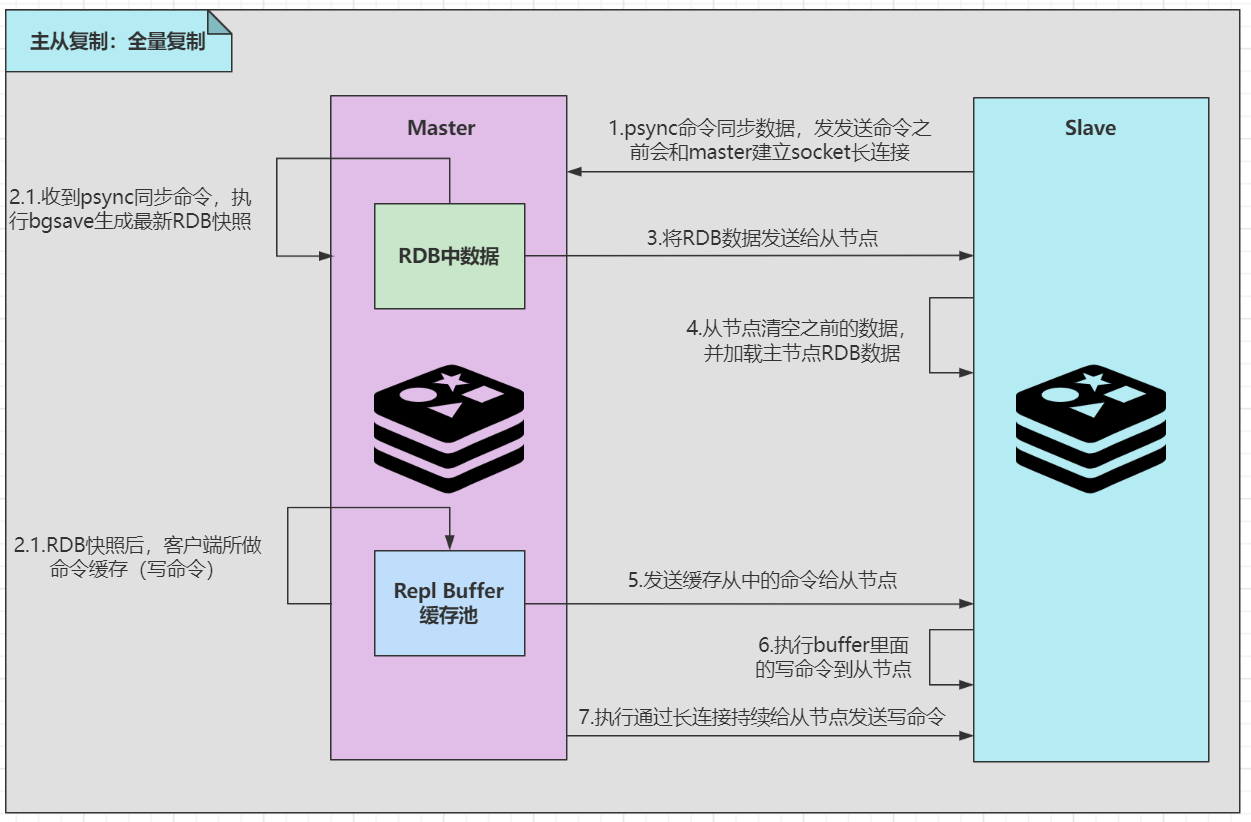
Principle of master-slave replication:
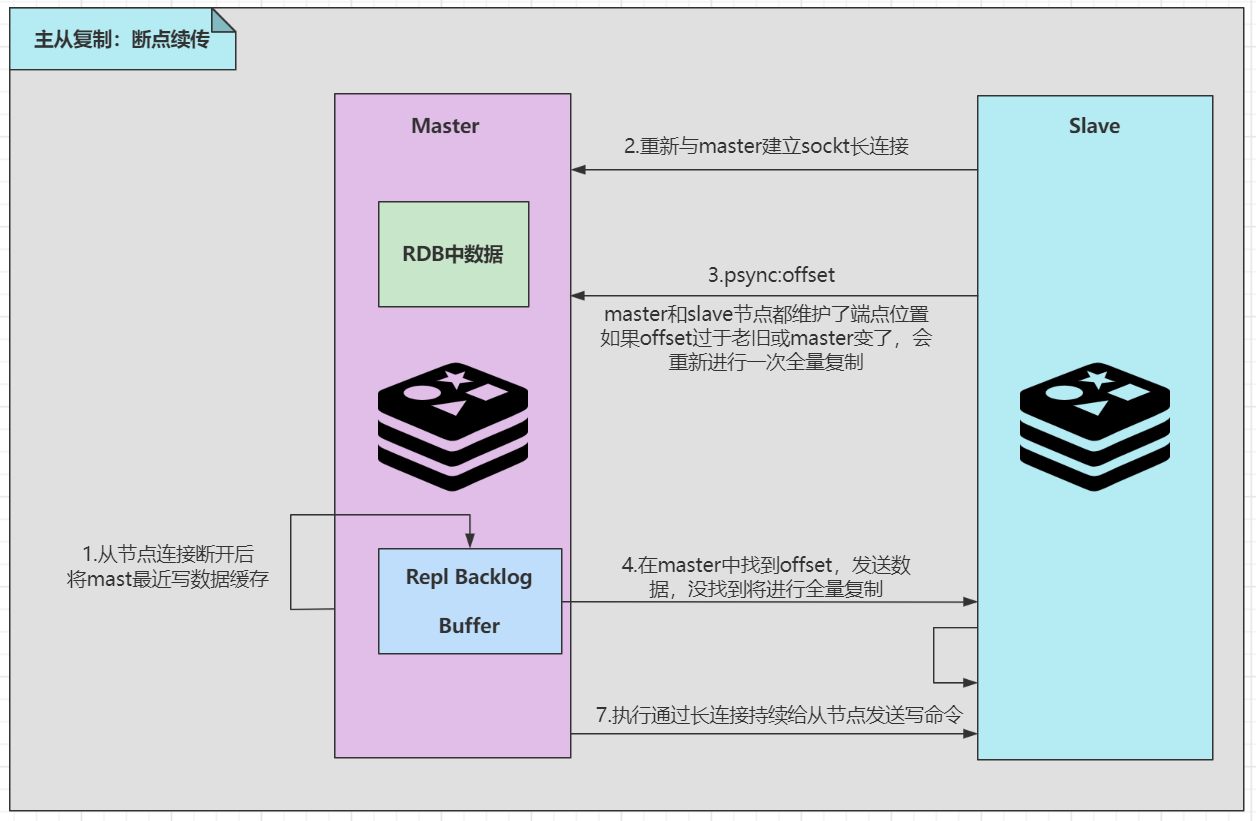
Master-slave replication storm: during master-slave replication, there may be many slave nodes. Multiple slave nodes replicate from the master node at the same time, resulting in excessive pressure on the master node. You can build some slave nodes on the slave node to synchronize data from the slave node
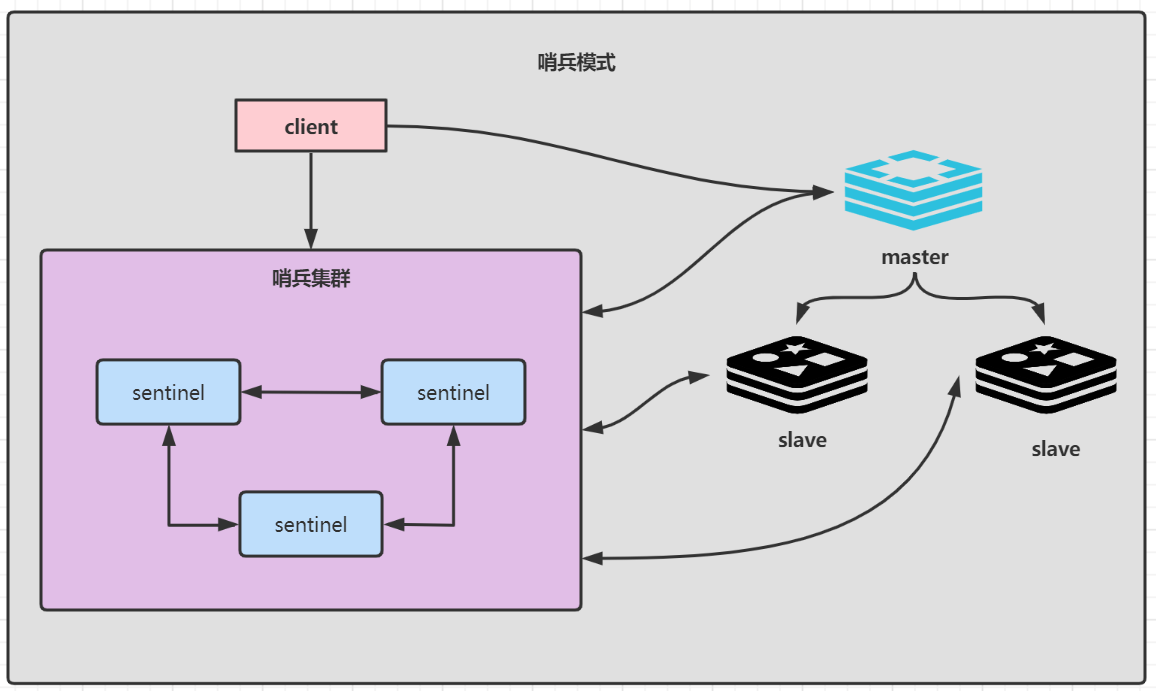
3, Redis sentinel high availability architecture
The client connects to the sentinel. During the first visit, the sentinel finds out the primary node of Redis, and then directly accesses the primary node of Redis. The sentinel dynamically monitors all nodes. When the master node hangs up, the sentinel automatically elects a new master node and pushes the new master node to the client (the client end of Redis generally realizes the subscription function and subscribes to the node change message published by sentinel).
Disadvantages of sentry structure:
- After the primary node hangs up, the re-election will be unavailable for a few seconds or even more
- Only one node is used as the write node, and the maximum concurrency is about 10W
- The maximum memory is recommended to be 10 gigabytes, which will affect the performance (the persistent file is too large, which will affect the efficiency of data recovery or master-slave synchronization)
Three sentinels are recommended. After the sentinel is set up, the sentinel will actively write to the configuration file. The steps of setting up the sentinel architecture are as follows:
1,Make a copy sentinel.conf file
cp sentinel.conf sentinel‐6399.conf

2,modify setinel.conf File related configuration
port 6399
daemonize yes #Background start
pidfile "/var/run/redis‐sentinel‐6399.pid"
logfile "6399.log"
dir "/usr/local/redis‐5.0.3/data"

# sentinel monitor <master‐redis‐name> <master‐redis‐ip> <master‐redis‐port> <quorum>
# quorum is a number indicating how many sentinel s consider a master to be invalid before the master is actually invalid
# This value is generally: total sentinel / 2 + 1

# masterName take whatever you want
sentinel monitor [masterName] 192.168.56.10 6379 2

3,start-up sentinel Sentinel instance
src/redis‐sentinel sentinel‐26379.conf
After the sentinel cluster is started, the metadata information of sentinel cluster will be written into all sentinel configuration files. If it has been configured before, the last one is the effective configuration
# After startup, you can connect to Redis and use the Info command to view sentinel information. Configure multiple sentinels and add sentinel
src/redis‐cli ‐p 6399
info

#The info command is executed as follows
#Represents the slave node information of the redis master node
sentinel known‐replica masterTest 192.168.56.10 6380
#Represents other sentinel nodes perceived
sentinel known‐sentinel masterTest 192.168.56.10 6399 xxxxxxxx
SpringBoot integrates Redis and uses sentinel architecture
1. Introduce dependency
<dependency>
    <groupId>org.springframework.boot</groupId>
    <artifactId>spring‐boot‐starter‐data‐redis</artifactId>
</dependency>
<dependency>
    <groupId>org.apache.commons</groupId>
    <artifactId>commons‐pool2</artifactId>
</dependency
2. Configuration file
spring:
  redis:
	database: 0
	timeout: 3000
	sentinel: #Sentinel mode
	master: masterTest #Name of the cluster where the primary server is located
	nodes: 192.168.56.10:6379,192.168.56.10:26380:26380,192.168.56.10:6381
	lettuce:
	  pool: #Connection pool information
	  	max-idle: 50
	  	min-idle: 10
	  	max-actice: 800
	  	max-wait: 800