for Redis It is very important to understand the conf file. Like JVM, Mysql master-slave replication, Tomcat basic configuration and Nginx configuration, see the true chapter for details. Especially for Redis cluster or some personalized configuration, this Redis The understanding of Config is even more essential. Here, the author divides the article into two parts: basic operation practice and detailed configuration to analyze Redis's Config file (you can also directly jump to the detailed configuration part to understand the details of Redis.conf).
[basic operation actual combat]
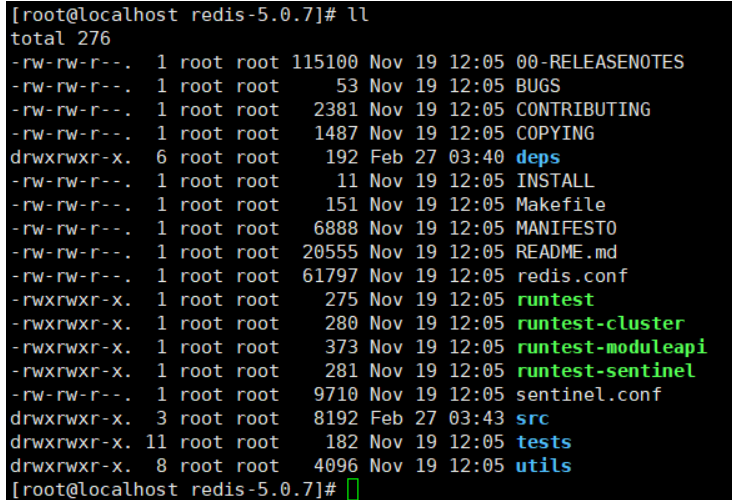
redis.config is located in the decompressed package directory of redis, as shown in the following figure
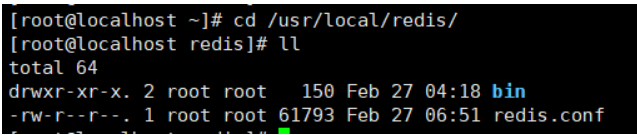
We usually copy the configuration file to our installation directory, which is at the same level as our bin directory
Next, we can modify the configuration file. Here we modify three locations
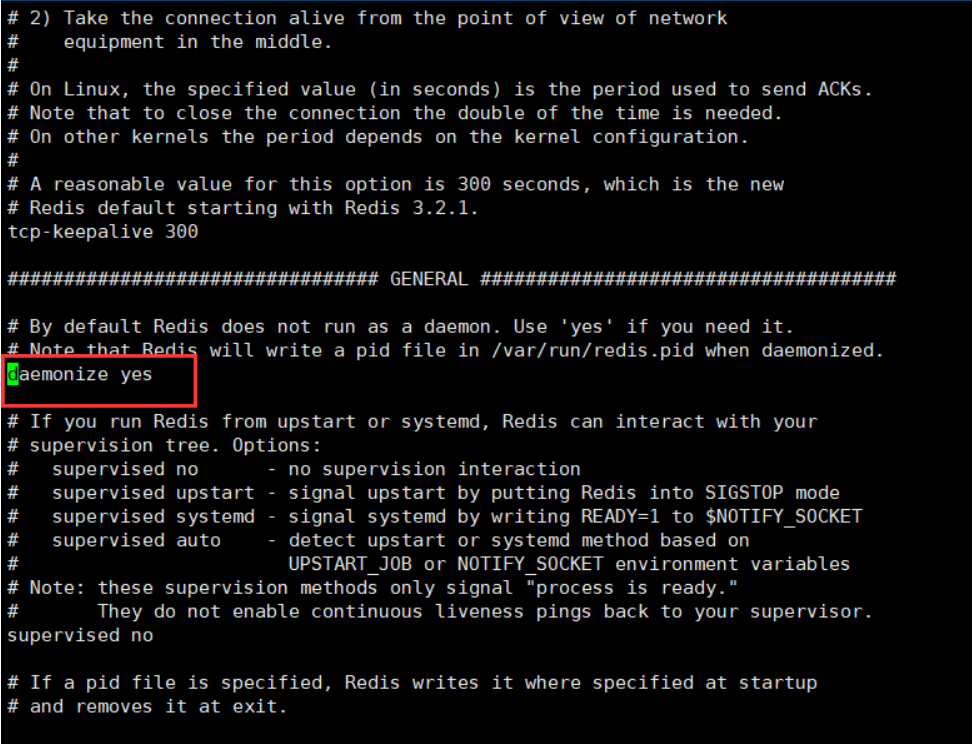
Daemon means daemon. The default value is no. we change it to yes, so that when we start the redis service, our window will not be occupied
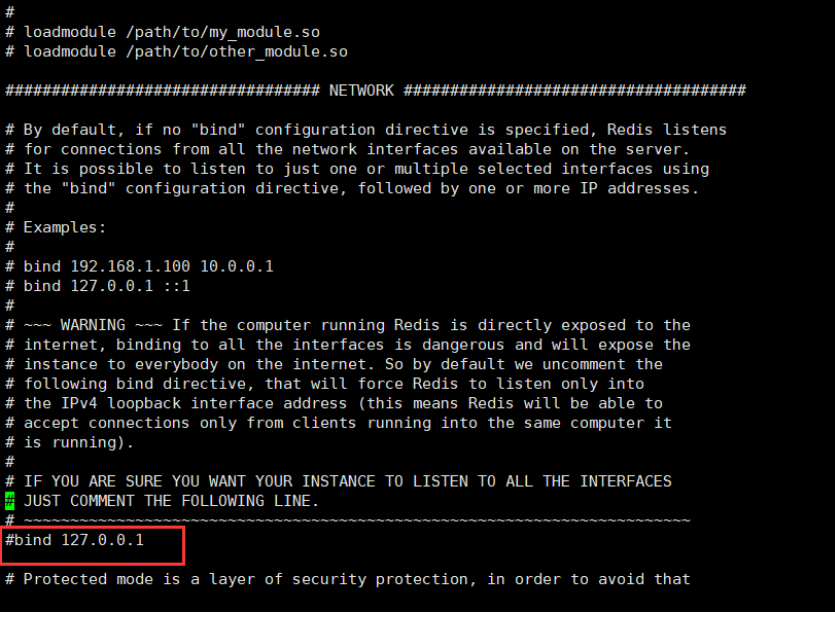
bind 127.0.0.1 this is our host address, which means that only our host is allowed to access redis. This sentence is cancelled because we need remote access
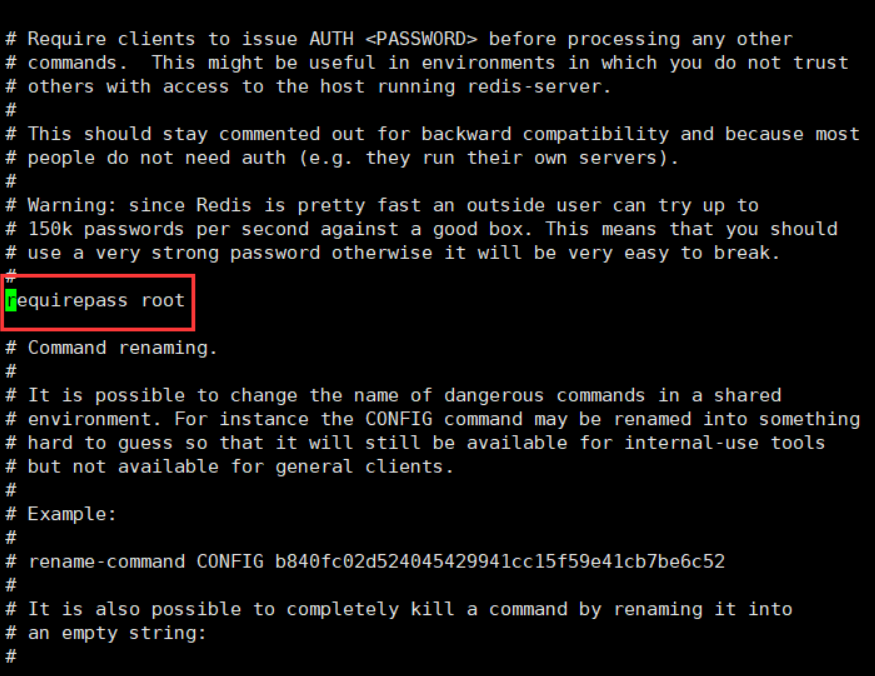
requirepass since we have set the password to allow remote access, the password is essential. If we set the password, the client needs to provide the password through the auto command when connecting to redis. Here we set the password to root
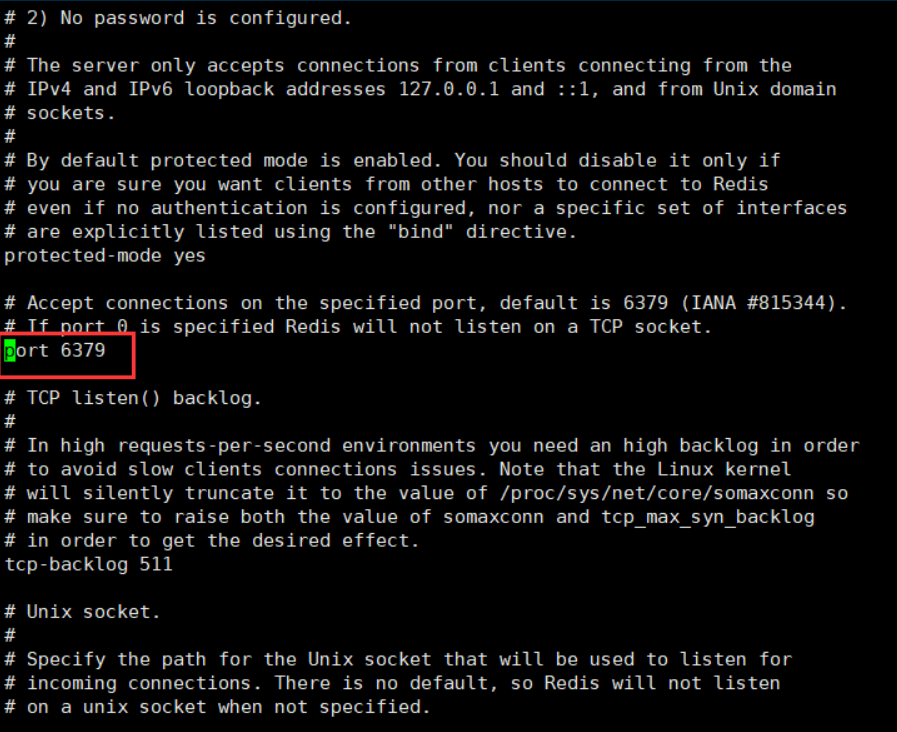
port 6379 means port number. The default is 6379. We don't need to modify it
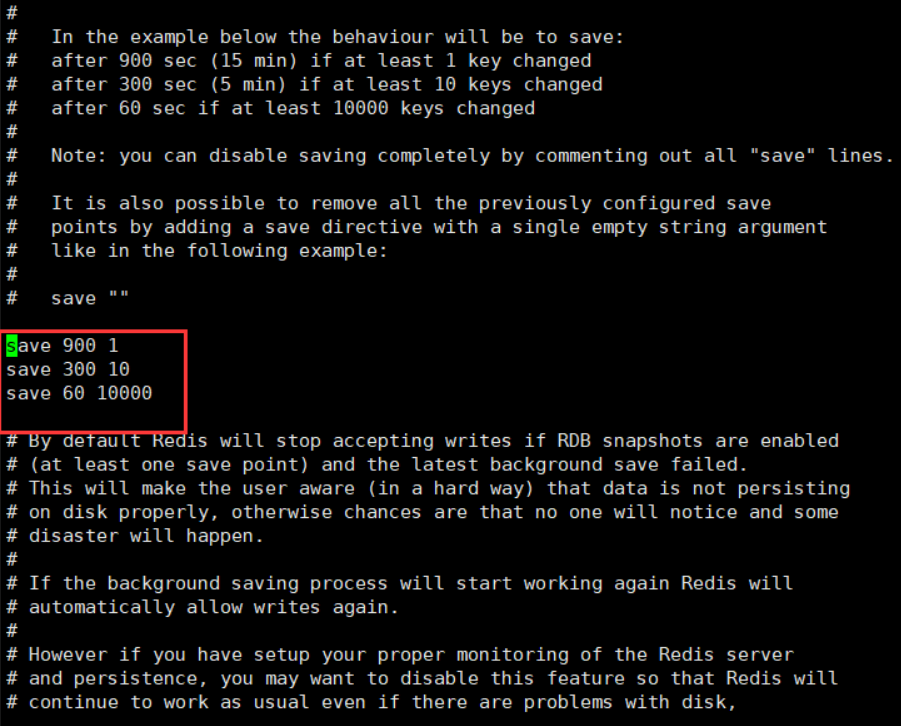
save 900 1
save 300 10
save 60 10000
Because redis is an operation on memory, that is, it does not persist. Here is an operation to persist the data in memory, which means that if one data is modified, it will be persisted once after 900 seconds. If 10 data are modified, it will be persisted once after 300 seconds. If 10000 data are modified, it will be persisted once after 60 seconds, In other words, the more changes you make, the more frequent they persist
After we modify the configuration file, we need to add the configuration file when starting the redis service if we want the configuration file to take effect
./bin/redis-server redis.conf

Next, we start the redis client. Remember to add the password, auto parameter and the syntax of remote access client
./redis-cli -h host -p port -a password
Here, - h is the host ip address, - p is the port number and - a is the password. If you access the local machine, the ip can be omitted. If the port number is omitted, the default is 6379
./bin/redis-cli -a root

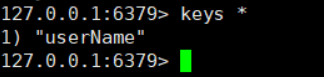
The keys * here is to view all the keys, so that the client is started, and we can set a key value pair
set key value this is the syntax

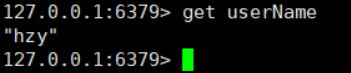
We can also take values
get key this is syntax
Then view all the keys
keys *
As we have explained above, redis operates the memory and will persist it according to the number of times you modify it. If we abort the service abnormally before it persists, the data will be lost. If we shut down the service normally, redis will persist the data before the service is shut down normally, so we must shut down the service normally, Shut down the service normally through the client
We can see from the figure below that the redis service is starting

We shut down the reids service normally. First, we need to log in to the redis client, and then execute the shutdown operation

It can be seen that after we shut down the redis service, the client and the server are also disconnected. At this time, we ctrl+c disconnect the client and then check the process

It can be found that there is no redis service process
[detailed configuration]
# When the memory size needs to be configured in the configuration, 1k, 5GB, 4M and other similar formats can be used. The conversion method is as follows (case insensitive)
#
# 1k => 1000 bytes
# 1kb => 1024 bytes
# 1m => 1000000 bytes
# 1mb => 1024*1024 bytes
# 1g => 1000000000 bytes
# 1gb => 1024*1024*1024 bytes
#
# The case of memory configuration is the same For example, 1gb 1Gb 1GB 1gB


# [important] initialize no by default, redis does not run in the background. If it needs to run in the background, change the value of this item to yes
daemonize yes

# When redis is running in the background, redis will place the pid file in / var / run / redis.com by default pid, you can configure to other addresses.
# When running multiple redis services, you need to specify different pid files and ports
pidfile /var/run/redis.pid

# [important] specify the port on which redis runs. The default is 6379
port 6379

# Specify that redis only receives requests from this IP address. If it is not set, all requests will be processed,
# It is best to set this in a production environment
# bind 127.0.0.1

# Specify the path for the unix socket that will be used to listen for
# incoming connections. There is no default, so Redis will not listen
# on a unix socket when not specified.
#
# unixsocket /tmp/redis.sock
# unixsocketperm 755

# Sets the timeout in seconds when the client connects. When the client does not issue any instructions during this period, close the connection
#[important] 0 is to turn off this setting
timeout 0

# Specify logging level
# Redis supports four levels in total: debug, verbose, notice and warning. The default is verbose
# debug records a lot of information for development and testing
# varbose useful information, not as much as debug will record
# notice is an ordinary verbose, which is often used in production environment
# warning only very important or serious information will be recorded in the log
loglevel debug

# Configuration log file address
# The default value is stdout, which is standard output. If in background mode, it will be output to / dev/null
#logfile stdout
logfile /var/log/redis/redis.log

# To enable logging to the system logger, just set 'syslog-enabled' to yes,
# and optionally update the other syslog parameters to suit your needs.
# syslog-enabled no

# Specify the syslog identity.
# syslog-ident redis

# Specify the syslog facility.  Must be USER or between LOCAL0-LOCAL7.
# syslog-facility local0

# Number of available databases
# The default value is 16, the default database is 0, and the database range is between 0 - (database-1)
databases 16

################################ [[important] snapshot  #################################
#
# Save data to disk in the following format:
#
#   save <seconds> <changes>
#
#   It indicates how many update operations will be performed in how long and how many times the data will be synchronized to the data file rdb.
#   It is equivalent to conditional trigger snapshot, which can be matched with multiple conditions
#
#   For example, the settings in the default configuration file set three conditions
#
#   At least one key is changed within 900 seconds of save 900 (rdb synchronization will be performed at 900 seconds)
#   At least 300 key s have been changed within 10 300 seconds of save 300 (then rdb synchronization will be performed at 900 seconds)
#   At least 10000 key s have been changed in 60 seconds of save (rdb synchronization will be performed in 60 seconds)

save 900 1
save 300 10
save 60 10000

# Whether to compress data when storing to local database (persistent to rdb file). The default value is yes
rdbcompression yes


# After RDB, the file name of the local persistent database is. The default value is dump RDB (persistent data will be saved in this file and then ready to swipe the disk)
dbfilename dump.rdb

# working directory
#
# The path where the files backed up by the database image are placed.
# The path and file name here should be configured separately because redis will first write the status of the current database into a temporary file when the backup is completed,
# Then replace the temporary file with the file specified above, and the temporary file here and the backup file configured above will be placed in the specified path.
#
# AOF files will also be stored in this directory
#
# Note that there must be a directory instead of a file
dir ./

################################# [[important] master slave replication #################################

# Master slave copy Set this database as the slave database of other databases
# Set the IP address and port of the master service when the local machine is slav service. When Redis is started, it will automatically synchronize data from the master
# Here, the host IP is permanently set (after setting, you will be regarded as a slave)
# slaveof <masterip> <masterport>

# When password protection is set for the master service (use the password formulated by requirepass)
# Password of slav service connecting to master
#
# masterauth <master-password>


# When the slave library loses connection with the host or replication is in progress, the slave library has two operation modes:
#
# 1) If slave serve stale data is set to Yes (the default setting), the slave library will continue the request of the corresponding client
#
# 2) If slave serve stale data refers to no, any request other than INFO and SLAVOF commands will return one
#    Error "SYNC with master in progress"
# [stale/ste ɪ l / - old]
slave-serve-stale-data yes

# The slave library will send PINGs to the master library at a time interval You can set this time interval through repl Ping slave period. The default is 10 seconds
#
# repl-ping-slave-period 10
# The summary is to send the pingPong signal to detect the survival at an interval of how many seconds. The following is to determine the return timeout after sending this signal
# Repl timeout sets the transfer time or ping reply interval of bulk data in the main database. The default value is 60 seconds
# Make sure repl timeout is greater than repl Ping slave period
# repl-timeout 60

################################## security ###################################

# Set the password that needs to be used after the client connection and before any other assignments.
# Warning: because redis is very fast, an external user can make 150K password attempts in one second under a good server, which means you need to specify a very powerful password to prevent brute force cracking
#
# requirepass foobared

# Command rename
#
# Relatively dangerous commands can be renamed in a shared environment. For example, rename CONFIG to a character that is not easy to guess.
#
# give an example:
#
# rename-command CONFIG b840fc02d524045429941cc15f59e41cb7be6c52
#
# If you want to delete a command, just rename it to an empty character, "", as follows:
#
# rename-command CONFIG ""

################################### [Important constraints ####################################

# Set the maximum number of client connections at the same time, which is unlimited by default. The number of client connections that Redis can open at the same time is the maximum number of file descriptors that Redis process can open,
# If maxclients 0 is set, it means there is no restriction.
# When the number of client connections reaches the limit, Redis will close the new connection and return the max number of clients reached error message to the client
#
# maxclients 128

# Specify the maximum memory limit of Redis. When Redis starts, it will load data into memory. After reaching the maximum memory, Redis will first try to clear the expired or about to expire keys
# Redis will also remove the empty list object
#
# After this method is processed, the maximum memory setting is still reached, and no more write operations can be performed, but read operations can still be performed
#
# Note: Redis's new vm mechanism will store the Key in memory and the Value in the swap area
#
# maxmemory is more suitable for using redis as a memcached cache than a real DB.
# When Redis is used as a real database, memory usage will be a big overhead
# maxmemory <bytes>

# What data will Redis choose to delete when the memory reaches the maximum? There are five ways to choose from
#[important - interview questions]
# Volatile LRU - > use LRU algorithm to remove the key with expired time (LRU: Least Recently Used)
# Allkeys LRU - > remove any key using LRU algorithm
# Volatile random - > remove random key s whose expiration time has been set
# allkeys->random -> remove a random key, any key
# Volatile TTL - > remove keys that are about to expire (minor TTL)
# Noeviction - > no can be removed, just a write error is returned
#
# Note: for the above policy, if there is no appropriate key to remove, Redis will return an error when writing
#
#       Write commands include: set setnx setex append
#       incr decr rpush lpush rpushx lpushx linsert lset rpoplpush sadd
#       sinter sinterstore sunion sunionstore sdiff sdiffstore zadd zincrby
#       zunionstore zinterstore hset hsetnx hmset hincrby incrby decrby
#       getset mset msetnx exec sort
#
# [important] the default is:
#
# maxmemory-policy volatile-lru

# LRU and minimal TTL algorithms are not accurate algorithms, but relatively accurate algorithms (in order to save memory), you can choose the sample size for detection at will.
# Redis selects three samples for testing by default. You can set them through maxmemory samples
#
# maxmemory-samples 3

##############################[[important] AOF ###############################

# By default, redis will asynchronously back up the database image to disk in the background, but the backup is very time-consuming, and the backup cannot be very frequent. If conditions such as switching off, power limiting and unplugging occur, a large range of data loss will be caused.
# Therefore, redis provides another more efficient way of database backup and disaster recovery.
# After the append only mode is enabled, redis will append every write request received to append only In the AOF file, when redis restarts, it will restore the previous state from the file.
# But this will cause appendonly The AOF file is too large, so redis also supports the BGREWRITEAOF instruction. For appendonly Aof to rearrange.
# You can turn on asynchronous dumps and AOF at the same time

appendonly no

# Aof file name (default: "appendonly.aof")
# appendfilename appendonly.aof


# Redis supports three strategies for synchronizing AOF files:
#
# no: the system operates without synchronization Faster.
# always: always means to synchronize every write operation Slow, Safest.
# everysec: indicates that write operations are accumulated and synchronized once per second Compromise.
#
# The default is "everysec", which is the best compromise between speed and security.
# If you want Redis to run more efficiently, you can also set it to "no" to let the operating system decide when to execute
# Or on the contrary, if you want to make the data more secure, you can also set it to "always"
#
# If you are not sure, use "everysec"

# appendfsync always
appendfsync everysec
# appendfsync no

# When the AOF policy is set to always or everysec, the background processing process (background saving or AOF log rewriting) will perform a large number of I/O operations
# In some Linux configurations, overly long fsync() requests are blocked. Note that there is no fix now, even if fsync is processing in another thread
#
# To alleviate this problem, you can set the following parameter no appendfsync on rewrite
#
# This means that while another child is saving the durability of Redis is
# the same as "appendfsync none", that in pratical terms means that it is
# possible to lost up to 30 seconds of log in the worst scenario (with the
# default Linux settings).
#
# If you have latency problems turn this to "yes". Otherwise leave it as
# "no" that is the safest pick from the point of view of durability.
no-appendfsync-on-rewrite no

# Automatic rewrite of the append only file.
# AOF auto override
# When the AOF file grows to a certain size, Redis can call BGREWRITEAOF to rewrite the log file
#
# It works like this: Redis will remember the size of the file after the last log (if it has not been rewritten since the startup, the size of the day will be determined at the startup)
#
# The base size is compared with the current size. If the current size is larger than the base size by a specified percentage, the rewrite function will start
# At the same time, you need to specify a minimum size for AOF rewriting, which is used to prevent rewriting AOF files even if the files are small but grow greatly
# Set the percentage to 0 to turn off this feature


auto-aof-rewrite-percentage 100
auto-aof-rewrite-min-size 64mb

################################## SLOW LOG ###################################

# Redis Slow Log records commands that exceed a specific execution time. The execution time does not include I/O calculation, such as connecting to the client and returning results, but the command execution time
#
# Slow log can be set through two parameters: one is to tell Redis how long it takes to execute the recorded parameter slow log slow than (subtle),
# The other is the length of slow log. When a new command is logged, the oldest command is removed from the queue


# The following time is expressed in subtle micro units, so 1000000 represents one minute.
# Note that setting a negative number will turn off slow logging, while setting it to 0 will force every command to be logged
slowlog-log-slower-than 10000


# There is no limit on the length of the log, just note that it will consume memory
# The memory consumed by slow logs can be recovered through slow log reset
slowlog-max-len 1024

################################ VM ###############################

### WARNING! Virtual Memory is deprecated in Redis 2.4
### The use of Virtual Memory is strongly discouraged.

# Virtual Memory allows Redis to work with datasets bigger than the actual
# amount of RAM needed to hold the whole dataset in memory.
# In order to do so very used keys are taken in memory while the other keys
# are swapped into a swap file, similarly to what operating systems do
# with memory pages.
#
# To enable VM just set 'vm-enabled' to yes, and set the following three
# VM parameters accordingly to your needs.

vm-enabled no
# vm-enabled yes

# This is the path of the Redis swap file. As you can guess, swap files
# can't be shared by different Redis instances, so make sure to use a swap
# file for every redis process you are running. Redis will complain if the
# swap file is already in use.
#
# The best kind of storage for the Redis swap file (that's accessed at random)
# is a Solid State Disk (SSD).
#
# *** WARNING *** if you are using a shared hosting the default of putting
# the swap file under /tmp is not secure. Create a dir with access granted
# only to Redis user and configure Redis to create the swap file there.
vm-swap-file /tmp/redis.swap

# vm-max-memory configures the VM to use at max the specified amount of
# RAM. Everything that deos not fit will be swapped on disk *if* possible, that
# is, if there is still enough contiguous space in the swap file.
#
# With vm-max-memory 0 the system will swap everything it can. Not a good
# default, just specify the max amount of RAM you can in bytes, but it's
# better to leave some margin. For instance specify an amount of RAM
# that's more or less between 60 and 80% of your free RAM.
vm-max-memory 0

# Redis swap files is split into pages. An object can be saved using multiple
# contiguous pages, but pages can't be shared between different objects.
# So if your page is too big, small objects swapped out on disk will waste
# a lot of space. If you page is too small, there is less space in the swap
# file (assuming you configured the same number of total swap file pages).
#
# If you use a lot of small objects, use a page size of 64 or 32 bytes.
# If you use a lot of big objects, use a bigger page size.
# If unsure, use the default :)
vm-page-size 32

# Number of total memory pages in the swap file.
# Given that the page table (a bitmap of free/used pages) is taken in memory,
# every 8 pages on disk will consume 1 byte of RAM.
#
# The total swap size is vm-page-size * vm-pages
#
# With the default of 32-bytes memory pages and 134217728 pages Redis will
# use a 4 GB swap file, that will use 16 MB of RAM for the page table.
#
# It's better to use the smallest acceptable value for your application,
# but the default is large in order to work in most conditions.
vm-pages 134217728

# Max number of VM I/O threads running at the same time.
# This threads are used to read/write data from/to swap file, since they
# also encode and decode objects from disk to memory or the reverse, a bigger
# number of threads can help with big objects even if they can't help with
# I/O itself as the physical device may not be able to couple with many
# reads/writes operations at the same time.
#
# The special value of 0 turn off threaded I/O and enables the blocking
# Virtual Memory implementation.
vm-max-threads 4

############################### ADVANCED CONFIG ###############################

# When the hash contains more than the specified number of elements and the maximum element does not exceed the critical value,
# hash will be stored in a special encoding mode (greatly reducing memory use), and these two thresholds can be set here
# The Value corresponding to Redis Hash is actually a HashMap. In fact, there are two different implementations here,
# When there are few members in this Hash, Redis will use a compact storage method similar to one-dimensional array to save memory, instead of using the real HashMap structure. The encoding of the corresponding value redisObject is zipmap,
# When the number of members increases, it will be automatically converted to a real HashMap. At this time, encoding is ht.
hash-max-zipmap-entries 512
hash-max-zipmap-value 64

# The compact storage format of de pointer will be adopted below the number of nodes of list data type.
# list data type node value size less than how many bytes will adopt compact storage format.
list-max-ziplist-entries 512
list-max-ziplist-value 64

# set data type internal data will be stored in compact format if they are all numeric and contain fewer nodes.
set-max-intset-entries 512

# The compact storage format of de pointer will be adopted below the number of nodes of zsort data type.
# If the size of the node value of zsort data type is less than how many bytes, the compact storage format will be adopted.
zset-max-ziplist-entries 128
zset-max-ziplist-value 64


# Redis will use 1 ms CPU time every 100 ms to rehash the hash table of redis, which can reduce the use of memory
#
# In your usage scenario, there is a very strict need for real-time, and Redis can not accept the request with a delay of 2 milliseconds from time to time. Configure this to no.
#
# If there is no such strict real-time requirement, it can be set to yes to release memory as soon as possible
activerehashing yes

################################## INCLUDES ###################################

# Specify to include other configuration files. You can use the same configuration file for * * bold style * * among multiple Redis instances on the same host, and each instance has its own specific configuration file

# include /path/to/local.conf
# include /path/to/other.conf