Sentinel
Sentry is a very important component in Redis cluster architecture. The emergence of sentry mainly solves the problem of human intervention in case of failure of master-slave replication.
1. Main functions of redis sentry
(1) Cluster monitoring: responsible for monitoring whether Redis master and slave processes work normally
(2) Message notification: if a Redis instance fails, the sentry is responsible for sending a message as an alarm notification to the administrator
(3) Failover: if the master node hangs, it will be automatically transferred to the slave node
(4) Configuration center: if failover occurs, notify the client of the new master address
2. High availability of redis sentry
Principle: when the primary node fails, Redis Sentinel will automatically complete fault discovery and transfer, and notify the application to achieve high availability.
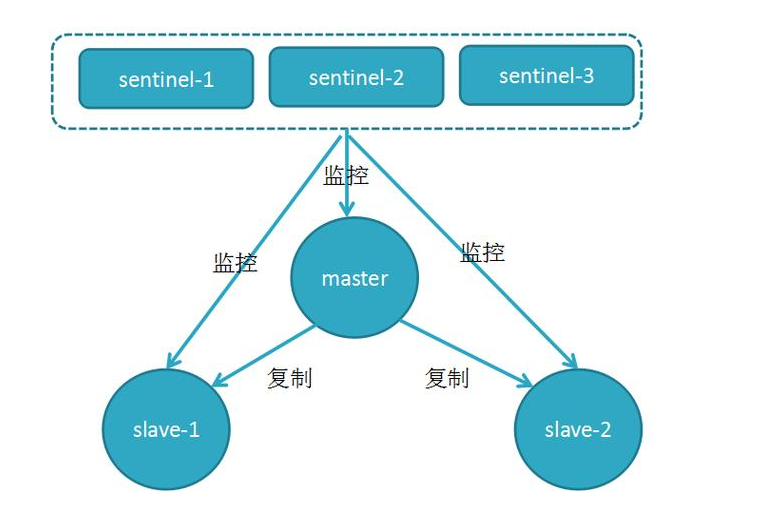
- Sentinel mechanism establishes multiple sentinel nodes (processes) to jointly monitor the operation of data nodes.
- At the same time, sentinel nodes also communicate with each other to exchange the monitoring status of master-slave nodes.
- Every 1 second, each Sentinel will send a ping command to the whole cluster: Master master server + Slave server + other Sentinel processes for heartbeat detection.
deploy
host
1. Installation reference: https://blog.csdn.net/zhuchunyan_aijia/article/details/78476151
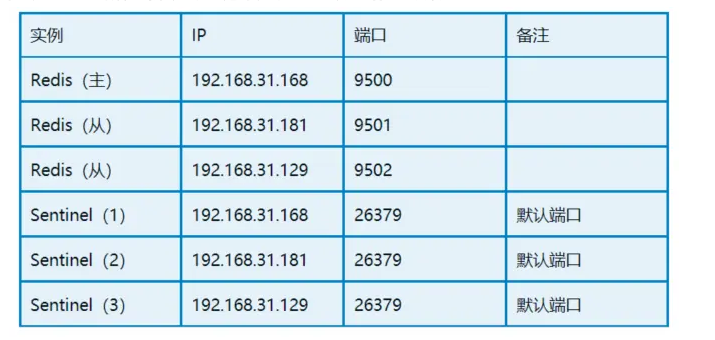
2. Modify the configuration file VI / usr / local / redis / etc / redis Conf host: 168
#1. redis does not run in thread guard mode by default. If you need to adjust to thread guard mode, please

daemonize no  =>  daemonize yes

#2. Change the default port 6379 to another

port 6379   => port 9500

#3. Bind will restrict the addresses that can access redis. The default (127.0.0.1) refers to local access. If you want to release redis, if you want to build a redis cluster, comment out the bind; At the same time, change the protected mode from yes to no

#bind 127.0.0.1

protected-mode yes  => protected-mode no

#4. Change the PID file name to be consistent with the modified PORT

pidfile /var/run/redis_9500.pid

#5. Set log file path

logfile "/var/run/redis/redis.log"

#6. Specify the local database storage directory
    dir ./
#Modify dir/ Is an absolute path,
#By default, when redis server is started, dump.exe will be generated or read in the current directory rdb
#Therefore, if you execute redis server / etc / redis.exe in the root directory Conf,
#The dump. Directory in the root directory is read RDB, to enable redis server to execute in any directory
#So change dir to absolute path here
dir /usr/local/redis

#7. Modify appendonly to yes
#Specifies whether to log after each update operation,
#Redis writes data to disk asynchronously by default,
#If it is not turned on, it may cause data loss for a period of time in case of power failure.
#Because redis synchronizes data files according to the above save conditions,
#Therefore, some data will only exist in memory for a period of time. The default is no
appendonly yes

#8. Set the Redis connection password. If the connection password is configured, the client needs to provide the password through the auth < password > command when connecting to Redis. It is closed by default
requirepass foobared

# If the password is set: both the master and slave must have requirepass and masterauth. Because in sentinel mode, the master server will become a slave server.
masterauth  foobared

#9. redis has db0~db15 by default, and DB is configured
databases 16
3. Modify the configuration file VI / usr / local / redis / etc / redis Conf host: 181129
The configuration is the same as that on 168, with the addition of
#Because 192.168.31.168 is used as the master database here, only the following configuration items of 181 and 129 slave libraries need to be modified (only two slave redis instances need to be modified)

# Please note that slaveof is used before version 5.0, and replicaof is used for configurations after version 5.0. However, due to the principle of downward compatibility, even if you use slaveof in version 5.0, there will be no problem, but it is generally recommended to use the new one, otherwise one day, if you suddenly do not support the old slaveof, you will be GG.

replicaof 192.168.31.168 9500
Modification:
port 6379 => port 9501 The port can be the same as that of the 9502, which is actually deployed on three machines
4. Start the service and enter three redis machines for execution
redis-server redis.conf
Check whether the startup is successful: Command: ps -ef | grep redis
5. Check whether the master-slave relationship is successfully configured and execute the command:
bin/redis-cli -p 9500
auth password
info replication
[root@centos7a src]# ./redis-cli -h 192.168.31.168 -p 9500

192.168.31.168:9500> info replication

Replication

role:master

connected_slaves:2

slave0:ip=192.168.31.181,port=9501,state=online,offset=2235966,lag=1

slave1:ip=192.168.31.129,port=9502,state=online,offset=2235966,lag=1

master_replid:1df20ecc0df92307ef811e9bd81cc09e131725c7

master_replid2:0000000000000000000000000000000000000000

masterreploffset:2236538

........


[root@mimy-centos7b src]# ./redis-cli -h 192.168.31.181 -p 9501

192.168.31.181:9501> info replication

Replication

role:slave

master_host:192.168.31.168

master_port:9500

masterlinkstatus:up

masterlastio_seconds_ago:0

mastersyncin_progress:0

slavereploffset:2317523

........


[root@localhost src]# ./redis-cli -h 192.168.31.129 -p 9502

192.168.31.129:9502> info replication

Replication

role:slave

master_host:192.168.31.168

master_port:9500

masterlinkstatus:up

masterlastio_seconds_ago:1

mastersyncin_progress:0

slavereploffset:2336225

........
6. / / after the master-slave replication is configured, configure the sentinel mode} modify each sentinel conf
port 26379

# Whether to set background operation as background operation

daemonize yes

# pid file at run time

pidfile /var/run/redis-sentinel.pid

# sentinel log file

logfile  "/var/log/sentinel.log"

# working directory

dir /tmp

# Here, the IP and port of the main database are defined. The last 2 means that the main database has been hung up (i.e. objective failure) until it is recognized by the two sentinel s

sentinel monitor mymaster 192.168.31.168 9500 2

# If the main database does not respond within 30000 milliseconds (i.e. 30 seconds), it is considered that the main database is hung (i.e. subjective failure)

sentinel down-after-milliseconds mymaster 30000

# If the new master database is selected, the maximum number of slave databases that can synchronize data from the new master database at the same time is allowed

sentinel parallel-syncs mymaster 1

# If failover is not achieved within the specified time (i.e. 180000 milliseconds, i.e. 180 seconds), it will be initiated again automatically

sentinel failover-timeout mymaster 180000

sentinel deny-scripts-reconfig yes

//If the password is set, this is to be written
 sentinel auth-pass mymaster password
7. Start 3 redis Sentinel
bin/redis-sentinel sentinel27269.conf
bin/redis-sentinel sentinel27270.conf
bin/redis-sentinel sentinel27271.conf
Check whether the startup is successful: Command: ps -ef | grep redis
View sentry information:
/redis-cli -h 192.168.31.168 -p 26379
info sentinel

8. Startup sequence
Start Redis and Sentinel with the following commands: Redis (Master) - > Redis (slave) - > Redis (slave) - > Sentinel (1) - > Sentinel (2) - > Sentinel (3)
9. Verify data synchronization
#1. At first, the three machines were synchronous and had no data;

192.168.31.168:9500> KEYS *

(empty list or set)

192.168.31.181:9501> keys *

(empty list or set)

192.168.31.129:9502> keys *

(empty list or set)

#2. Insert in the main library (KEY1,CHAOS MONKEY)

192.168.31.168:9500> SET KEY1 'CHAOS MONKEY'

OK

#3. Query whether the other two slave libraries are synchronized

192.168.31.181:9501> get KEY1

"CHAOS MONKEY"

192.168.31.129:9502> GET KEY1

"CHAOS MONKEY"
From the log of the 129 machine (/ var/run/redis/redis.log), the data is being synchronized from 168 to the 129 slave database (screenshot 1). In addition, the same synchronization behavior also occurs in slave libraries from 168 to 181 (screenshot 2).
10. High availability verification
First of all, we can check sentinel from one machine by using the command ". / redis cli - H 192.168.31.168 - P 26379 info sentinel". At present, the main database is 192.168.31.168.

Next, we try to simulate the main database crash, first stop the 168 main database, and then pass sentinel The log shows that the primary database has been changed from 168 to 181.
First, 181 found 168 offline, which is a subjective failure; Because we're at sentinel sentinel monitor mymaster 127.0.0.1 6379 2 is set in conf. the last 2 represents that two sentinels need to think that the main database offline is the real offline (i.e. objective failure), and then conduct the election;
Then, the sentinels of 129 or 168 also found that 168 had been offline, and had reached 2. Therefore, they set the 168 Main warehouse offline (objective failure) and began the election;
Then, the election began, and finally 181 was elected as the main library.
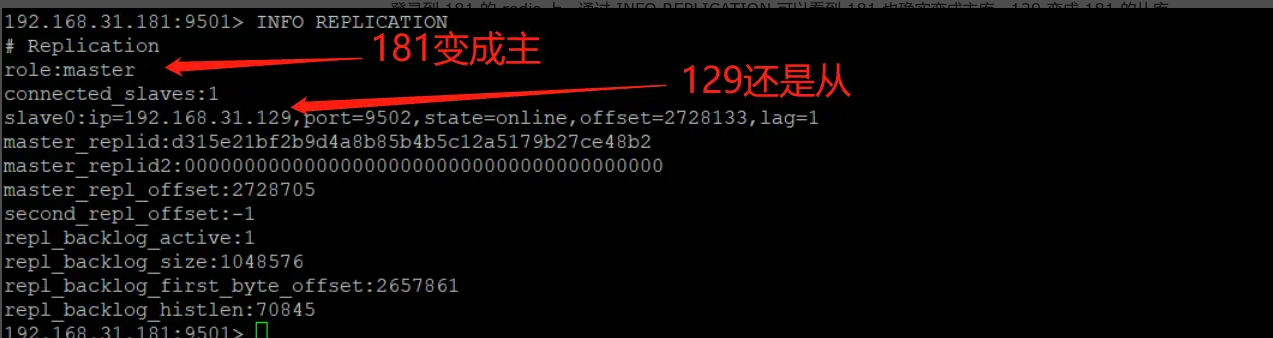
Log in to the redis of 181, and you can see through INFO REPLICATION that 181 has indeed become the master database and 129 has become the slave database of 181
At this time, we continue to try to add a KEY. From the following results, we can see that 129 can normally synchronize data from 181 (new master database)
192.168.31.181:9501> keys *

1) "KEY1"

2) "KEY2"

3) "KEY3"


192.168.31.129:9502> keys *

1) "KEY3"

2) "KEY2"

3) "KEY1"


192.168.31.181:9501> set KEY4 BUTTERFLY

OK

192.168.31.181:9501> keys *

1) "KEY1"

2) "KEY4"

3) "KEY2"

4) "KEY3"


192.168.31.129:9502> keys *

1) "KEY3"

2) "KEY2"

3) "KEY4"

4) "KEY1"