Release an npm package and build your own third-party library
preface
When Xiaosheng needs to release his npm package, he can't meet his needs by seeing many online tutorials; Either it's too simple or it's short of three or four. Therefore, go to GitHub of major manufacturers and read its source code patiently before you have experience; I hereby make a blog to remember and encourage you.
If you need to quickly build your own third-party library, please move to: npm-plugins-building-shell perhaps Borrow the shell and quickly build an npm plug-in library.
Apply for an npm account and create related github projects
Go to apply for npm account: https://www.npmjs.com/
The name of the github project I created here is my-npm-libs , you need another name.
Create npm project locally
We need to create our own npm project.
mkdir my-npm-libs # Create a folder. Note that the name here is consistent with the GitHub project name you created above
cd my-npm-libs # Enter file
# Use - y here to skip the following operations and let you fill in the contents. Just use the default values for all contents. If necessary, you can go back to package JSON file
npm init -y # Default configuration
Here we choose the default configuration npm init -y. if you need more detailed configuration, please use:
npm init
The results of using npm init are shown in the figure below:
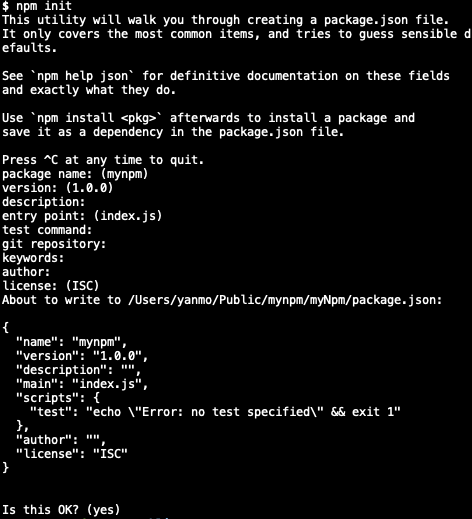
see npm init document , for more details.
npm project directory
mkdir examples lib src test # Create the required directory
touch .babelrc .gitignore README.md # Create required files
touch examples/index.html src/index.js test/index.js
The contents are as follows:
.
├── examples/                         // Directories: placing case files
│   ├── index.html                    // File: case running results
├── lib/                              // Directory: place files referenced by script
├── src/                              // Catalogs: library catalogs
│   ├── index.js                      // Files: library content
├── test/                             // Directories: placing unit test files
│   ├── index.js                      // Document: test content
.babelrc
.gitignore
package.json
README.md
Related configuration (please configure in order)
src/index.js library content
Our package needs to support the following three reference methods:
import reference
import ... from '...'
require reference
const ... = require('...')
Label reference
<script src="..."></script>
Here we use our own method to obtain data types:
// Get data type
(function (root, globalName, factory) {
  if (typeof define === 'function' && define.amd) {
    // AMD:
    define([], factory);
  } else if (typeof module === 'object' && module.exports) {
    // Node:
    module.exports = factory();
    // Use module export as simulated ES6 default export:
    module.exports.default = module.exports;
  } else {
    // Browser:
    window[globalName] = factory();
  }
}(this, 'dataType', function () {
  'use strict';

  return function dataType (data) {
    return ({}).toString.call(data).match(/\s([a-zA-Z]+)/)[1].toLowerCase();
  }
}));
babel configuration
At present, most browsers only support ES5, so we need to convert the syntax above ES5 to ES5, and we need to reference babel. If you don't know about babel, please move on babel official website.
If you don't need syntax conversion, skip this babel configuration step.
We need to configure babel. Here, due to the update of babel, the configuration of babel is basically divided into two categories:
1.babel6.X and below
2.babel7.X and above
babel6. Configuration of X and below
Install the Babel command line tool (Babel CLI) and a Babel preset:
npm install --save-dev babel-cli babel-preset-env
Create a babelrc file (or use your package.json file): if we have created it above, we don't need to create it here.
{
  "presets": ["env"]
}
Since Babel only performs syntax conversion (such as arrow function), you can use Babel Polyfill to support new global variables, such as Promise, or new native methods, such as string padStart(left-pad). It uses core JS and regener.
Install Babel Polyfill:
npm install --save-dev babel-polyfill
Run this command to compile all code from src directory to lib:
./node_modules/.bin/babel src --out-dir lib
babel7. Configuration of X and above
Install Babel command line tool (@ babel/cli), Babel core and a @ babel preset:
npm install --save-dev @babel/core @babel/cli @babel/preset-env
In the root directory of the project, create a file named Babel config. JS configuration file:
const presets = [
  ["@babel/env", {
    targets: {
      edge: "17",
      firefox: "60",
      chrome: "67",
      safari: "11.1"
    },
    useBuiltIns: "usage"
  }]
]; // The browser list above is just an example for demonstration. You must adjust to the browser you want to support.
@The babel/polyfill module includes core JS and a custom regenerator runtime to simulate the complete ES2015 + environment.
This means you can use new built-in functions like Promise or WeakMap, such as array From or object Static methods such as assign, such as array prototype. Include such instance methods, and the generator function (provided for you to use the reggenerator plug-in).
Install @ babel/polyfill:
npm install --save @babel/polyfill
Run this command to compile all code from src directory to lib:
./node_modules/.bin/babel src --out-dir lib
###. gitignore configuration
.DS_Store
node_modules/
npm-debug.log*
yarn-debug.log*
yarn-error.log*

# Editor directories and files
.idea
.vscode
*.suo
*.ntvs*
*.njsproj
*.sln
package.json configuration
{
  "name": "my-npm-libs",
  "description": "Publish a npm Package, build your own third-party library",
  "version": "1.0.1",
  "author": "nongshuqiner <ym1185509297@163.com>",
  "license": "MIT",
  "main": "src/index.js",
  "files": [
    "examples",
    "lib",
    "src",
    "test"
  ],
  "private": false,
  "scripts": {
    "test": "mocha --recursive",
    "examples": "open ./examples/index.html",
    "build": "./node_modules/.bin/babel src --out-dir lib"
  },
  "keywords": [
    "my-npm-libs"
  ],
  "homepage": "https://github.com/nongshuqiner/my-npm-libs.git",
  "repository": {
    "type": "git",
    "url": "git+https://github.com/nongshuqiner/my-npm-libs.git"
  },
  "devDependencies": {
    "babel-cli": "^6.26.0",
    "babel-polyfill": "^6.26.0",
    "babel-preset-env": "^1.7.0",
    "chai": "^4.2.0",
    "mocha": "^5.2.0"
  }
}
examples/index.html configuration
Configure examples / index Before HTML, you need to run the following commands:
./node_modules/.bin/babel src --out-dir lib
# Or, because we're in package JSON has been configured, so you can also use the following command to build
npm run build
examples/index.html content:
<!DOCTYPE html>
<html>
  <head>
    <meta charset="utf-8">
    <meta name="viewport" content="width=device-width,initial-scale=1.0">
    <title>my-npm-libs</title>
  </head>
  <body>
    <div id="examples">
      <div class="">
        var a = [1, 2, 3, 4, 1, 5, 1, 7],a What is the data type of?
      </div>
      <div id="result"></div>
    </div>
    <script src="../lib/index.js"></script>
    <script>
      console.log(window.dataType);
      var a = [1, 2, 3, 4, 1, 5, 1, 7];
      var result = document.getElementById('result');
      result.innerHTML = dataType(a);
    </script>
  </body>
</html>
We can view cases through the following commands:
npm run examples
README.md configuration
# XXX (component name)

## summary

...

## Install

npm install --save ...

## Usage

...

... Other contents ...

## Donation

...

## Contact me

...

## License

[MIT](http://opensource.org/licenses/MIT) Copyright (c) 2018 - forever Naufal Rabbani
Test unit test
As for unit testing, you can also choose relevant libraries to test by yourself, or test according to my habits.
You need to know before the test mocha,chai Here are two libraries. You can see the tutorials: Mocha instance tutorial of testing framework
To install mocha and chai:
npm install --save-dev mocha chai
test/index.js:
// Assertion library Chai js
var expect = require('chai').expect;
var dataType = require('../src/index');

// The test script should include one or more describe blocks, called test suite
describe('Basic data type', function () {
  // Each describe block should include one or more it blocks, called test case s
  // Basic data type
  it('undefined-Type detection test', () => {
    // Assert
    expect(dataType(undefined)).to.equal('undefined');
  });
  it('null-Type detection test', () => {
    expect(dataType(null)).to.equal('null');
  });
  it('string-Type detection test', () => {
    expect(dataType('abc')).to.equal('string');
  });
  it('boolean-Type detection test', () => {
    expect(dataType(true)).to.equal('boolean');
  });
  it('number-Type detection test', () => {
    expect(dataType(1)).to.equal('number');
  });
});

describe('Reference data type', function () {
  it('array-Type detection test', () => {
    expect(dataType([1])).to.equal('array');
  });
  it('object-Type detection test', () => {
    expect(dataType({})).to.equal('object');
  });
  it('function-Type detection test', () => {
    expect(dataType(function () {})).to.equal('function');
  });
});

describe('Other data types', function () {
  it('date-Type detection test', () => {
    expect(dataType(new Date())).to.equal('date');
  });
  it('regex-Type detection test', () => {
    expect(dataType(new RegExp("\\w+"))).to.equal('regexp');
  });
});
Pass the command line test:
npm run test
The results are as follows:
$ npm run test

> my-npm-libs@1.0.1 test /Users/yanmo/Public/mynpm/my-npm-libs
> mocha --recursive


  Basic data type
    ✓ undefined-Type detection test
    ✓ null-Type detection test
    ✓ string-Type detection test
    ✓ boolean-Type detection test
    ✓ number-Type detection test

  Reference data type
    ✓ array-Type detection test
    ✓ object-Type detection test
    ✓ function-Type detection test

  Other data types
    ✓ date-Type detection test
    ✓ regex-Type detection test


  10 passing (12ms)
So far, the construction of a basic and simple npm third-party library has been completed. Now let's do other publishing work.
Publish npm package
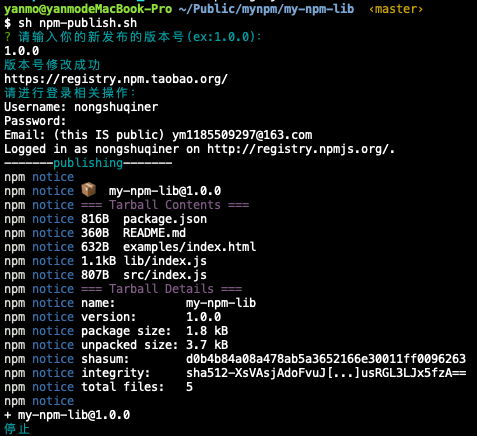
Enter the project root directory and log in to the npm account just applied for. Execute submission after login.
npm login # land

npm publish # release
When publishing npm packages, you should pay attention to switching the image library of npm warehouse from domestic Taobao source to npm foreign source, otherwise it cannot be submitted.
Here I have made a shell file to simplify your submission. You can create a new file NPM publish in the root directory SH, as follows:
#!/usr/bin/env bash

echo "\033[0;32m?\033[0m \033[36m Please enter the version number of your new release(ex:1.0.0): \033[0m"

read version

# Process package json
sed -i -e "s/\"version\": \(.*\)/\"version\": \"$version\",/g" 'package.json'
if [ -f "package.json-e" ];then
  rm 'package.json-e'
fi
echo '\033[36m Version number modified successfully\033[0m'

npm config get registry # Check warehouse image library

npm config set registry=http://registry.npmjs.org # set warehouse image library: Taobao image https://registry.npm.taobao.org

echo '\033[36m Please login:\033[0m'

npm login # land

echo "-------\033[36mpublishing\033[0m-------"

npm publish # release

npm config set registry=https://registry.npm.taobao.org # set as Taobao image

echo "\033[36m complete \033[0m"
exit
You can then run the following command:
sh npm-publish.sh
The execution effect is shown in the figure:
After your npm package is published, you can access it through the following format:
unpkg.com/:package@:version/:file
The access results are shown in the figure below:
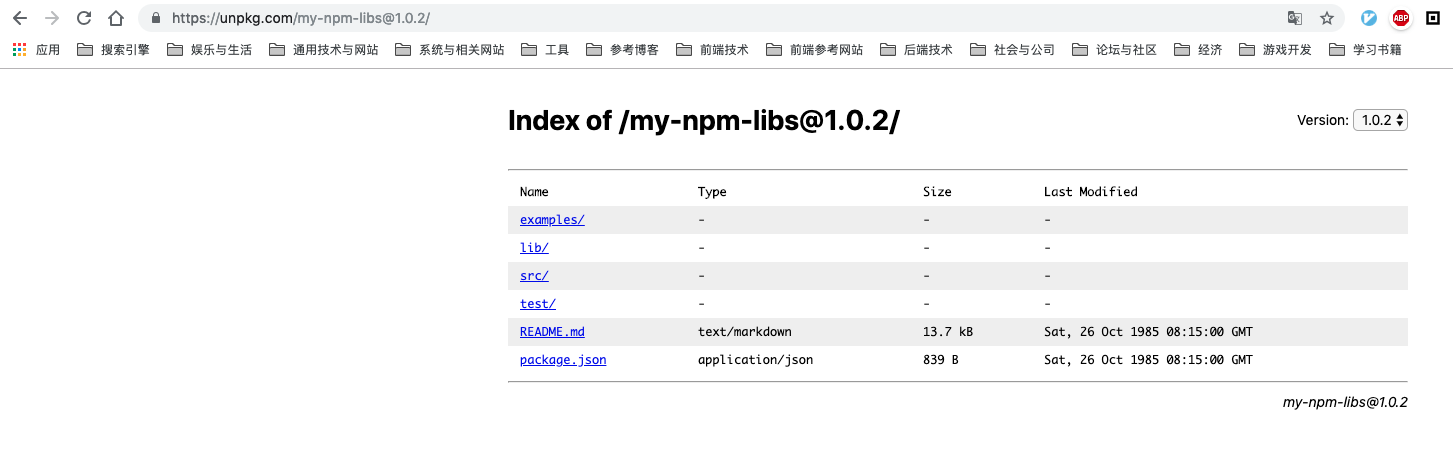
This also means that you can access your package in the form of < script > tags. I guess you need to know: UNPKG.
git submission
git init
git add -A
git commit -m "first commit"
git remote add origin XXX
git push -u origin master
Usage
It can be used after publishing successfully. There are two forms of use: npm installation and < script > reference.
npm installation:
npm install --save my-npm-libs
import myNpmLibs from 'my-npm-libs'
var a = [1, 2, 3, 4, 1, 5, 1, 7]
console.log(myNpmLibs(a)) // array
// perhaps
const myNpmLibs = require('my-npm-libs')
var a = [1, 2, 3, 4, 1, 5, 1, 7]
console.log(myNpmLibs(a)) // array
< script > use
<script src="//unpkg.com/my-npm-libs@1.0.2/lib/index.js"></script>
<script>
  console.log(window.dataType);
  var a = [1, 2, 3, 4, 1, 5, 1, 7];
  console.log(dataType(a));
</script>
Run
# git clone ...
git clone https://github.com/nongshuqiner/my-npm-libs.git

# enter
cd my-npm-libs

# install dependencies
npm install

# open examples HTML
npm run examples

# Run this command to compile all the code from the src directory to lib
npm run build

# test
npm run test
Donation (reward)

Contact me
Just Contact Me At:
- Email: ym1185509297@163.com
- Brief book: Yan Mo'er
epilogue
So far, the work of the package we released has been completely completed.
I have studied many other third-party libraries and tool websites for reference. Here are some links for your reference:
unpkg
b64-to-blob
The anatomy of a vanilla JavaScript plugin
How to define a highly qualified native JS plug-in
How to write and build JS libraries in 2018
Building Your Own JavaScript Modal Plugin
How to write a frontend JavaScript plugin using ES6 + SASS + Webpack
Before publishing, you can throw the entire directory to the node of another project_ Modules folder to test whether the functions we write are correct.
Tip: there are still wonderful things to look forward to. Please pay attention to my CSDN blog: Nong shuqin'er , or my topic: web front end . If you have any comments, you can comment. I will take each comment seriously.