
The story comes from the Internet.
preface
This article describes through self understanding. If there is any inaccuracy, please correct it.
Before telling a series of related professional terms, try to explain the love and hatred between node and pod in Kubernetes with an easy to understand story.
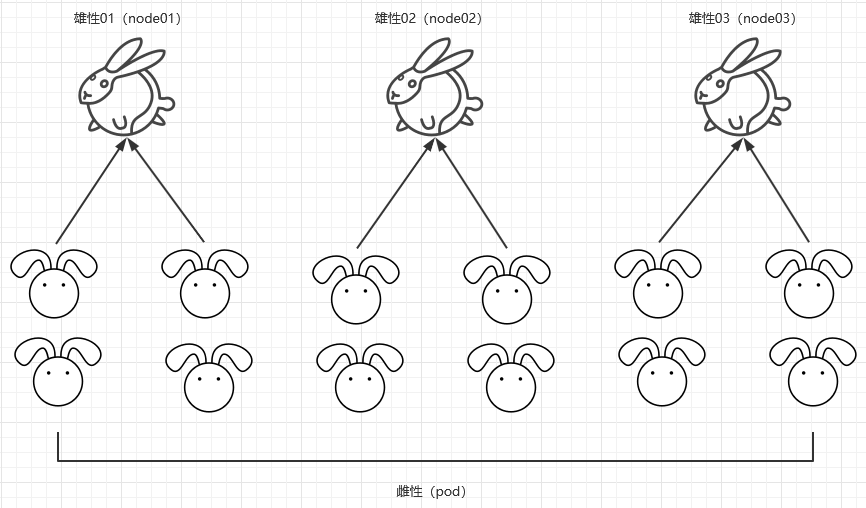
Male (node) | female (pod)
On a planet outside the Milky way, there is a group of bisexual creatures, which are female (pod) and male (node). Female creatures are in the majority, while only three high-quality male creatures (nodes) are left due to the survival of the fittest. When males and females are together, they are easy to attract, and the following situations will occur:
(1) There are more males and fewer females, and the three high-quality male creatures have the same personality and advantages, and the female creatures choose the same one. Therefore, the female creatures are divided into three equal rows and three male creatures together. This is similar to the principle of equal distribution.
Concept in k8s: it is the most common and common pod distribution mode in k8s, which is commonly used with deployment and daemon controllers.
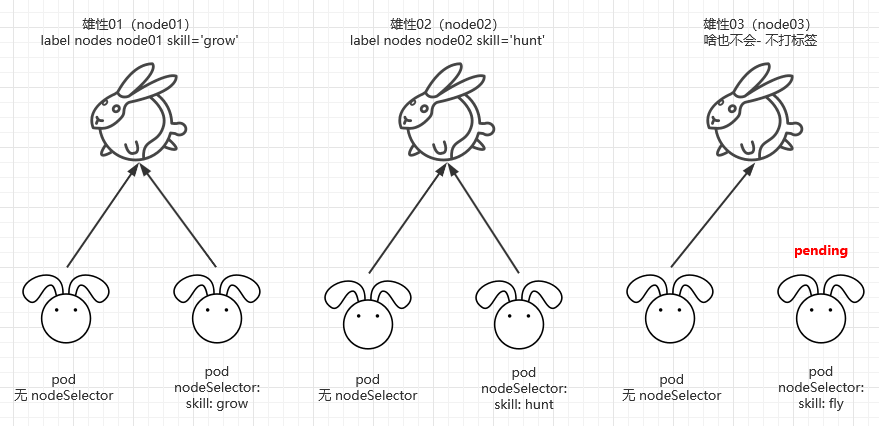
(2) Over time, organisms began to evolve. The three male creatures have their own differences. The male numbered 1 learned to plant (node01 label skill = 'grow'); Male No. 2 learned to hunt (node02 label skill = 'hunt'); The male with number 3 learned nothing (kept default without learning). Ordinary females (pod) still maintain the principle of equal distribution. Some rapidly evolving female (pod) creatures found the differences of the three high-quality male (node) creatures, and each began to have some choices. Some females prefer male creatures that learn to grow (nodeSelector skill = 'grow'); Some females prefer male creatures that learn to hunt (nodeSelector skill = 'hunt'); Some female creatures like strange characteristics. They like flying males, which can't be satisfied by the only three male creatures. If one day a male creature evolves to be able to fly, they will be attached to the male creatures participating in the flight. If they have not evolved to be able to fly, they will wait. In k8s, this is the use of nodeSelector in yaml file.
Concept in k8s: when a node is labeled with a specific label, the following situations will occur:
- If nodeSelector is not specified in pod, the default schedule scheduling algorithm will be maintained;
- If a nodeSelector is specified in the pod, and the key and value in the specified nodeSelector match a key and value in a node, the pod is directly scheduled to the node;
- A nodeSelector is specified in the pod. If the key and value in the specified nodeSelector are not included in any node, the pod will always be in padding state.
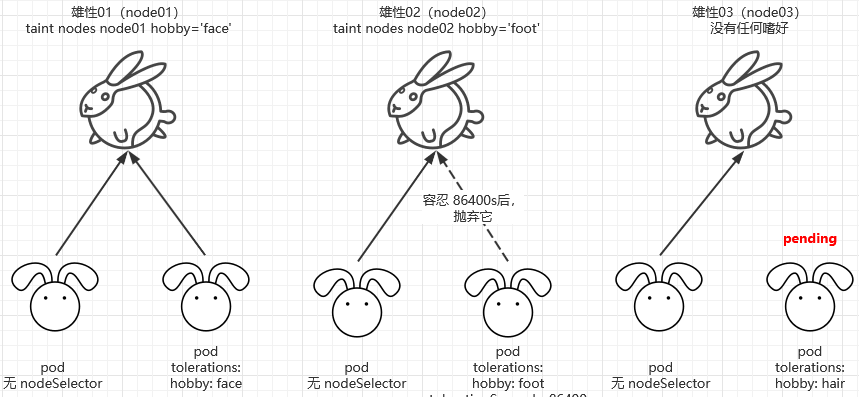
(3) Three male (node) not only has the advantages increased, but also has the disadvantages. The male with number 1 likes to hit the face (node01 taint hobby = 'face'); Male No. 2 likes spanking (node01 taint hobby = 'hunkers'); Male No. 3 likes stepping on feet (node01 taint hobby = 'foot'); Ordinary female (pod) organisms still maintain the principle of equal distribution, while some re evolved female organisms also have their own personality. Females who can tolerate slapping face are with males numbered 1 (tolerance hobby = 'face'), but this tolerance may be permanent or one day (tolerance seconds = 86400). The three male creatures occasionally fool around together, and the male creature numbered 1 may change his hobby to sleeping in one day. Some female creatures who can't tolerate its habit of sleeping in will leave it at intervals or immediately.
Concept in k8s: This is stain and tolerance.
There are other options and parameters for stain and tolerance, which will be explained later.
nodeSelector
Assign the pod to the specified node.
The clusters are as follows:
$ kubectl get nodes


NAME         STATUS   ROLES    AGE   VERSION
k8s-master   Ready    master   20h   v1.19.7
k8s-node01   Ready    <none>   20h   v1.19.7
k8s-node02   Ready    <none>   20h   v1.19.7
Add a label for k8s-node01
$ kubectl label nodes k8s-node01 disktype=ssd
node/k8s-node01 labeled
View label
$ kubectl get nodes --show-labels
NAME         STATUS   ROLES    AGE   VERSION   LABELS
k8s-master   Ready    master   20h   v1.19.7   ..., kubernetes.io/hostname=k8s-master
k8s-node01   Ready    <none>   20h   v1.19.7   ..., disktype=ssd,kubernetes.io/hostname=k8s-node01
k8s-node02   Ready    <none>   20h   v1.19.7   ..., kubernetes.io/hostname=k8s-node02
You can see the k8s-node01 node label: disktype=ssd
Create a Pod scheduled to the selected node
apiVersion: apps/v1
kind: Deployment
metadata:
  labels:
    app: ngx
  name: ngx
spec:
  replicas: 2
  selector:
    matchLabels:
      app: ngx
  template:
    metadata:
      labels:
        app: ngx
    spec:
      containers:
      - image: nginx:alpine-arm64
        name: nginx
      nodeSelector:
        disktype: ssd    #### Select the node of service key: value
Create a pod to check whether it is dispatched to the specified node
$ kubectl apply -f  ngx.yaml
deployment.apps/ngx created
$ kubectl get po -o wide
NAME                   READY   STATUS    RESTARTS   AGE   IP            NODE         NOMINATED NODE   READINESS GATES
ngx-5f4df66559-hjmzg   1/1     Running   0          10s   10.244.1.13   k8s-node01   <none>           <none>
ngx-5f4df66559-wqgdb   1/1     Running   0          10s   10.244.1.14   k8s-node01   <none>           <none>
k8s affinity
When it comes to affinity, affinity is mainly divided into two categories: nodeAffinity and podAffinity.
nodeAffinity
nodeAffinity is node affinity. Scheduling can be divided into soft strategy and hard strategy. Soft strategy is that if you don't have a node that meets the scheduling requirements, POD will ignore this rule and continue to complete the scheduling process. In short, it is a strategy that meets the best conditions and doesn't matter if there are none; The hard strategy is tough. If there is no node that meets the conditions, try again and again until the conditions are met. In short, it is a strategy that you must meet my requirements, or I won't do it. nodeAffinity has two strategies:
- requiredDuringSchedulingIgnoredDuringExecution: hard policy
- preferredDuringSchedulingIgnoredDuringExecution: soft policy
Hard strategy
apiVersion: apps/v1
kind: Deployment
metadata:
  labels:
    app: ngx
  name: ngx
spec:
  replicas: 2
  selector:
    matchLabels:
      app: ngx
  template:
    metadata:
      labels:
        app: ngx
    spec:
      affinity:
        nodeAffinity:
          requiredDuringSchedulingIgnoredDuringExecution:
            nodeSelectorTerms:
            - matchExpressions:
              - key: disktype ## Value of key
                operator: In ## include
                values:
                - ssd ## value
      containers:
      - image: nginx:alpine-arm64
        name: nginx
      nodeSelector:
        disktype: ssd
The above two pod s will only run on nodes that meet node label disktype=value. If no node meets this condition, it will always be in pending state.
$ kubectl get po -o wide
NAME                  READY   STATUS    RESTARTS   AGE     IP            NODE         NOMINATED NODE   READINESS GATES
ngx-7b65b44bc-gff9x   1/1     Running   0          3m53s   10.244.1.15   k8s-node01   <none>           <none>
ngx-7b65b44bc-w7bsf   1/1     Running   0          3m53s   10.244.1.16   k8s-node01   <none>           <none>

$ kubectl get nodes k8s-node01 --show-labels
NAME         STATUS   ROLES    AGE   VERSION   LABELS
k8s-node01   Ready    <none>   22h   v1.19.7   ..., disktype=ssd,kubernetes.io/arch=arm64,kubernetes.io/hostname=k8s-node01
Soft strategy
apiVersion: apps/v1
kind: Deployment
metadata:
  labels:
    app: ngx
  name: ngx
spec:
  replicas: 2
  selector:
    matchLabels:
      app: ngx
  template:
    metadata:
      labels:
        app: ngx
    spec:
      affinity:
        nodeAffinity:
          preferredDuringSchedulingIgnoredDuringExecution:
          - weight: 10
            preference:
              matchExpressions:
              - key: disktype
                operator: In
                values:
                - hdd
      containers:
      - image: nginx:alpine-arm64
        name: nginx
The soft strategy is that the first choice is the node with node label disktype=hdd. If not, the scheduling strategy of the default scheduler is adopted, which is not mandatory.
$ kubectl get po -o wide
NAME                  READY   STATUS    RESTARTS   AGE     IP            NODE         NOMINATED NODE   READINESS GATES
ngx-d4754b6fd-lr96g   1/1     Running   0          2m55s   10.244.2.13   k8s-node02   <none>           <none>
ngx-d4754b6fd-ns7hs   1/1     Running   0          2m55s   10.244.1.28   k8s-node01   <none>           <none>
The operator provides the following operations:
- The value of In: label is In a list
- NotIn: the value of label is not in a list
- A value greater than Gt:
- Lt: the value of label is less than a certain value
- Exists: a label exists
- DoesNotExist: a label does not exist
If there are multiple options under nodeSelectorTerms, you can meet any condition; If matchExpressions has multiple options, these conditions must be met at the same time to schedule POD normally.
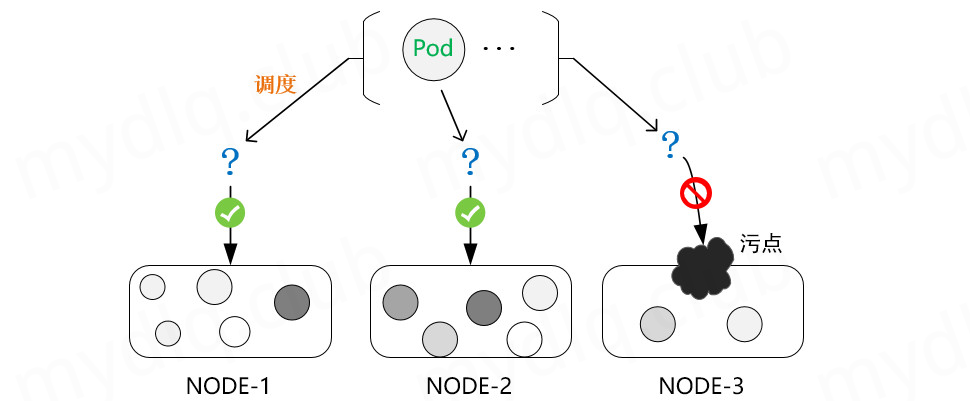
Stain and tolerance
In Kubernetes, Node affinity is an attribute defined on the Pod, which can make the Pod schedule to a Node according to our requirements. On the contrary, Taints is an attribute on the Node, which can make the Pod unable to schedule to the Node with stain, and even expel the existing Pod on the Node with stain. Of course, the corresponding Kubernetes can set the tolerance attribute for the Pod to allow the Pod to tolerate the stains set on the Node. In this way, the stains set on the Node will be ignored during scheduling and the Pod will be scheduled to the Node. In general, Taints are usually used in conjunction with accelerations.
Taints (taints)
View stains
View the stain of node
$ kubectl describe nodes k8s-master
...
Taints:             node-role.kubernetes.io/master:NoSchedule
...

# You can also view it through the following operations:
$ kubectl get nodes k8s-master -o go-template={{.spec.taints}}
[map[effect:NoSchedule key:node-role.kubernetes.io/master]]
The tainted content is generally composed of three elements: key, value and an effect, which are shown as follows:
<key>=<value>:<effect>
The value here can be empty, expressed as:
node-role.kubernetes.io/master:NoSchedule
- key: node-role.kubernetes.io/master
- value: empty
- effect: NoSchedule
Set stain
Generally, we need to set a node to allow only a specific Pod for scheduling. At this time, we have to set a stain on the node, which can be set in the format of kubectl taint node [node] key=value[effect], where the value of effect can be as follows:
- PreferNoSchedule: try not to schedule.
- NoSchedule: must not be scheduled.
- NoExecute: not only will it not be scheduled, it will also expel the existing Pod on the Node.
Generally, we set stains by aligning them as in the following example:
### Setting a stain does not allow Pod scheduling to this node
$ kubectl taint node k8s-master key1=value1:NoSchedule
### Set the stain and try to prevent the stain from scheduling to the node
$ kubectl taint node k8s-master key2=value2:PreferNoSchedule
### Set a stain, do not allow ordinary pods to be scheduled to the node, and expel the existing pods on the node
$ kubectl taint node k8s-master key3=value3:NoExecute
Remove stains
The above describes how to add a stain to the Node to prevent the Pod from scheduling. Next, we will talk about how to delete the stain on the Node. You can use the following command:
kubectl taint node [node] [key]-
The above syntax is similar to creating a stain, but it should be noted that to delete a stain, you need to know the key and set a "-" item at the end to delete the stain. An example is as follows:
For the convenience of demonstration, set the stain first:
### Set stain 1
$ kubectl taint node k8s-master key1=value1:PreferNoSchedule
node/k8s-master tainted
### Set stain 2
$ kubectl taint node k8s-master key2=value2:NoSchedule
node/k8s-master tainted
### Set stain 3 and do not set value
$ kubectl taint node k8s-master key2=:PreferNoSchedule
node/k8s-master tainted
Looking at the stain, you can see the three values set above:
$ kubectl describe nodes k8s-master
...
Taints:             key2=value2:NoSchedule
                    node-role.kubernetes.io/master:NoSchedule
                    key1=value1:PreferNoSchedule
                    key2:PreferNoSchedule
...
Then remove the stain
### To delete the stain, you can specify the [effect] value without specifying the value to delete the stain of the key[effect]
$ kubectl taint node k8s-master key1:PreferNoSchedule-

### You can also delete all [effect s] of this key2 directly according to the key:
$ kubectl taint node k8s-master key2-
Check the stains again and you can see that the above stains have been deleted:
$ kubectl describe nodes k8s-master
...
Taints:             node-role.kubernetes.io/master:NoSchedule
...
Tolerants
Pod setting tolerance
In order to prevent some pods from scheduling to some specific nodes, you can set taints on the nodes. Of course, if you want some pods to be able to ignore the stain of the node and continue to be able to schedule to the node, you can set tolerance for the Pod so that the Pod can tolerate the stain set on the node, for example:
Stain a node:
kubectl taint node k8s-node01 key=value:NoSchedule
For Pod setting tolerance, the following two methods are available:
### The tolerated key, value and corresponding effect must also be consistent with the stain taints
......
tolerations:
- key: "key"
  operator: "Equal"
  value: "value"
  effect: "NoSchedule"
### The key of tolerance tolerances is the same as the key of taints to be tainted, and the set effect is also the same. There is no need to set value
......
tolerations:
- key: "key"
  operator: "Exists"
  effect: "NoSchedule"
Basic concepts of Node and Pod for stain and tolerance
concept
- A node can have multiple stains;
- A pod can have multiple tolerance;
- kubernetes performs multiple stain and tolerance methods similar to filters
If a node has multiple stains and there are multiple tolerance on the pod, the pod can be scheduled to the node as long as the tolerance in the pod can contain all the stains set on the node. If the tolerance set on the pod cannot contain all the stains set on the node, and the effect of the remaining stains on the node that cannot be included is PreferNoSchedule, it may also be scheduled to the node.
be careful
When there is always tolerance in pod, pod will first select the node without stain, and then select the node with stain tolerance again.
- If the node is tainted, the effect is NoSchedule, and the pod is not tolerant of response, kubernetes will not schedule the pod to this node.
- If there is a stain on the Node and the effect is PreferNoShedule, Kubernetes will try not to schedule the Pod to the Node.
- If the Node has a stain and the effect is NoExecute, the pod running on the Node will be expelled from the Node. A pod that is not running on a Node cannot be scheduled to this Node. Generally, when a Node is in NotReady state, the pod starts quickly on other normal nodes.
Set tolerance in Deployment
Set tolerance for deployment in kubernetes. An example is as follows:
apiVersion: apps/vl
kind: Deployment
metadata:
  name: example
spec:
  replicas: 5
  template:
    spec:
      ......
      tolerations:
      - key: "key"
        operator: "Equal"
        value: "value"
        effect: "NoSchedule"
Set tolerance time
Normally, if a stain with effect = noexecute is added to the Node. Then all pods that cannot tolerate this stain will be kicked out immediately. The Pod with tolerance label will not be kicked off. However, a tolerance with effect = noexecute can specify a tolerationSeconds to specify how long the stain will not be kicked off when it is added. For example:
tolerations:


- key: "key"


  operator: "Equal"


  value: "value"


  effect: "Noexecute"


  tolerationSeconds: 3600
If the pod is already on the node with stain and effect of NoExecute. This pod can run until 3600s before being kicked out. If the stain on the node is removed at this time, the pod will not be kicked off.
Tolerance example
The Operator defaults to Equal and can be set to Equal and Exists. Examples are as follows:
Operator is Exists
Tolerate any stain
For example, an empty key will match all keys, value s and effect s. That is, tolerate any stain.
tolerations:


- operator: "Exists"
Tolerate the stain of a key value
For example, if an empty effect and the key is not empty, all the same effects as the key will be matched:
tolerations:


- key: "key"


  operator: "Exists"
Operator is Equal
There is a stain on the node
If the key of Node and Pod is key1 and value1 is the same as effect, it can be scheduled:
#stain


key1=value1:NoSchedule


#Pod settings


tolerations:


- key: "key1"


  operator: "Equal"


  value: "value1"


  effect: "NoSchedule"
There are multiple stains on the node
If the key, value, effect and Pod tolerance of the stain of the Node are the same, the scheduling can be performed:
## Set stain


key1=value1:NoSchedule


key2=value2:NoExecute


## Pod setting tolerance


tolerations:


- key: "key1"


  operator: "Equal"


  value: "value1"


  effect: "NoSchedule"


- key: "key2"


  operator: "Equal"


  value: "value2"


  effect: "NoExecute"
Most of the stains on the Node are the same as those on the Pod. The difference is that if the Node stain effect is PreferNoSchedule, it may be scheduled:
## stain


key1=value1:NoSchedule


key2=value2:NoExecute


key3=value3:PreferNoSchedule


## Pod tolerance settings


tolerations:


- key: "key1"


  operator: "Equal"


  value: "value1"


  effect: "NoSchedule"


- key: "key2"


  operator: "Equal"


  value: "value2"


  effect: "NoExecute"
Most of the stains on Node and Pod are the same. The difference is that Node stain effect s are NoSchedule and NoExecute and will not be scheduled:
## stain


key1=value1:NoSchedule


key2=value2:NoExecute


key3=value3:PreferNoSchedule


## Pod setting tolerance


tolerations:


- key: "key1"


  operator: "Equal"


  value: "value1"


  effect: "NoSchedule"


- key: "key3"


  operator: "Equal"


  value: "value3"


  effect: "PreferNoSchedule"
Compare and understand the difference between Exists and Equal:
- Exists is inclusive, Equal is Equal, exists is used in a wider range, and Equal is accurate matching.
- When NoExecute exists in the stain, but NoExecute does not exist in the tolerance, it will not be scheduled to this node.
- Exists can not write value, while Equal must specify the corresponding value
Stain expulsion
When using kubernetes, you will encounter that a node has obviously been down. Check that the node state changes from Ready state to NotReady state, but the pod where the node is located is already in running state, and it will change to Terminating state after a long time. Why?
For node nodes, if the node effect is set to NoExecute, it will affect the running Pod on the node, as shown below:
- Immediately expel the pod without matching tolerance.
- If tolerance is set but the tolerationSeconds parameter is not specified, the tolerance will take effect permanently and will not be expelled.
- If tolerance is set but the tolerationSeconds parameter is specified, the tolerance is valid at the specified time and will be rejected after the specified time. (the default setting of pod is tolerance seconds = 300s)
In addition, when some conditions are true, the node controller will automatically pollute the node. Built in the following stains:
| key | notes |
|---|---|
| node.kubernetes.io/not-ready | The node is not ready. This corresponds to NodeCondition Ready being false. |
| node.kubernetes.io/unreachable | Unable to access node from node controller. This corresponds to NodeCondition Ready being Unknown. |
| node.kubernetes.io/out-of-disk | Node is low on disk. |
| node.kubernetes.io/memory-pressure | Node has memory pressure. |
| node.kubernetes.io/disk-pressure | Node has disk pressure. |
| node.kubernetes.io/network-unavailable | The node's network is not available. |
| node.kubernetes.io/unschedulable | Node is not schedulable. |
| node.cloudprovider.kubernetes.io/uninitialized | When kubelet starts from an "external" cloud provider, this stain is set on the node to mark it as unavailable. After the controller from cloud controller manager initializes this node, kubelet removes this stain. |
Through the foreshadowing of the above knowledge, when a node goes down, what kind of stain will kubernetes cluster put on it?
A node in Ready status
$ kubectl get node k8s-node02 -o go-template={{.spec.taints}}


<no value>
A node with NotReady status
$ kubectl get node k8s-node02 -o go-template={{.spec.taints}}


[map[effect:NoSchedule key:node.kubernetes.io/unreachable timeAdded:2021-12-23T13:49:58Z] map[effect:NoExecute key:node.kubernetes.io/unreachable timeAdded:2021-12-23T13:50:03Z]]
Nodes in NotReady state are marked with the following two stains:
Taints:             node.kubernetes.io/unreachable:NoExecute


                    node.kubernetes.io/unreachable:NoSchedule
Next, test what tolerance the kubernetes cluster will assign to the Pod.
$ kubectl get po nginx-745b4df97d-mgdmp -o yaml


...


  tolerations:


  - effect: NoExecute


    key: node.kubernetes.io/not-ready


    operator: Exists


    tolerationSeconds: 300  ## 300/60=5min


  - effect: NoExecute


    key: node.kubernetes.io/unreachable


    operator: Exists


    tolerationSeconds: 300 ## 300/60=5min


...
See here, the failure mechanism of the Pod is very clear. When the node node is in NotReady or unreachable state, the Pod will tolerate it for 5 minutes and then be expelled. In these five minutes, even if the Pod is in the running state, it cannot provide services normally. Therefore, you can manually specify 0 tolerance in the yaml list. The list file is as follows:
apiVersion: apps/v1


kind: Deployment


metadata:


  labels:


    app: nginx


  name: nginx


spec:


  replicas: 4


  selector:


    matchLabels:


      app: nginx


  template:


    metadata:


      labels:


        app: nginx


    spec:


      tolerations:


      - effect: NoExecute


        key: node.kubernetes.io/not-ready


        operator: Exists


        tolerationSeconds: 0


      - effect: NoExecute


        key: node.kubernetes.io/unreachable


        operator: Exists


        tolerationSeconds: 0


      containers:


      - image: nginx:alpine


        name: nginx
Generate Pod
$ kubectl get po -o wide


NAME                    READY   STATUS    RESTARTS   AGE   IP            NODE         NOMINATED NODE   READINESS GATES


nginx-84f6f75c6-c76fm   1/1     Running   0          6s    10.244.3.16   k8s-node02   <none>           <none>


nginx-84f6f75c6-hsxq5   1/1     Running   0          6s    10.244.3.15   k8s-node02   <none>           <none>


nginx-84f6f75c6-wkt52   1/1     Running   0          6s    10.244.1.63   k8s-node01   <none>           <none>


nginx-84f6f75c6-xmkjs   1/1     Running   0          6s    10.244.3.17   k8s-node02   <none>           <none>
Next, forcibly close k8s-node02 node and check whether Pod is transferred.
$ kubectl get po -o wide


NAME                    READY   STATUS        RESTARTS   AGE    IP            NODE         NOMINATED NODE   READINESS GATES


nginx-84f6f75c6-c76fm   1/1     Terminating   0          116s   10.244.3.16   k8s-node02   <none>           <none>


nginx-84f6f75c6-csqf4   1/1     Running       0          13s    10.244.1.66   k8s-node01   <none>           <none>


nginx-84f6f75c6-hsxq5   1/1     Terminating   0          116s   10.244.3.15   k8s-node02   <none>           <none>


nginx-84f6f75c6-r2v4p   1/1     Running       0          13s    10.244.1.64   k8s-node01   <none>           <none>


nginx-84f6f75c6-v4knq   1/1     Running       0          13s    10.244.1.65   k8s-node01   <none>           <none>


nginx-84f6f75c6-wkt52   1/1     Running       0          116s   10.244.1.63   k8s-node01   <none>           <none>


nginx-84f6f75c6-xmkjs   1/1     Terminating   0          116s   10.244.3.17   k8s-node02   <none>           <none>
After the node node is in NotReady state, the Pod is transferred immediately. This is done by explicitly specifying the tolerance time in the yaml manifest file. You can also modify the apiserver configuration directly to modify the default tolerance time.
vim /etc/kubernetes/manifests/kube-apiserver.yaml


...


spec:


  containers:


  - command:


    - kube-apiserver


    - --advertise-address=192.168.1.11


    - --default-not-ready-toleration-seconds=1    ## New row


    - --default-unreachable-toleration-seconds=1  ## New row


...
After the modification is saved, Kube apiserver-k8s-masterpod will automatically reload the latest configuration.
$ kubectl get po nginx-84f6f75c6-wkt52 -o yaml


...


  tolerations:


  - effect: NoExecute


    key: node.kubernetes.io/not-ready


    operator: Exists


    tolerationSeconds: 0


  - effect: NoExecute


    key: node.kubernetes.io/unreachable


    operator: Exists


    tolerationSeconds: 0


...
For small clusters, you can set global variables directly.
Note: when there is only one node in kubernetes cluster, Pod transfer cannot be achieved because Pod has no way out.