PXE(preboot execute environment) is the latest technology developed by Intel Corporation, working in Client/Server network mode, supporting workstations to download images from remote servers over the network, and thereby supporting the boot of operating systems over the network. During the boot process, the terminal requires the server to assign an IP address and then uses TFTP (trivial file transfer protocol)Or the MTFTP(multicast trivial file transfer protocol) protocol downloads a boot package and executes it in local memory, which completes the basic terminal software settings and boots the pre-installed terminal operating system on the server.PXE can boot many operating systems, such as Windows95/98/2000/windows2003/windows2008/win7/win8,linux, etc.
1. Introduction to System Environment
Virtual Machine Software: VirtualBox
Virtual Machine Network Connection: Host-Only Network Only
Server-side operating system: CentOS 7
Configuration service: DHCP+TFTP+FTP (HTTP, NFS, etc.)
Goal accomplished: Set up a pxe environment and complete the automated installation of CentOS 7 system with kickstart response file.
Introduction to 1.1 Server and Boot Files
Main File
During system installation, the system installation interface is not visible until the kernel file is loaded by the boot file.
pxelinux.0 - System boot file
vmlinuz, initrd.img - Kernel file
DHCP Server
Provide clients with necessary network information, such as IP, netmask, gateway, dns, etc. and provide clients with the location of boot files (pxelinux.0) and TFTP server address.
TFTP Server
Mainly provides the client with the kernel file and boot file.
FTP Server
Provide kickstart response files and system image files for clients.
When the pxe system is installed, the dhcp server first provides the client with information such as IP, boot file location, TFTP address, etc. After the client obtains the relevant information, the boot file and kernel file are downloaded through TFTP to boot the system, and the various software packages and kickstart response files required during the system installation are downloaded through the ftp server.
The kickstart response file is mainly used to set time zone, password, system partition, package selection and other information automatically.
1.2 Server-side Detailed Environment
The detailed system environment is:
[root@pxe1 ~]# uname -a
Linux pxe1 3.10.0-514.el7.x86_64 #1 SMP Tue Nov 22 16:42:41 UTC 2016 x86_64 x86_64 x86_64 GNU/Linux
[root@pxe1 ~]#
[root@pxe1 ~]# hostnamectl
   Static hostname: pxe1
         Icon name: computer-vm
           Chassis: vm
        Machine ID: 18ef8dea83044565b82bf6bed368cdab
           Boot ID: 9beedf23c4e14016a0a458ddcd9c487b
    Virtualization: kvm
  Operating System: CentOS Linux 7 (Core)
       CPE OS Name: cpe:/o:centos:centos:7
            Kernel: Linux 3.10.0-514.el7.x86_64
      Architecture: x86-64
[root@pxe1 ~]# cat /etc/hosts
127.0.0.1   localhost localhost.localdomain localhost4 localhost4.localdomain4
::1         localhost localhost.localdomain localhost6 localhost6.localdomain6
192.168.56.14 pxe1

[root@pxe1 yum.repos.d]# ifconfig
enp0s3: flags=4163<UP,BROADCAST,RUNNING,MULTICAST>  mtu 1500
        inet 192.168.56.14  netmask 255.255.255.0  broadcast 192.168.56.255
        inet6 fe80::a00:27ff:fe43:c11d  prefixlen 64  scopeid 0x20<link>
        ether 08:00:27:43:c1:1d  txqueuelen 1000  (Ethernet)
        RX packets 1441  bytes 121057 (118.2 KiB)
        RX errors 0  dropped 0  overruns 0  frame 0
        TX packets 928  bytes 98905 (96.5 KiB)
        TX errors 0  dropped 0 overruns 0  carrier 0  collisions 0
...
1.3 Server-side initial environment preparation
Turn off SELinux and firewalls:
# For subsequent configuration convenience, first turn off the system SELinux and firewall
# Turn off SELinux, modify the file so that SELINUX=disabled
[root@pxe1 ~]# vim /etc/selinux/config
# This file controls the state of SELinux on the system.
# SELINUX= can take one of these three values:
#     enforcing - SELinux security policy is enforced.
#     permissive - SELinux prints warnings instead of enforcing.
#     disabled - No SELinux policy is loaded.
SELINUX=disabled
# SELINUXTYPE= can take one of three two values:
#     targeted - Targeted processes are protected,
#     minimum - Modification of targeted policy. Only selected processes are protected.
#     mls - Multi Level Security protection.
SELINUXTYPE=targeted

#The configuration takes effect after restarting the system to see the status of SELinux.
[root@pxe1 ~]# sestatus
SELinux status:                 disabled

#Close Firewall
[root@pxe1 ~]# systemctl stop firewalld
[root@pxe1 ~]# systemctl disable firewalld
[root@pxe1 ~]# systemctl status firewalld
● firewalld.service - firewalld - dynamic firewall daemon
   Loaded: loaded (/usr/lib/systemd/system/firewalld.service; disabled; vendor preset: enabled)
   Active: inactive (dead)
     Docs: man:firewalld(1)
1.4 Client Environment Preparation
Create a new linux virtual machine in VirtualBox:
Name: Fill in freely
Type: linux
Version: Red Hat (64-bit)
Virtual hard disk:
Now create a virtual hard disk, and be careful to allocate enough hard disk size to avoid installation failures due to insufficient hard disk space.I choose 20G here for dynamic allocation.
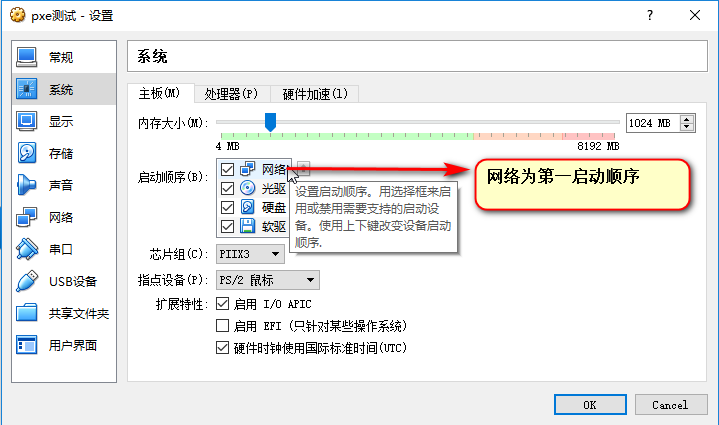
Boot-up sequence: Network boot ranks first.
Setup Method: Select New Virtual Machine, Setup--System--Motherboard--Startup Order--Set Network First

Network: Host-Only network only
Setup Method: Select New Virtual Machine, Setup--Network--Network Card 1--Enable Network Connection--Connection Method: Host-Only
2. Configure yum source
This paper mainly describes how to configure the local yum source using the system disc.
First mount the system disc:
Click the disc icon in the lower right corner of the virtual machine to select the system image file you want to mount.

Create a yum source profile:
# First mount the disc into the / mnt directory
[root@pxe1 ~]# umount /dev/cdrom -l
[root@pxe1 ~]# mount /dev/cdrom /mnt/
mount: /dev/sr0 is write-protected, mounting read-only

#Create a yum profile
[root@pxe1 ~]# cd /etc/yum.repos.d/
[root@pxe1 yum.repos.d]# ls
CentOS-Base.repo  CentOS-Debuginfo.repo  CentOS-Sources.repo  CentOS-fasttrack.repo
CentOS-CR.repo    CentOS-Media.repo      CentOS-Vault.repo
#Avoid repo files on your system by backing them up first
[root@pxe1 yum.repos.d]# mkdir bak
[root@pxe1 yum.repos.d]# mv *.repo bak/
[root@pxe1 yum.repos.d]# ls
bak
[root@pxe1 yum.repos.d]# vim my.repo
[development]          <--Note: Be sure to write here development
name=my-centos7-dvd
baseurl=file:///mnt
enabled=1
gpgcheck=0
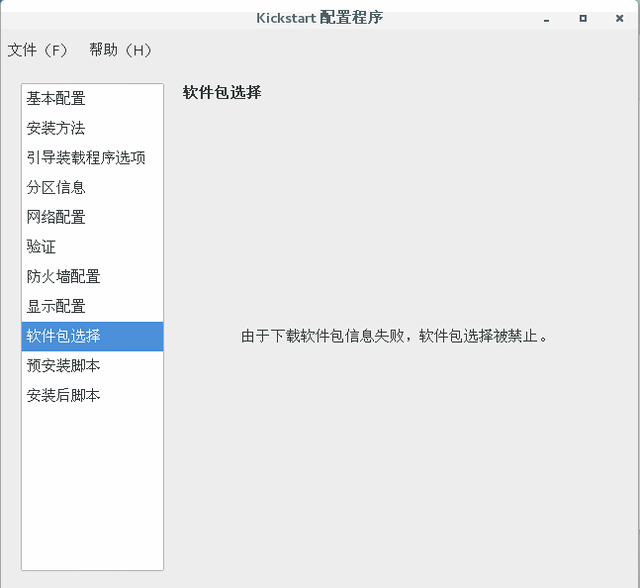
Note: The first line [development] in my.repo file is recommended in square brackets. Filling in other things can cause the following problems when the system-config-kickstart command generates a kickstart file file:
Package selection is disabled due to a failure to download package information
Create a yum cache:
[root@pxe1 yum.repos.d]# yum clean all
Failed to set locale, defaulting to C
Loaded plugins: fastestmirror, langpacks
Cleaning repos: development
Cleaning up everything
[root@pxe1 yum.repos.d]# yum makecache
Failed to set locale, defaulting to C
Loaded plugins: fastestmirror, langpacks
development                                                  | 3.6 kB  00:00:00
(1/4): development/filelists_db                              | 3.0 MB  00:00:00
(2/4): development/group_gz                                  | 155 kB  00:00:00
(3/4): development/other_db                                  | 1.3 MB  00:00:00
(4/4): development/primary_db                                | 3.0 MB  00:00:00
Determining fastest mirrors
Metadata Cache Created
3. DHCP Server Configuration
dhcp provides clients with necessary network information, such as IP, netmask, gateway, dns, etc. It also provides clients with the location of the boot file (pxelinux.0) and the address of the TFTP server.
3.1 Install dhcp package
[root@pxe1 yum.repos.d]# yum install -y dhcp
...
Installed:
  dhcp.x86_64 12:4.2.5-47.el7.centos
Complete!
3.2 Modify dhcp profile
DHCP profile location: /etc/dhcp/dhcpd.conf
[root@pxe1 yum.repos.d]# cat /etc/dhcp/dhcpd.conf
#
# DHCP Server Configuration file.
#   see /usr/share/doc/dhcp*/dhcpd.conf.example
#   see dhcpd.conf(5) man page
subnet 192.168.56.0 netmask 255.255.255.0 {
  range 192.168.56.10 192.168.56.20;
  default-lease-time 600;
  max-lease-time 7200;
  filename "pxelinux.0";
  next-server 192.168.56.14;
}

# subnet 192.168.56.0 netmask 255.255.255.0 Server IP Segment and Mask
# Range 192.168.56.10 192.168.56.20; the address range for DHCP distribution, preferably including native IP.
# default-lease-time 600;max-lease-time 7200; IP address lease time.
# filename "pxelinux.0"; specify the boot file location, here is pxelinux.0 in the TFTP root directory.
#  next-server 192.168.56.14; TFTP server address.
3.3 Start the dhcp service
[root@pxe1 yum.repos.d]# systemctl restart dhcpd
[root@pxe1 yum.repos.d]# systemctl enable dhcpd
Created symlink from /etc/systemd/system/multi-user.target.wants/dhcpd.service to /usr/lib/systemd/system/dhcpd.service.
[root@pxe1 yum.repos.d]# systemctl status dhcpd
● dhcpd.service - DHCPv4 Server Daemon
   Loaded: loaded (/usr/lib/systemd/system/dhcpd.service; enabled; vendor preset: disabled)
   Active: active (running) since Thu 2017-05-25 11:00:26 CST; 26s ago
     Docs: man:dhcpd(8)
           man:dhcpd.conf(5)
 Main PID: 11849 (dhcpd)
   Status: "Dispatching packets..."
   CGroup: /system.slice/dhcpd.service
           └─11849 /usr/sbin/dhcpd -f -cf /etc/dhcp/dhcpd.conf -user dhcpd -group dhcpd --no-pid

May 25 11:00:26 pxe1 dhcpd[11849]: No subnet declaration for virbr0 (192.168.122.1).
May 25 11:00:26 pxe1 dhcpd[11849]: ** Ignoring requests on virbr0.  If this is not what
May 25 11:00:26 pxe1 dhcpd[11849]:    you want, please write a subnet declaration
May 25 11:00:26 pxe1 dhcpd[11849]:    in your dhcpd.conf file for the network segment
May 25 11:00:26 pxe1 dhcpd[11849]:    to which interface virbr0 is attached. **
May 25 11:00:26 pxe1 dhcpd[11849]:
May 25 11:00:26 pxe1 dhcpd[11849]: Listening on LPF/enp0s3/08:00:27:43:c1:1d/192.168.56.0/24
May 25 11:00:26 pxe1 dhcpd[11849]: Sending on   LPF/enp0s3/08:00:27:43:c1:1d/192.168.56.0/24
May 25 11:00:26 pxe1 dhcpd[11849]: Sending on   Socket/fallback/fallback-net
May 25 11:00:26 pxe1 systemd[1]: Started DHCPv4 Server Daemon.
[root@pxe1 yum.repos.d]# netstat -nulp | grep dhcp
udp        0      0 0.0.0.0:67              0.0.0.0:*                           11849/dhcpd
udp        0      0 0.0.0.0:16465           0.0.0.0:*                           11849/dhcpd
udp6       0      0 :::31651                :::*                                11849/dhcpd
Note: If there is an error starting the dhcp service, check the/var/log/messages log. There will be a clear error prompt, most of which is caused by a configuration file format or content error.
3.4 Verify DHCP service configuration
Once the dhcp server configuration is complete, the client virtual machine you prepared before starting can check if you can get the IP address, and if you can get the IP normally, the configuration is normal, as follows:
At this point, the dhcp server configuration is complete.
4. TFTP Server Configuration
The TFTP server mainly provides the client with kernel and boot files.
4.1 Install TFTP Server
Installation method:
[root@pxe1 /]# yum install -y tftp-server
...
Installed:
  tftp-server.x86_64 0:5.2-13.el7
Complete!
# Install the TFTP command to test whether the TFTP service is functioning properly
[root@pxe1 /]# yum install -y tftp
4.2 Start TFTP Server
# Edit Profile/etc/xinetd.d/tftp
[root@pxe1 /]# vim /etc/xinetd.d/tftp
disable			= no   <--take yes Modify to no
Start the tftp service:
# First make sure tftp.socket is working
[root@pxe1 /]# systemctl start tftp.socket
[root@pxe1 /]# systemctl enable tftp.socket
Created symlink from /etc/systemd/system/sockets.target.wants/tftp.socket to /usr/lib/systemd/system/tftp.socket.
[root@pxe1 /]# systemctl status tftp.socket
● tftp.socket - Tftp Server Activation Socket
   Loaded: loaded (/usr/lib/systemd/system/tftp.socket; enabled; vendor preset: disabled)
   Active: active (listening) since four 2017-05-25 14:57:33 CST; 1h 0min ago
   Listen: [::]:69 (Datagram)

5 month 25 14:57:33 pxe1 systemd[1]: Listening on Tftp Server Activation Socket.
5 month 25 14:57:33 pxe1 systemd[1]: Starting Tftp Server Activation Socket.

# Then start tftp.service
[root@pxe1 ~]# systemctl restart tftp.service
[root@pxe1 ~]# systemctl enable tftp.service
Created symlink from /etc/systemd/system/sockets.target.wants/tftp.socket to /usr/lib/systemd/system/tftp.socket.
[root@pxe1 ~]# systemctl status tftp.service
● tftp.service - Tftp Server
   Loaded: loaded (/usr/lib/systemd/system/tftp.service; indirect; vendor preset: disabled)
   Active: active (running) since four 2017-05-25 14:57:33 CST; 20s ago
     Docs: man:in.tftpd
 Main PID: 14621 (in.tftpd)
   CGroup: /system.slice/tftp.service
           └─14621 /usr/sbin/in.tftpd -s /var/lib/tftpboot

5 month 25 14:57:33 pxe1 systemd[1]: Started Tftp Server.
5 month 25 14:57:33 pxe1 systemd[1]: Starting Tftp Server...
4.3 Import necessary files
The main files that need to be imported into the TFTP server are:
Boot File - pxelinux.0
Kernel file: vmlinuz initrd.img
Boot menu: isolinux.cfg -- menu file for selecting boot items after boot-up
4.3.1 Import Boot File
The boot file pxelinux.0 is generated by the package syslinux, which is first installed:
[root@pxe1 ~]# yum install -y syslinux
# Copy pxelinux.0 to the TFTP root directory
[root@pxe1 ~]# cp /usr/share/syslinux/pxelinux.0 /var/lib/tftpboot/
4.3.2 Importing Kernel and Menu Files
Kernel file: vmlinuz initrd.img, commonly found in the pxeboot directory of the system CD:
[root@pxe1 syslinux]# cd /mnt/images/pxeboot/
[root@pxe1 pxeboot]# ls
initrd.img  TRANS.TBL  vmlinuz
But we can see that the same content exists in the isolinux directory, including the boot menu (isolinux.cfg) and the files it uses to start it:
isolinux.cfg - boot menu profile
vesamenu.c32 - One of the two window modules that come with the system
boot.msg - window prompt information file, prompt information appears before the menu appears, display time is shorter, you can add some information such as WordArt.
splash.png - Window background picture
Therefore, we can copy the kernel files from the images/pxeboot/directory of the system disc or from isolinux. For convenience, we can copy only the files we need from the isolinux directory, such as:
isolinux.cfg vesamenu.c32 boot.msg splash.png
You can also copy all the files in the isolinux directory to the TFTP root directory/var/lib/tftpboot:
[root@pxe1 /]# cp -rf /mnt/isolinux/* /var/lib/tftpboot/
Then prepare the pxe boot menu:
[root@pxe1 /]# mkdir /var/lib/tftpboot/pxelinux.cfg
[root@pxe1 /]# mv /var/lib/tftpboot/isolinux.cfg /var/lib/tftpboot/pxelinux.cfg/default
[root@pxe1 /]# cd /var/lib/tftpboot/pxelinux.cfg
[root@pxe1 pxelinux.cfg]# ls
default
Modify boot menu options:
[root@pxe1 pxelinux.cfg]# vim /var/lib/tftpboot/pxelinux.cfg/default
# Modify menu wait time first
timeout 600 <--Menu shows wait time in 1 unit/10 Seconds, default wait 60 seconds.
#Modify menu wait time is 60, that is, wait 6 seconds, if there is no operation, enter the default menu;
timeout 600
# Then modify the display menu
# -----------------------------------------------------------------
# Find the following section in the file
label linux
  menu label ^Install CentOS Linux 7
  kernel vmlinuz
  append initrd=initrd.img inst.stage2=hd:LABEL=CentOS\x207\x20x86_64 quiet

label check
  menu label Test this ^media & install CentOS Linux 7
  menu default
  kernel vmlinuz
  append initrd=initrd.img inst.stage2=hd:LABEL=CentOS\x207\x20x86_64 rd.live.check quiet

# Modify it to
label linux
  menu label ^Install CentOS Linux 7 by kickstart
  menu default
  kernel vmlinuz
  append initrd=initrd.img inst.repo=ftp://192.168.56.14/pub inst.ks=ftp://192.168.56.14/ks.cfg

label linux 2
  menu label ^Install CentOS Linux 7 by vnc
  kernel vmlinuz
  append initrd=initrd.img inst.repo=ftp://192.168.56.14/pub inst.vnc inst.vncpassword=password

label linux 3
  menu label ^Install CentOS Linux 7 by vnc -listen
  kernel vmlinuz
  append initrd=initrd.img inst.repo=ftp://192.168.56.14/pub inst.vnc inst.vncconnect=192.168.56.1

# The rest of this article does not need to be modified, and you are interested in trying to modify other options for testing.
4.4 Verify TFTP Service
4.4.1 Verify TFTP Service Configuration
Here's how to verify that the TFTP service is configured correctly:
[root@pxe1 kk]# ls /var/lib/tftpboot/
boot.cat  grub.conf   isolinux.bin  pxelinux.0    splash.png  vesamenu.c32
boot.msg  initrd.img  memtest       pxelinux.cfg  TRANS.TBL   vmlinuz
[root@pxe1 kk]#
[root@pxe1 kk]# tftp 192.168.56.14
tftp> get boot.msg
tftp> quit
[root@pxe1 kk]#
[root@pxe1 kk]# ls
boot.msg
# Successful get to boot.msg file indicates that TFTP service is normal.
4.4.2 Verify menu and boot file configuration
Client virtual machines prepared before startup check to see if the boot menu can be displayed properly and if initrd.img and vmlinuz kernel files can be obtained properly.
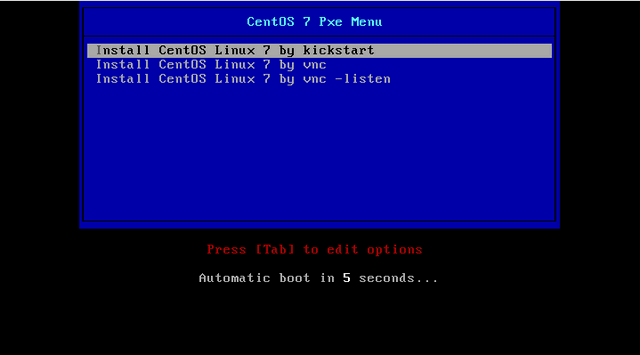
If the configuration is okay, you will see the previously configured boot menu appear:
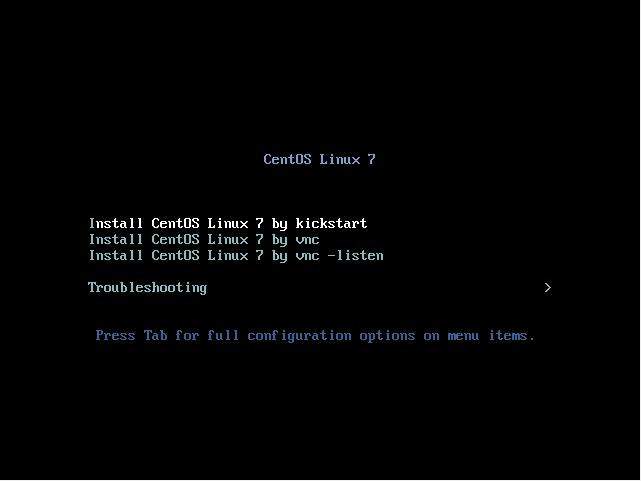
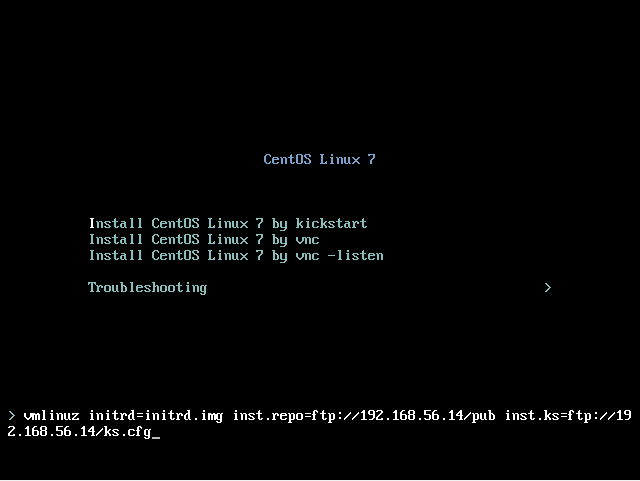
Pressing TAB on the corresponding boot menu displays the specific configuration of the menu item:
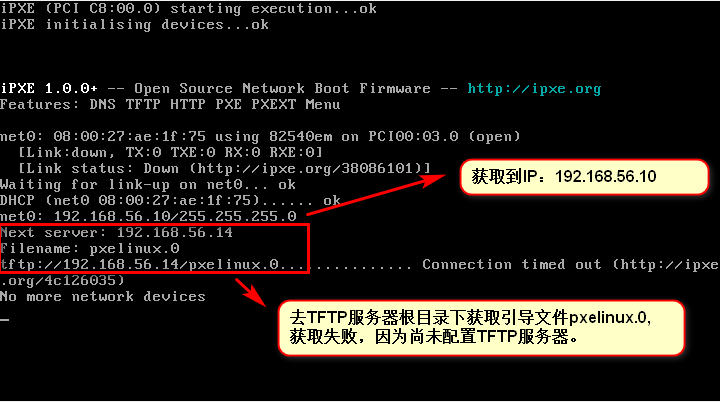
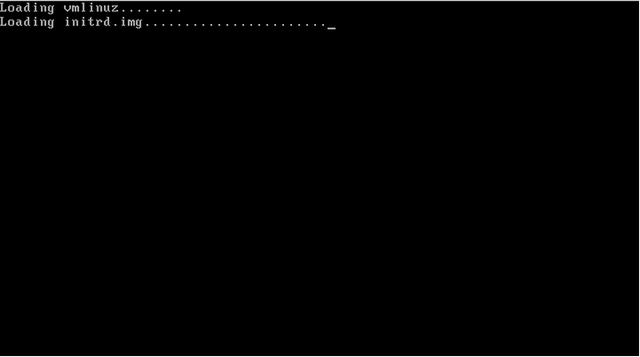
After pressing Enter, an interface to get the kernel file appears:
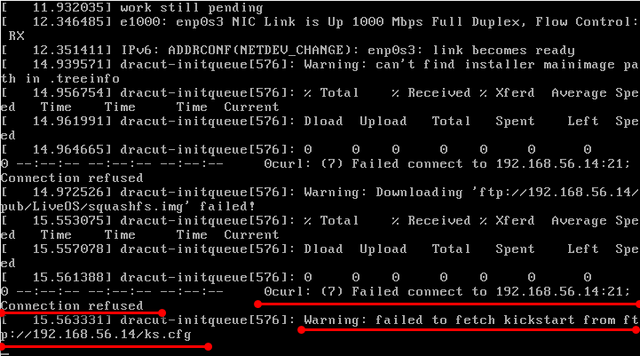
Finally, the system prompt failed to get ks file because ftp server has not been configured yet:
5. kickstart file preparation
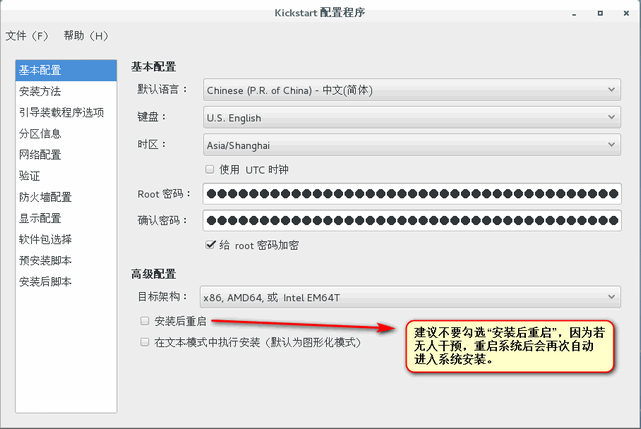
[root@pxe1 mnt]# yum install -y system-config-kickstart
# After installation, the GUI executes the system-config-kickstart command to configure the ks file
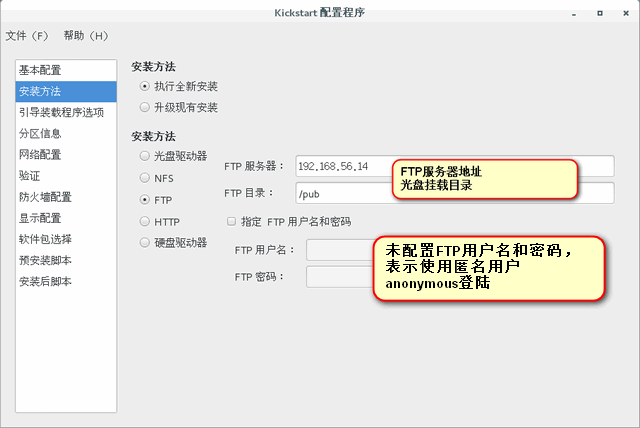
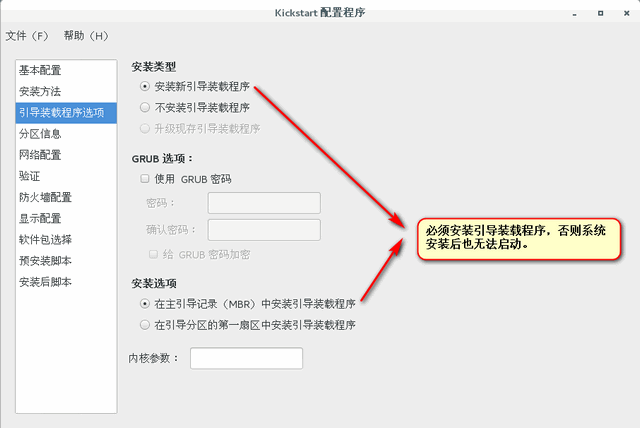
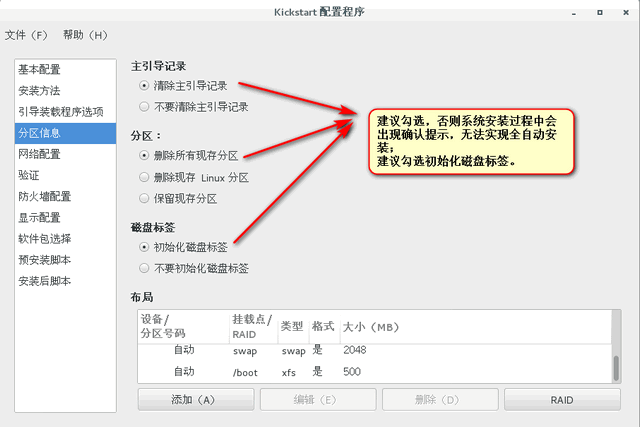
Considerations for kickstart file configuration are as follows:
The disc mount location in the following figure is the pub directory under the FTP root directory, i.e. /var/ftp/pub:
The package selection interface can be selected directly here or the contents of the%packages and%end intervals in the server/root/anaconda-ks.cfg file can be copied to the new file.
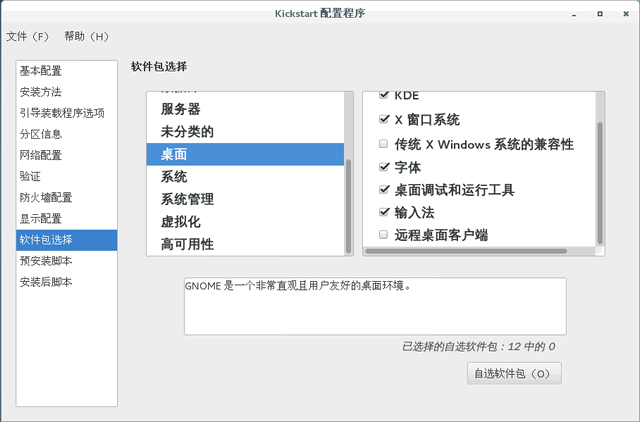
Select other options as needed, save the file after configuration is complete, and copy it to the FTP root directory/var/ftp when FTP server configuration is complete.
Then modify the generated ks.cfg file and add the following at the end of the file (do not delete the%end at the end) to indicate that the kdump function is turned off:
%addon com_redhat_kdump --disable --reserve-mb='auto'

%end
The kickstart file configuration is now complete.
6. FTP Server Configuration
6.1 Install FTP Server
[root@pxe1 mnt]# yum install -y vsftpd
[root@pxe1 mnt]# systemctl restart vsftpd
[root@pxe1 mnt]# systemctl enable vsftpd
Created symlink from /etc/systemd/system/multi-user.target.wants/vsftpd.service to /usr/lib/systemd/system/vsftpd.service.
[root@pxe1 mnt]# systemctl status vsftpd
● vsftpd.service - Vsftpd ftp daemon
   Loaded: loaded (/usr/lib/systemd/system/vsftpd.service; enabled; vendor preset: disabled)
   Active: active (running) since 2017-05-25 16:59:12 CST; 11s ago
 Main PID: 16466 (vsftpd)
   CGroup: /system.slice/vsftpd.service
           └─16466 /usr/sbin/vsftpd /etc/vsftpd/vsftpd.conf

5 month 25 16:59:12 pxe1 systemd[1]: Starting Vsftpd ftp daemon...
5 month 25 16:59:12 pxe1 systemd[1]: Started Vsftpd ftp daemon.

# Install the ftp command for ftp server validation.
[root@pxe1 mnt]# yum install -y ftp
6.2 Start FTP Server
[root@pxe1 /]# systemctl restart vsftpd
[root@pxe1 /]# systemctl enable vsftpd
[root@pxe1 /]# systemctl status vsftpd
● vsftpd.service - Vsftpd ftp daemon
   Loaded: loaded (/usr/lib/systemd/system/vsftpd.service; enabled; vendor preset: disabled)
   Active: active (running) since five 2017-05-26 08:28:29 CST; 15s ago
 Main PID: 2682 (vsftpd)
   CGroup: /system.slice/vsftpd.service
           └─2682 /usr/sbin/vsftpd /etc/vsftpd/vsftpd.conf

5 month 26 08:28:28 pxe1 systemd[1]: Starting Vsftpd ftp daemon...
5 month 26 08:28:29 pxe1 systemd[1]: Started Vsftpd ftp daemon.
6.3 Import ks files and mount discs
First copy the kickstart file you just generated to the FTP directory:
[root@pxe1 /]# cd /var/ftp/
[root@pxe1 ftp]# ls
ks.cfg  pub
Then mount the shutdown to the / var/ftp/pub directory:
# Since the disc was mounted to the / mntt directory when configuring the yum source, there are now two ways to mount the disc:
# 1. Bind / mnt directory to / var/ftp/pub directory
[root@pxe1 ~]# mount --bind /mnt/ /var/ftp/pub/
[root@pxe1 ~]# ls /var/ftp/pub/
CentOS_BuildTag  EULA  images    LiveOS    repodata              RPM-GPG-KEY-CentOS-Testing-7
EFI              GPL   isolinux  Packages  RPM-GPG-KEY-CentOS-7  TRANS.TBL

# 2. First uninstall the disc from the / mnt directory, then mount it to the / var/ftp/pub directory
[root@pxe1 ~]# umount /dev/cdrom
[root@pxe1 ~]# mount /dev/cdrom /var/ftp/pub/
6.4 Verify FTP Server
This configuration generates kickstart files when the logged-in user is anonumous. The following tests whether anonymous users can normally download files from FTP servers:
[root@pxe1 kk]# ls /var/ftp/
ks.cfg  pub
[root@pxe1 kk]# ftp 192.168.56.14
Connected to 192.168.56.14 (192.168.56.14).
220 (vsFTPd 3.0.2)
Name (192.168.56.14:root): anonymous
331 Please specify the password.
Password:
230 Login successful.
Remote system type is UNIX.
Using binary mode to transfer files.
ftp> ls
227 Entering Passive Mode (192,168,56,14,217,98).
150 Here comes the directory listing.
-rw-r--r--    1 0        0            1459 May 25 09:36 ks.cfg
drwxr-xr-x    8 0        0            2048 Dec 05 13:20 pub
226 Directory send OK.
ftp> get ks.cfg
local: ks.cfg remote: ks.cfg
227 Entering Passive Mode (192,168,56,14,152,101).
150 Opening BINARY mode data connection for ks.cfg (1459 bytes).
226 Transfer complete.
1459 bytes received in 0.0433 secs (33.68 Kbytes/sec)
ftp> bye
221 Goodbye.
[root@pxe1 kk]# ls
ks.cfg
Successful get to ks.cfg file indicates that the configuration is okay and the client virtual machine can now be restarted to test for automated system installation.
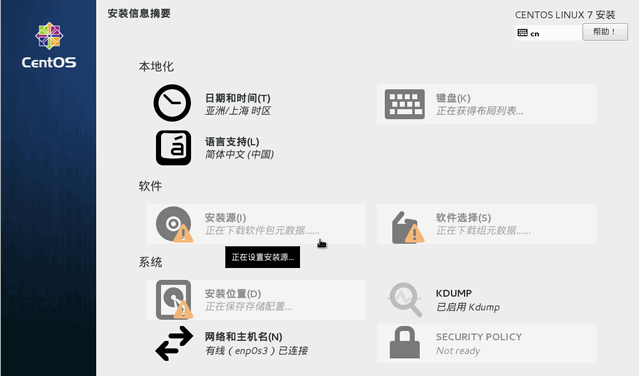
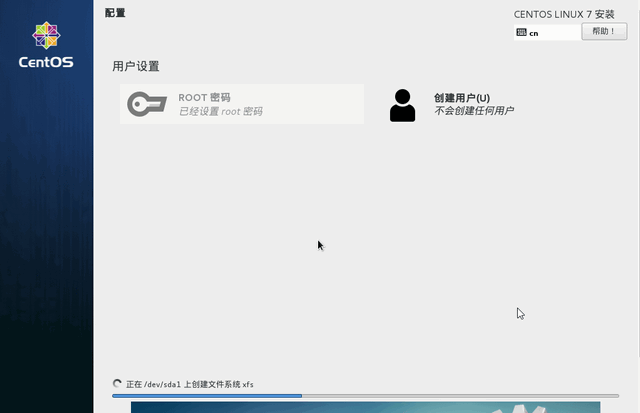
7. Automated System Installation Testing
Restart the client virtual machine and you can see that the system starts to install automatically, so the pxe+kickstart automatic system installation configuration is complete.
8. Introduction of the boot menu
The main contents of the guide menu default configured in this article are as follows:
label linux
  menu label ^Install CentOS Linux 7 by kickstart
  menu default
  kernel vmlinuz
  append initrd=initrd.img inst.repo=ftp://192.168.56.14/pub inst.ks=ftp://192.168.56.14/ks.cfg

label linux 2
  menu label ^Install CentOS Linux 7 by vnc
  kernel vmlinuz
  append initrd=initrd.img inst.repo=ftp://192.168.56.14/pub inst.vnc inst.vncpassword=password

label linux 3
  menu label ^Install CentOS Linux 7 by vnc -listen
  kernel vmlinuz
  append initrd=initrd.img inst.repo=ftp://192.168.56.14/pub inst.vnc inst.vncconnect=192.168.56.1
During system startup, menus correspond to the following:

8.1 kickstart menu introduction
Menu 1 Introduction:
label linux
  menu label ^Install CentOS Linux 7 by kickstart
  menu default
  kernel vmlinuz
  append initrd=initrd.img inst.repo=ftp://192.168.56.14/pub inst.ks=ftp://192.168.56.14/ks.cfg
# Automatic installation using kickstart
# This menu indicates that the mirror file is in the FTP root directory/var/ftp/pub and the kickstart file is in the FTP root directory/var/ftp.
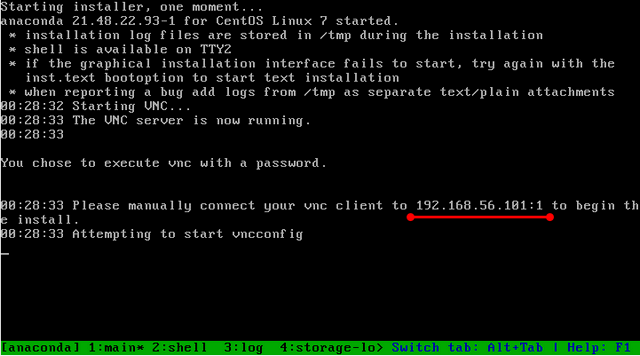
Menu 2 introduces:
label linux 2
  menu label ^Install CentOS Linux 7 by vnc
  kernel vmlinuz
  append initrd=initrd.img inst.repo=ftp://192.168.56.14/pub inst.vnc inst.vncpassword=password

# Manual installation using vnc
# This menu indicates that the image file is in FTP root directory/var/ftp/pub, and the vnc password is password. When this menu is selected, the system will prompt vnc to log on to the IP and port after the system boots. After vnc connection, you can install the system manually, or you can specify the kickstart file location at the end of the menu and install it automatically.
Figure:
Menu 3 introduces:
label linux 3
  menu label ^Install CentOS Linux 7 by vnc -listen
  kernel vmlinuz
  append initrd=initrd.img inst.repo=ftp://192.168.56.14/pub inst.vnc inst.vncconnect=192.168.56.1

# This menu item indicates system installation using vnc listening mode
# This menu indicates that under FTP root directory/var/ftp/pub, the vnc listening process on computer 192.168.56.1 has no login password;
# Note: inst.vncconnect=192.168.56.1 refers to the IP address of the computer on which the vnc client will run.
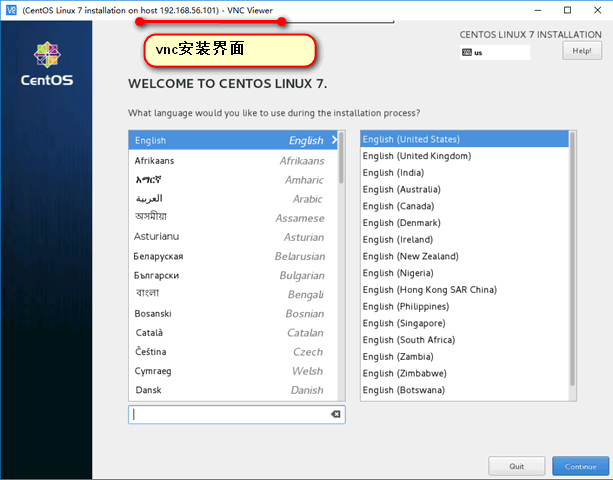
192.168.56.1 here is my notebook IP, so after you start the client virtual machine, you just need to open the vnc client listening mode on your notebook to automatically display the installation interface.
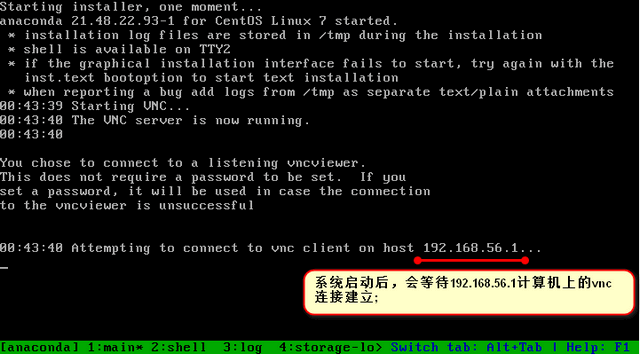
After turning on vnc monitoring mode on your notebook, wait a moment and it will automatically connect to the system installation interface:

9. Other ways to create a boot menu
9.1 menu.c32 menu module
vesamenu.c32 - One of the menu modules
The navigation menu described above was generated using vesamenu.c32.
menu.c32 - One of the menu modules
After installing the syslinux command package, both menu modules are generated under the directory/usr/share/syslinux/. When creating a boot menu using menu.c32, you only need to copy the menu module menu.c32 and the kernel file, and the boot file to the TFTP root directory/var/lib/tftpboot.
[root@pxe1 tftpboot]# ls /var/lib/tftpboot/
initrd.img  menu.c32  pxelinux.0  pxelinux.cfg  vmlinuz
The contents of the menu file are:
[root@pxe1 tftpboot]# cat /var/lib/tftpboot/pxelinux.cfg/default
default menu.c32
 timeout 60
 menu title CentOS 7 Pxe Menu

label linux
  menu label ^Install CentOS Linux 7 by kickstart
  menu default
  kernel vmlinuz
  append initrd=initrd.img inst.repo=ftp://192.168.56.14/pub inst.ks=ftp://192.168.56.14/ks.cfg

label linux 2
  menu label ^Install CentOS Linux 7 by vnc
  kernel vmlinuz
  append initrd=initrd.img inst.repo=ftp://192.168.56.14/pub inst.vnc inst.vncpassword=password

label linux 3
  menu label ^Install CentOS Linux 7 by vnc -listen
  kernel vmlinuz
  append initrd=initrd.img inst.repo=ftp://192.168.56.14/pub inst.vnc inst.vncconnect=192.168.56.1
The menu display style is: