Author: Yi Zhan
In the previous series of articles, we have introduced the scenario of MSE for full link traffic control through the function of full link canary. We have learned how to realize the full link gray scale of RPC calls such as Spring Cloud and Dubbo, but it does not involve the traffic control in asynchronous scenarios such as messages. Today, we will start with what we introduced last time< How to obtain the same enterprise level full link gray scale capability in 20 minutes? >Based on the scenario in, this paper further introduces the full link gray scale of the message scenario.
Although the grayscale requirements of messages in most business scenarios are not as strict as those of RPC, there are still some demands for the whole link of messages in the following two scenarios.
1. The first scenario is that new RPC calls may be generated during message consumption. If the previously set rules of full link traffic control are not followed in the message ring, this part of the traffic generated through the message will "escape", resulting in the destruction of the rules of full link gray scale, resulting in non-compliance with expectations.
In order to prevent this situation, we need to restore the original traffic flag in the message during consumption and follow the original rules during RPC calls. We describe in detail through the architectural diagram. After satisfying this logic, we call the link. What we can see from the picture below is that the messages produced by the gray scale and baseline environment are random when the message is pushed, but the new RPC calls generated in the consumption process can still return to the original environment of the traffic.
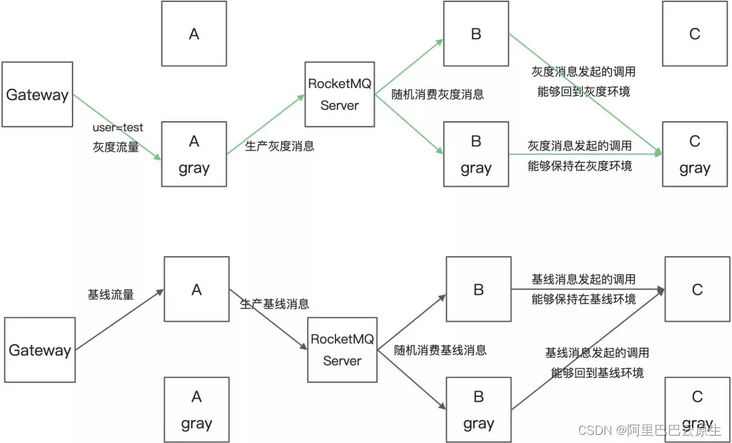
2. The second scenario requires more strict message gray isolation. For example, when the message consumption logic is modified, it is hoped to verify the correctness of the new message consumption logic through small traffic. It is strictly required that gray messages can only be pushed to gray message consumers.
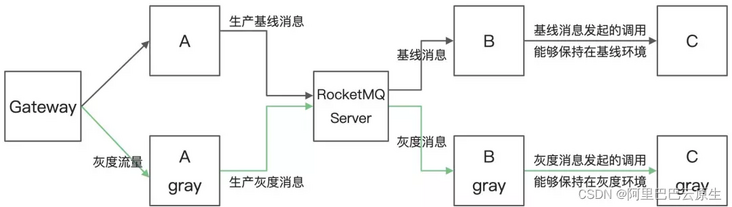
Today, let's practice the full link grayscale of messages in the second scenario. At present, MSE only supports the grayscale of RocketMQ messages. If you are using the open source version of RocketMQ, the version needs to be 4.5.0 or above. If you are using the commercial version of Alibaba cloud RocketMQ, you need to use the platinum version, and the Ons Client version needs to be 1.8.0 Final and above. If you only want to use the first scenario, you only need to turn on the full link gray function for B application, and there is no need to make additional message gray related configuration.
In this best practice operation, we deploy the application in the Kubernetes version of Alibaba cloud container service, that is, ACK cluster. However, in fact, the message gray has no restrictive requirements for the application deployment mode. You can refer to the MSE help document to find the access method corresponding to the deployment mode you use, and you can also use the message full link gray.
prerequisite
1. To open MSE professional edition, please refer to opening MSE micro Service Management Professional Edition [1].
2. To create an ACK cluster, see creating a Kubernetes cluster [2].
Operation steps
Step 1: access MSE microservice governance
1. Install MSE ack pilot
a. Log in to the container service console [3].
b. On the left navigation bar, click markets > app catalog.
c. On the application directory page, click Alibaba cloud applications, select micro services, and click ack MSE pilot.
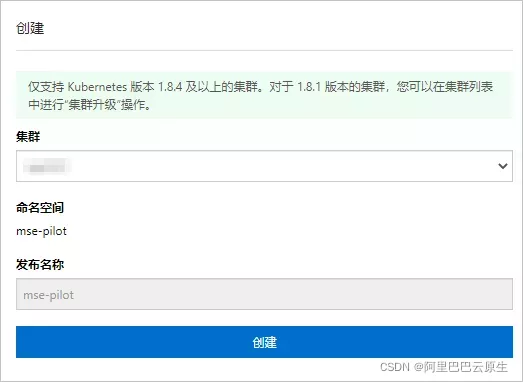
d. Select a cluster from the cluster list on the right side of the ACK MSE pilot page, and then click create.
It takes about 2 minutes to install MSE microservice governance component. Please wait patiently.
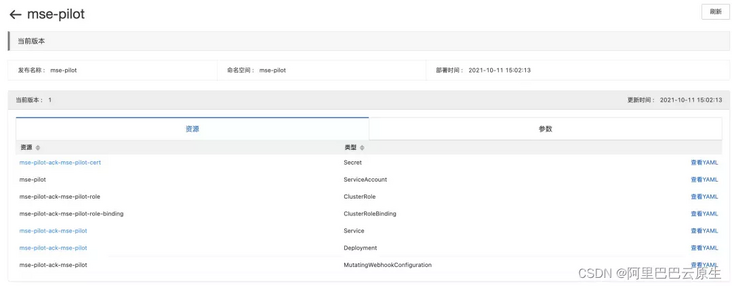
After the creation is successful, it will automatically jump to the Helm page of the target cluster to check the installation results. If the following page shows the relevant resources, the installation is successful.
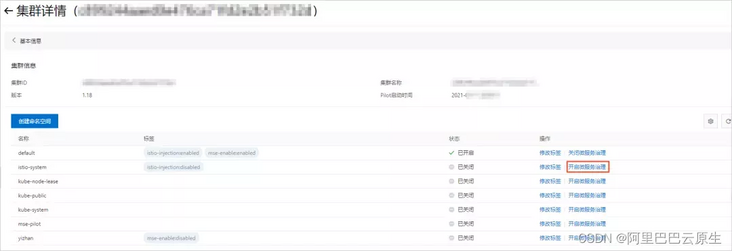
2. Enable MSE microservice governance for applications in ACK namespace
a. Log in to MSE governance center console [4]. If you haven't opened MSE micro service governance, please open it according to the prompt.
b. On the left navigation bar, select microservice governance center > kubernetes cluster list.
c. On the Kubernetes cluster list page, select the cluster name or cluster ID in the search box list, then enter the corresponding keyword and click the search icon.
d. Click Manage in the target cluster operations column.
e. In the namespace list area of the cluster details page, click open microservice governance under the target namespace operation column.
f. Click OK in the open microservice governance dialog box.
Step 2: restore the online scene
First, we will deploy spring-cloud-zuul, spring-cloud-a, spring-cloud-b and spring-cloud-c business applications, as well as the registry Nacos Server and the message service RocketMQ Server to simulate a real call link.
The structure diagram of Demo application is shown in the figure below. The calls between applications include both Spring Cloud calls and Dubbo calls, covering the two most commonly used microservice frameworks on the market. Among them, application C will produce RocketMQ messages, which will be consumed by application A. when consuming messages, a will also initiate new calls. These applications are the simplest standard usage of Spring Cloud, Dubbo and RocketMQ. You can also directly https://github.com/aliyun/alibabacloud-microservice-demo/tree/master/mse-simple-demo View the source code on the project.
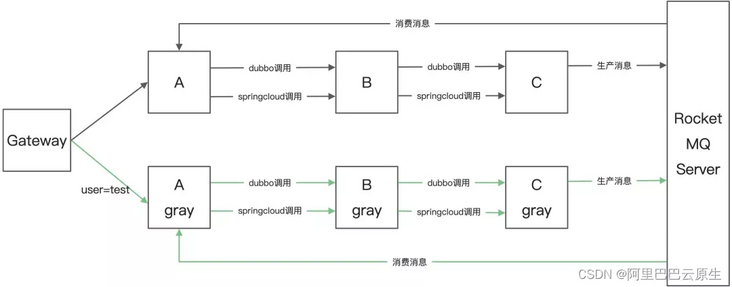
Before deployment, briefly introduce the call link
When the spring cloud zuul application receives the request of "/ A/dubbo", it will forward the request to spring-cloud-a, then spring-cloud-a accesses spring-cloud-b through dubbo protocol, and spring-cloud-b also accesses spring-cloud-c through dubbo protocol. After receiving the request, spring-cloud-c will produce a message and return its own environment tag and ip. These produced messages will be consumed by the spring-cloud-a application. When consuming messages, the spring-cloud-a application will call B through the spring cloud, and then B will call C through the spring cloud, and output the results to its own log.
When we call /A/dubbo When
 The return value is A[10.25.0.32] -> B[10.25.0.152] -> C[10.25.0.30]


At the same time, A After the application receives the message, the output log is as follows

2021-12-28 10:58:50.301  INFO 1 --- [essageThread_15] c.a.mse.demo.service.MqConsumer          : topic:TEST_MQ,producer:C[10.25.0.30],invoke result:A[10.25.0.32] -> B[10.25.0.152] -> C[10.25.0.30]
After getting familiar with the call link, we continue to deploy the application. You can use kubectl or directly use the ACK console to deploy the application. The yaml file used for deployment is as follows. You can also directly https://github.com/aliyun/alibabacloud-microservice-demo/tree/master/mse-simple-demo Get the corresponding source code on.
# Deploy Nacos Server

apiVersion: apps/v1
kind: Deployment
metadata:
  name: nacos-server
spec:
  selector:
    matchLabels:
      app: nacos-server
  template:
    metadata:
      annotations:
      labels:
        app: nacos-server
    spec:
      containers:
        - env:
            - name: MODE
              value: "standalone"
          image: registry.cn-shanghai.aliyuncs.com/yizhan/nacos-server:latest
          imagePullPolicy: IfNotPresent
          name: nacos-server
          ports:
            - containerPort: 8848

---
apiVersion: v1
kind: Service
metadata:
  name: nacos-server
spec:
  type: ClusterIP
  selector:
    app: nacos-server
  ports:
    - name: http
      port: 8848
      targetPort: 8848

# Deploy business applications
---
apiVersion: apps/v1
kind: Deployment
metadata:
  name: spring-cloud-zuul
spec:
  selector:
    matchLabels:
      app: spring-cloud-zuul
  template:
    metadata:
      annotations:
        msePilotCreateAppName: spring-cloud-zuul
      labels:
        app: spring-cloud-zuul
    spec:
      containers:
        - env:
            - name: JAVA_HOME
              value: /usr/lib/jvm/java-1.8-openjdk/jre
            - name: enable.mq.invoke
              value: 'true'
          image: registry.cn-shanghai.aliyuncs.com/yizhan/spring-cloud-zuul:1.0.0
          imagePullPolicy: Always
          name: spring-cloud-zuul
          ports:
            - containerPort: 20000

---
apiVersion: v1
kind: Service
metadata:
  annotations:
    service.beta.kubernetes.io/alibaba-cloud-loadbalancer-spec: slb.s1.small
    service.beta.kubernetes.io/alicloud-loadbalancer-address-type: internet
  name: zuul-slb
spec:
  ports:
    - port: 80
      protocol: TCP
      targetPort: 20000
  selector:
    app: spring-cloud-zuul
  type: LoadBalancer
status:
  loadBalancer: {}

---
apiVersion: apps/v1
kind: Deployment
metadata:
  name: spring-cloud-a
spec:
  selector:
    matchLabels:
      app: spring-cloud-a
  template:
    metadata:
      annotations:
        msePilotCreateAppName: spring-cloud-a
      labels:
        app: spring-cloud-a
    spec:
      containers:
        - env:
            - name: JAVA_HOME
              value: /usr/lib/jvm/java-1.8-openjdk/jre
          image: registry.cn-shanghai.aliyuncs.com/yizhan/spring-cloud-a:1.0.0
          imagePullPolicy: Always
          name: spring-cloud-a
          ports:
            - containerPort: 20001
          livenessProbe:
            tcpSocket:
              port: 20001
            initialDelaySeconds: 10
            periodSeconds: 30


---
apiVersion: apps/v1
kind: Deployment
metadata:
  name: spring-cloud-b
spec:
  selector:
    matchLabels:
      app: spring-cloud-b
  template:
    metadata:
      annotations:
        msePilotCreateAppName: spring-cloud-b
      labels:
        app: spring-cloud-b
    spec:
      containers:
        - env:
            - name: JAVA_HOME
              value: /usr/lib/jvm/java-1.8-openjdk/jre
          image: registry.cn-shanghai.aliyuncs.com/yizhan/spring-cloud-b:1.0.0
          imagePullPolicy: Always
          name: spring-cloud-b
          ports:
            - containerPort: 20002
          livenessProbe:
            tcpSocket:
              port: 20002
            initialDelaySeconds: 10
            periodSeconds: 30

---
apiVersion: apps/v1
kind: Deployment
metadata:
  name: spring-cloud-c
spec:
  selector:
    matchLabels:
      app: spring-cloud-c
  template:
    metadata:
      annotations:
        msePilotCreateAppName: spring-cloud-c
      labels:
        app: spring-cloud-c
    spec:
      containers:
        - env:
            - name: JAVA_HOME
              value: /usr/lib/jvm/java-1.8-openjdk/jre
          image: registry.cn-shanghai.aliyuncs.com/yizhan/spring-cloud-c:1.0.0
          imagePullPolicy: Always
          name: spring-cloud-c
          ports:
            - containerPort: 20003
          livenessProbe:
            tcpSocket:
              port: 20003
            initialDelaySeconds: 10
            periodSeconds: 30
---

apiVersion: apps/v1
kind: Deployment
metadata:
  name: rockectmq-broker
spec:
  selector:
    matchLabels:
      app: rockectmq-broker
  template:
    metadata:
      labels:
        app: rockectmq-broker
    spec:
      containers:
        - command:
            - sh
            - mqbroker
            - '-n'
            - 'mqnamesrv:9876'
            - '-c /home/rocketmq/rocketmq-4.5.0/conf/broker.conf'
          env:
            - name: ROCKETMQ_HOME
              value: /home/rocketmq/rocketmq-4.5.0
          image: registry.cn-shanghai.aliyuncs.com/yizhan/rocketmq:4.5.0
          imagePullPolicy: Always
          name: rockectmq-broker
          ports:
            - containerPort: 9876
              protocol: TCP
            - containerPort: 10911
              protocol: TCP
            - containerPort: 10912
              protocol: TCP
            - containerPort: 10909

---

apiVersion: apps/v1
kind: Deployment
metadata:
  name: rocketmq-name-server
spec:
  selector:
    matchLabels:
      app: rocketmq-name-server
  template:
    metadata:
      labels:
        app: rocketmq-name-server
    spec:
      containers:
        - command:
            - sh
            - mqnamesrv
          env:
            - name: ROCKETMQ_HOME
              value: /home/rocketmq/rocketmq-4.5.0
          image: registry.cn-shanghai.aliyuncs.com/yizhan/rocketmq:4.5.0
          imagePullPolicy: Always
          name: rocketmq-name-server
          ports:
            - containerPort: 9876
              protocol: TCP
            - containerPort: 10911
              protocol: TCP
            - containerPort: 10912
              protocol: TCP
            - containerPort: 10909
              protocol: TCP

---

apiVersion: v1
kind: Service
metadata:
  name: mqnamesrv
spec:
  type: ClusterIP
  selector:
    app: rocketmq-name-server
  ports:
    - name: mqnamesrv-9876-9876
      port: 9876
      targetPort: 9876
After successful installation, an example is as follows:
➜  ~ kubectl get svc,deploy
NAME                   TYPE           CLUSTER-IP        EXTERNAL-IP    PORT(S)        AGE
service/kubernetes     ClusterIP      192.168.0.1       <none>         443/TCP        7d
service/mqnamesrv      ClusterIP      192.168.213.38    <none>         9876/TCP       47h
service/nacos-server   ClusterIP      192.168.24.189    <none>         8848/TCP       47h
service/zuul-slb       LoadBalancer   192.168.189.111   123.56.253.4   80:30260/TCP   47h

NAME                                   READY   UP-TO-DATE   AVAILABLE   AGE
deployment.apps/nacos-server           1/1     1            1           4m
deployment.apps/rockectmq-broker       1/1     1            1           4m
deployment.apps/rocketmq-name-server   1/1     1            1           5m
deployment.apps/spring-cloud-a         1/1     1            1           5m
deployment.apps/spring-cloud-b         1/1     1            1           5m
deployment.apps/spring-cloud-c         1/1     1            1           5m
deployment.apps/spring-cloud-zuul      1/1     1            1           5m
At the same time, we can verify the call link just mentioned through zuul SLB
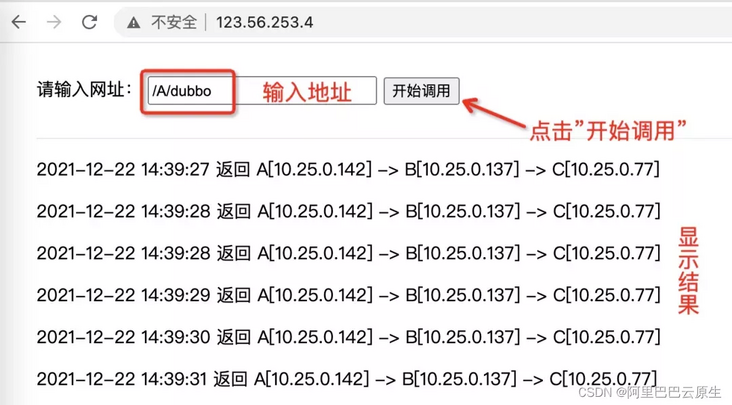
➜  ~ curl http://123.56.253.4/A/dubbo
A[10.25.0.32] -> B[10.25.0.152] -> C[10.25.0.30]
Step 3: turn on the message grayscale function
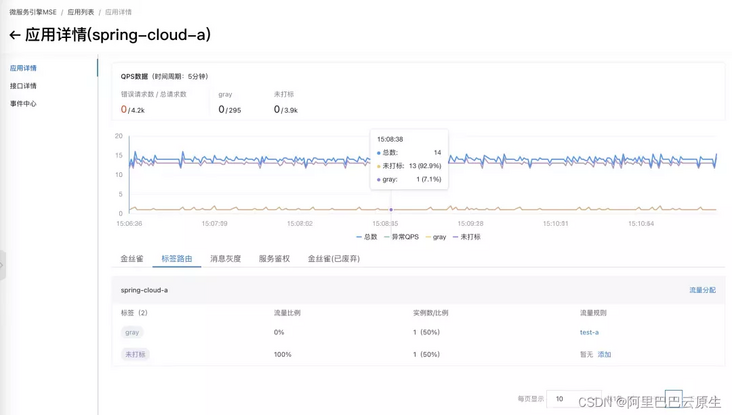
Now, according to the prompt of the console, turn on the grayscale of the message in spring-cloud-c, the producer of the message, and spring-cloud-a, the consumer of the message. We open it directly through the console of MSE, click to enter the details page of the application, and select the "message gray" tab.
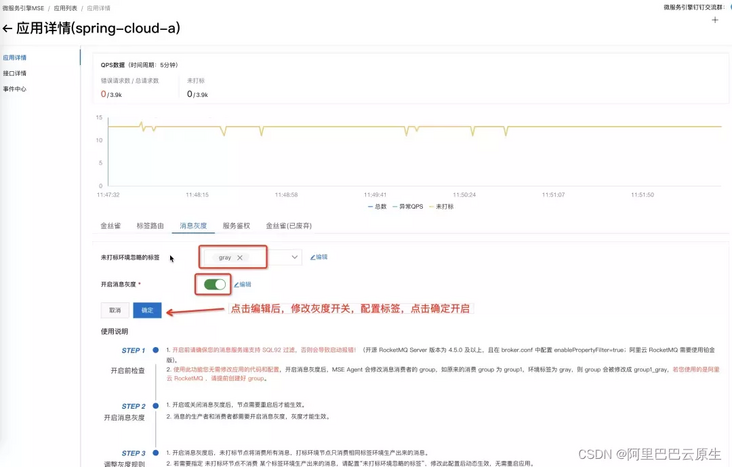
It can be seen that in the label ignored by the unmarked environment, we enter gray, which means that messages with gray environment can only be consumed by spring-cloud-a-gray, not spring-cloud-a.
*1. It needs to be explained here. Considering that in the actual scenario, the owners of spring-cloud-c application and spring-cloud-a application may not be the same person, and they may not be able to synchronize gray publishing at the same time, in the gray level of messages, the default behavior of unmarked environment is to consume all messages. In this way, spring-cloud-c does not need to force spring-cloud-a applications to publish grayscale at the same time.
2. We give the owner of spring-cloud-a the right to choose the consumption behavior of the unmarked environment. If we need to realize that the unmarked environment does not consume the messages produced by c-gray, we only need to configure it on the console, and the configuration will take effect in real time*
- Using this function, you do not need to modify the code and configuration of the application.
- Message producers and consumers need to turn on message grayscale at the same time to make the message grayscale function take effect.
Currently, message types only support RocketMQ, including open source version and Alibaba cloud commercial version.
- If you use open source RocketMQ, both RocketMQ Server and RocketMQ Client need to use version 4.5.0 or above.
- If you use Alibaba cloud RocketMQ, you need to use the platinum version, and the Ons Client uses 1.8.0 Final and above.
- After the message grayscale is turned on, MSE will modify the Consumer Group of the message. For example, the original Consumer Group is group1 and the environment label is gray. After the message gray is turned on, the group will be modified to group1_gray, if you are using Alibaba cloud RocketMQ, please create a group in advance.
- SQL92 is used by default. If you use open source RocketMQ, you need to enable this function on the server (that is, configure enablePropertyFilter=true in broker.conf).
- By default, unmarked nodes will consume messages from all environments. If you need to specify that unmarked ring nodes do not consume messages produced by a label environment, please configure "labels ignored by unmarked environment". After modifying this configuration, it will take effect dynamically without restarting the application.
Step 4: restart the node, deploy a new version of the application, and introduce traffic for verification
First of all, because the node needs to be restarted to take effect after the message grayscale function of the application is turned on and off, we first need to restart the spring-cloud-a and spring-cloud-c applications. You can choose to redeploy on the console or directly use the kubectl command to delete the existing pod.

Then, continue to use yaml files to deploy new versions of spring-cloud-a-gray, spring-cloud-b-gray and spring-cloud-c-gray in the middle of Kubernetes cluster
apiVersion: apps/v1
kind: Deployment
metadata:
  name: spring-cloud-a-gray
spec:
  selector:
    matchLabels:
      app: spring-cloud-a-gray
  template:
    metadata:
      annotations:
        alicloud.service.tag: gray
        msePilotCreateAppName: spring-cloud-a
      labels:
        app: spring-cloud-a-gray
    spec:
      containers:
        - env:
            - name: JAVA_HOME
              value: /usr/lib/jvm/java-1.8-openjdk/jre
          image: registry.cn-shanghai.aliyuncs.com/yizhan/spring-cloud-a:1.0.0
          imagePullPolicy: Always
          name: spring-cloud-a-gray
          ports:
            - containerPort: 20001
          livenessProbe:
            tcpSocket:
              port: 20001
            initialDelaySeconds: 10
            periodSeconds: 30
---
apiVersion: apps/v1
kind: Deployment
metadata:
  name: spring-cloud-b-gray
spec:
  selector:
    matchLabels:
      app: spring-cloud-b-gray
  template:
    metadata:
      annotations:
        alicloud.service.tag: gray
        msePilotCreateAppName: spring-cloud-b
      labels:
        app: spring-cloud-b-gray
    spec:
      containers:
        - env:
            - name: JAVA_HOME
              value: /usr/lib/jvm/java-1.8-openjdk/jre
          image: registry.cn-shanghai.aliyuncs.com/yizhan/spring-cloud-b:1.0.0
          imagePullPolicy: Always
          name: spring-cloud-b-gray
          ports:
            - containerPort: 20002
          livenessProbe:
            tcpSocket:
              port: 20002
            initialDelaySeconds: 10
            periodSeconds: 30

---

apiVersion: apps/v1
kind: Deployment
metadata:
  name: spring-cloud-c-gray
spec:
  selector:
    matchLabels:
      app: spring-cloud-c-gray
  template:
    metadata:
      annotations:
        alicloud.service.tag: gray
        msePilotCreateAppName: spring-cloud-c
      labels:
        app: spring-cloud-c-gray
    spec:
      containers:
        - env:
            - name: JAVA_HOME
              value: /usr/lib/jvm/java-1.8-openjdk/jre
          image: registry.cn-shanghai.aliyuncs.com/yizhan/spring-cloud-c:1.0.0
          imagePullPolicy: Always
          name: spring-cloud-c-gray
          ports:
            - containerPort: 20003
          livenessProbe:
            tcpSocket:
              port: 20003
            initialDelaySeconds: 10
            periodSeconds: 30
1. After deployment, we introduce traffic and verify it
2. Log in to MSE governance center console [4] and select application list.
Click the apply spring-cloud-a application details menu, and you can see that all traffic requests go to the unmarked version of spring-cloud-a application, that is, the stable version.
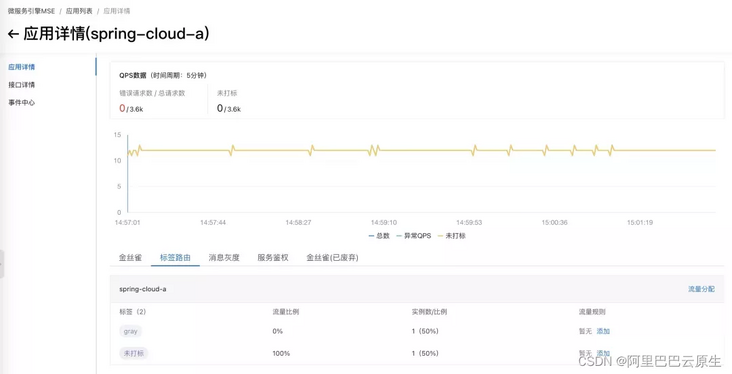
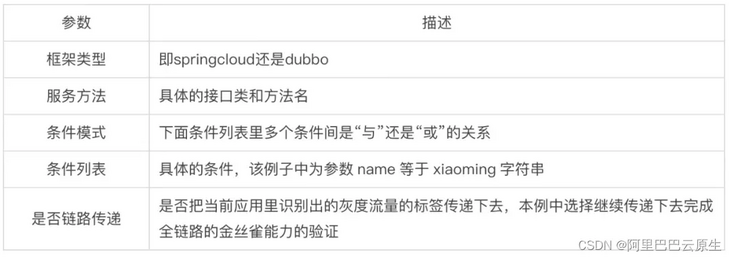
Click the Add button in the tag route at the bottom of the page to set the gray rules for the gray version of spring-cloud-a application.
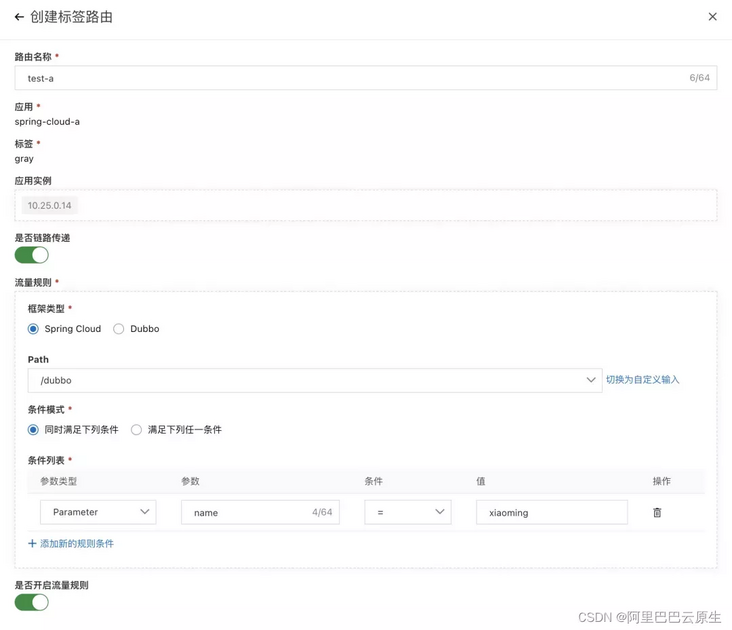
To initiate traffic calls, we initiate traffic calls through zuul SLB and check the gray level.
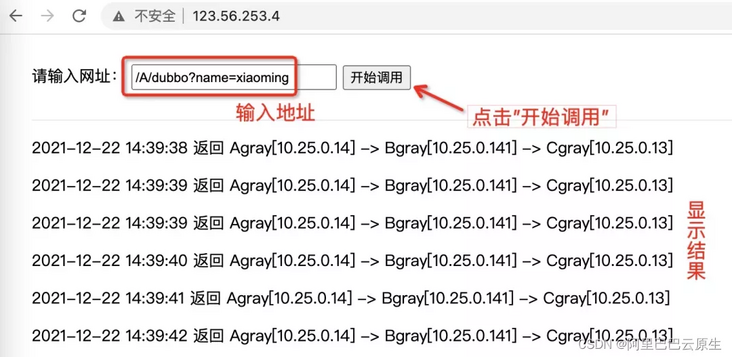
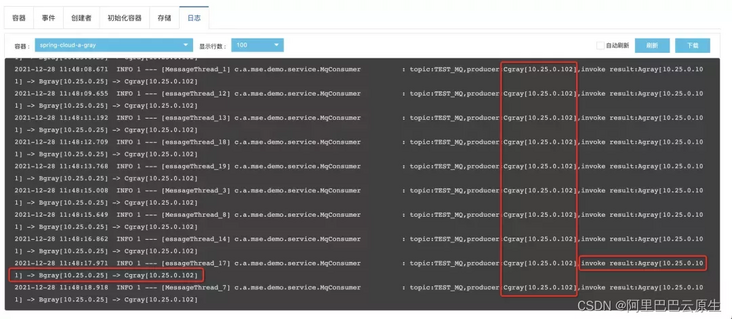
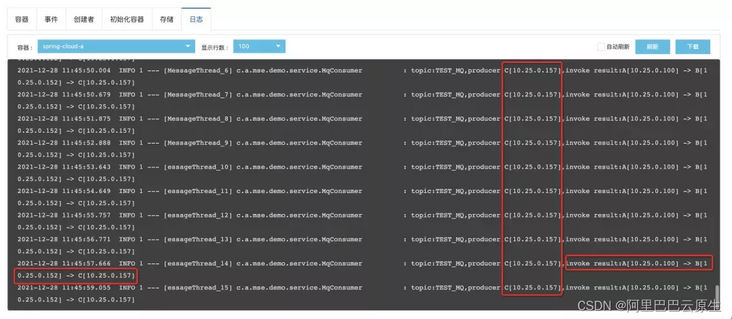
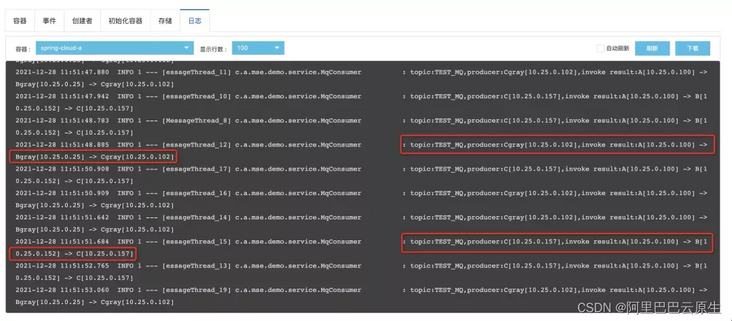
We check the message consumption through the logs of spring-cloud-a and spring-cloud-a-gray. It can be seen that the grayscale function of messages has taken effect. The spring-cloud-a-gray environment will only consume messages with gray, and the spring-cloud-a environment will only consume messages produced by unmarked traffic.
In the screenshot, we can see the log topic: test output from the spring-cloud-a-gray environment_ MQ, producer: Cgray [10.25.0.102], invoke result: array [10.25.0.101] - [bgray [10.25.0.25] - [10.25.0.102], spring-cloud-a-gray will only consume the messages produced by Cgray, and the Spring Cloud call initiated in the process of consuming the messages will also result in array [10.25.0.101] - [bgray [10.25.0.25] - [10.25.0.102] - [Cgray [10.25.0.102], that is, closed loop in gray environment.
In the spring-cloud-a environment, the output log is topic: test_ MQ, producer: C [10.25.0.157], invoke result: a [10.25.0.100] - [b [10.25.0.152] - [C [10.25.0.157], will only consume the messages produced by the baseline environment of C, and the Spring Cloud call initiated in this process is also closed-loop in the baseline environment.
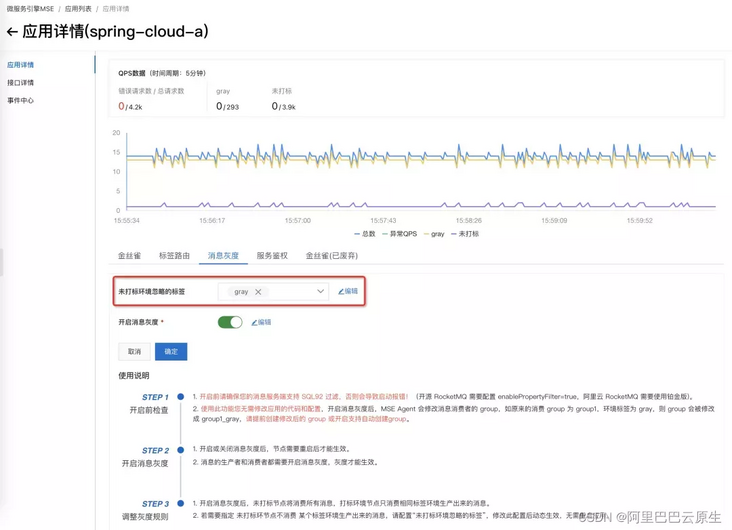
Step 5: adjust the tag filtering rules of messages and verify them
Considering that in the actual scene, the owners of spring-cloud-c application and spring-cloud-a application may not be the same person, and they may not be able to synchronize the gray publishing at the same time, in the gray level of messages, the default behavior of the unmarked environment is to consume all messages. In this way, spring-cloud-c does not need to force spring-cloud-a applications to publish grayscale at the same time, and use the same environment standard.
When spring-cloud-a consumes, the owner of spring-cloud-a has the right to choose the behavior of the unmarked environment. If it is necessary to realize that the unmarked environment does not consume the messages produced by c-gray, it only needs to be configured on the console, and the configuration will take effect in real time.
1. Adjust the filtering rules of spring-cloud-a unmarked environment. For example, if we want to select the unmarked environment and no longer consume the messages produced by the gray environment, we just need to select gray in the "label ignored by the unmarked environment" and click OK.
2. After adjusting the rules, the rules can take effect dynamically without restarting. We can directly check the log of spring-cloud-a to verify that the rule adjustment takes effect.
From this log, we can see that the baseline environment can consume the messages produced by gray and the baseline environment at the same time, and the Spring Cloud calls generated when consuming the corresponding environment messages are routed to gray and the baseline environment respectively.
Operation summary
1. The whole process of full link message grayscale does not need to modify any code and configuration.
2. At present, only RocketMQ is supported, and the Client version needs to be after 4.5.0. RocketMQ Server needs to support SQL92 rule filtering, that is, open source RocketMQ needs to be configured with enablePropertyFilter=true, and Alibaba cloud RocketMQ needs to use platinum version.
3. After the message grayscale is turned on, the MSE Agent will modify the group of the message consumer. If the original consumption group is group1 and the environment label is gray, the group will be modified to group1_gray, if you use Alibaba cloud RocketMQ, you need to create the modified group in advance.
4. After opening and closing the message, the application needs to be restarted to take effect; Modifying the label function ignored in the unmarked environment can take effect dynamically without restarting.
Related links
[1] MSE microservice governance Professional Edition:
https://help.aliyun.com/document_detail/333529.html
[2] Kubernetes cluster:
https://help.aliyun.com/document_detail/86488.html
[3] Container service console:
https://cs.console.aliyun.com/
[4] MSE governance center console
https://mse.console.aliyun.com/#/msc/home
click here , go to MSE official website for more details!