In actual development, docker is generally used to install rocketmq. Docker installs rocketmq as follows:
docker installation configuration rocketmq
docker installing rocketmq
docker pull foxiswho/rocketmq:server-4.3.2
docker pull foxiswho/rocketmq:broker-4.3.2

Create container docker create -p 9876:9876 --name rmqserver \
-e JAVA_OPT_EXT = -server -Xms128m -Xmx128m -Xmn128m \
-e JAVA_OPTS = -Duser.home = /opt \
-v /usr/local/rmq/rmqserver/logs:/opt/logs \
-v /usr/local/rmq/rmqserver/store:/opt/store \
foxiswho/rocketmq:server-4.3.2


establish broker container
docker create -p 10911:10911 -p 10909:10909 --name rmqbroker \
-e JAVA_OPTS=-Duser.home = /opt \
-e JAVA_OPT_EXT=-server -Xms128m -Xmx128m -Xmn128m \
-v /usr/local/rmq/rmqbroker/conf/broker.conf:/etc/rocketmq/broker.conf \
-v /usr/local/rmq/rmqbroker/store:/opt/store \
foxiswho/rocketmq:broker-4.3.2

Pull image
docker pull styletang/rocketmq-console-ng:1.0.0
 Create startup container
docker run -e JAVA_OPTS = -Drocketmq.namesrv.addr = 172.17.0.3:9876
-Dcom.rocketmq.sendMessageWithVIPChannel=false -p 8082:8080 -t styletang/rocketmq-console-ng:1.0.0
rocketMq cluster construction
There are several types of rocketMQ clusters:
- 2m-2s-async: 2 master and 2 slave asynchronous disk brushing (throughput is large, but messages may be lost),
- 2m-2s-sync:2 master and 2 slave synchronous disk brushing (throughput will decrease, but messages are safer),
- 2m noslave: 2 master and no slave (single point of failure), and then you can directly configure the broker Conf to configure the single point environment.
-
Dleger high availability cluster is used to realize master-slave switching.
The nodes in the cluster will randomly elect a leader based on the Raft protocol, and the others are follower s. Usually, the formal environment adopts this method to build clusters.
Cluster architecture


Dual master and dual slave asynchronous architecture
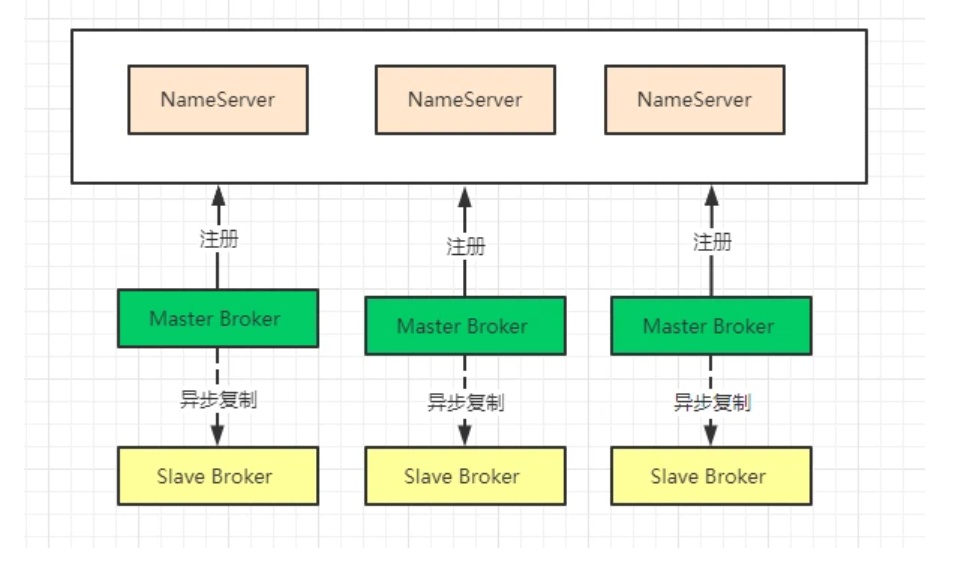
The advantages and disadvantages of this model are as follows:
- Advantages: even if the disk is damaged, very few messages are lost, and the real-time performance of messages will not be affected. At the same time, after the Master goes down, consumers can still consume from Slave. Moreover, this process is transparent to the application without manual intervention, and the performance is almost the same as that of multi master mode;
- Disadvantages: when the Master goes down and the disk is damaged, a small amount of messages will be lost.
Prepare two hosts
192.168.36.131 tomcat01
192.168.36.132 tomcat02
In order to facilitate observation, we will set up a 2-master and 2-slave asynchronous disk brushing cluster this time, so we will use the configuration file under conf/2m-2s-async. In actual projects, in order to achieve high availability, we will generally use dleger. The clusters to be designed are as follows:

At conf/2m-2s-async
Configure broker-b.properties
brokerIP1 = 192.168.36.131
#Cluster name. Nodes with the same name are in the same cluster
brokerClusterName = rocketmq-cluster
#broker name. Nodes with the same name are a group of master-slave nodes.
brokerName = broker-b
#Broker ID, 0 means Master, and > 0 means Slave
brokerId = 0
#nameServer address, semicolon split
namesrvAddr = 192.168.36.132:9876;192.168.36.131:9876
#When sending messages, automatically create topic s that do not exist in the server. The number of queues created by default
defaultTopicQueueNums = 4
#Whether to allow the Broker to automatically create topics. It is recommended to open offline and close online
autoCreateTopicEnable = true
#Whether to allow the Broker to automatically create subscription groups. It is recommended to open offline and close online
autoCreateSubscriptionGroup = true
#Listening port of Broker external service
listenPort = 10911
#Delete file time I, 4 a.m. by default
deleteWhen = 04
#File retention time, 48 hours by default
fileReservedTime = 120
#commitLog the default size of each file is 1G
mapedFileSizeCommitLog = 1073741824
#ConsumeQueue stores 30W files by default, which can be adjusted according to business conditions
mapedFileSizeConsumeQueue = 300000
#destroyMapedFileIntervalForcibly=120000
#redeleteHangedFileInterval = 120000
#Detect physical file disk space
diskMaxUsedSpaceRatio = 88
#Storage path
storePathRootDir = /home/lulu/rocketmq-all-4.7.1-bin-release/store
#commitLog storage path
storePathCommitLog = /home/lulu/rocketmq-all-4.7.1-bin-release/store/commitlog
#Consumption queue storage path storage path
storePathConsumeQueue = /home/lulu/rocketmq-all-4.7.1-bin-release/store/consumequeue
#Message index storage path
storePathIndex = /home/lulu/rocketmq-all-4.7.1-bin-release/store/index
#checkpoint file storage path
storeCheckpoint = /home/lulu/rocketmq-all-4.7.1-bin-release/store/checkpoint
#abort file storage path
abortFile = /home/lulu/rocketmq-all-4.7.1-bin-release/store/abort
#Limited message size
maxMessageSize = 65536
flushCommitLogLeastPages=4
flushConsumeQueueLeastPages=2
flushCommitLogThoroughInterval=10000
flushConsumeQueueThoroughInterval=60000
#Role of Broker
#- ASYNC_MASTER asynchronous replication master
#- SYNC_MASTER synchronous double write master
#- SLAVE
brokerRole = ASYNC_MASTER
#Disc brushing mode
#- ASYNC_FLUSH asynchronous brush disk
#- SYNC_FLUSH synchronous brush disc
flushDiskType = ASYNC_FLUSH
#checkTransactionMessageEnable=false
#Number of message sending thread pools
sendMessageThreadPoolNums = 128
#Number of pull message thread pools
pullMessageThreadPoolNums = 128
#enablePropertyFilter=true
#aclEnable=true
Configure broker-a-s.properties slave node
brokerIP1 = 192.168.36.131
#Cluster name. Nodes with the same name are in the same cluster
brokerClusterName=rocketmq-cluster
#broker name. Nodes with the same name are a group of master-slave nodes.
brokerName=broker-a
#Broker ID, 0 means Master, and > 0 means Slave
brokerId=1
#nameServer address, semicolon split
namesrvAddr=192.168.36.132:9876;192.168.36.131:9876
#When sending messages, automatically create topic s that do not exist in the server. The number of queues created by default
defaultTopicQueueNums=4
#Whether to allow the Broker to automatically create topics. It is recommended to open offline and close online
autoCreateTopicEnable=true
#Whether to allow the Broker to automatically create subscription groups. It is recommended to open offline and close online
autoCreateSubscriptionGroup=true
#Listening port of Broker external service
listenPort=11011
#Delete file time: 4 am by default
deleteWhen=04
#File retention time, 48 hours by default
fileReservedTime=120
#commitLog the default size of each file is 1G
mapedFileSizeCommitLog=1073741824
#ConsumeQueue stores 30W files by default, which can be adjusted according to business conditions
mapedFileSizeConsumeQueue=300000
#destroyMapedFileIntervalForcibly=120000
#redeleteHangedFileInterval=120000
#Detect physical file disk space
diskMaxUsedSpaceRatio=88
#Storage path
storePathRootDir=/home/lulu/rocketmq-all-4.7.1-bin-release/storeSlave
#commitLog storage path
storePathCommitLog=/home/lulu/rocketmq-all-4.7.1-bin-release/storeSlave/commitlog
#Consumption queue storage path storage path
storePathConsumeQueue=/home/lulu/rocketmq-all-4.7.1-bin-release/storeSlave/consumequeue
#Message index storage path
storePathIndex=/home/lulu/rocketmq-all-4.7.1-bin-release/storeSlave/index
#checkpoint file storage path
storeCheckpoint=/home/lulu/rocketmq-all-4.7.1-bin-release/storeSlave/checkpoint
#abort file storage path
abortFile=/home/lulu/rocketmq-all-4.7.1-bin-release/storeSlave/abort
#Limited message size
maxMessageSize=65536
flushCommitLogLeastPages=4
flushConsumeQueueLeastPages=2
flushCommitLogThoroughInterval=10000
flushConsumeQueueThoroughInterval=60000
#Role of Broker
#- ASYNC_MASTER asynchronous replication master
#- SYNC_MASTER synchronous double write master
#- SLAVE
brokerRole=SLAVE
#Disc brushing mode
#- ASYNC_FLUSH asynchronous brush disk
#- SYNC_FLUSH synchronous brush disc
flushDiskType=ASYNC_FLUSH
#checkTransactionMessageEnable=false
#Number of message sending thread pools
sendMessageThreadPoolNums=128
#Number of pull message thread pools
pullMessageThreadPoolNums=128
#enablePropertyFilter=true
#Open acl permission
#aclEnable=true
The configuration of the same host is the same, but the ip address is different
This completes the broker configuration. Configuration items needing attention:
1. The store directories of two instances on the same machine cannot be the same, otherwise the error lock failed and MQ ready started will be reported
2. The listenPort of two instances on the same machine cannot be the same. Otherwise, an error will be reported that the port is occupied. Nameserver does not need to be configured. Just start it directly. This also shows that nameserver is stateless.
3. For other configuration items, see RocketMq all configurations
Start dual master and dual slave asynchronous:
nohup bin/mqbroker -c conf/2m-2s-async/broker-a.properties &
nohup bin/mqbroker -c conf/2m-2s-async/broker-b-s.properties &
nohup bin/mqbroker -c  conf/2m-2s-async/broker-b.properties &
nohup bin/mqbroker -c  conf/2m-2s-async/broker-a-s.properties &
When starting a slave, if you encounter an error lock failed and MQ ready started, it is because multiple instances share the same storePath. In this case, you need to adjust the path of the store.
Using the jps instruction, you can see one NameSrvStartup process and two BrokerStartup processes.
nohup. There is also a log of successful startup in out. Corresponding log file:
# View nameServer logs
tail -500f ~/logs/rocketmqlogs/namesrv.log
# View broker log
tail -500f ~/logs/rocketmqlogs/broker.log
Dual master and dual slave synchronous configuration
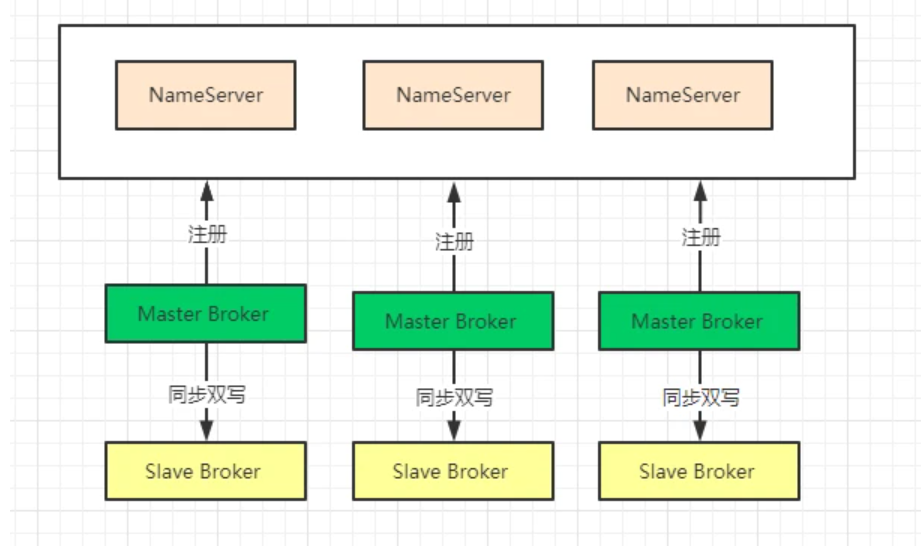
The advantages and disadvantages of this model are as follows:
- Advantages: there is no single point of failure in data and services. When the Master goes down, there is no delay in messages, and the service availability and data availability are very high;
- Disadvantages: the performance is slightly lower than that of asynchronous replication mode (about 10% lower), and the RT for sending a single message will be slightly higher. In the current version, after the primary node goes down, the standby machine cannot automatically switch to the host·
Only need to modify
brokerRole=SYNC_ Master others do not need to be changed
Multi master and no slave node configuration

The advantages and disadvantages of this model are as follows:
- Advantages: the configuration is simple, and the downtime or restart maintenance of a single Master has no impact on the application. When the disk is configured as RAID10, even if the machine downtime is unrecoverable, because the RAID10 disk is very reliable, the message will not be lost (a small number of messages will be lost in asynchronous disk brushing, and none will be lost in synchronous disk brushing), and the performance is the highest;
- Disadvantages: during the downtime of a single machine, messages that are not consumed on this machine cannot be subscribed before the machine is restored, and the real-time performance of messages will be affected.
Dledger mode

Using Dledger technology requires at least three brokers, one master and two slave, so that the three brokers can form a Group, that is, the three brokers can be run in groups. Once the Master goes down, Dledger can elect a master from the remaining two brokers to continue providing services. This is also the reason why the above cluster method cannot convert from slave to master
Overall architecture: high availability, high concurrency, scalability and massive messages
The cluster configuration is as follows:
Modify broker-n0 Conf file
brokerClusterName = RaftCluster
brokerName=RaftNode00
listenPort=30911
namesrvAddr=192.168.36.131:9876;192.168.36.132:9876
#Create theme automatically when theme does not exist
autoCreateTopicEnable=false
###Create subscription group automatically when subscription group does not exist
autoCreateSubscriptionGroup=false
storePathRootDir=/tmp/rmqstore/node00
storePathCommitLog=/tmp/rmqstore/node00/commitlog
#Start DLedger
enableDLegerCommitLog=true
#The name of the DLedger Raft Group should be consistent with the brokerName
dLegerGroup=RaftNode00
#The port information of each node in the DLedger Group and the configuration of each node in the same Group must be consistent
dLegerPeers=n0-127.0.0.1:40911;n1-127.0.0.1:40912;n2-127.0.0.1:40913
#Node id, which must belong to one of dLegerPeers; Each node in the same Group should be unique
dLegerSelfId=n0
#Number of sending threads. It is recommended to configure the number of Cpu cores
sendMessageThreadPoolNums=16
broker-n1.conf file
brokerClusterName = RaftCluster
brokerName=RaftNode00
listenPort=30921
namesrvAddr=192.168.36.131:9876;192.168.36.132:9876
#Create theme automatically when theme does not exist
autoCreateTopicEnable=false
#Create subscription group automatically when subscription group does not exist
autoCreateSubscriptionGroup=false
storePathRootDir=/tmp/rmqstore/node01
storePathCommitLog=/tmp/rmqstore/node01/commitlog
enableDLegerCommitLog=true
dLegerGroup=RaftNode00
dLegerPeers=n0-127.0.0.1:40911;n1-127.0.0.1:40912;n2-127.0.0.1:40913
## must be unique
dLegerSelfId=n1
sendMessageThreadPoolNums=16
broker-n2.conf file
brokerClusterName = RaftCluster
brokerName=RaftNode00
listenPort=30931
namesrvAddr=192.168.36.131:9876;192.168.36.132:9876
#Create theme automatically when theme does not exist
autoCreateTopicEnable=false
#Create subscription group automatically when subscription group does not exist
autoCreateSubscriptionGroup=false
storePathRootDir=/tmp/rmqstore/node02
storePathCommitLog=/tmp/rmqstore/node02/commitlog
enableDLegerCommitLog=true
dLegerGroup=RaftNode00
dLegerPeers=n0-127.0.0.1:40911;n1-127.0.0.1:40912;n2-127.0.0.1:40913
## must be unique
dLegerSelfId=n2
sendMessageThreadPoolNums=16
Configure on the two services respectively. The startup process is as follows:
Start mqnamesrv first
nohup bin/mqnamesrv &
Start broker
nohup  bin/mqbroker -c  conf/dledger/broker-n0.conf &
nohup  bin/mqbroker -c  conf/dledger/broker-n1.conf &
nohup  bin/mqbroker -c  conf/dledger/broker-n2.conf &
Set up management console
There is no console in RocketMQ source code, but there is a console provided in RocketMQ community extension project. Address: https://github.com/apache/rocketmq-externals After downloading, enter the rocket console directory and compile it with maven
mvn clean package -Dmaven.test.skip=true
After compiling, get the jar package under target and execute it directly. But at this time, we should pay attention to the application of this project The address of nameserver needs to be specified in properties. By default, this property is empty.
Then we can add an application in the current directory of the jar package The properties file overrides one of the default properties in the jar package:
rocketmq.config.namesrvAddr=tomcat02:9876;tomcat01:9876
Of course, it can also be applied in the configuration file of {resource of the project Properties modification
Execute command start
nohup java -jar rocketmq-console-ng-1.0.1.jar > lout.log 2>1 &
mqadmin administration tool
The format of the mqadmin command is as follows:/ mqadmin {command} {args}
For example:
#View cluster monitoring status sh - mqadmin - clusterlist ‐ n 192.168.241.198:9876
All instructions are as follows:
- Topic related:
| name | meaning | Command options | explain |
| updateTopic | Create or update Topic configuration | -b | The Broker address indicates the Broker where the topic is located. Only a single Broker is supported. The address is ip:port |
| -c | Cluster name, indicating the cluster where topic is located (clusters can be queried through clusterList) | ||
| -h- | Print help | ||
| -n | NameServer service address, format ip:port | ||
| -p | Specify the read-write permission of the new topic (W=2|R=4|WR=6) | ||
| -r | Number of readable queues (8 by default) | ||
| -w | Number of writable queues (8 by default) | ||
| -t | topic name (the name can only use the characters ^ [a-zA-Z0-9 -] + $) | ||
| deleteTopic | Delete Topic | -c | Cluster name, which means deleting a topic under a cluster (clusters can be queried through clusterList) |
| -h | Print help | ||
| -n | NameServer service address, format ip:port | ||
| -t | topic name (the name can only use the characters ^ [a-zA-Z0-9 -] + $) | ||
| topicList | View Topic list information | -h | Print help |
| -c | Do not configure - c to return only the topic list. Add - c to return clustername, topic and consumergroup information, that is, the cluster and subscription relationship of topic, without parameters | ||
| -n | NameServer service address, format ip:port | ||
| topicRoute | View Topic routing information | -t | topic name |
| -h | Print help | ||
| -n | NameServer service address, format ip:port | ||
| topicStatus | View Topic message queue offset | -t | topic name |
| -h | Print help | ||
| -n | NameServer service address, format ip:port | ||
| topicClusterList | View the cluster list of Topic | -t | topic name |
| -h | Print help | ||
| -n | NameServer service address, format ip:port | ||
| updateTopicPerm | Update Topic read and write permissions | -t | topic name |
| -h | Print help | ||
| -n | NameServer service address, format ip:port | ||
| -b | The Broker address indicates the Broker where the topic is located. Only a single Broker is supported. The address is ip:port | ||
| -p | Specify the read-write permission of the new topic (W=2|R=4|WR=6) | ||
| -c | Cluster name, indicating the cluster where topic is located (the cluster can be queried through clusterList), - b takes precedence. If there is no - b, the command will be executed for all brokers in the cluster | ||
| updateOrderConf | Create, delete and obtain the kv configuration of specific namespace from NameServer, which is not enabled yet | -h | Print help |
| -n | NameServer service address, format ip:port | ||
| -t | topic, key | ||
| -v | orderConf, value | ||
| -m | method, optional: get, put, delete | ||
| allocateMQ | The average load algorithm is used to calculate the load result of the consumer list load message queue | -t | topic name |
| -h | Print help | ||
| -n | NameServer service address, format ip:port | ||
| -i | ipList, separated by commas, calculates the message queue of these IPS to load the Topic | ||
| statsAll | Print Topic subscription relationship, TPS, accumulation, 24h read-write total and other information | -h | Print help |
| -n | NameServer service address, format ip:port | ||
| -a | Print only active topic s | ||
| -t | Specify topic |
- Cluster correlation
| name | meaning | Command options | explain |
| clusterList | View cluster information, such as cluster, BrokerName, BrokerId, TPS, etc | -m | Print more information (add the following information #intotalyest, #outtotalyest, #intotaltoday, #outtotaltoday) |
| -h | Print help | ||
| -n | NameServer service address, format ip:port | ||
| -i | Print interval in seconds | ||
| clusterRT | Send a message to detect the RT of each broker in the cluster. Send the message to ${BrokerName} Topic. | -a | Amount, total number of probes per time, RT = total time / amount |
| -s | Message size in B | ||
| -c | Detect which cluster | ||
| -p | Whether to print the formatted log, split by | and not print by default | ||
| -h | Print help | ||
| -m | Computer room, printing | ||
| -i | Sending interval, in seconds | ||
| -n | NameServer service address, format ip:port |
- Broker related
| name | meaning | Command options | explain |
| updateBrokerConfig | Updating the Broker configuration file will modify the Broker conf | -b | Broker address in the form of ip:port |
| -c | cluster name | ||
| -k | key value | ||
| -v | Value value | ||
| -h | Print help | ||
| -n | NameServer service address, format ip:port | ||
| brokerStatus | Check Broker statistics and operation status (almost all the information you want is in it) | -b | Broker address, ip:port |
| -h | Print help | ||
| -n | NameServer service address, format ip:port | ||
| brokerConsumeStats | According to the consumption of each consumer in the Broker, the consumption offset, Broker Offset, Diff, timstamp and other information are returned according to the Message Queue dimension | -b | Broker address, ip:port |
| -t | Request timeout | ||
| -l | diff threshold, which is exceeded before printing | ||
| -o | Whether it is sequential topic, generally false | ||
| -h | Print help | ||
| -n | NameServer service address, format ip:port | ||
| getBrokerConfig | Get Broker configuration | -b | Broker address, ip:port |
| -n | NameServer service address, format ip:port | ||
| wipeWritePerm | Clear Broker write permission from NameServer | -b | Broker address, ip:port |
| -n | NameServer service address, format ip:port | ||
| -h | Print help | ||
| cleanExpiredCQ | Clean up the expired consumption queue on the Broker. If you manually reduce the number of pairs of columns, an expired queue may be generated | -n | NameServer service address, format ip:port |
| -h | Print help | ||
| -b | Broker address, ip:port | ||
| -c | Cluster name | ||
| cleanUnusedTopic | Clean up unused topics on the Broker and release the consumption queue of topics from memory. If you delete topics manually, unused topics will be generated | -n | NameServer service address, format ip:port |
| -h | Print help | ||
| -b | Broker address, ip:port | ||
| -c | Cluster name | ||
| sendMsgStatus | Send a message to the Broker and return the sending status and RT | -n | NameServer service address, format ip:port |
| -h | Print help | ||
| -b | Broker name, which is different from the broker address | ||
| -s | Message size in B | ||
| -c | Sending times |
- Message correlation
| name | meaning | Command options | explain |
| queryMsgById | Query msg according to offsetMsgId. If you use the open source console, you should use offsetMsgId. This command has other parameters. Please read QueryMsgByIdSubCommand for specific functions. | -i | msgId |
| -h | Print help | ||
| -n | NameServer service address, format ip:port | ||
| queryMsgByKey | Query message according to message Key | -k | msgKey |
| -t | Topic name | ||
| -h | Print help | ||
| -n | NameServer service address, format ip:port | ||
| queryMsgByOffset | Query message according to Offset | -b | Broker name, (note that the name of the broker is filled in here, not the address of the broker. The broker name can be found in the clusterList) |
| -i | query queue id | ||
| -o | offset value | ||
| -t | topic name | ||
| -h | Print help | ||
| -n | NameServer service address, format ip:port | ||
| queryMsgByUniqueKey | According to the query of msgId, msgId is different from offsetMsgId. See the common operation and maintenance questions for the difference- g. - d is used together. After finding the message, try to make a specific consumer consume the message and return the consumption result | -h | Print help |
| -n | NameServer service address, format ip:port | ||
| -i | uniqe msg id | ||
| -g | consumerGroup | ||
| -d | clientId | ||
| -t | topic name | ||
| checkMsgSendRT | Detect the RT that sends messages to topic. The function is similar to clusterRT | -h | Print help |
| -n | NameServer service address, format ip:port | ||
| -t | topic name | ||
| -a | Detection times | ||
| -s | Message size | ||
| sendMessage | A message can be sent to a specific Message Queue or sent normally according to the configuration. | -h | Print help |
| -n | NameServer service address, format ip:port | ||
| -t | topic name | ||
| -p | Body, message body | ||
| -k | keys | ||
| -c | tags | ||
| -b | BrokerName | ||
| -i | queueId | ||
| consumeMessage | Consumer news. You can consume messages according to offset, start & end timest amp and message queue, and execute different consumption logic according to different configurations. See consummessagecommand for details. | -h | Print help |
| -n | NameServer service address, format ip:port | ||
| -t | topic name | ||
| -b | BrokerName | ||
| -o | Start consumption from offset | ||
| -i | queueId | ||
| -g | Consumer grouping | ||
| -s | Start timestamp. See - h for format | ||
| -d | End timestamp | ||
| -c | How many messages are consumed | ||
| printMsg | Consume and print messages from Broker, optional time period | -h | Print help |
| -n | NameServer service address, format ip:port | ||
| -t | topic name | ||
| -c | Character set, such as UTF-8 | ||
| -s | subExpress, filter expression | ||
| -b | Start timestamp. See - h for format | ||
| -e | End timestamp | ||
| -d | Print message body | ||
| printMsgByQueue | Similar to printMsg, but specify Message Queue | -h | Print help |
| -n | NameServer service address, format ip:port | ||
| -t | topic name | ||
| -i | queueId | ||
| -a | BrokerName | ||
| -c | Character set, such as UTF-8 | ||
| -s | subExpress, filter expression | ||
| -b | Start timestamp. See - h for format | ||
| -e | End timestamp | ||
| -p | Print message | ||
| -d | Print message body | ||
| -f | Count the tag quantity and print it | ||
| resetOffsetByTime | Reset the offset according to the timestamp, and both the Broker and the consumer will reset | -h | Print help |
| -n | NameServer service address, format ip:port | ||
| -g | Consumer grouping | ||
| -t | topic name | ||
| -s | Reset the offset corresponding to this timestamp | ||
| -f | Whether to force reset. If false, only backtracking offset is supported. If true, regardless of the relationship between offset and consumeOffset corresponding to timestamp | ||
| -c | Reset c + + client offset |
- Consumer and consumer group related
| name | meaning | Command options | explain |
| consumerProgress | To view the consumption status of the subscription group, you can view the message accumulation of the specific client IP | -g | Consumer group name |
| -s | Print client IP | ||
| -h | Print help | ||
| -n | NameServer service address, format ip:port | ||
| consumerStatus | Check the status of consumers, including whether there are the same subscriptions in the same group, analyze whether the Process Queue is stacked, and return the jstag result of consumers. For more content, users see ConsumerStatusSubCommand | -h | Print help |
| -n | NameServer service address, format ip:port | ||
| -g | consumer group | ||
| -i | clientId | ||
| -s | Execute jstack | ||
| getConsumerStatus | Get Consumer consumption progress | -g | Consumer group name |
| -t | Query subject | ||
| -i | Consumer client ip | ||
| -n | NameServer service address, format ip:port | ||
| -h | Print help | ||
| updateSubGroup | Update or create subscription relationships | -n | NameServer service address, format ip:port |
| -h | Print help | ||
| -b | Broker address | ||
| -c | Cluster name | ||
| -g | Consumer group name | ||
| -s | Whether the group allows consumption | ||
| -m | Whether to consume from the minimum offset | ||
| -d | Is it broadcast mode | ||
| -q | Number of retry queues | ||
| -r | max retries | ||
| -i | It is effective when slaveReadEnable is enabled, and it has not yet reached the recommended BrokerId to consume from the slave. You can configure the standby id and actively consume from the standby | ||
| -w | If the Broker proposes to consume from a slave, the configuration determines which slave to consume from, and the Broker ID is configured, for example, 1 | ||
| -a | Is load balancing notified to other consumers when the number of consumers changes | ||
| deleteSubGroup | Delete subscription relationship from Broker | -n | NameServer service address, format ip:port |
| -h | Print help | ||
| -b | Broker address | ||
| -c | Cluster name | ||
| -g | Consumer group name | ||
| cloneGroupOffset | Use the offset of the source group in the target group | -n | NameServer service address, format ip:port |
| -h | Print help | ||
| -s | Source consumer group | ||
| -d | Target consumer group | ||
| -t | topic name | ||
| -o | Not used yet |
- Connection correlation
| name | meaning | Command options | explain |
| consumerConnec tion | Query the network connection of the Consumer | -g | Consumer group name |
| -n | NameServer service address, format ip:port | ||
| -h | Print help | ||
| producerConnec tion | Query the network connection of Producer | -g | Producer group name |
| -t | Subject name | ||
| -n | NameServer service address, format ip:port | ||
| -h | Print help |
- NameServer related
| name | meaning | Command options | explain |
| updateKvConfig | Update the kv configuration of NameServer, which is not used yet | -s | Namespace |
| -k | key | ||
| -v | value | ||
| -n | NameServer service address, format ip:port | ||
| -h | Print help | ||
| deleteKvConfig | Delete the kv configuration of NameServer | -s | Namespace |
| -k | key | ||
| -n | NameServer service address, format ip:port | ||
| -h | Print help | ||
| getNamesrvConfig | Get NameServer configuration | -n | NameServer service address, format ip:port |
| -h | Print help | ||
| updateNamesrvConfig | Modify NameServer configuration | -n | NameServer service address, format ip:port |
| -h | Print help | ||
| -k | key | ||
| -v | value |
other
| name | meaning | Command options | explain |
| startMonitoring | Start the monitoring process to monitor the number of messages deleted by mistake, retry queue messages, etc | -n | NameServer service address, format ip:port |
| -h | Print help |
be careful:
1. Almost all instructions need to configure the nameServer address through the - n parameter. The format is ip:port
2. Almost all executions can be helped with the - h parameter
3. When there are both Broker address (- b) and cluster name clustername(-c) matching items, the instructions will be executed with the Broker address first. If the Broker address is not configured, instructions are executed for all hosts in the cluster.