brief introduction
Apache RocketMQ is a high-performance and high-throughput distributed messaging middleware open source by Alibaba, After Ali donated it to the Apache Software Foundation, it hatched into a Top-Level Project of Apache (top level project, TLP). RocketMQ is implemented based on Ali's closed source MetaQ kernel. It serves Ali's various systems, especially in the field of e-commerce. RocketMQ is developed in Java language, so it is compared with other popular message middleware in the industry, such as RabbitMQ (developed using Erlang) and Kafka (developed using Scala), it is more friendly to Java programmers and more conducive to developers to encapsulate and expand on its underlying basis.
The official website of RocketMQ is http://rocketmq.apache.org/ , according to the introduction on the official website, Apache RocketMQ ™ It is a standardized message engine and lightweight data processing platform. It has the following advantages:
- Low latency: under high concurrency pressure, more than 99.6% of the response latency is within 1 millisecond
- Financial oriented: the tracking and audit functions supported by the system are highly available
- Industry developability: it ensures trillion level message capacity
- Vendor neutral: a new distributed messaging and streaming standard has been opened in the latest version 4.1
- Big data friendly: batch transmission with general integration function supports massive throughput
- Massive accumulation: as long as enough disk space is given, messages can be accumulated without performance loss
RocketMQ birth background
In the early days, Alibaba was based on ActiveMQ 5.0 X (lower than 5.3) constructs distributed message middleware and uses it for asynchronous communication, search, social network activity flow, data pipeline and even transaction process of their multinational companies. With the growth of trade business throughput, the pressure from message cluster has become an urgent problem to be solved.
Why design RocketMQ?
With the growth of queues and the use of virtual topics, the ActiveMQ IO module has encountered a bottleneck. Although Ali tries its best to solve this problem through current limiting, fusing or degradation, the effect is poor. Therefore, at that time, they began to focus on the popular messaging solution Kafka. Unfortunately, Kafka cannot meet Ali's requirements, especially in terms of low latency and high reliability. See here For more information.
In this case, they decided to invent a new messaging engine to deal with a wider set of use cases - from the traditional publish / subscribe scheme to the mass real-time zero loss tolerant trading system.
RocketMQ vs. ActiveMQ vs. Kafka
The following table shows RocketMQ, ActiveMQ, and Kafka (according to awesome-java For example, Apache RocketMQ is the most popular messaging solution:
| Message Oriented Middleware | ActiveMQ | Kafka | RocketMQ |
|---|---|---|---|
| CLIENT SDK | Java,. NET, C + +, etc | Java, Scala, etc | Java, C++, Go |
| Agreements and specifications | Push model, support OpenWire, STOMP, AMQP, MQTT, JMS | Pull model, support TCP | Pull model, support TCP, JMS, OpenMessaging |
| Sequential message | Independent consumers or queues can ensure order | Ensure the order of messages within the partition | It can ensure that the messages are strictly sorted and can be well extended |
| Timing message | support | I won't support it | support |
| Batch message | I won't support it | Support with asynchronous producer | Yes, use asynchronous mode to avoid message loss |
| Broadcast message | support | I won't support it | support |
| Message filtering | support | Yes, you can use Kafka flow to filter messages | Support, attribute filter expression based on SQL92 |
| Server triggered message redelivery | I won't support it | I won't support it | support |
| Message storage | JDBC and high-performance logs (such as level dB and kahaDB) are used to support very fast persistence operations | High performance file storage | High performance and low latency file storage |
| Message traceability | support | This feature is supported by an offset indicator | Two indicators, timestamp and offset, are supported |
| Message Priority | support | I won't support it | I won't support it |
| High availability and failover | Yes, depending on the storage. If you use kahadb, you need a ZooKeeper server | Yes, a ZooKeeper server is required | Support, master-slave mode, no other tools are required |
| Message tracking | I won't support it | I won't support it | support |
| to configure | The default configuration is low-level, and the user needs to optimize the configuration parameters | Kafka uses key values to configure the format. These values can be provided from a file or programmatically | Out of the box, users only need to pay attention to a small number of configurations |
| Management and operation tools | support | Support, use terminal commands to display core indicators | Support, rich Web and terminal commands can display core indicators |
Quick Start
This section will introduce how to quickly install a RocketMQ on the local machine for sending and receiving messages. More details can be accessed https://github.com/apache/rocketmq/tree/master/docs/cn View.
Pre requirements
Before installing RokcetMQ, you need to install the following software:
- 64 bit operating system, Linux/Unix/Mac operating system is recommended
- 64 bit JDK 1.8 and above
- Maven 3.2.x
- Git
- Reserve at least 4G disk space for the Broker server
Download, install and use
Linux
1. Install jdk
-
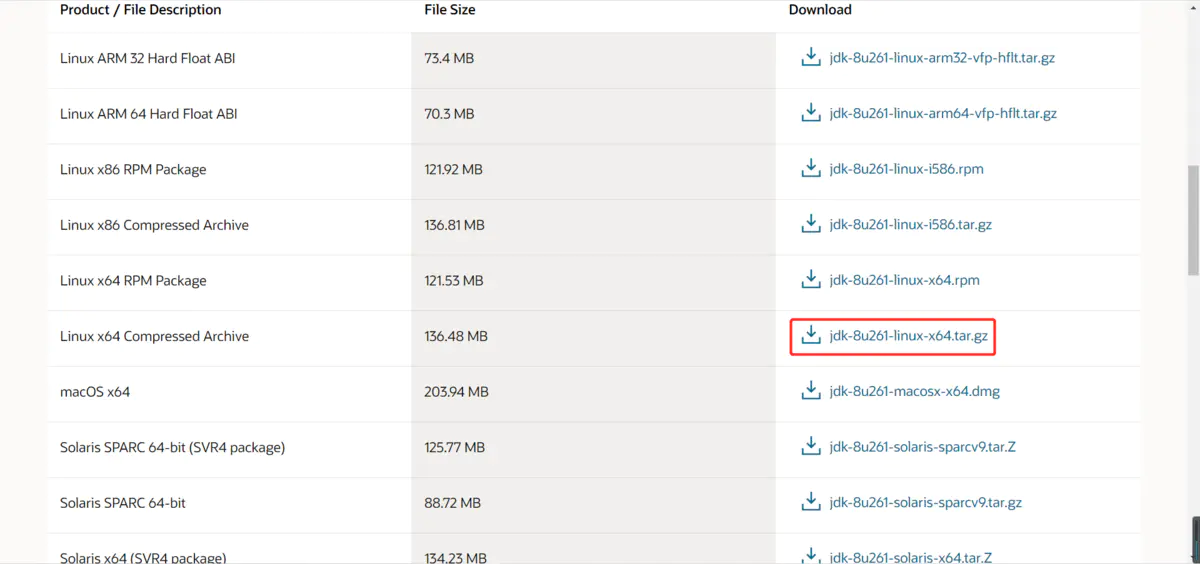
First in oracle official website Download the compressed package for Linux jdk 8
-
Then use the ftp tool to upload the downloaded compressed package to the Linux server
-
Use tar -zxvf jdk-8u261-linux-x64 tar. GZ command to extract the file
-
Configure system environment variables
[root@node01 opt]# vi /etc/profile
Add the following at the end of the file:
# jdk drop directory
JAVA_HOME=/opt/jdk1.8.0_226
# jre drop directory
JRE_HOME=/opt/jdk1.8.0_226/jre
# Configure the path environment variable to separate:
PATH=$PATH:$JAVA_HOME/bin:$JRE_HOME/bin
# Configure the classpath environment variable to separate:
CLASSPATH=.:$JAVA_HOME/lib/dt.jar:$JAVA_HOME/lib/tools.jar:$JRE_HOME/lib
# Setting environment variables
export JAVA_HOME JRE_HOME PATH CLASSPATH
- Make changes to the configuration file effective
[root@node01 opt]# source /etc/profile
- Check the jdk version. So far, the jdk has been installed
[root@node01 opt]# java -version
java version "1.8.0_226"
Java(TM) SE Runtime Environment (build 1.8.0_226-b11)
Java HotSpot(TM) 64-Bit Server VM (build 25.226-b11, mixed mode)
2. Install maven
- Download maven using wget
[root@node01 opt]# wget https://mirrors.bfsu.edu.cn/apache/maven/maven-3/3.6.3/binaries/apache-maven-3.6.3-bin.tar.gz
- decompression
[root@node01 opt]# tar -zxvf apache-maven-3.6.3-bin.tar.gz
- Add alicloud image
[root@node01 opt]# cd apache-maven-3.6.3/conf/
[root@node01 conf]# ll
 Total consumption 20
drwxr-xr-x. 2 root root  4096 11 July 2019 logging
-rw-r--r--. 1 root root 10468 11 July 2019 settings.xml
-rw-r--r--. 1 root root  3747 11 July 2019 toolchains.xml
[root@node01 conf]# vi settings.xml
In the configuration file settings Add the following code to XML:
<mirror>
    <id>aliyun-maven</id>
    <mirrorOf>*</mirrorOf>
    <name>aliyun maven</name>
    <url>http://maven.aliyun.com/nexus/content/groups/public</url>
</mirror>
- Configure environment variables
[root@node01 conf]# vi /etc/profile
Add the following configuration to the file:
# maven installation directory
M2_HOME=/opt/apache-maven-3.6.3
PATH=$PATH:$M2_HOME/bin
export M2_HOME
[root@node01 opt]# source /etc/profile
- Check the maven version. So far, maven has been installed
[root@node01 conf]# mvn -v
Apache Maven 3.6.3 (cecedd343002696d0abb50b32b541b8a6ba2883f)
Maven home: /opt/apache-maven-3.6.3
Java version: 1.8.0_226, vendor: Oracle Corporation, runtime: /opt/jdk1.8.0_226/jre
Default locale: zh_CN, platform encoding: UTF-8
OS name: "linux", version: "3.10.0-1127.el7.x86_64", arch: "amd64", family: "unix"
3. Install rocketmq
1. Download the rocketmq source package
[root@node01 opt]# wget https://mirror.bit.edu.cn/apache/rocketmq/4.7.1/rocketmq-all-4.7.1-source-release.zip
2. Decompression
[root@node01 opt]# yum install -y unzip
[root@node01 opt]# unzip rocketmq-all-4.7.1-source-release.zip
3. Go to the unzipped file directory for compilation
[root@node01 rocketmq-all-4.7.1-source-release]# mvn -Prelease-all -DskipTests clean install -U
4. Move the compiled file to another location
[root@node01 rocketmq-all-4.7.1-source-release]# cd distribution/target/rocketmq-4.7.1
[root@node01 rocketmq-4.7.1]# ll
 Total consumption 4
drwxr-xr-x. 6 root root 4096 8 September 29-15:42 rocketmq-4.7.1
[root@node01 rocketmq-4.7.1]# mv rocketmq-4.7.1/ /opt
5. Start the Name Server. If the following information is displayed on the terminal, it indicates that the startup is successful:
[root@node01 opt]# cd rocketmq-4.7.1/bin/
[root@node01 bin]# ls
cachedog.sh       dledger      mqbroker            mqbroker.numanode1  mqnamesrv      mqshutdown.cmd  play.sh        runbroker.sh   setcache.sh   tools.sh
cleancache.sh     mqadmin      mqbroker.cmd        mqbroker.numanode2  mqnamesrv.cmd  os.sh           README.md      runserver.cmd  startfsrv.sh
cleancache.v1.sh  mqadmin.cmd  mqbroker.numanode0  mqbroker.numanode3  mqshutdown     play.cmd        runbroker.cmd  runserver.sh   tools.cmd
[root@node01 bin]# ./mqnamesrv
Java HotSpot(TM) 64-Bit Server VM warning: Using the DefNew young collector with the CMS collector is deprecated and will likely be removed in a future release
Java HotSpot(TM) 64-Bit Server VM warning: UseCMSCompactAtFullCollection is deprecated and will likely be removed in a future release.
The Name Server boot success. serializeType=JSON
6. Start the broker
When you start the broker with the command, you will find the following error:
[root@node01 bin]# ./mqbroker -n localhost:9876
Java HotSpot(TM) 64-Bit Server VM warning: INFO: os::commit_memory(0x00000005c0000000, 8589934592, 0) failed; error='Cannot allocate memory' (errno=12)
#
# There is insufficient memory for the Java Runtime Environment to continue.
# Native memory allocation (mmap) failed to map 8589934592 bytes for committing reserved memory.
# An error report file with more information is saved as:
# /opt/rocketmq-4.7.1/bin/hs_err_pid9514.log
From the error message, we can know that the reason is that the jvm startup initialization memory allocation is greater than the physical memory.
Therefore, we can modify the jvm parameters in the startup script to solve this problem. First, let's modify the startup script of nameserver:
[root@node01 bin]# vi runserver.sh
Locate the configuration line that allocates jvm memory:
JAVA_OPT="${JAVA_OPT} -server -Xms4g -Xmx4g -Xmn2g -XX:MetaspaceSize=128m -XX:MaxMetaspaceSize=320m"
Modify it to the following configuration (the specific configuration value is adjusted according to the actual production scenario):
JAVA_OPT="${JAVA_OPT} -server -Xms1g -Xmx1g -Xmn256m -XX:MetaspaceSize=128m -XX:MaxMetaspaceSize=320m"
Then modify the startup script of the broker:
[root@node01 bin]# vi runbroker.sh
Similarly, find the configuration line that allocates jvm memory:
JAVA_OPT="${JAVA_OPT} -server -Xms8g -Xmx8g -Xmn4g"
Modify it to the following configuration (the specific configuration value is adjusted according to the actual production scenario):
JAVA_OPT="${JAVA_OPT} -server -Xms1g -Xmx1g -Xmn512m"
Restart nameserver and broker after modification. When the following message appears, the broker has been started successfully:
[root@node01 bin]# ./mqbroker -n localhost:9876
The broker[node01, 192.168.114.60:10911] boot success. serializeType=JSON and name server is localhost:9876
7. Execute the test program to test message sending and receiving
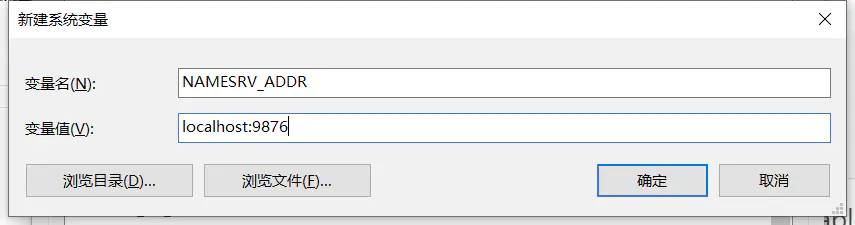
Before sending / receiving messages, we need to tell the client the location of the Name Server. RocketMQ provides a variety of ways to achieve this goal. For simplicity, we set the environment variable NAMESRV_ADDR. Add the following configuration in / etc/profile:
export NAMESRV_ADDR=localhost:9876
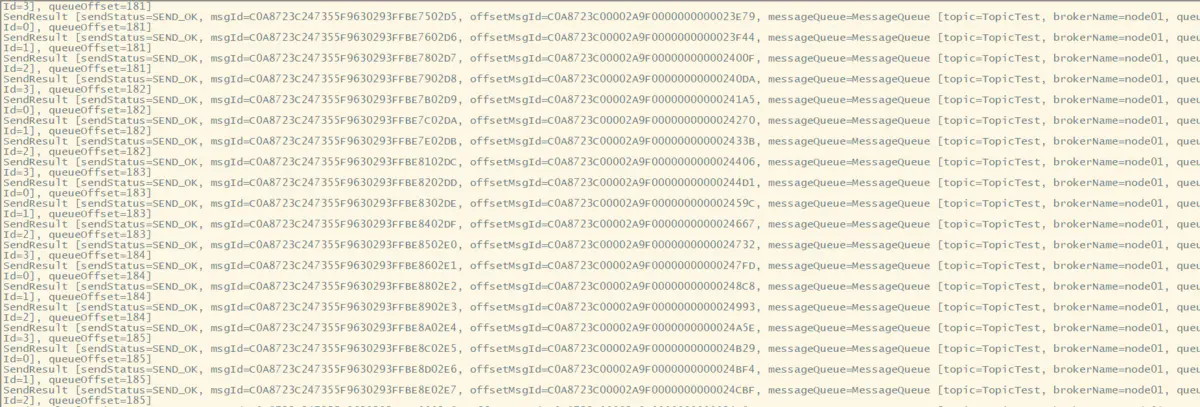
Send a message using the test program:
./tools.sh org.apache.rocketmq.example.quickstart.Producer
If the following information is displayed, the message is sent successfully:
Start another session and use the test program to receive the message:
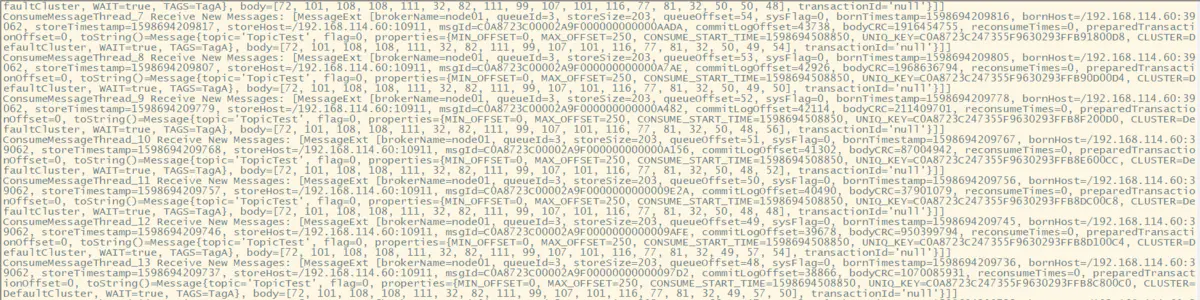
./tools.sh org.apache.rocketmq.example.quickstart.Consumer
If the following information is displayed, the message is received successfully:
8. Close
Close broker:
[root@node01 bin]# ./mqshutdown broker
The mqbroker(1502) is running...
Send shutdown request to mqbroker(1502) OK
Close name server:
[root@node01 bin]# ./mqshutdown namesrv
The mqnamesrv(1444) is running...
Send shutdown request to mqnamesrv(1444) OK
Windows
This article mainly describes the installation of RocketMQ under windows 10 operating system. Please ensure that PowerShell is installed in your operating system. Like Linux, you need to install jdk and maven before installing RocketMQ on windows. This article will not describe how to install jdk and maven in detail. Please refer to the installation materials yourself.
1. Install RocketMQ
- First, in Official website Download the binary compressed package of RocketMQ, and then select a local directory for decompression
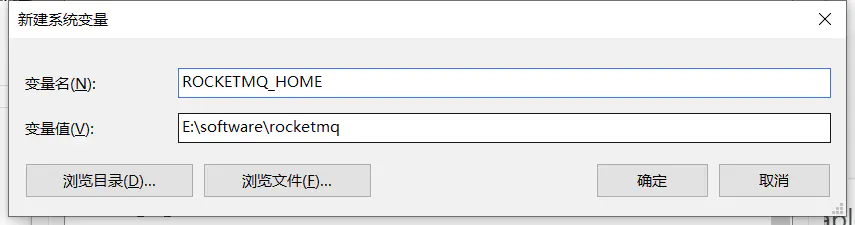
- Configure environment variables and add the following two environment variables:
Open runbroker CMD, modify the following configuration line:
set "JAVA_OPT=%JAVA_OPT% -cp %CLASSPATH%"
The modified configuration line is as follows:
rem set "JAVA_OPT=%JAVA_OPT% -cp "%CLASSPATH%"
- Start name server:

- Start broker:
 When the console displays the following information, it indicates that the startup is successful:
- Use the test program to send / receive messages
Send message: Receive message:
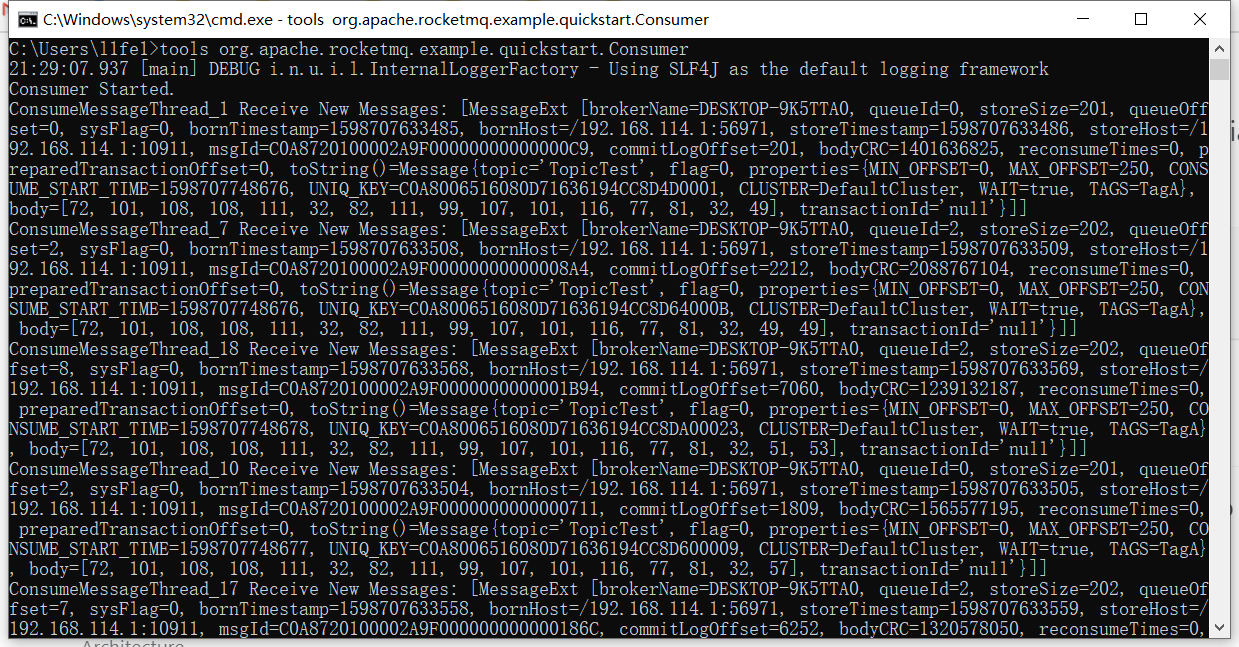
- close
Just close cmd/powershell directly (do not do this in the production environment)
Problems that may be encountered when the installation starts
1. When compiling, the package cannot find the prompt 502 error on the mirror
Cause: bad network or maven warehouse server error
Try again, or change to another image warehouse
2. Failed to start the broker with Cannot allocate memory error
This problem has been described above and will not be repeated here
3. Start the broker successfully, but prompt: Failed to obtain the host name
Cause: the current host name cannot be resolved
Add a map in / etc/hosts
# Configure ip address to hostname mapping
192.168.114.60 node-01
4. Date calibration
Install ntpdate
yum install ntpdate
ntpdate ntp1.aliyun.com
Console rocketmq console
Compile and install
1. Download
Download address of compiled source package: https://github.com/apache/rocketmq-externals
Chinese guide
https://github.com/apache/rocketmq-externals/blob/master/rocketmq-console/doc/1_0_0/UserGuide_CN.md
2. Upload the source package to the server and unzip it
[root@node01 opt]# unzip rocketmq-externals.zip
3. Compilation
[root@node01 opt]# cd rocketmq-externals/rocketmq-console/
[root@node01 rocketmq-console]# mvn clean package -Dmaven.test.skip=true
4. Start
After successful compilation, execute rocketmq-console-ng-2.0 in the rocketmq-console/target directory 0.jar
Start up (make sure your name server has been started). You can add the nameserver address dynamically directly, or you can configure the nameserver address by editing the application.properties configuration file in the rocketmq console / SRC / main / resources directory and adding the rocketmq.config.namesrvAddr property.
[root@node01 rocketmq-console]# ll
 Total dosage 68
drwxr-xr-x. 3 root root  4096 8 October 30:50 doc
-rw-r--r--. 1 root root 30422 8 October 30:50 LICENSE
-rw-r--r--. 1 root root   180 8 October 30:50 NOTICE
-rw-r--r--. 1 root root 10593 8 October 30:50 pom.xml
-rw-r--r--. 1 root root  2390 8 October 30:50 README.md
drwxr-xr-x. 4 root root  4096 8 October 30:50 src
drwxr-xr-x. 3 root root  4096 8 October 30:50 style
drwxr-xr-x. 7 root root  4096 8 October 30:59 target
[root@node01 rocketmq-console]# cd target/
[root@node01 target]# java -jar rocketmq-console-ng-2.0.0.jar --rocketmq.config.namesrvAddr=localhost:9876
The startup is successful when the following interface appears:

After successful startup, you can access the server port 8080.
Interface composition
RocketMQ is cluster oriented, which can be reflected in the interface of RocketMQ console.
Operation and maintenance
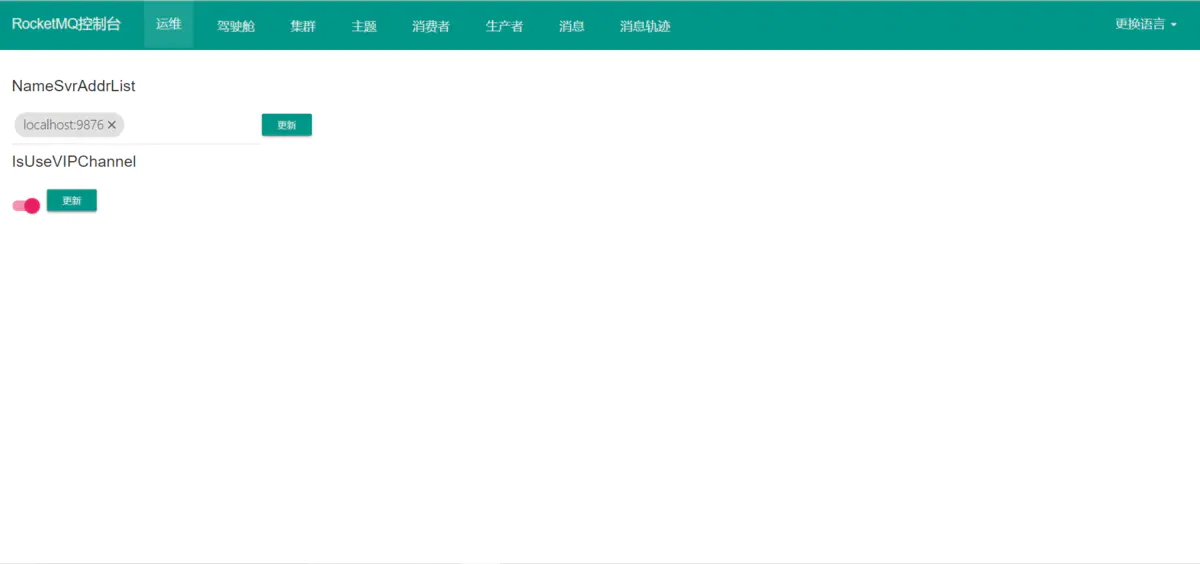
- NameSvrAddrList: configure the address of the name server, which is a list. Therefore, you can configure the addresses of multiple name servers, which indicates that the name server can be deployed in a cluster
- IsUseVIPChannel: whether to use VIPChannel
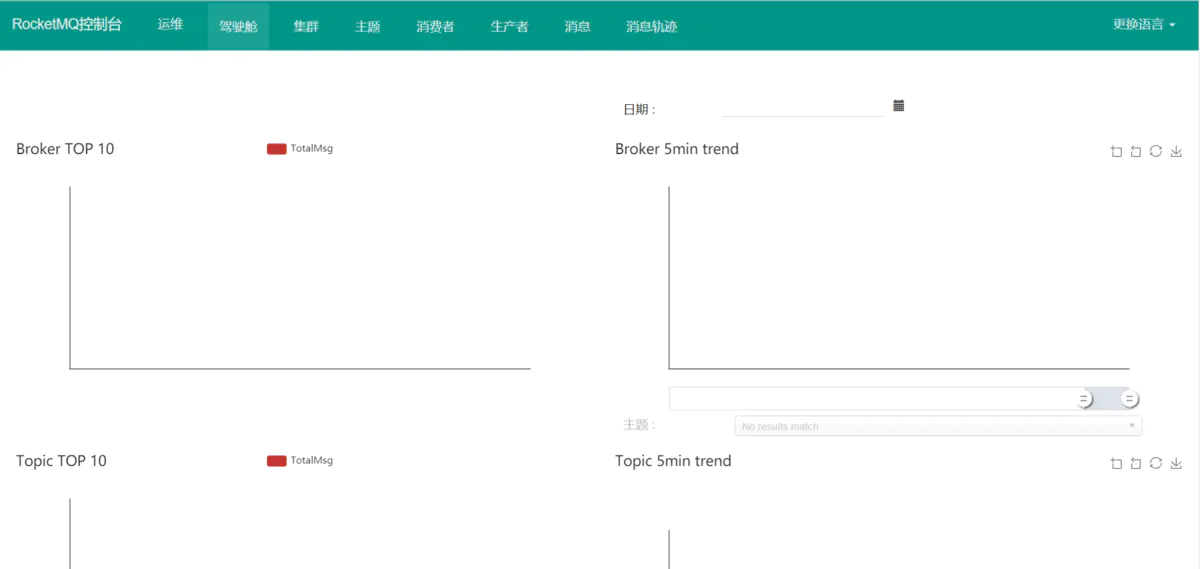
cockpit
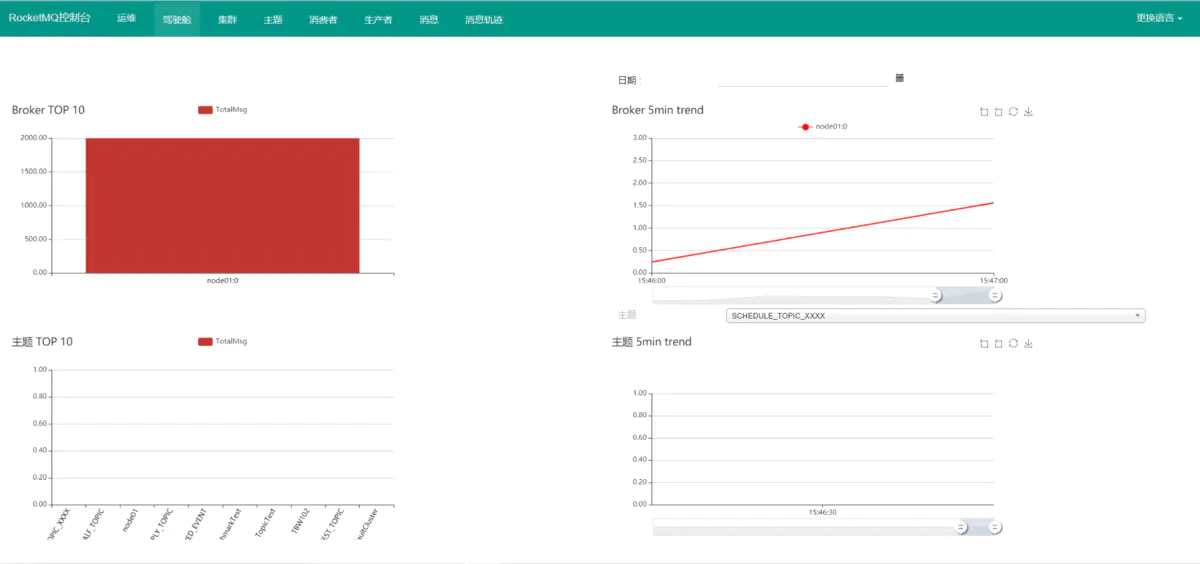
- Broker TOP 10: view the message volume (total) of the top 10 brokers with the largest message volume
- Broker 5min trend: view the 5-minute trend of broker message volume
- Topic TOP 10: view the message volume (total amount) of 10 single topics with the largest message volume
- Topic 5min trend: view the trend of topic message volume for 5 minutes
colony
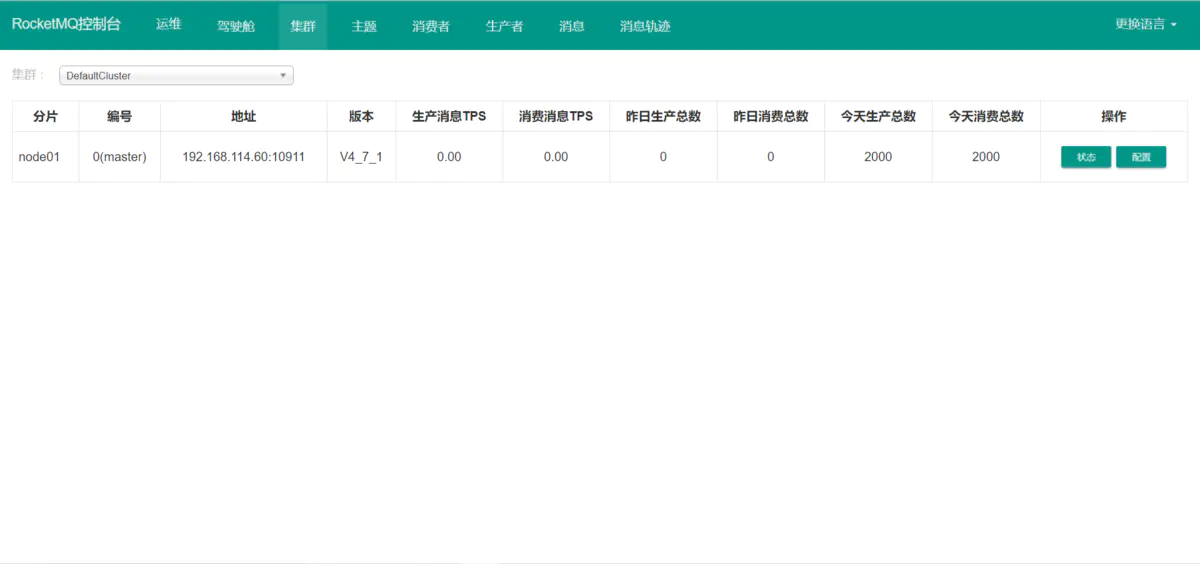
- View the distribution of clusters
- Relationship between cluster and broker
- Brokers included in the cluster
- View broker specific information / operation information / status information
- View broker configuration information
theme
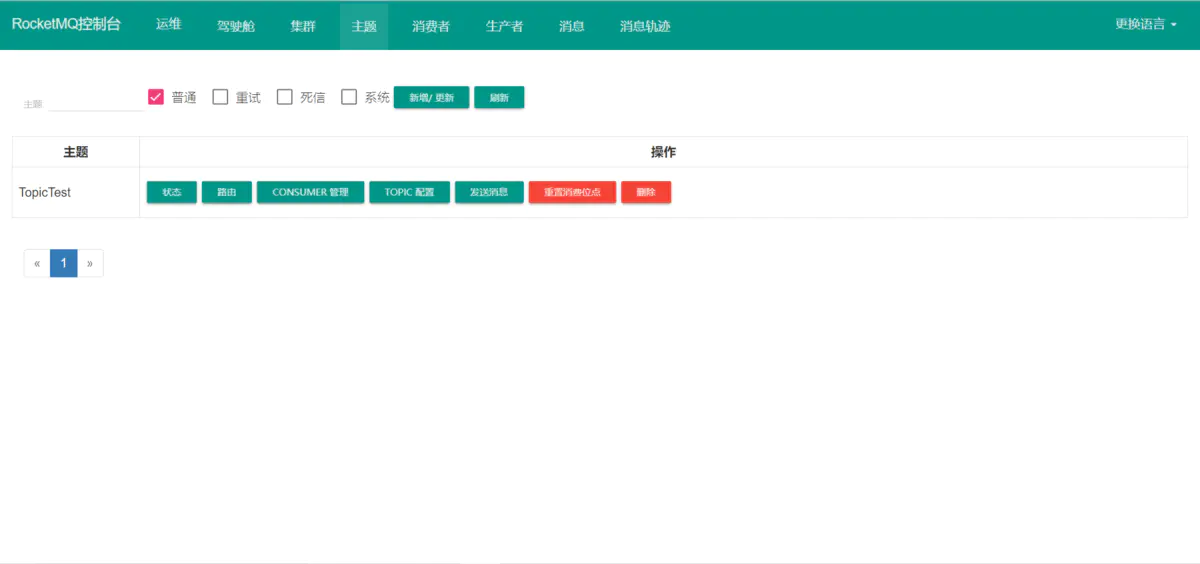
- All topics are displayed and can be filtered by topic name
- Filter general / retry / dead letter / system topics
- New / updated topics
- clusterName: cluster name
- brokerName: host name
- topicName: topic name
- Writequeuenum: number of write queues
- readQueueNums: number of read queues
- perm: 2 is write, 4 is read, and 6 is read and write
- Status query message delivery status (which broker s / which queue s / how many messages are delivered, etc.)
- Route view the route of the message (which brokers will you send the message of this topic to and the queue information of the corresponding broker)
- CONSUMER management (which group s have subscribed to and consumed this topic, and what is the consumption status)
- Topic configuration (view / change the current topic configuration)
- Send a message (send a test message to this topic)
- Reset the consumption location (online and offline, but check whether the reset is successful)
- Delete the topic (it will delete the topic configuration and routing information on all broker s and namesrv. Please do this carefully in the production environment)
consumer
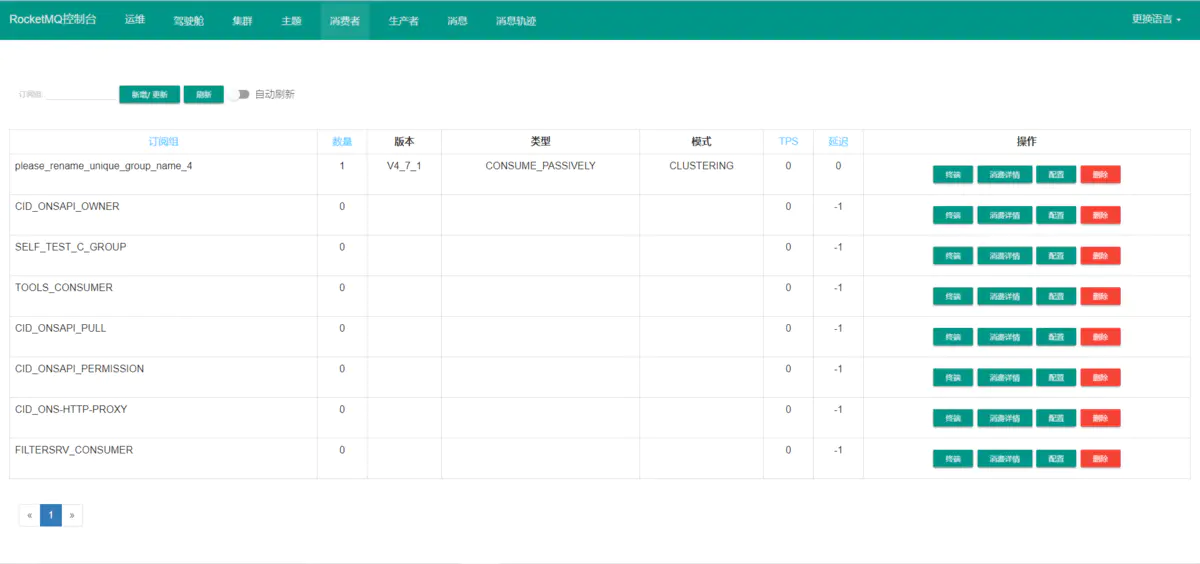
- All consumption groups are displayed and can be filtered by group name
- Refresh page / refresh page every five seconds
- Sort by subscription group / quantity / TPS / delay
- Add / update consumption group
- clusterName: cluster name
- brokerName: host name
- groupName: the name of the consumption group
- consumeEnable: whether consumption is allowed. If it is set to FALSE, consumption will not be allowed
- consumeBroadcastEnable: can I broadcast consumption
- Retryqueuenum: the size of the retry queue
- brokerId: where is the normal consumption
- Which broker when consumption slowly: what's the problem
- Terminal: online consumption client viewing, including version subscription information and consumption mode
- Consumption details: view the consumption details of the corresponding consumption group, the consumption of all topics subscribed by this consumption group, and the consumption client corresponding to each queue (including Retry messages)
- Configuration: view / change the configuration of the consumption group
- Delete: delete the consumption group on the specified broker (caution)
producer
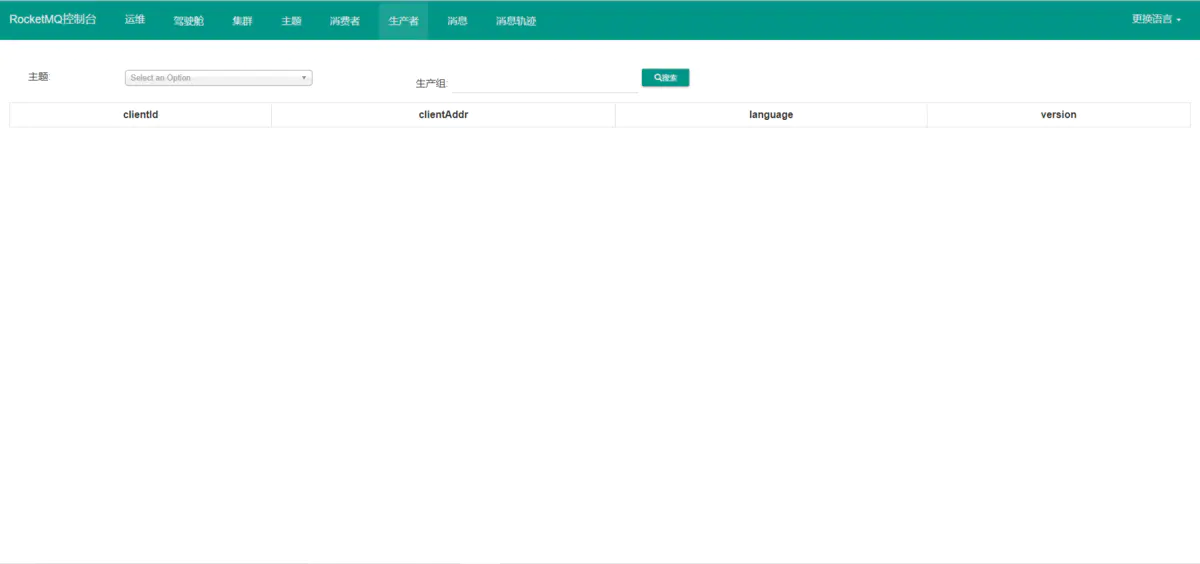
- Show the online message producer client (host, version, address and other information), which can be filtered by group name
- Filter by topic
news
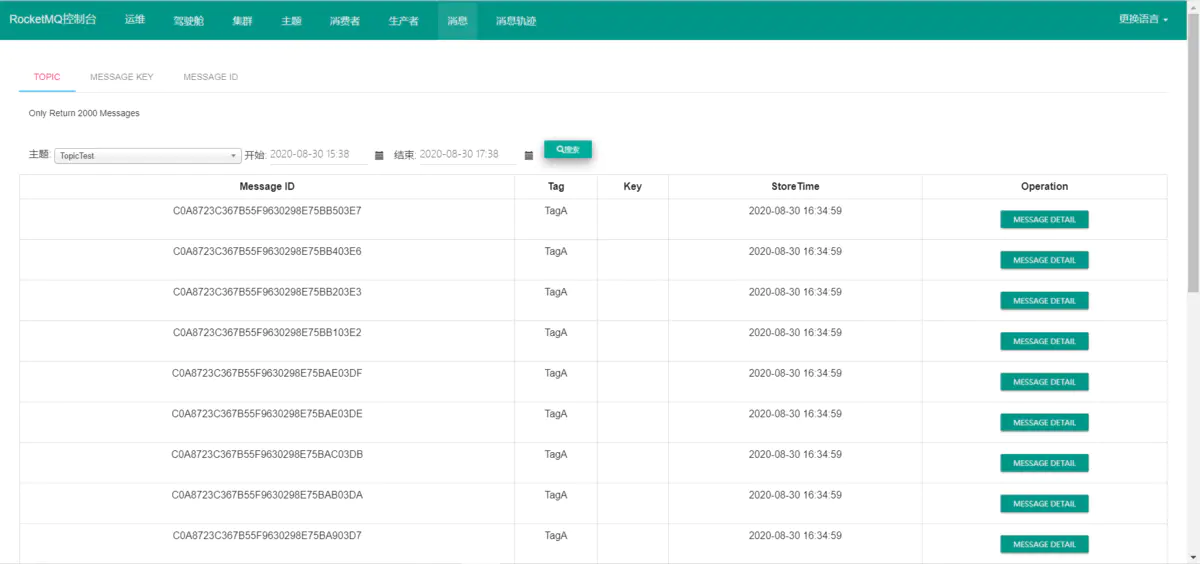
- Query according to Topic and time interval (due to the large amount of data, only 2000 items will be displayed at most, and more will be ignored)
- Query according to Message Key and Topic
- Only 64 will be displayed at most
- Query messages according to Message Id and Topic
- Message details: display the details of this message and view the consumption of the message corresponding to the specific consumption group (if abnormal, you can view the specific exception information). You can resend the message to the specified consumption group.
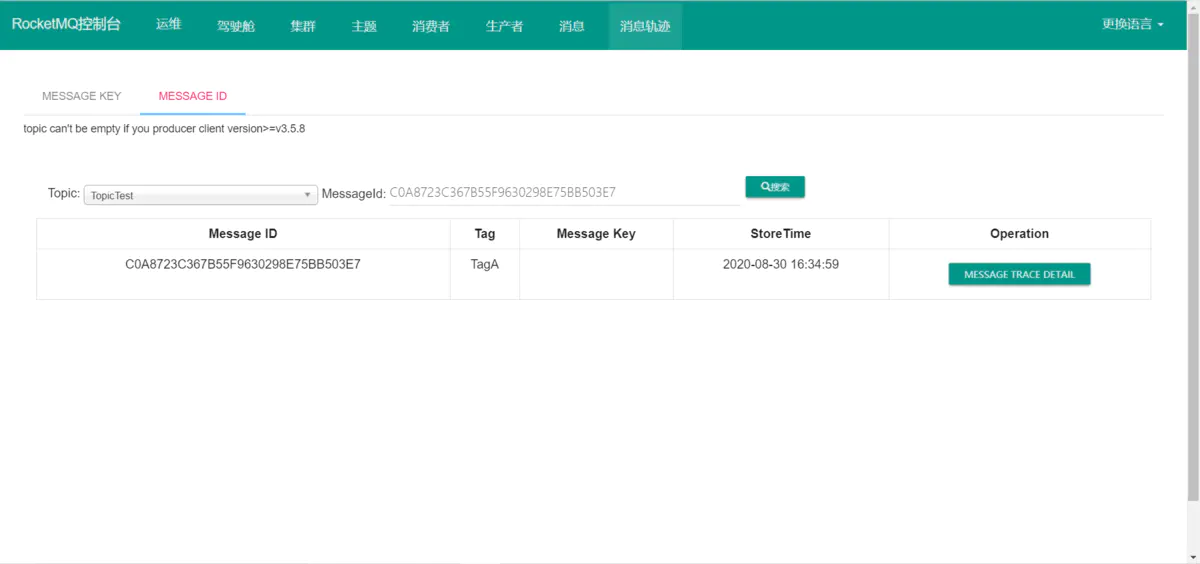
Message track
- Query according to Message Key and Topic
- Only 64 will be displayed at most
- Query messages according to Message Id and Topic
- Message track details: displays the details of the message track of this message