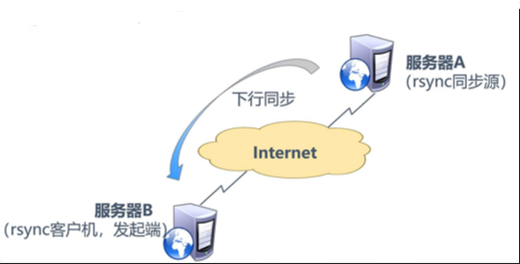
Overview of rsync synchronization:
Remote Sync --- Remote synchronization, local replication support, or synchronization with other SSH, rsync hosts, similar to SCP but richer than scp.
Official website: http://rsync.samba.org
rsync synchronization features:
1. You can mirror the entire catalog tree and file system.

2. It is very easy to maintain the permissions, time, hard and soft links of the original file, and so on, without special permissions to install.

3. Fast: rsync copies the entire content the first time it synchronizes, but transfers only the modified files the next time.rsync can compress and decompress data during transmission, so it can use less bandwidth.

4. Security: You can use scp, ssh, etc. to transfer files, of course, you can also use direct socket connection.
5. Support anonymous transmission to facilitate site mirroring.
Instance demo
Step 1: Configure the rsync source server
rsync is built into the system kernel. rpm - q rsync view packages without additional installation. If minimizing installation, use yum to install them
1. Modify rsyncd.conf configuration file
[root@server ~]# vim /etc/rsyncd.conf
#Lines 7, 8, 9,
uid = nobody
gid = nobody
use chroot = yes

#11 lines,
pid file = /var/run/rsyncd.pid

#16 lines,
dont compress   = *.gz *.tgz *.zip *.z *.Z *.rpm *.deb *.bz2

#Append port number
port 873

#Append log file path
log file = /var/log/rsyncd.log

#Append Authorized Access Address Segment
hosts allow = 192.168.142.0/24

#Add Sharing Module
#Module Name
[wwwroot]

#Source Shared Directory Path
path = /var/www/html

#Website Description
comment = www.bdqn.cn

#readOnly
read only = yes

#Username
auth users = backuper

#Authenticated User Password File Path
secrets file = /etc/rsyncd_users.db
2. Create an authenticated user password file
[root@server ~]# vim /etc/rsyncd_users.db
#Write Authenticated User Name and Password
backuper:abc123
3. Authorize the maximum privilege of the owner only
[root@server ~]# chmod 600 /etc/rsyncd_users.db
4. Install HTTP services
[root@server ~]# yum install httpd -y
5. Create shared content
[root@server ~]# cd /var/www/html
[root@server html]# echo "this is test web" > index.html
6. Open Services
[root@server html]# rsync --daemon
7. View service status
[root@server html]# netstat -ntap | grep rsync
tcp        0      0 0.0.0.0:873             0.0.0.0:*               LISTEN      60268/rsync
tcp6       0      0 :::873                  :::*                    LISTEN      60268/rsync
8. Turn off firewalls and security features
[root@server html]# systemctl stop firewalld.service
[root@server html]# setenforce 0
Step 2: Configure the Customer Initiator
1. Turn off firewalls and security features
[root@localhost ~]# systemctl stop firewalld.service
[root@localhost ~]# setenforce 0
2. Install http services
[root@localhost ~]# yum install httpd -y
3. Customer Initiator Configuration
#Configure Source 1, User Name@Host Address:Shared Module Name
[root@localhost ~]# rsync -avz backuper@192.168.142.153::wwwroot /var/www/html
Password: #Enter user password
receiving incremental file list
./
index.html

sent 83 bytes  received 172 bytes  72.86 bytes/sec
total size is 17  speedup is 0.07

#View shared content
[root@localhost ~]# cat /var/www/html/index.html
this is test web
#Configure Source 2, rsync://Username@Host Address/Shared Module Name
[root@localhost ~]# rsync -avz rsync://backuper@192.168.142.153/wwwroot /var/www/html
Password:
receiving incremental file list
./
index.html

sent 83 bytes  received 172 bytes  56.67 bytes/sec
total size is 17  speedup is 0.07

#View shared content
[root@localhost ~]# cat /var/www/html/index.html
this is test web
4. Create an interactive-free password file
[root@localhost ~]# vim /etc/server.pass
abc123

[root@localhost ~]# chmod 600 /etc/server.pass

#Interactive-free source configuration
[root@localhost ~]# rsync -avz --delete --password-file=/etc/server.pass backuper@192.168.142.153::wwwroot /var/www/html
receiving incremental file list
./
index.html

sent 83 bytes  received 172 bytes  510.00 bytes/sec
total size is 17  speedup is 0.07

#View shared content
[root@localhost ~]# cat /var/www/html/index.html
this is test web
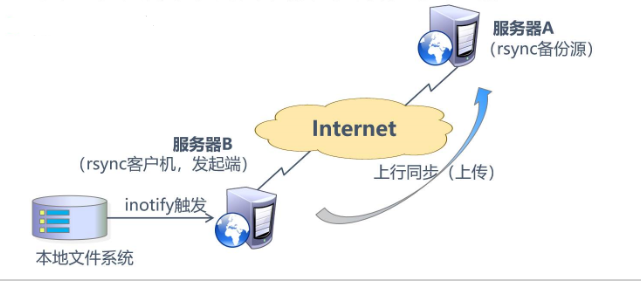
Real-time rsync synchronization with inotify tools
Configure rsync real-time synchronization:
1. Insufficient periodic synchronization:

The backup time is fixed, the delay is detailed, and the real-time performance is poor.
Dense periodic tasks are unnecessary when the synchronization source remains constant for a long time

2. Advantages of real-time synchronization:

Enable backup as soon as the synchronization source changes;
Backup is not performed as long as the synchronization source does not change
About inotify:
Inotify is a Linux feature that monitors file system operations such as reading, writing, and creating.Inotify is responsive, simple to use, and much more efficient than cron task busy polling.

Beginning with version 2.6.13;
You can monitor changes in the file system and respond to notifications;
Auxiliary software: inotify-tools
Step 1: Configure rsync+inotify real-time synchronization
1. Configure the rsync source server and modify the rsyncd.conf configuration file
[root@server ~]# vim /etc/rsyncd.conf
#Turn off read-only
read only = no
2. Adjust client's inotify kernel parameters
[root@client ~]# vim /etc/sysctl.conf
#Monitor queue size
fs.inotify.max_queued_events = 16384

#Maximum number of monitoring instances
fs.inotify.max_user_instances = 1024

#Maximum number of monitoring files per instance
fs.inotify.max_user_watches = 1048576
3. Effective Kernel Parameters
[root@client ~]# sysctl -p
fs.inotify.max_queued_events = 16384
fs.inotify.max_user_instances = 1024
fs.inotify.max_user_watches = 1048576
4. Install the compilation environment
[root@client ~]# yum install -y gcc gcc-c++ make
5. Remote Access Resource Pack
[root@client ~]# mount.cifs //192.168.142.1/inotify /mnt
[root@sclient ~]# cd /mnt
[root@client mnt]# ls
inotify-tools-3.14.tar.gz
6. Unzip Resource Pack
[root@client mnt]# tar zxvf inotify-tools-3.14.tar.gz -C /opt
7. Configure inotify
[root@client mnt]# cd /opt/inotify-tools-3.14/
[root@client inotify-tools-3.14]# ./configure
8. Compile and Install
[root@client inotify-tools-3.14]# make && make install
9. Install the inotify-tools assistant
[root@client inotify-tools-3.14]# inotifywait -mrq -e modify,create,move,delete /var/www/html/

#-m for continuous monitoring, -r for recursive monitoring of all child objects, -q for simplified output information, and-e for what type of time to monitor
10. Restart a terminal login, add or delete files
#create a file
[root@client html]# touch abc
[root@client html]# ls
abc  index.html

#Delete Files
[root@client html]# rm -rf abc
[root@client html]# ls
index.html
11. Return to the monitor to verify the synchronization effect
[root@client inotify-tools-3.14]# inotifywait -mrq -e modify,create,move,delete /var/www/html/
/var/www/html/ CREATE abc       #Create Records
/var/www/html/ DELETE abc       #Delete Record
12. Trigger rsync synchronization script via inotifywait
vim inotify.sh
#!/bin/bash
INOTIFY_CMD="inotifywait -mrq -e modify,create,attrib,move,delete /var/www/html/"
RSYNCLCMD="rsyne -azH --delete --password-file=/etc/server.pass /var/www/htm1/ backuper@192.168.142.153::wwwroot/"
$INOTIFY_CMD | while read DIRECTORY EVENT FILE
#Read monitoring records of output
do
if [ $(pgrep rsync | wc -l) -le 0 ] ; then
#Start rsync immediately if it is executed
$RSYNC_CMD
fi
done
13. Source-to-client requires html directory maximum authorization
[root@server www]# chmod 777 html/
[root@client www]# chmod 777 html/
14. Executing scripts
[root@client opt]# source inotify.sh
15. Restart the terminal and enter the shared directory
[root@client opt]# cd /var/www/html/
16. Write new content
[root@client html]# echo "this is my update" > test.txt
Step 2: Verify real-time synchronization
**1.Back to Source to View Sync Packets**
[root@server html]# ls
index.html  test.txt
2. View sync data
[root@server html]# cat test.txt
this is my update