background
I've also built and experienced Elasticsearch 7 X's services and clusters, however, have been running in the Intranet environment at that time, and there is no configuration xpack related to its authentication. I remember the suggestion written at that time: because Elasticsearch does not enable the built-in security defense mechanism by default, it is not recommended to open it directly on the public network in the production environment. Otherwise, it's running naked on the Internet... No, ElasticSearch 8.0 is coming. The default security protection is one of the new features. According to the official introduction, ElasticSearch 8.0 brings Main characteristics include:
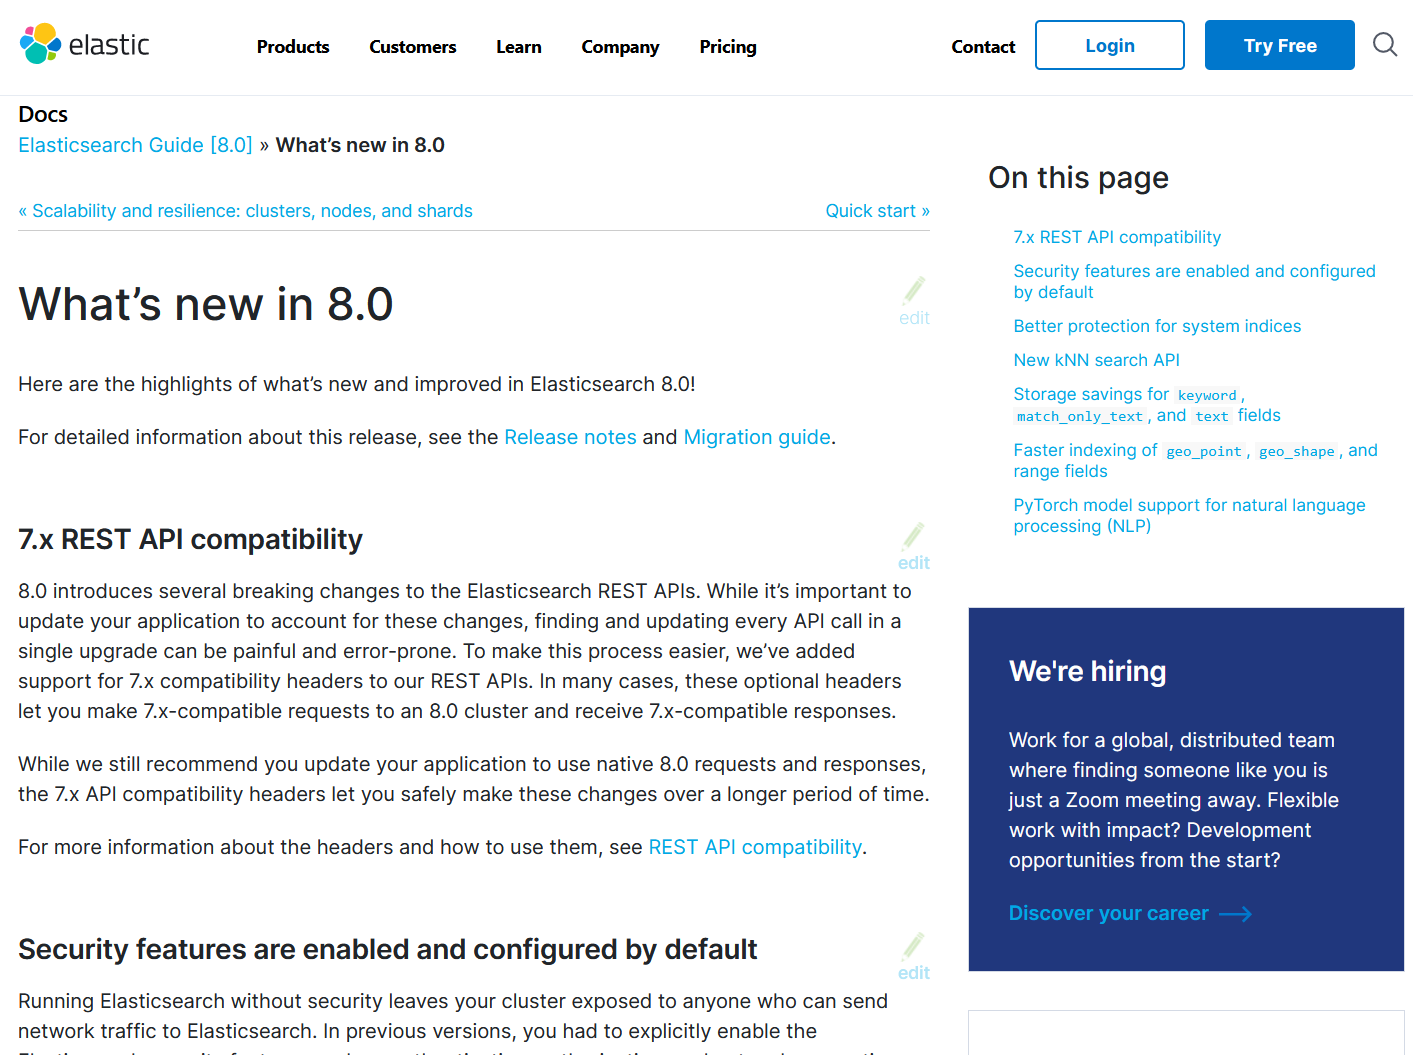
- 7.x REST API compatibility (compatible with 7.x REST API through header information configuration)
- Security features are enabled and configured by default
- Better protection for system indexes
- New kNN search API
- Storage savings for keyword, match_only_text, and text fields
- Faster indexing of geo_point, geo_shape, and range fields
- PyTorch model support for natural language processing (NLP)
System environment
Install on CentOS7. The virtual host information is as follows:
[root@hadoop1 local]# uname -a
Linux hadoop1 3.10.0-1127.el7.x86_64 #1 SMP Tue Mar 31 23:36:51 UTC 2020 x86_64 x86_64 x86_64 GNU/Linux
[root@hadoop1 local]# cat /proc/version
Linux version 3.10.0-1127.el7.x86_64 (mockbuild@kbuilder.bsys.centos.org) (gcc version 4.8.5 20150623 (Red Hat 4.8.5-39) (GCC) ) #1 SMP Tue Mar 31 23:36:51 UTC 2020
[root@hadoop1 local]# cat /etc/redhat-release
CentOS Linux release 7.8.2003 (Core)
Memory: 4 G
 Processor: 2*2
 Hard disk: 100 G
Download, install, and launch ElasticSearch8
[root@hadoop1 ~]# cd /usr/local/
[root@hadoop1 local]# wget https://artifacts.elastic.co/downloads/elasticsearch/elasticsearch-8.0.0-linux-x86_64.tar.gz
[root@hadoop1 local]# tar -xvf elasticsearch-8.0.0-linux-x86_64.tar.gz
[root@hadoop1 local]# mv elasticsearch-8.0.0 elasticsearch
[root@hadoop1 local]# cd elasticsearch
[root@hadoop1 elasticsearch]# ./bin/elasticsearch
Question 1: you cannot start elasticsearch directly by using root
org.elasticsearch.bootstrap. StartupException: java.lang. RuntimeException: can not run elasticsearch as root
Solution: add users and grant permissions to the elasticsearch directory
# Add user es admin
[root@hadoop1 elasticsearch]# useradd es-admin
# Give permission to the elasticsearch directory
[root@hadoop1 elasticsearch]# chown -R es-admin:es-admin /usr/local/elasticsearch
# Switch to es admin
[root@hadoop1 elasticsearch]# su es-admin
# Try to start ElasticSearch
[es-admin@hadoop1 elasticsearch]$ ./bin/elasticsearch
Problem 2: the default configuration of the operating system does not meet the requirements of elasticsearch
ERROR: [2] bootstrap checks failed. You must address the points described in the following [2] lines before starting Elasticsearch.
bootstrap check failure [1] of [2]: max file descriptors [4096] for elasticsearch process is too low, increase to at least [65535]
bootstrap check failure [2] of [2]: max virtual memory areas vm.max_map_count [65530] is too low, increase to at least [262144]
resolvent:
- Solve the problem of "max file descriptors [4096] for elasticsearch process is too low":
# Check the default configuration of the system first
[es-admin@hadoop1 elasticsearch]$ ulimit -Hn
4096
[es-admin@hadoop1 elasticsearch]$ ulimit -Sn
1024

# Switch to root
[es-admin@hadoop1 elasticsearch]$ exit
exit

# Edit VI / etc / security / limits Conf, add the following contents at the end. Note that it will not take effect until the root user logs in again
[root@hadoop1 elasticsearch]# vi /etc/security/limits.conf
*               soft    nofile          65536
*               hard    nofile          65536

# Verify that our actions are effective
[root@hadoop1 elasticsearch]# ulimit -Hn
65536
[root@hadoop1 elasticsearch]# ulimit -Sn
65536
- Solve the problem of "max virtual memory areas vm.max_map_count [65530] is too low":
# Edit / vi.sysctl/etc Conf, add at the end:
[es-admin@hadoop1 elasticsearch]$ vi /etc/sysctl.conf
vm.max_map_count = 262144

# Remember to use sysctl -p to refresh the configuration file
[root@hadoop1 elasticsearch]# sysctl -p

# Switch to es admin user
[root@hadoop1 elasticsearch]# su es-admin

# Attempt to start
[es-admin@hadoop1 elasticsearch]$ ./bin/elasticsearch
No accident, ElasticSearch 8.0 service can be started normally. At the same time, pay attention to the log printed on the console, which contains four parts of important information:
- Password of elastic user (required ~) when logging into the Web interface of ElasticSearch and Kibana;
- HTTP CA certificate SHA-256 fingerprint;
- The enrollment token used by Kibana to connect to the current ElasticSearch service (note that the validity period is 30 minutes!!);
- It explains how to make other ElasticSearch nodes join the current cluster (I will introduce ElasticSearch 8.0 distributed search engine cluster and its high availability test in the next article).
━━━━━━━━━━━━━━━━━━━━━━━━━━━━━━━━━━━━━━━━━━━━━━━━━━━━━━━━━━━━━━━━━━━━━━━━━━━━━━━━━━━━━━━━━━━━━━━━━━━━━━━━━━━━━━━━━━━━━━
✅ Elasticsearch security features have been automatically configured!
✅ Authentication is enabled and cluster connections are encrypted.

Password for the elastic user (reset with `bin/elasticsearch-reset-password -u elastic`):
  9SWTTFDuibtaS2*L0NRv

HTTP CA certificate SHA-256 fingerprint:
  75480a9fc93649e2ebd8dd0a9f0721247e8cff32fdbc78abf0b30d7ac9c8e8bd

Configure Kibana to use this cluster:
• Run Kibana and click the configuration link in the terminal when Kibana starts.
• Copy the following enrollment token and paste it into Kibana in your browser (valid for the next 30 minutes):
  eyJ2ZXIiOiI4LjAuMCIsImFkciI6WyIxOTIuMTY4LjQ0LjEyNzo5MjAwIl0sImZnciI6Ijc1NDgwYTlmYzkzNjQ5ZTJlYmQ4ZGQwYTlmMDcyMTI0N2U4Y2ZmMzJmZGJjNzhhYmYwYjMwZDdhYzljOGU4YmQiLCJrZXkiOiJWYjg0RW44QnVQdHBqaU9BTUgxZjpnNFpjeUFDWVJYQ2xLRVp2eXF3U3RBIn0=

Configure other nodes to join this cluster:
• On this node:
  ⁃ Create an enrollment token with `bin/elasticsearch-create-enrollment-token -s node`.
  ⁃ Uncomment the transport.host setting at the end of config/elasticsearch.yml.
  ⁃ Restart Elasticsearch.
• On other nodes:
  ⁃ Start Elasticsearch with `bin/elasticsearch --enrollment-token <token>`, using the enrollment token that you generated.
━━━━━━━━━━━━━━━━━━━━━━━━━━━━━━━━━━━━━━━━━━━━━━━━━━━━━━━━━━━━━━━━━━━━━━━━━━━━━━━━━━━━━━━━━━━━━━━━━━━━━━━━━━━━━━━━━━━━━━
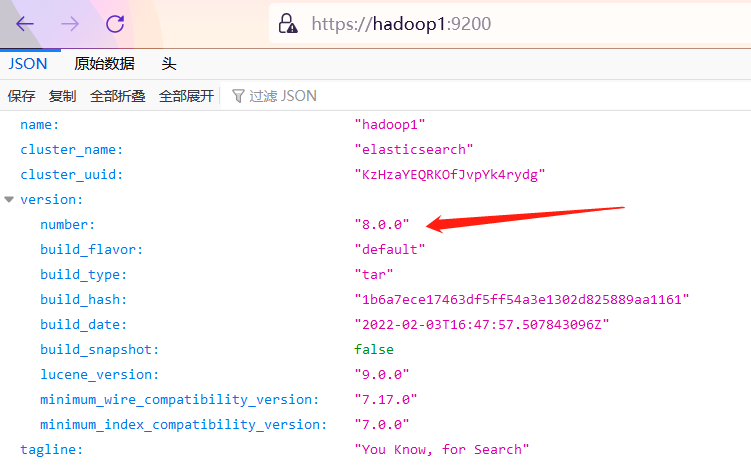
After the above problems are solved, visit in the browser“ https://localhost:9200 ", note that HTTPS protocol is used here to access.

Enter user name: elastic, password: 9SWTTFDuibtaS2*L0NRv. After successful login, the classic launch information page: "You Know, for Search".
Download, install and start Kibana8
[root@hadoop1 ~]# cd /usr/local/
[root@hadoop1 local]# wget https://artifacts.elastic.co/downloads/kibana/kibana-8.0.0-linux-x86_64.tar.gz
[root@hadoop1 local]# tar -xvf kibana-8.0.0-linux-x86_64.tar.gz
[root@hadoop1 local]# mv kibana-8.0.0 kibana
[root@hadoop1 local]# cd kibana
[root@hadoop1 kibana]# ./bin/kibana
Question 1: kibana cannot be started directly by root user
Error: Unable to write to UUID file at /usr/local/kibana/data/uuid. Ensure Kibana has sufficient permissions to read / write to this file. Error was: EACCES
Solution: use the ES admin user (this is newly added in the front, and the name can be given by yourself) to grant permission to the kibana directory.
# Give permission to kibana directory
[root@hadoop1 kibana]# chown -R es-admin:es-admin /usr/local/kibana
# Switch to es admin
[root@hadoop1 kibana]# su es-admin
# Try to start Kibana
[es-admin@hadoop1 kibana]$ ./bin/kibana
Question 2: by default, kibana services can only be accessed locally
After solving the previous problem, Kibana started successfully and printed the following contents on the console, which can only be accessed locally, but my CentOS system can't open the browser for local access.
Go to http://localhost:5601/?code=194486 to get started.
Solution: modify the configuration so that other machines can also access Kibana.
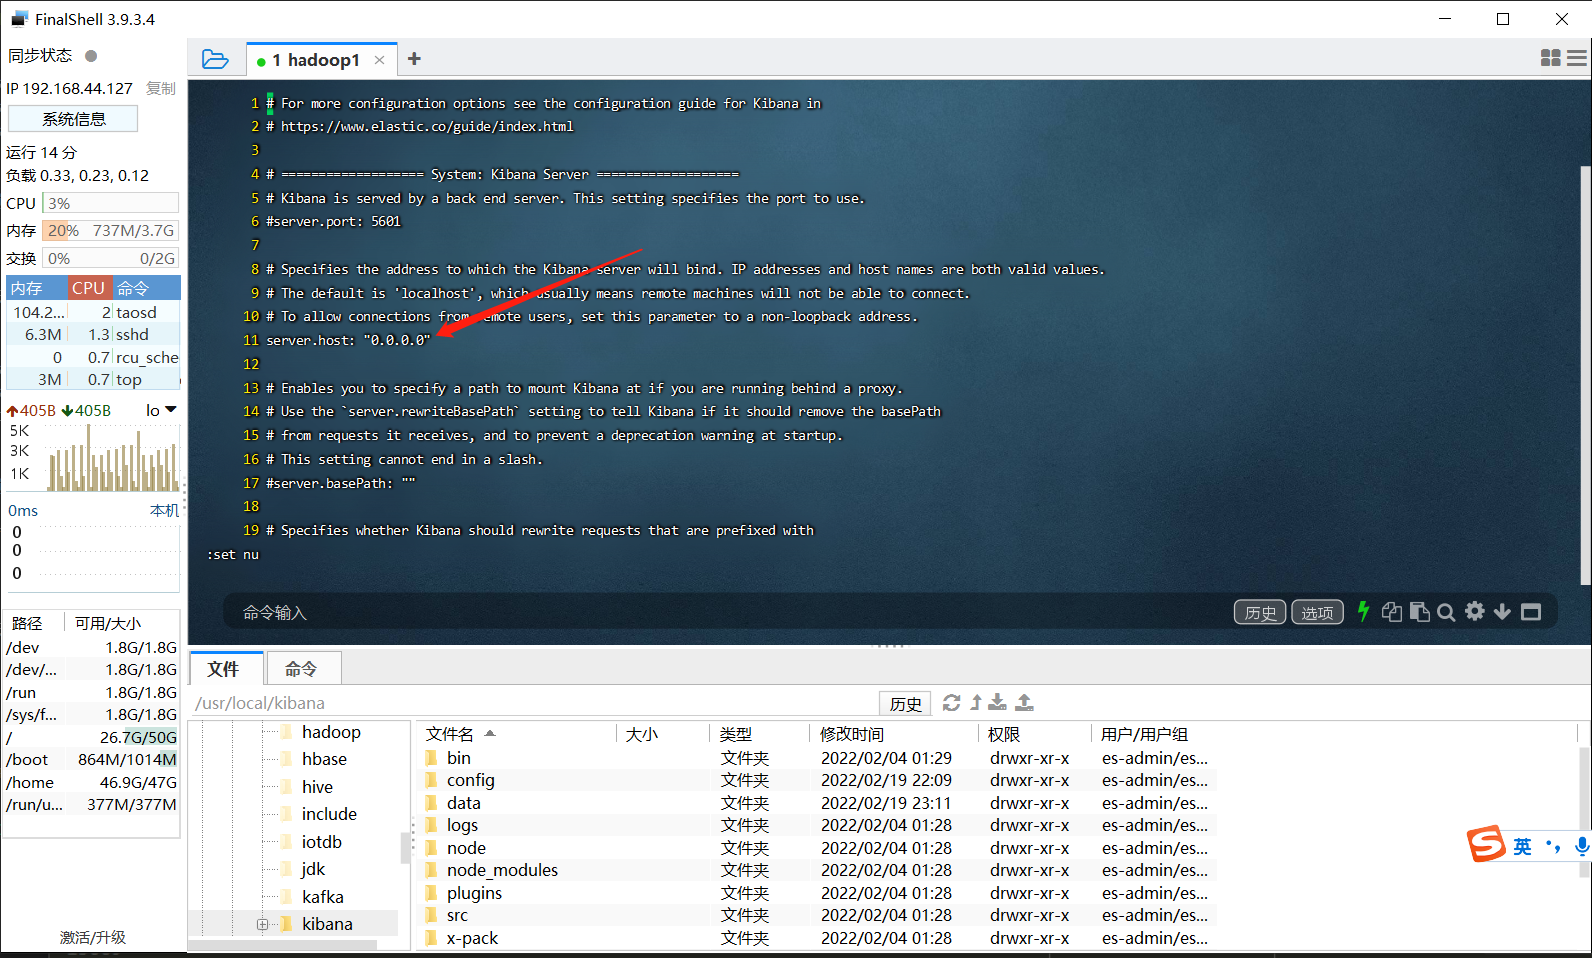
# Edit the configuration file and modify the server host: "0.0.0.0"
[es-admin@hadoop1 kibana]$ vi ./config/kibana.yml
server.host: "0.0.0.0"

# Try to start Kibana
[es-admin@hadoop1 kibana]$ ./bin/kibana
After Kibana is successfully started, use the connection with additional random code generated by the console to open it on the remote browser, and enter the enrollment token generated by default when ElasticSearch is started for the first time.
Question 3: Kibana's enrollment token for ElasticSearch has expired
[2022-02-19T22:16:24.366+08:00][ERROR][plugins.interactiveSetup.elasticsearch] Failed to enroll with host "https://192.168.44.127:9200": {"error":{"root_cause":[{"type":"security_exception", "reason":"unable to authenticate with provided credentials and anonymous access is not allowed for this request", "additional_unsuccessful_credentials":"API key: api key is expired", "header":{"WWW-Authenticate":["Basic realm="security" charset="UTF-8"", "Bearer realm="security"", "ApiKey"]}}], "type":"security_exception", "reason":"unable to authenticate with provided credentials and anonymous access is not allowed for this request", "additional_unsuccessful_credentials":"API key: api key is expired", "header":{"WWW-Authenticate":["Basic realm="security" charset="UTF-8"", "Bearer realm="security"", "ApiKey"]}}, "status":401}
As mentioned earlier, when ElasticSearch is started for the first time, the enrollment token generated by default is valid within 30 minutes, but what if it takes more than 30 minutes from the first time ElasticSearch service is started to Kibana service is started to connect ElasticSearch? (it feels like a kite with a broken line, losing the single line connection with the organization. I'm so flustered.)
At this time, you need to use the tool provided with E lasticSearch: / bin / ElasticSearch create enrollment token to manually regenerate the enrollment token of Kibana connecting ElasticSearch.
# Use the ElasticSearch built-in tool: / bin / ElasticSearch create enrollment token. This tool is also used when adding nodes to the cluster later~~
[root@hadoop1 elasticsearch]# ./bin/elasticsearch-create-enrollment-token  -s kibana
warning: ignoring JAVA_HOME=/usr/local/jdk; using bundled JDK
eyJ2ZXIiOiI4LjAuMCIsImFkciI6WyIxOTIuMTY4LjQ0LjEyNzo5MjAwIl0sImZnciI6Ijc1NDgwYTlmYzkzNjQ5ZTJlYmQ4ZGQwYTlmMDcyMTI0N2U4Y2ZmMzJmZGJjNzhhYmYwYjMwZDdhYzljOGU4YmQiLCJrZXkiOiJWcjlhRW44QnVQdHBqaU9BQjMwTDpCNHlYclhweFNzNmRtWWJaaFBKOWhRIn0=
Then, enter the user name and password, log in to Kibana (the user name and password here are the same as those used by ElasticSearch), and finish the work~

Summary
The reason why we want to practice the latest version of ElasticSearch 8.0 is mainly based on the new feature of enabling the security function by default. After all, there have been an endless stream of blackmail incidents about ElasticSearch, Redis and even MongoDB in the past. The main reason is that people are weak in security awareness or lazy and do not have the authentication function configured, Then use the default configuration of these services (the most basic authentication function is not enabled, let alone strong password.) Run directly in the public network environment (streaking)..
Attachment: previously written content about ElasticSearch, including ElasticSearch8 0 distributed search engine cluster and its high availability test.
- Introduction to ElasticSearch (I) single node initial experience
- Introduction to ElasticSearch (II) batch import of data (Postman and Kibana)
- Introduction to ElasticSearch (III) Logstash enables MySQL data synchronization to ElasticSearch
- Introduction to ElasticSearch (IV) common plug-ins: Head plug-in and ik participle
- Introduction to ElasticSearch (V) springboot2 3.0 integrated ElasticSearch7 5.2-HighLevelClient
- Introduction to ElasticSearch (VI) springboot2 3.0 integrated ElasticSearch7 5.2-SpringData
- Introduction to ElasticSearch (VII) building ElasticSearch cluster
- At Huawei Kunpeng openeuler 20 Install ElasticSearch on 03 system
- Elasticsearch8 of full stack development 0 distributed search engine cluster and its high availability test
If you have any questions or any bugs are found, please feel free to contact me.
Your comments and suggestions are welcome!