Running microservices on Docker
Using Dockerfile to build Docker image
Dockerfile builds Docker images. Dockerfile is a text file that contains several instructions that describe the details of building an image.
1) Prepare a file named Dockerfile:
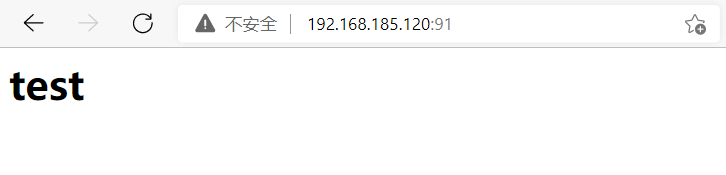
FORM nginx
RUN echo '<h1>test</h1>' > /usr/share/nginx/html/index.html
FORM and RUN are the instructions of Dockerfile. The FROM instruction specifies the underlying image, and the RUN instruction executes the command.
2) Execute the following command in the path of Dockerfile to build the image
docker build -t nginx:my .
Among them, the last point (.) of the command is used for path parameter transmission and represents the current path.
3) Execute the following command to start a Docker container using the image
docker run -d -p 92:80 nginx:my
4) Visit
Dockerfile common instructions
ADD copy file
The ADD directive is used to copy files
ADD <src>... <dest>
ADD ["<src>",... "<dest>"]
Copy files from the src directory to the container dest. src can be the relative path of the directory where the Dockerfile is located, a URL, or a compressed package.
Note: src must be within the context of the build. Commands such as ADD... / something / something cannot be used, because the docker build command will first send the context path and its subdirectory to the docker daemon.
If src is a URL and dest does not end with a slash, DeST will be treated as a file and the content file corresponding to src will be downloaded to dest.
If src is a URL and dest ends with a slash, DeST will be regarded as a directory, and the corresponding contents of src will be downloaded to the dest directory.
If src is a directory, the contents of the entire directory will be copied, including file system metadata.
If the file is in a recognized compressed package format, docker will decompress it automatically.
ADD microservice-discovery-eureka.jar app.jar
ARG set build parameters
The ARG instruction is used to set build parameters, similar to ENV. Unlike ENV, ARG sets environment variables at build time, which will not exist when the container runs.
ARG user1=someuser
CMD container start command
The CMD instruction is used to provide default values for the execution container. Each Dockerfile has only one CMD command. If multiple CMD commands are specified, only the last one will be executed. If the running command is specified when starting the container, the command specified by CMD will be overwritten.
CMD ["executable","param1","param2"]((recommended)
CMD ["param1","param2"] (by ENTRYPOINT Command (provide preset parameters)
CMD command param1 param2 (stay shell (executed in)
CMD echo "This is a test." | wc -
COPY copy file
COPY <src>... <dest>
COPY ["<src>",... "<dest>"]
COPY the src on the local side to the dest of the container. The COPY directive is similar to the ADD directive. COPY does not support URL s and compressed packages
ENTRYPOINT entry point
ENTRYPOINT ["executable","param1","param2"]
ENTRYPOINT command param1 param2
The purpose of the ENTRYPOINT and CMD instructions is the same. They both specify the command to be executed when the Docker container is started. They can be set multiple times, but only the last one is valid.
ENV setting environment variables
The ENV instruction is used to set environment variables
ENV <key> <value>
ENV <key>=<value> ...
ENV JAVA_JOME /path/to/java
EXPOSE declares the exposed port
The export instruction is used to declare the port on which the container provides services at run time. The format is export < port > [< port >...]
It should be noted that this is only a declaration. The runtime will not open the corresponding port because of this declaration. The purpose of this instruction is to help the image user understand the daemon port of the image service; Secondly, when random mapping is used at run time, the port of export is automatically mapped.
#Declare exposing a port example
EXPOSE port1
#The command used by the corresponding run container
docker run -p port1 image
#Claims expose multiple port examples
EXPOSE port1 port2 port3
#The command used by the corresponding run container
docker run -p port1 -p port2 -p port3 image
#You can also specify the port number that needs to be mapped to the host machine
docker run -p host_port1:port1 -p host_port2:port2 -p host_port3:port3 image
FROM specifies the base image
Using the basic image of the FROM instruction, the FROM instruction is a bit like the extensions keyword in Java. Note that the FROM instruction must be specified and written before other instructions. All instructions after the FROM instruction depend on the specified image.
FROM <image>
FROM <image>:<tag>
FROM <image>@<digest>
LABEL add metadata for image
The LABEL directive is used to add metadata to the image.
The format is label < key > = < value > < key > = < value > < key > = < value >
Convert the command line using and
LABEL "com.example.vendor"="ACME Incorporated"
LABEL com.example.lable-with-value="foo"
LABEL version="1.0"
LABEL description="This text illustrates \
that label-values can span multiple lines."
MAINTAINER specifies the MAINTAINER's information
MAINTAINER instruction is used to specify MAINTAINER information and to sign Dockerfile.
The format is maintainer < name >
RUN execute command
RUN <command>
RUN ["executable","param1","param2"]
Run < command > runs in the shell terminal. In Linux, it defaults to / bin/sh -c, and in Windows, it is cmd /s /c. This format is used, just like entering a command directly on the command line. RUN ["executable","param1","param2"] is executed by exec, which is similar to a function call. Specify that other terminals can operate in this way, such as run ["/ bin / bash"“ -C "," echo hello "], this method must use double quotation marks ["] instead of single quotation marks ['], because this method will be converted into a JSON array.
USER set USER
This instruction is used to set the user or UID when starting the image. The RUN, CMD and ENTRYPOINT instructions written after this instruction will use this user to execute the command.
USER daemon
VOLUME specifies the mount point
This instruction enables a directory in the container to have the function of persistent storage. This directory can be used by the container itself or shared with other containers. When the application in the container has the requirement of persistent data, this instruction can be used in Dockerfile.
VOLUME /data
WORKDIR specifies the working directory
WORKDIR /path/to/workdir
The switch directory instruction is similar to the cd command. The RUN, CMD and ENTRYPOINT instructions written after the instruction take the directory as the current directory and execute the corresponding commands.
other
Dockerfile also has some other instructions, such as STOPSINGAL, healthcheck, SHELL, etc. it is not commonly used.
Building images using Dockerfile
preparation
Take the project microservice discovery Eureka as an example. First, execute the following command to build the project into a jar package: microservice discovery eureka-0.0.1-snapshot.jar
mvn clean package #Packaging projects with Maven

Mirror construction
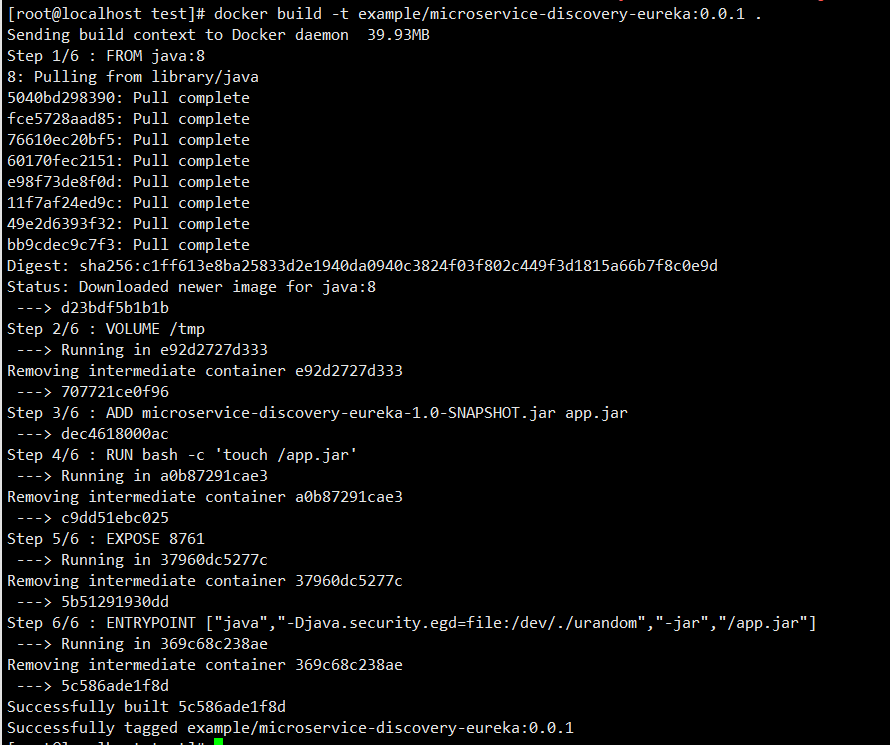
1) Create a file named Dockerfile in the directory where the jar package is located.
touch Dockerfile
Add the following to Dockerfile.
#Based on which image
FROM java:8

#Mount the local folder to the current container
VOLUME /tmp

#Copy files to container
ADD microservice-discovery-eureka-1.0-SNAPSHOT.jar app.jar
RUN bash -c 'touch /app.jar'

#Declare the ports that need to be exposed
EXPOSE 8761

#Configure the commands to be executed after the container starts
ENTRYPOINT ["java","-Djava.security.egd=file:/dev/./urandom","-jar","/app.jar"]
3) Use the docker build command to build the image
docker build -t example/microservice-discovery-eureka:0.0.1 .
#Format: docker build -t warehouse name / image name (: label) relative position of Dockerfile
test
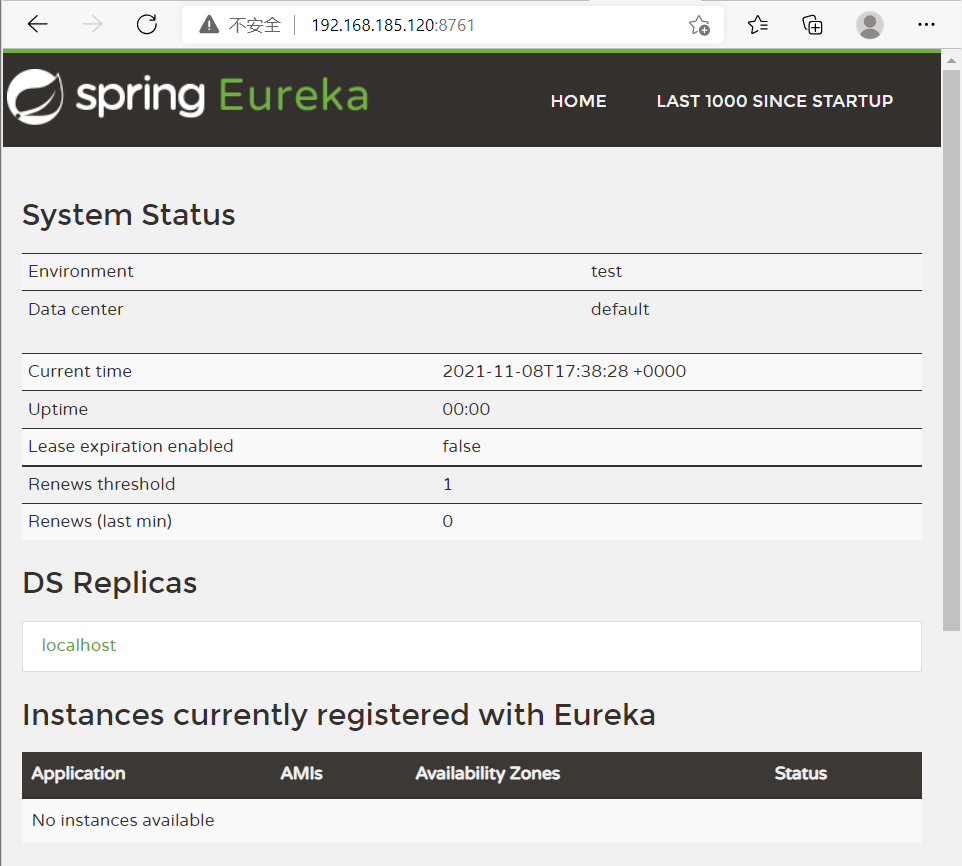
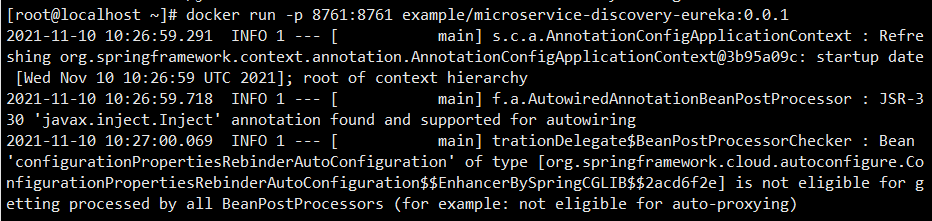
1) Start mirroring
docker run -d -p 8761:8761 example/microservice-discovery-eureka:0.0.1
2) Visit http://Docker Host IP:8761 /, and Eureka Server home page can be displayed normally.
Using Docker Registry to manage Docker images
So far, Docker images have been built and microservices run on Docker. However, a complete application system may contain hundreds of microservices, which may correspond to hundreds of images. If the versions of each microservice are considered, more images may be built. How should these images be managed?
Using Docker Hub to manage images
Docker Hub is a Docker Registry officially maintained by docker, which stores many excellent images. In addition, Docker Hub also provides authentication, workgroup structure, workflow tools, build triggers and other tools to simplify work.
Registration and login
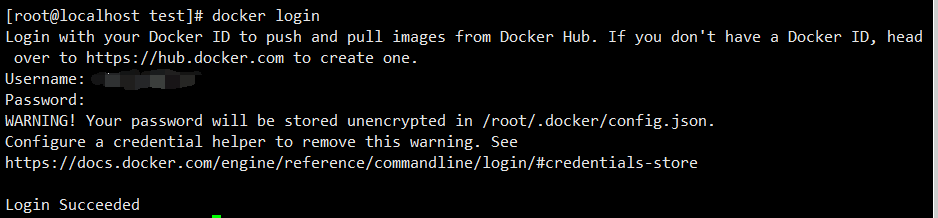
The use of Docker Hub is very simple. Just register a Docker Hub account and you can use it normally. After logging in, you can see the homepage of Docker Hub.
You can also log in to the Docker Hub using the docker login command. Enter this command and enter the account and password as prompted to complete the login.
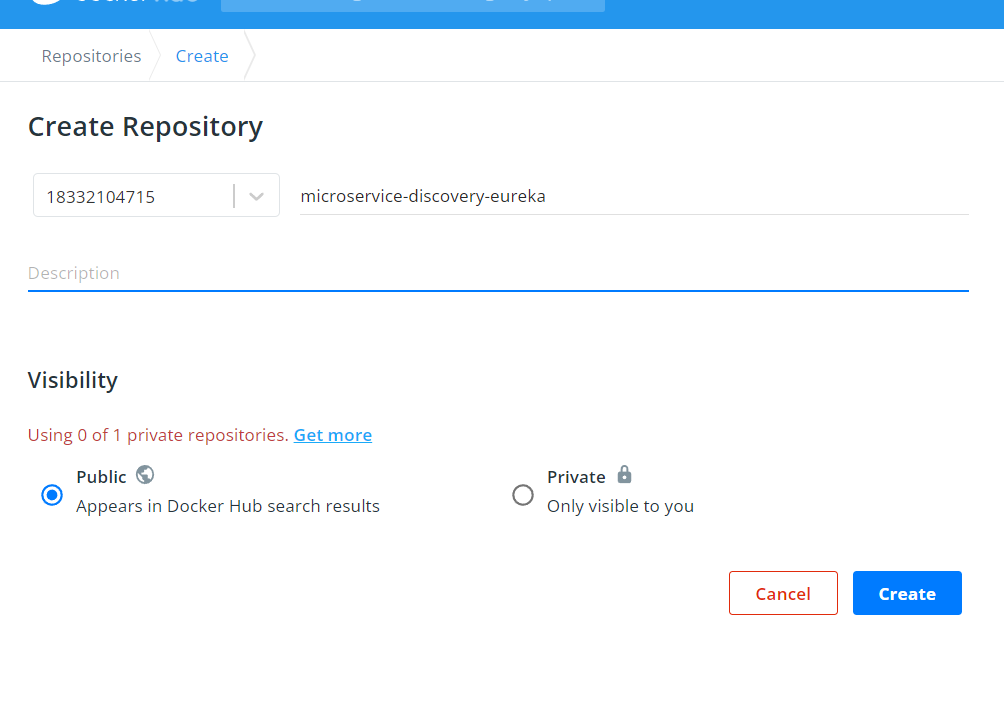
Create warehouse
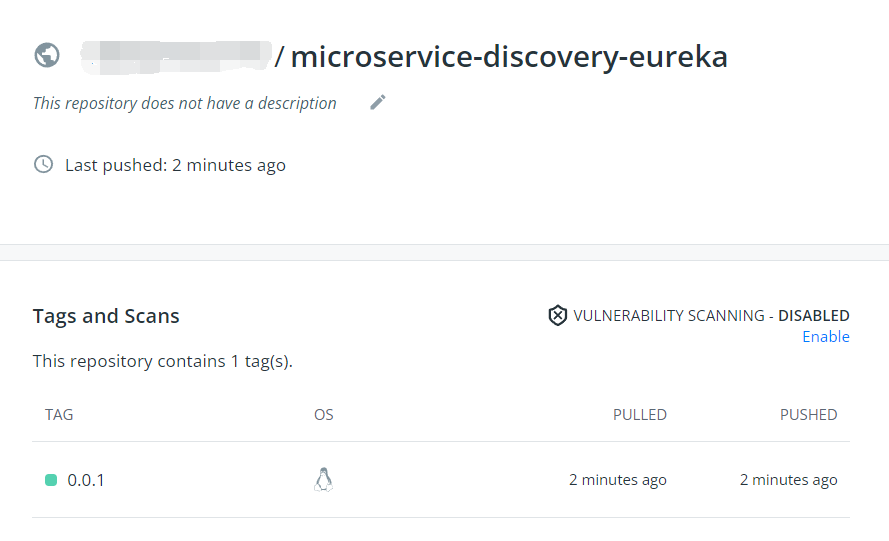
Click the Create Repository button on the Docker Hub home page and fill in the information as prompted to create a warehouse. Just fill in the relevant information and click the Create button to create a public warehouse called microservice discovery Eureka.
Push image
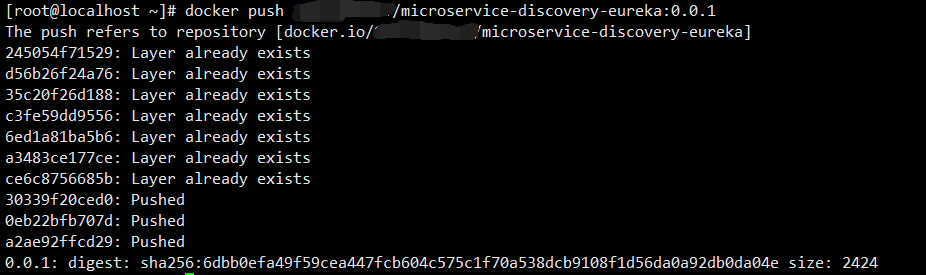
Let's push the image built earlier to the Docker Hub. Use the following command
docker push example/microservice-discovery-eureka:0.0.1
After a period of waiting, you can push successfully. In this way, you can view the pushed images in the Docker Hub.
Manage images using a private warehouse
In many scenarios, you need to use a private warehouse to manage Docker images. Compared with Docker Hub, private warehouse has the following advantages
- Save bandwidth. For the existing images in the private warehouse, you don't need to download them from the Docker Hub, just download them from the private warehouse.
- Safer.
- Facilitate unified management of internal images
Build private warehouse
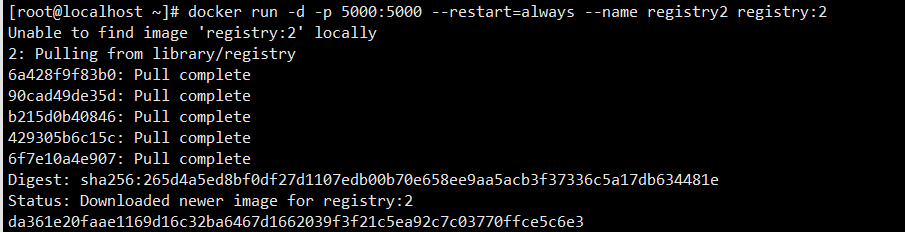
The construction of Docker Registry 2.0 is very simple. Just execute the following command to create and start a Docker Registry 2.0
docker run -d -p 5000:5000 --restart=always --name registry2 registry:2
Push image to private warehouse
Previously, the docker push command was used to push the image to the Docker Hub. Now, the container built earlier is pushed to the private warehouse
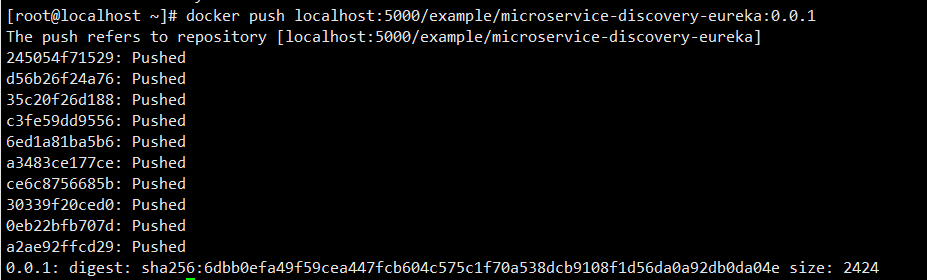
docker push localhost:5000/example/microservice-discovery-eureka:0.0.1
After executing the above command, it is found that the push is not successful, and the following contents are prompted:

Docker Hub is the default Docker Registry, so example / microservice discovery Eureka: 0.0.1 is equivalent to docker.io/example/microservice discovery Eureka: 0.0.1. Therefore, if you want to push to a private warehouse, you need to modify the image label.
docker tag example/microservice-discovery-eureka:0.0.1 localhost:5000/example/microservice-discovery-eureka:0.0.1
After modifying the label, execute again
Note: Docker registry 2.0 requires Docker version higher than 1.6
You can also configure domain name, SSL login, authentication, etc. for private warehouses.
Docker Registry 2.0 can meet the needs of most scenarios, but it does not include functions such as interface, user management and permission control. If you want to use these functions, you can use Docker Trusted Registry.
Using Maven plug-in to build Docker image
Maven is a powerful project management and construction tool. If you can use Maven to build a Docker image, the work can be further simplified.
Here is a Maven plug-in developed by Spotify
Open Docker remote API
# vim /usr/lib/systemd/system/docker.service
[Service]
ExecStart=/usr/bin/dockerd -H tcp://0.0.0.0:2375 -H unix://var/run/docker.sock
“ unix:///var/run/docker.sock ”: unix socket, through which the local client will connect to Docker Daemon.
“ tcp://0.0.0.0:2375 ”: tcp socket, which means that any remote client is allowed to connect to Docker Daemon through port 2375.

You can see that docker has started a new daemon.
Set white list
vim /etc/docker/daemon.json
{
  "insecure-registries":["192.168.238.10:5000"],									#It's registries, not registries
}
Upload java8 to a private repository
Start warehouse
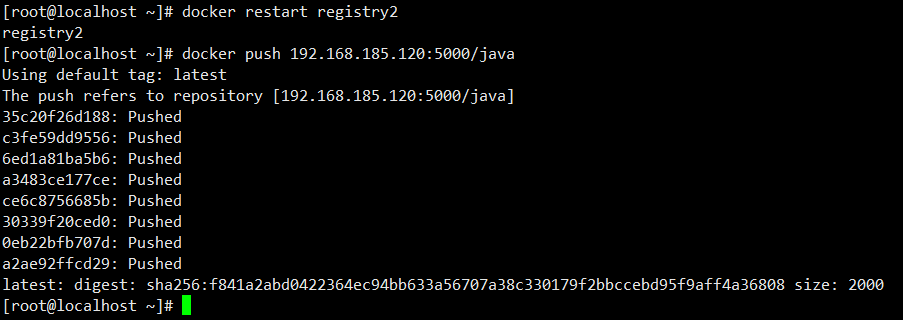
docker start registry:2
Modify the tag for the java:8 image and upload it
docker tag java:8 192.168.185.120:5000/java
docker push 192.168.185.120:5000/java
quick get start
Take the project microservice discovery Eureka as an example
1) Add Maven's Docker plug-in in pom.xml.
            <plugin>
                <groupId>com.spotify</groupId>
                <artifactId>docker-maven-plugin</artifactId>
                <version>0.4.13</version>
                <configuration>
                    <imageName>example/microservice-discovery-eureka:0.0.1</imageName>
                    <dockerHost>http://192.168.185.120:2375</dockerHost>
                    <baseImage>192.168.185.120:5000/java</baseImage>
                    <entryPoint>["java","-jar","/${project.build.finalName}.jar"]</entryPoint>
                    <resources>
                        <resource>
                            <targetPath>/</targetPath>
                            <directory>${project.build.directory}</directory>
                            <include>${project.build.finalName}</include>
                        </resource>
                    </resources>
                </configuration>
            </plugin>
- imageName: used to specify the image name, where example is the warehouse name, microservice discovery Eureka is the image name, and 0.0.1 is the label name.
- baseImage: used to specify the underlying image, similar to the FROM instruction in Dockerfile.
- Entrypoint: similar to the entrypoint instruction of Dockerfile.
- resources.resource.directory: used to specify the root directory to be copied, ${project.build.directory} represents the target directory.
- resources.resource.include: used to specify the files to be copied$ {project.build.finalName}.jar refers to the packaged jar package file.
2) Execute the following command to build the Docker image.
mvn clean package docker:build
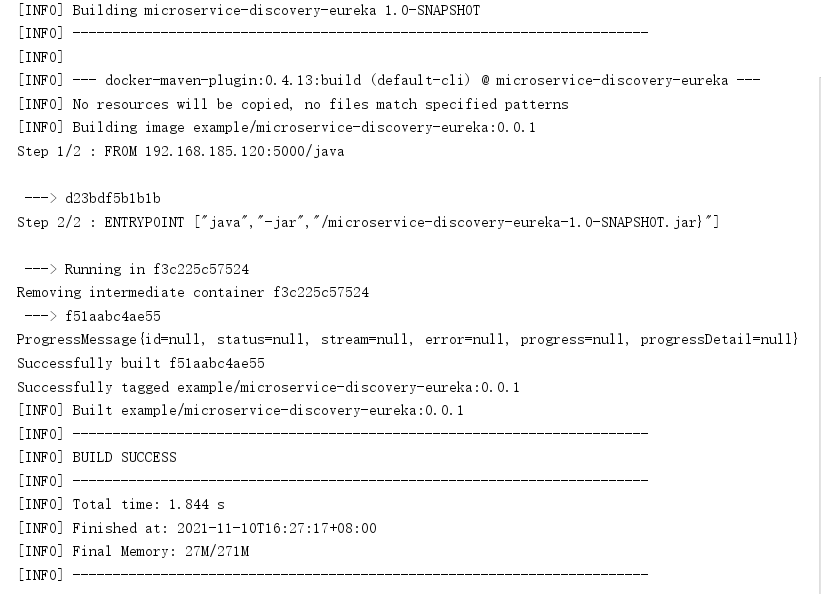

The plug-in reads the Dockerfile and builds it
First, create a Dockerfile in the / microservice discovery Eureka / SRC / main / docker directory
#Based on which image
FROM java:8

#Mount the local folder to the current container
VOLUME /tmp

#Copy files to container
ADD microservice-discovery-eureka-1.0-SNAPSHOT.jar app.jar
RUN bash -c 'touch /app.jar'

#Declare the ports that need to be exposed
EXPOSE 8761

#Configure the commands to be executed after the container starts
ENTRYPOINT ["java","-Djava.security.egd=file:/dev/./urandom","-jar","/app.jar"]
Modify pom.xml
            <plugin>
                <groupId>com.spotify</groupId>
                <artifactId>docker-maven-plugin</artifactId>
                <version>1.0.0</version>
                <configuration>
                    <imageName>example/microservice-discovery-eureka:0.0.1</imageName>
                    <dockerHost>http://192.168.2.120:2375</dockerHost>
                    <dockerDirectory>${project.basedir}/src/main/docker</dockerDirectory>
                    <resources>
                        <resource>
                            <targetPath>/</targetPath>
                            <directory>${project.build.directory}</directory>
                            <include>${project.build.finalName}.jar</include>
                        </resource>
                    </resources>
                </configuration>
            </plugin>
As you can see, instead of specifying baseImage and entrypoint, use dockerDirectory to specify the path where Dockerfile is located. In this way, you can use Dockefiler to build Docker images.

Bind the plug-in to a phase execution
In many scenarios, there is a requirement that when the mvn clean package is executed, for example, the plug-in will automatically build a Docker image. To achieve this, just bind the plug-in goal to a phase.
Phase and goal can be understood as follows: the format of maven command is mvn phase:goal, such as mvn package docker build. Then the package docker is phase and the build is goal.
            <plugin>
                <groupId>com.spotify</groupId>
                <artifactId>docker-maven-plugin</artifactId>
                <version>1.0.0</version>
                <executions>
                    <execution>
                        <id>build-image</id>
                        <phase>package</phase>
                        <goals>
                            <goal>build</goal>
                        </goals>
                    </execution>
                </executions>
                <configuration>
                    <imageName>example/microservice-discovery-eureka:0.0.1</imageName>
                    <dockerHost>http://192.168.2.120:2375</dockerHost>
                    <dockerDirectory>${project.basedir}/src/main/docker</dockerDirectory>
                    <resources>
                        <resource>
                            <targetPath>/</targetPath>
                            <directory>${project.build.directory}</directory>
                            <include>${project.build.finalName}.jar</include>
                        </resource>
                    </resources>
                </configuration>
            </plugin>
From the configuration, you only need to add the following configuration
                <executions>
                    <execution>
                        <id>build-image</id>
                        <phase>package</phase>
                        <goals>
                            <goal>build</goal>
                        </goals>
                    </execution>
                </executions>
You can bind the plug-in to the phase of package.
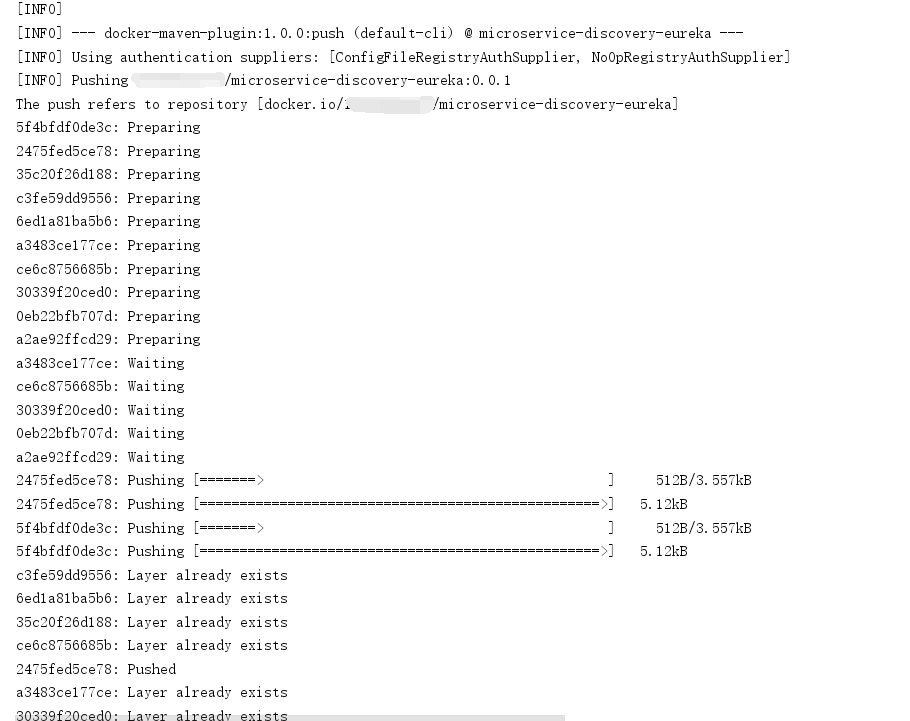
Push image
Previously, the docker push command was used to push the image, or the Maven plug-in can be used to push the image. You can use Maven plug-in to push a Docker image to Docker Hub.
1) Modify Maven's global configuration file settings.xml and add the following contents to configure the user information of Docker Hub.
	<server>
      <id>docker-hub</id>
      <username>repouser</username>
      <password>repopwd</password>
	  <configuration>
	    <email>email</email>
	  </configuration>
    </server>
2) Modify pom.xml
            <plugin>
                <groupId>com.spotify</groupId>
                <artifactId>docker-maven-plugin</artifactId>
                <version>1.0.0</version>
                <executions>
                    <execution>
                        <id>build-image</id>
                        <phase>package</phase>
                        <goals>
                            <goal>build</goal>
                        </goals>
                    </execution>
                </executions>
                <configuration>
                    <imageName>18332104715/microservice-discovery-eureka:0.0.1</imageName>
                    <dockerHost>http://192.168.2.120:2375</dockerHost>
                    <dockerDirectory>${project.basedir}/src/main/docker</dockerDirectory>
                    <resources>
                        <resource>
                            <targetPath>/</targetPath>
                            <directory>${project.build.directory}</directory>
                            <include>${project.build.finalName}.jar</include>
                        </resource>
                    </resources>
                    <serverId>docker-hub</serverId>
                </configuration>
            </plugin>
3) Execute the following command to add the identity of the pushImage, indicating that the image is pushed.
mvn clean package docker:build -DpushImage
Similarly, you can also push images to private warehouses. You only need to specify imageName to be similar
<imageName>localhost:5000/microservice-discovery-eureka:0.0.1</imageName>
Note: the above example specifies the image name and label through imageName
<imageName>localhost:5000/microservice-discovery-eureka:0.0.1</imageName>
The imageTags element also provides more flexibility in specifying image names and labels
<configuration>
	<imageName>example/microservice-discovery-eureka</imageName>
	<imageTags>
		<imageTag>0.0.5</imageTag>
		<imageTag>latest</imageTag>
	</imageTags>
</configuration>
This allows you to assign two labels to the same mirror.
You can also use the dockerImageTags parameter to specify the tag name when building the command
mvn clean pachage docker:build -DpushImageTags -DdockerImageTags=latest -DdockerImageTags=another-tag
To repeatedly build images of the same tag name, set forceTags to true, which will overwrite the construction of images of the same tag.
<configuration>
	<forceTags>true</forceTags>
</configuration>
Spotify is the world's largest legitimate streaming music service platform.