The use of a large number of Web pages in App can easily lead to huge memory occupation, memory leak and high crash rate. The use of WebView independent process is a reasonable solution to Android WebView related problems.
Why use WebView stand-alone processes
Android WebView
- OOM Problems Caused by WebView
- Android versions are different, with different kernels and compatibility Crash
- WebView code quality, inconsistency between WebView and Native versions, resulting in Crash
The memory usage of the Android App process is limited. There are two ways to see the size of available memory in App:
ActivityManager.getMemoryClass() Gets the normal size of available memory
ActivityManager.getLargeMemoryClass() gives you the maximum memory size to open largeHeap
Take Google Nexus 6P as an example. Normally, the available memory is 192M, and the maximum available memory is 512M.
Android WebView takes up a lot of memory. On low-configuration mobile phones, it often happens that multiple WebView pages are opened consecutively, when Activity at the bottom of the stack is destroyed, Activity needs to be recreated when it returns, or when multiple Webview pages are opened consecutively, some singleton objects in App are recycled by the system. Without special processing, it is easy to report data null pointer errors. These are the OOM manifestations of WebView. WebView independent processes can avoid the memory occupation of the main process.
Question 23 is also easy to happen with Webview. The cores of domestic mobile phones are different. Failure to achieve compatibility of Web pages leads to Crash. With the release of App version and App-Web version independent of each other, the dependence of Web pages on natives will become complex, version compatibility is not good, and will also lead to the intersection of WebView and natives. Crash occurs from time to time.
Wechat Experience Introduction
Process List at the Start of Wechat

Process List When Opening Wechat Public Number

image.png
Process List When Opening the Wechat applet
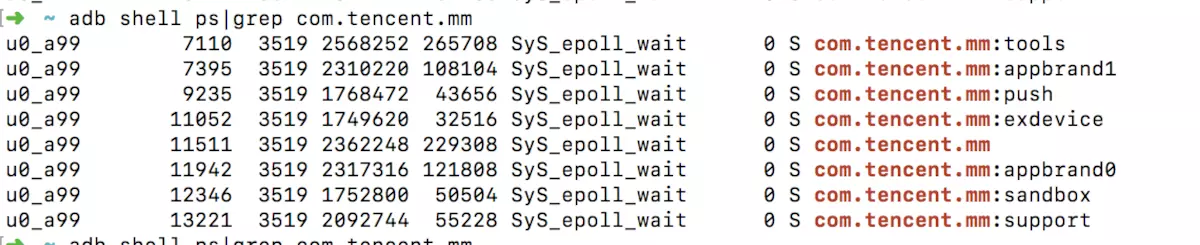
image.png
Above is the process list of Wechat. A brief analysis of the functions of each process is as follows:
com.tencent.mm: Wechat Master Process, Conversation and Friendship
com.tencent.mm:push: Wechat push, live
com.tencent.mm:tools and com.tencent.mm:support: functional support, such as opening a separate web page in a micro-letter, is in the tools process
com.tencent.mm:exdevice: estimated to be mobile phone related
com.tencent.mm:sandbox: Public Number Process, in which all pages opened by Public Number run
com.tencent.mm:appbrand: For small programs, the test found that whenever Weixin started a small program, it would establish a separate process appbrand[0], up to five processes.
Wechat separates web pages, public numbers and small programs into separate processes through such process separation, effectively increasing the memory usage of Wechat, avoiding the abnormal service of the main process caused by the memory occupation of the main process by WebView, and avoiding the public numbers with uneven quality through this independent process scheme. Web pages and applets Crash affect the operation of the main process. Thus, the WebView independent process scheme is feasible and necessary.
How to Implement WebView Independent Process
Implementation of WebView Independent Process
The implementation of WebView independent process is relatively simple, just need to find the corresponding WebView Activity in Android Manifest and configure its "android: process" attribute. As follows:
<activity
    android:name=".remote.RemoteCommonWebActivity"
    android:configChanges="orientation|keyboardHidden|screenSize"
    android:process=":remoteWeb"/>
Data communication between WebView process and main process
First, let's see why there is no direct communication between two processes.
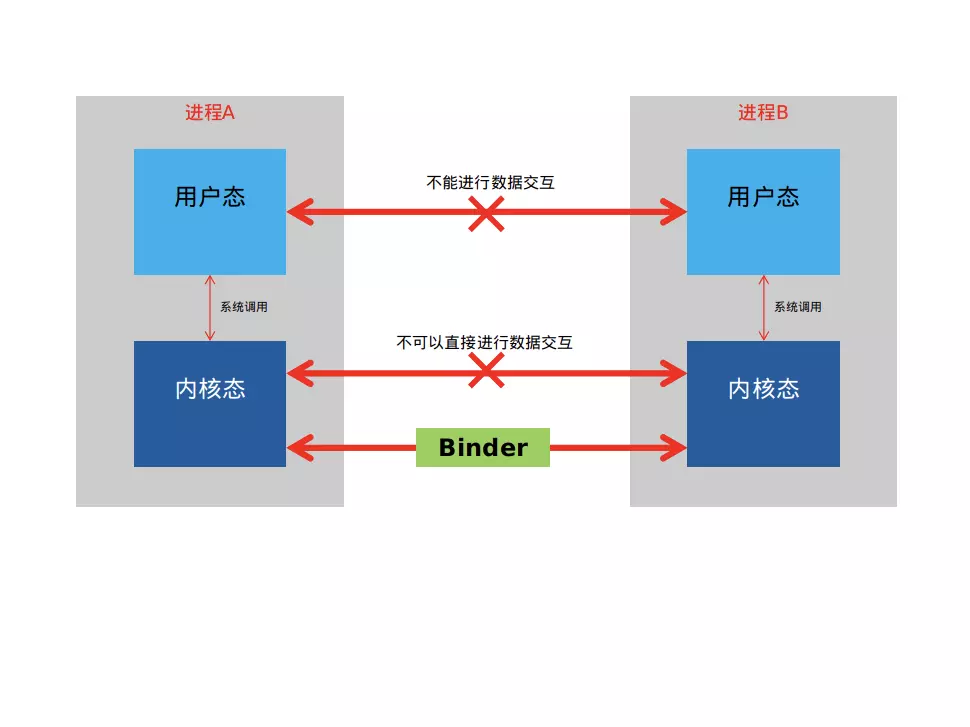
image.png
There are many ways of Android multi-process communication, the main ways are as follows:
- AIDL
- Messenger
- ContentProvider
- Shared files
- Bundle transfer between components
- Socket transmission
Considering that the main communication mode of WebView is method invocation, we adopt AIDL mode. AIDL is essentially a Binder mechanism. Here is a schematic diagram of the Binder mechanism on the Internet. Specific ways of using AIDL are not discussed here. Here are some core AIDL files.
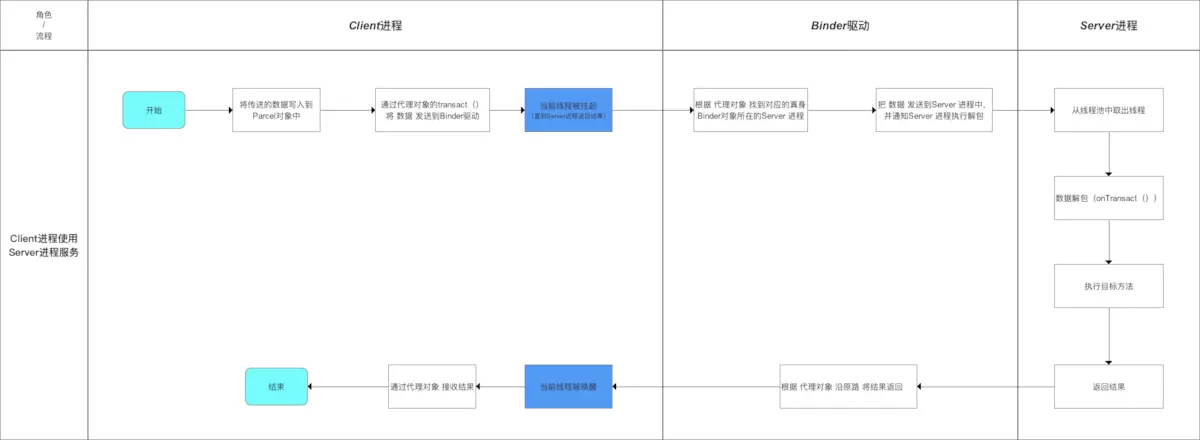
image.png
IBinderPool: The communication between the Webview process and the main process may involve multiple AIDL Binders. Functionally, we also write different AIDL Binders for different functional interfaces, so IBinderPool is used to satisfy the caller to obtain different Binders according to different types.
interface IBinderPool {
    IBinder queryBinder(int binderCode);  //Ways to find specific Binder s
}
IWebAidlInterface: The core of AIDL Binder, here the WebView process to each call to the main process as an action, each action will have a unique actionName, the main process will register these actions in advance, action also has a level level, each call ends through IWebAidlCallback to return results.
interface IWebAidlInterface {

    /**
     * actionName: Different actions, jsonParams: You need to read from the map according to different actions and turn them into others in turn
     */
    void handleWebAction(int level, String actionName, String jsonParams, in IWebAidlCallback callback);

 }
IWebAidlCallback: Result callback
interface IWebAidlCallback {
    void onResult(int responseCode, String actionName, String response);
}
In order to maintain the connection between the independent process and the main process and avoid the binder connection and retrieving every time an aidl call is made, a special class is needed to maintain the connection and return the Binder according to the condition. This class is called RemoteWebBinderPool.
public class RemoteWebBinderPool {

    public static final int BINDER_WEB_AIDL = 1;

    private Context mContext;
    private IBinderPool mBinderPool;
    private static volatile RemoteWebBinderPool sInstance;
    private CountDownLatch mConnectBinderPoolCountDownLatch;

    private RemoteWebBinderPool(Context context) {
        mContext = context.getApplicationContext();
        connectBinderPoolService();
    }

    public static RemoteWebBinderPool getInstance(Context context) {
        if (sInstance == null) {
            synchronized (RemoteWebBinderPool.class) {
                if (sInstance == null) {
                    sInstance = new RemoteWebBinderPool(context);
                }
            }
        }
        return sInstance;
    }

    private synchronized void connectBinderPoolService() {
        mConnectBinderPoolCountDownLatch = new CountDownLatch(1);
        Intent service = new Intent(mContext, MainProHandleRemoteService.class);
        mContext.bindService(service, mBinderPoolConnection, Context.BIND_AUTO_CREATE);
        try {
            mConnectBinderPoolCountDownLatch.await();
        } catch (InterruptedException e) {
            e.printStackTrace();
        }
    }

    public IBinder queryBinder(int binderCode) {
        IBinder binder = null;
        try {
            if (mBinderPool != null) {
                binder = mBinderPool.queryBinder(binderCode);
            }
        } catch (RemoteException e) {
            e.printStackTrace();
        }
        return binder;
    }

    private ServiceConnection mBinderPoolConnection = new ServiceConnection() {   // 5

        @Override
        public void onServiceDisconnected(ComponentName name) {

        }

        @Override
        public void onServiceConnected(ComponentName name, IBinder service) {
            mBinderPool = IBinderPool.Stub.asInterface(service);
            try {
                mBinderPool.asBinder().linkToDeath(mBinderPoolDeathRecipient, 0);
            } catch (RemoteException e) {
                e.printStackTrace();
            }
            mConnectBinderPoolCountDownLatch.countDown();
        }
    };

    private IBinder.DeathRecipient mBinderPoolDeathRecipient = new IBinder.DeathRecipient() {    // 6
        @Override
        public void binderDied() {
            mBinderPool.asBinder().unlinkToDeath(mBinderPoolDeathRecipient, 0);
            mBinderPool = null;
            connectBinderPoolService();
        }
    };

    public static class BinderPoolImpl extends IBinderPool.Stub {

        private Context context;

        public BinderPoolImpl(Context context) {
            this.context = context;
        }

        @Override
        public IBinder queryBinder(int binderCode) throws RemoteException {
            IBinder binder = null;
            switch (binderCode) {
                case BINDER_WEB_AIDL: {
                    binder = new MainProAidlInterface(context);
                    break;
                }
                default:
                    break;
            }
            return binder;
        }
    }

}
You can see from the code that the connection pool is connected to the main process MainProHandleRemoteService.
public class MainProHandleRemoteService extends Service {
    @Nullable
    @Override
    public IBinder onBind(Intent intent) {
        Binder mBinderPool = new RemoteWebBinderPool.BinderPoolImpl(context);
        return mBinderPool;
    }
}
Native-Web Interaction and Interface Management
A complete Web page and Native interaction process is as follows:
- When Native opens the page, it registers the interface: "webView. addJavascriptInterface" (jsInterface, "webview"); where jsInterface is an instance of the JsRemoteInterface class:
public final class JsRemoteInterface {
    @JavascriptInterface
    public void post(String cmd, String param) {
        ...
    }
- Web pages call native through "window. webview. post (cmd, JSON. stringify (para)";
- Native (that is, the Webview process) receives the call and passes it to the main process for execution through the IWebAidlInterface instance.
- After the main process receives the action request, it distributes the processing according to the action name, and completes the inter-process callback through IWebAidlCallback after execution.
Among them, the general Action structure is as follows:
public interface Command {

    String name();

    void exec(Context context, Map params, ResultBack resultBack);
}
Register all commands in advance according to different Levels. Take BaseLevel command as an example:
public class BaseLevelCommands {

    private HashMap<String, Command> commands;
    private Context mContext;

    public BaseLevelCommands(Context context) {
        this.mContext = context;
        registerCommands();
    }

    private void registerCommands() {
        commands = new HashMap<>();
        registerCommand(playVideoByNativeCommand);
    }

    private Command playVideoByNativeCommand = new Command() {
        @Override
        public String name() {
            return "videoPlay";
        }

        @Override
        public void exec(Context context, Map params, ResultBack resultBack) {
            if (params != null) {
                String videoUrl = (String) params.get("url");
                if (!TextUtils.isEmpty(videoUrl)) {
                    String suffix = videoUrl.substring(videoUrl.lastIndexOf(".") + 1);
                    DJFullScreenActivity.startActivityWithLanscape(context, videoUrl, DJFullScreenActivity.getVideoType(suffix), DJVideoPlayer.class, " ");
                }
            }
        }
    };
}
CommandsManager is responsible for distributing action s, structured as follows:
public class CommandsManager {

    private static CommandsManager instance;

    public static final int LEVEL_BASE = 1; // Foundation level
    public static final int LEVEL_ACCOUNT = 2; // level related to account

    private Context context;
    private BaseLevelCommands baseLevelCommands;
    private AccountLevelCommands accountLevelCommands;

    private CommandsManager(Context context) {
        this.context = context;
        baseLevelCommands = new BaseLevelCommands(context);
        accountLevelCommands = new AccountLevelCommands(context);
    }

    public static CommandsManager getInstance(Context context) {
        if (instance == null) {
            synchronized (CommandsManager.class) {
                instance = new CommandsManager(context);
            }
        }
        return instance;
    }

    public void findAndExec(int level, String action, Map params, ResultBack resultBack) {
        boolean methodFlag = false;
        switch (level) {
            case LEVEL_BASE: {
                if (baseLevelCommands.getCommands().get(action) != null) {
                    methodFlag = true;
                    baseLevelCommands.getCommands().get(action).exec(context, params, resultBack);
                }
                if (accountLevelCommands.getCommands().get(action) != null) {
                    AidlError aidlError = new AidlError(RemoteActionConstants.ERRORCODE.NO_AUTH, RemoteActionConstants.ERRORMESSAGE.NO_AUTH);
                    resultBack.onResult(RemoteActionConstants.FAILED, action, aidlError);
                }
                break;
            }
            case LEVEL_ACCOUNT: {
                if (baseLevelCommands.getCommands().get(action) != null) {
                    methodFlag = true;
                    baseLevelCommands.getCommands().get(action).exec(context, params, resultBack);
                }
                if (accountLevelCommands.getCommands().get(action) != null) {
                    methodFlag = true;
                    accountLevelCommands.getCommands().get(action).exec(context, params, resultBack);
                }
                break;
            }
        }
        if (!methodFlag) {
            AidlError aidlError = new AidlError(RemoteActionConstants.ERRORCODE.NO_METHOD, RemoteActionConstants.ERRORMESSAGE.NO_METHOD);
            resultBack.onResult(RemoteActionConstants.FAILED, action, aidlError);
        }
    }

}
The description may be somewhat unclear. For more details, please go to the source code. GitHub web progress: Android WebView stand-alone process solution Welcome to star.