

abstract
Starting with the target detection model, this paper demonstrates how to compile and optimize the trained model file step by step based on SageMaker Neo to improve the reasoning speed of the model. Yolo 3_ mobilenet1. 0_ The coco model is taken as an example to demonstrate the process of model preparation, model Neo compilation, model export, reasoning test and visualization. The reasoning results show that Neo based on sagemaker can significantly improve the reasoning speed and more than double the acceleration.
📢 Want to learn more frontier cases of artificial intelligence and machine learning? Come to the 2021 Amazon cloud technology China Summit to discuss and communicate with industry-leading technology practitioners! Click the picture to sign up ~
Model preparation
Before compiling the model with SageMaker Neo, first prepare the model according to the framework of neural network. For details, please refer to the official guide Compile and Deploy Models with Neo:
https://docs.aws.amazon.com/s...
Different frameworks have different requirements for models. Taking MXNet framework as an example, the requirements of the model are described as follows:
MXNet models must be saved as a single symbol file *-symbol.json and a single parameter *.params files.
In order to illustrate the detailed process of the whole SageMaker Neo optimization, this document is
yolo3_mobilenet1.0_coco human shape detection model as an example for model preparation, Neo compilation, and testing.
The model preparation is divided into two steps as follows:
Step 1: Download
yolo3_mobilenet1.0_coco human shape detection model:
wget -c https://ipc-models-zoo.s3.amazonaws.com/body-detector/body_detector_yolo3_mobilenet1.0_coco-0000.params
wget -c https://ipc-models-zoo.s3.amazonaws.com/body-detector/body_detector_yolo3_mobilenet1.0_coco-symbol.json
Step 2: type the above two documents into tar.gz package, execute the following python script:
import tarfile
tar = tarfile.open("body_detector_yolo3_mobilenet1.0_coco.tar.gz", "w:gz")
for name in ["body_detector_yolo3_mobilenet1.0_coco-0000.params", "body_detector_yolo3_mobilenet1.0_coco-symbol.json"]:
tar.add(name)
tar.close()
Python
After the script is executed, a file named
body_detector_yolo3_mobilenet1.0_coco.tar.gz
File, which is the input of SageMaker Neo compilation task.
Neo compilation job
SageMaker Neo compilation can be implemented directly on the SageMaker console. Its input is an S3 bucket path, and the optimized model export is also an S3 bucket path. The whole process is as follows:
1. Convert the generated
body_detector_yolo3_mobilenet1.0_coco.tar.gz
Upload to any specified S3 bucket path, such as
s3://object-det-neo/input/body_detector_yolo3_mobilenet1.0_coco.tar.gz
2. Enter the SageMaker console, click reasoning - compilation job in the left navigation bar, create a compilation job, enter the job name, and create an IAM role with S3 bucket access. The options in the input configuration include:
- Location of model components: S3 bucket path of model storage
- Data input configuration: that is, the input size during model reasoning. In this guide, the image with an aspect ratio of 3:2 is used as the benchmark, and the input scale is
- {"data": [1, 3, 416, 624]
Machine learning framework: as the guide takes MXNet as an example, MXNet is selected
3. Output configuration options include:
- Target equipment / target platform: select the target platform
- Operating system: select LINUX;
- Architecture: select x86_ sixty-four
- Accelerator: select NVIDIA
- Compiler options: importing
- {"gpu-code": "sm_75", "trt-ver": "7.0.0", "cuda-ver": "10.1"}
S3 output location: Specifies the optimized model output, such as - s3://object-det-neo/output/
Encryption key: keep the default (no custom encryption)
Finally, click Submit and wait for 3-5 minutes. The compiled model (e.g
s3://object-det-neo/output/body_detector_yolo3_mobilenet1.0_coco-LINUX_X86_64_NVIDIA.tar.gz
)It will be output to the specified S3 bucket position.
EC2 reasoning speed test
Start EC2 instance
Enter EC2 console, start the instance, and select Amazon system image (AMI) as
Deep Learning AMI (Amazon Linux 2) Version 44.0 - ami-01f1817a8a0c23c2e,
Select the instance type as g4dn XLarge, click next to configure instance details and maintain the default, click next to add storage and maintain the default root volume size of 95GiB, click next to add label (optional), click next to configure security group and maintain the default, click audit and start, select an existing key pair or create a new key pair, and click start.
Wait a few minutes. After the instance's status check and initialization are completed, link the instance through terminal:
ssh -i "your_key.pem" ec2-user@ec2-xxx-xxx-xx-xxx.compute-1.amazonaws.com
Reasoning test
After logging in to the instance through SSH, download the code and model of reasoning test (not optimized by Neo and optimized by Neo). The specific execution commands are as follows:
git clone https://github.com/aws-samples/amazon-ipc-ai-saas.git
cd amazon-ipc-ai-saas/source/neo
mkdir -p models/human_body_detector
cd models/human_body_detector
wget -c https://ipc-models-zoo.s3.amazonaws.com/body-detector/body_detector_yolo3_mobilenet1.0_coco-0000.params
wget -c https://ipc-models-zoo.s3.amazonaws.com/body-detector/body_detector_yolo3_mobilenet1.0_coco-symbol.json

cd ../../
mkdir -p models/human_body_detector_neo
cd models/human_body_detector_neo
wget -c https://ipc-models-zoo.s3.amazonaws.com/body-detector/body_detector_yolo3_mobilenet1.0_coco-LINUX_X86_64_NVIDIA.tar.gz
tar -zxvf body_detector_yolo3_mobilenet1.0_coco-LINUX_X86_64_NVIDIA.tar.gz
After the above command is executed, the structure in the neo / directory is as follows:
.
├── eval.py
├── models
│   ├── human_body_detector
│   │   ├── body_detector_yolo3_mobilenet1.0_coco-0000.params
│   │   └── body_detector_yolo3_mobilenet1.0_coco-symbol.json
│   └── human_body_detector_neo
│       ├── compiled.meta
│       ├── compiled_model.json
│       ├── compiled.params
│       ├── compiled.so
│       └── manifest
└── test_1280x1920x3.jpg
Install Neo AI DLR software and gluoncv dependency package. Refer to https://github.com/neo-ai/neo... ; The test platform here is Amazon g4dn XLarge, the installation command is as follows:
wget -c https://neo-ai-dlr-release.s3-us-west-2.amazonaws.com/v1.9.0/gpu/dlr-1.9.0-py3-none-any.whl
source activate mxnet_latest_p37
pip3 install dlr-1.9.0-py3-none-any.whl
pip3 install gluoncv==0.8.0
Go back to the neo / directory and execute the speed evaluation script eval Py, as follows:
python3 eval.py
The running results will be printed directly on the terminal, and the reasoning results will also be drawn and saved to the current directory (the detection result body_det_vis.jpg not optimized by SageMaker Neo, and the detection result body_det_vis_with_neo.jpg optimized by SageMaker Neo).
The visualization of reasoning results without Neo optimization and after Neo optimization are as follows:
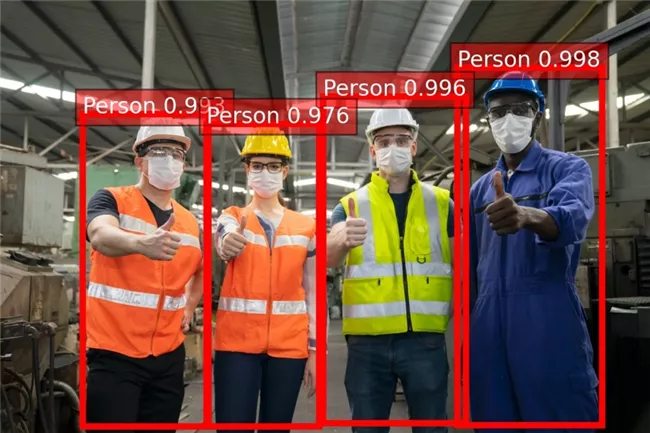

It can be seen that the optimization of SageMaker Neo basically does not affect the accuracy of detection, and the output results of running time overhead are as follows:
[NEO Optimization Disabled] Time Cost per Frame (input size = 1x3x416x624) = 23.388335704803467 ms
[NEO Optimization Enabled] Time Cost per Frame (input size = 1x3x416x624) = 10.05416750907898 ms
The model optimized by SageMaker Neo can more than double the reasoning speed. The reasoning time does not include base64 decoding and resize of images.
Note: after the test, close the instance to avoid unnecessary expenses.
Author of this article

Xu Gaowei
Amazon cloud technology solution architect
Responsible for consulting and architecture design of cloud computing solutions based on Amazon cloud technology, and committed to the application and promotion of Amazon cloud technology cloud services in automobile, Internet of things, artificial intelligence and other industries. Before joining Amazon cloud technology, he worked as a robot and artificial intelligence expert in BMW driverless R & D center, responsible for the research and development of unmanned vehicle environment perception, behavior prediction and decision planning.