Recently I needed to use the saliency map, studied it for a long time, took a note
What does saliency map do?
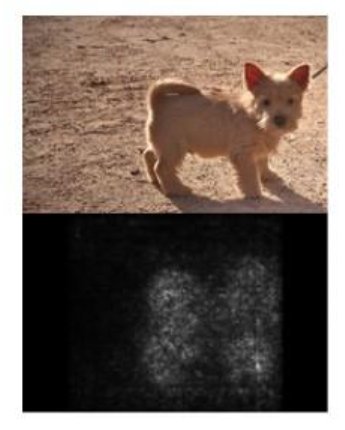
The saliency map can be understood as a feature map to measure the impact of the characteristics of each pixel point in the image on the classification results. Looking at the image below, you can see that the outline of the dog in the original image is highlighted, which indicates that the characteristics of these pixels in the image are very large for classification results.
Application scenarios for saliency map?
Used in image classification problems to measure the impact of each pixel point on the classification results; To be applied elsewhere is to measure the impact of the characteristics of each point, sequence, node, and so on, on the final result.
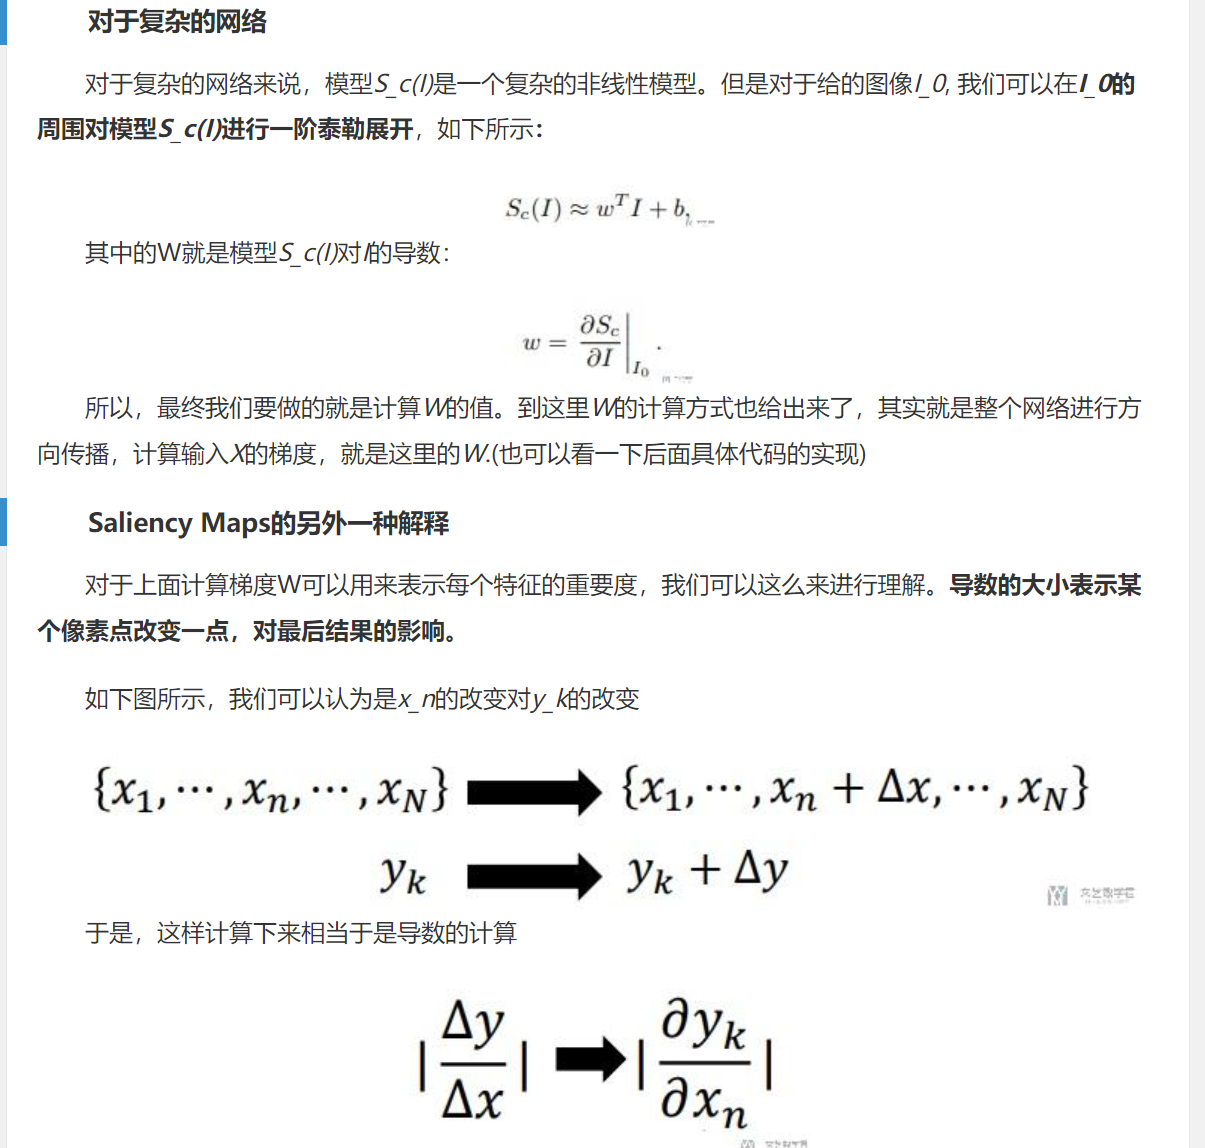
saliency map principle?
You can see the explanation in the diagram below. Presumably, the results are propagated backwards, the gradients for each layer are calculated, and the gradients are returned. Generate heatm images based on gradient and input characteristics to help observe the importance of each node's characteristics
How do I find the saliency map code?
There is not much code on the web and it is not very detailed. When backward method is used to reverse propagate, the gradient disappears directly. It is recommended that you go directly to Git to find the source code and paste the link below:
https://github.com/idiap/fullgrad-saliency
How do I use the saliency map code?
First of all, the environment, that is, the following four packages, all have tutorials on the Internet. Just load them with the pip command by yourself.
torch torchvision cv2 numpy
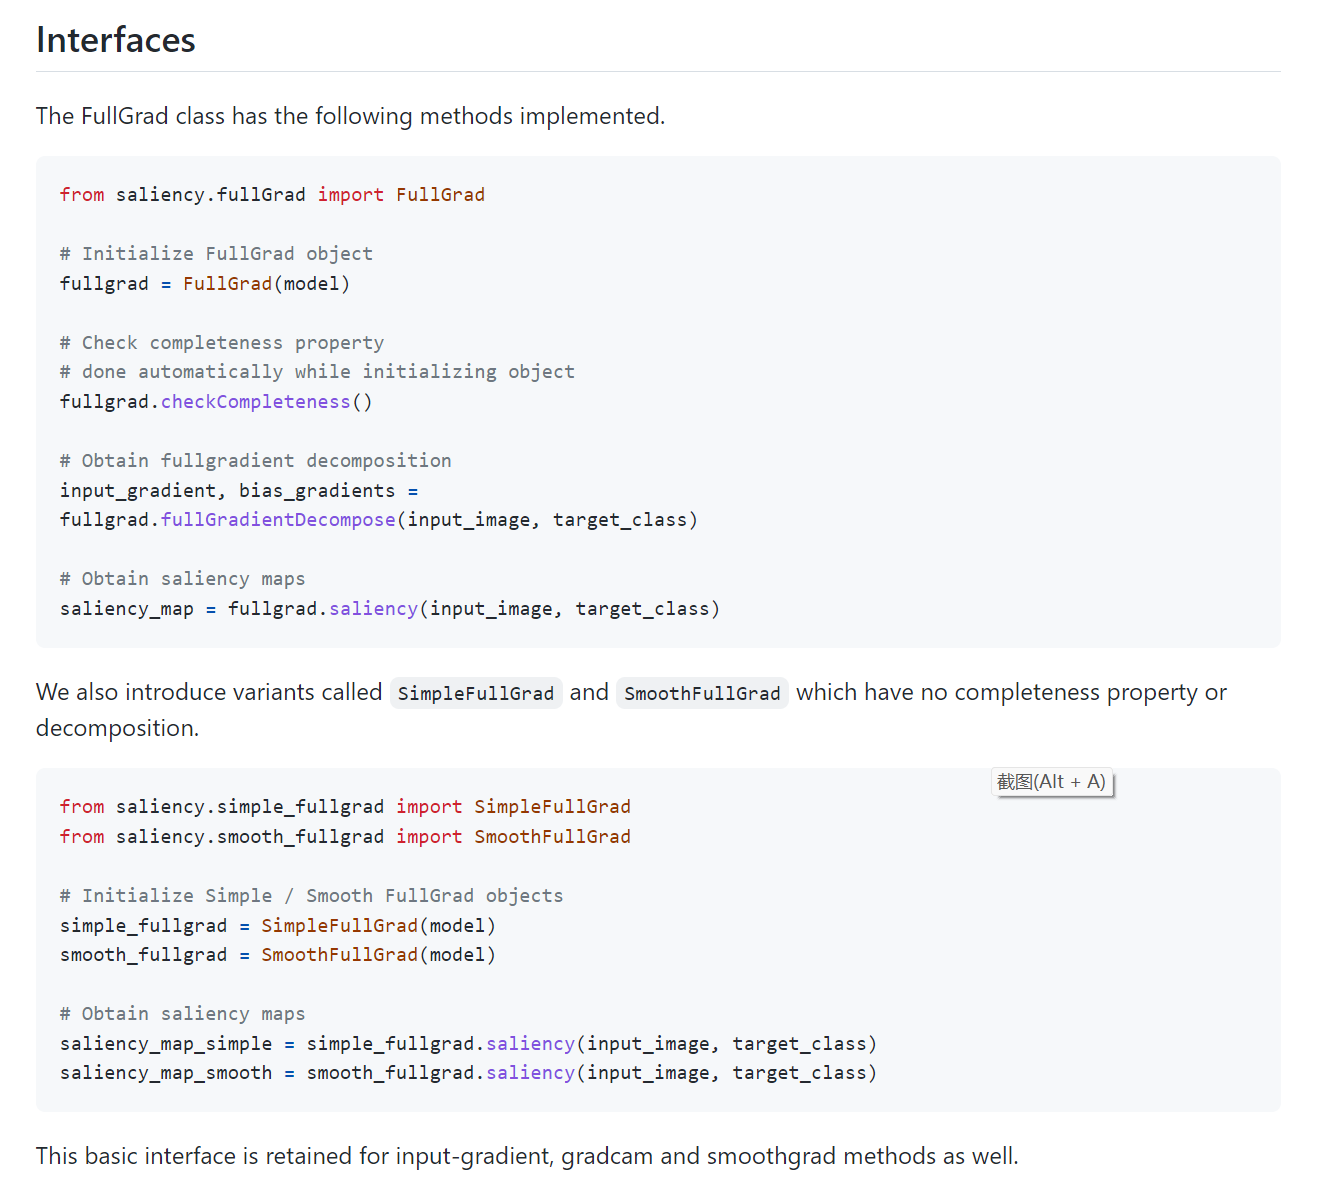
Then there's the code interface, which only gives some code interfaces, and we can use it directly. The top half of the picture is the interface required by gradients and biases, and the bottom half of the picture is the interface required by decomposition. I recommend using the interface directly requested together
Specific usage of saliency map code:
See the diagram below for the general logic of the project code. So how do I use the interface? Then look down
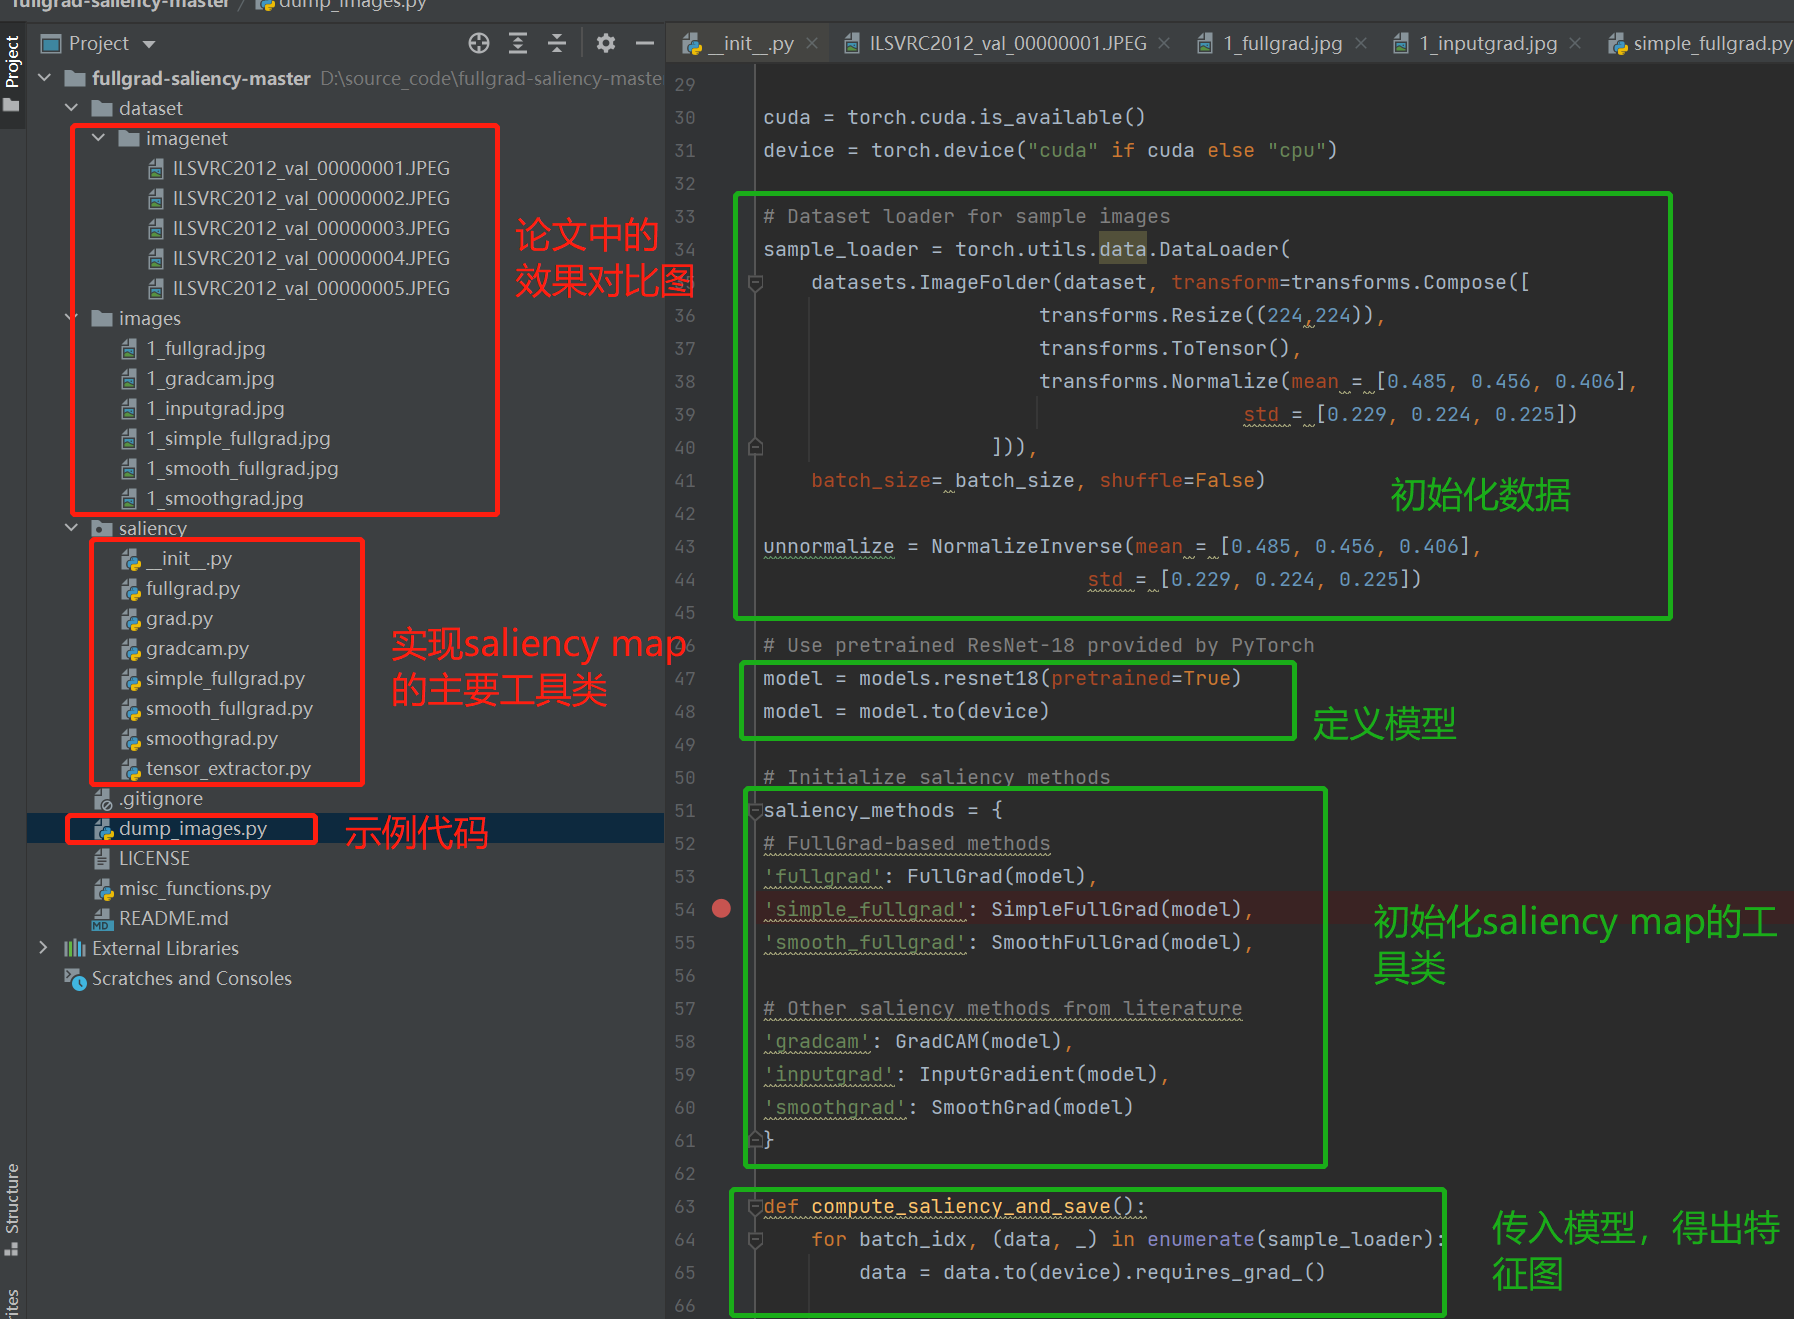
Look at the diagram below and use the tool classes and methods directly from the fullgrad file. This tool class requires gradient, biases, feature_gradient, explain what these three variables are.
Gradient: the characteristic gradient of each layer
biases: the offset of each layer of the network, what I understand is the error between the weight matrix and the characteristic matrix
feature_gradient: the feature gradient, which is the last feature gradient and the data source for drawing the heat map
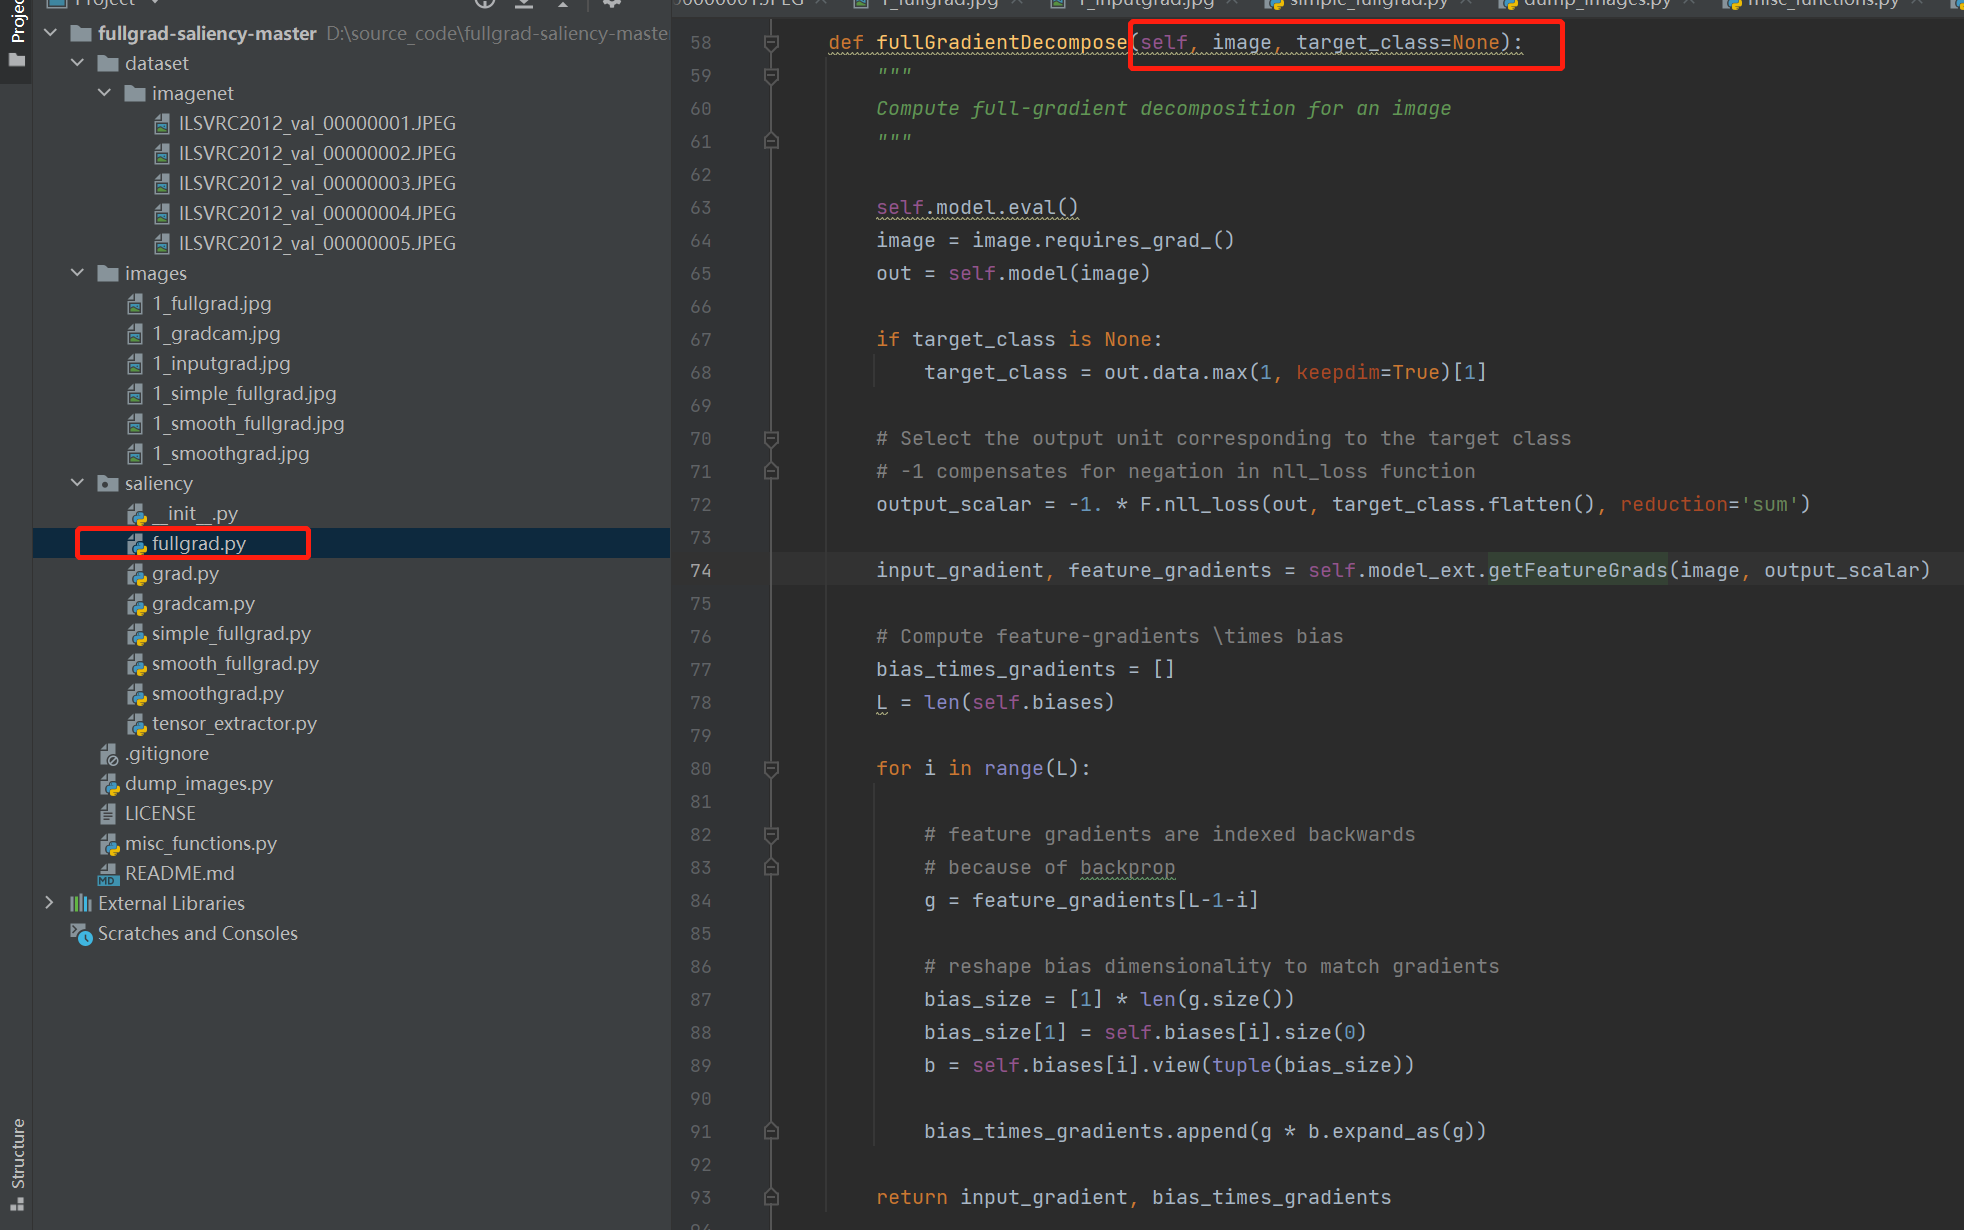
In the image below, I have a red box marked on the right with image and target_class has two parameters, which are explained as follows:
Image: The characteristics of the original image entered
target_class: the label of the image
So how do you use this code? Then look down.
If you want to use the code below directly, it's a little difficult. After all, it's the code of a paper or you need to go in and see it. Here's just the way to explain it. Once you understand the code explanation, the code below can be used directly.
The following code is part of the overall call
    def saliency(self, image, target_class=None):
        #FullGrad saliency

        self.model.eval()
        #Gradients and offsets from the features and labels of the transmitted image
        input_grad, bias_grad = self.fullGradientDecompose(image, target_class=target_class)

        # Input-gradient * image
        grd = input_grad * image
        gradient_all= self._postProcess(grd).sum(1, keepdim=True)

		#This part of the process of drawing the heat map was written by me. You can choose to use the source code instead of your own requirements.
        saliency_map = gradient_all.cpu().detach().numpy()
		image = image.cpu().detach().numpy()

		saliency_map = saliency_map - saliency_map.min()
		saliency_map = saliency_map / saliency_map.max()
		saliency_map = saliency_map.clip(0, 1)

		# Combine image with heatmap
		img_with_heatmap = np.float32(saliency_map) + np.float32(image)
		img_with_heatmap = img_with_heatmap / np.max(img_with_heatmap)

		plt.figure(dpi=200, figsize=(8, 18))
		sns.set()
		plt.xlabel('feature', {'family': 'Verdana', 'weight': 'normal', 'size': 23, 'color': '#000000'})
		sns.heatmap(data=img_with_heatmap, square=False, robust=True)
		plt.title("saliency map")
		# plt.gcf().set_size_inches(240, 1000)
		plt.savefig("./picture/grid.jpg")
		plt.show()
Code to solve the gradient:
 def fullGradientDecompose(self, image, target_class=None):
        """
        Compute full-gradient decomposition for an image
        """

        self.model.eval()#Set to test mode without updating model parameters
        image = image.requires_grad_()#Setting input image characteristics requires gradient returns
        out = self.model(image)#In the input model, get the final embedding
		#In fact, we have made some dimension transformations. if loss can be calculated, the following IFS can or can not be
        if target_class is None:
            target_class = out.data.max(1, keepdim=True)[1]

        # Select the output unit corresponding to the target class
        # -1 compensates for negation in nll_loss function
        output_scalar = -1. * F.nll_loss(out, target_class.flatten(), reduction='sum')
		#The initial attempt will be reversed, like the feature and calculated loss. The following line of code is the reverse rewind process, which I will paste into the next section of code, so let's go through it as a whole. Output is the gradient of input and the characteristic gradient
        input_gradient, feature_gradients = self.model_ext.getFeatureGrads(image, output_scalar)

        # Compute feature-gradients \times bias
        bias_times_gradients = []
        L = len(self.biases)
		#Traverse through each layer of the network, save all the gradients and offsets, and return
        for i in range(L):

            # feature gradients are indexed backwards
            # because of backprop
            g = feature_gradients[L-1-i]

            # reshape bias dimensionality to match gradients
            bias_size = [1] * len(g.size())
            bias_size[1] = self.biases[i].size(0)
            b = self.biases[i].view(tuple(bias_size))

            bias_times_gradients.append(g * b.expand_as(g))
		#Notice that the feature gradient and offset for each layer are returned here
        return input_gradient, bias_times_gradients
The code below is the gradient return process. There's nothing to do with this method, just get the gradients for all the layers and return back
    def getFeatureGrads(self, x, output_scalar):

        # Empty feature grads list
        self.feature_grads = []

        self.model.zero_grad()
        # Gradients w.r.t. input
        input_gradients = torch.autograd.grad(outputs = output_scalar, inputs = x)[0]

        return input_gradients, self.feature_grads
If you see this and understand it, saliency map is fine. If you don't understand it, leave your own questions in the comments or private messages.