catalogue
Step 3: generate code using plug-ins
Step 4: copy the file to the corresponding package
Step 5: use the generated code to write the client and server
This section mainly introduces the gRPC quick start example in Java. jdk version 1.7 +
You can download the official cases on github.# git address git clone -b v1.40.0 https://github.com/grpc/grpc-java # This example is located in the grpc Java / examples module # helloword package and hellowrod.com in the proto folder proto
My gitee code address:
# My example
https://gitee.com/work_ldj/gRPC-examples.git
# Hello grpc module (example used in this article)
# The module basically refers to the official website example of, but adds some comments
Step 1: create a project
1. Introduce dependency
(see source code for version)
<properties>
        <!--gRPC edition-->
        <gRPC.version>1.40.0</gRPC.version>
        <protobuf.version>3.17.2</protobuf.version>
</properties>

<dependencies>
        <dependency>
            <groupId>io.grpc</groupId>
            <artifactId>grpc-netty-shaded</artifactId>
        </dependency>

        <dependency>
            <groupId>io.grpc</groupId>
            <artifactId>grpc-protobuf</artifactId>
        </dependency>

        <dependency>
            <groupId>io.grpc</groupId>
            <artifactId>grpc-stub</artifactId>
        </dependency>

        <dependency>
            <groupId>io.grpc</groupId>
            <artifactId>grpc-testing</artifactId>
            <scope>test</scope>
        </dependency>

        <dependency>
            <groupId>com.google.protobuf</groupId>
            <artifactId>protobuf-java-util</artifactId>
        </dependency>

        <dependency>
            <groupId>org.mockito</groupId>
            <artifactId>mockito-core</artifactId>
            <scope>test</scope>
        </dependency>

        <dependency>
            <groupId>org.apache.tomcat</groupId>
            <artifactId>annotations-api</artifactId>
            <scope>provided</scope>
        </dependency>

        <!--Log component-->
        <dependency>
            <groupId>org.slf4j</groupId>
            <artifactId>slf4j-log4j12</artifactId>
        </dependency>
        <!--Test components-->
        <dependency>
            <groupId>junit</groupId>
            <artifactId>junit</artifactId>
        </dependency>

    </dependencies>
2. Introducing plug-ins
 <!--gRPC-examples Common build components-->
    <build>
        <extensions>
            <extension>
                <groupId>kr.motd.maven</groupId>
                <artifactId>os-maven-plugin</artifactId>
                <version>1.7.0</version>
            </extension>
        </extensions>

        <plugins>
            <!--
                protobuf and grpc plug-in unit
                Recommended use maven Plug in generated code
            -->
            <plugin>
                <groupId>org.xolstice.maven.plugins</groupId>
                <artifactId>protobuf-maven-plugin</artifactId>
                <version>0.6.1</version>
                <configuration>
                    <protocArtifact>com.google.protobuf:protoc:${protobuf.version}:exe:${os.detected.classifier}
                    </protocArtifact>
                    <pluginId>grpc-java</pluginId>
                    <pluginArtifact>io.grpc:protoc-gen-grpc-java:${gRPC.version}:exe:${os.detected.classifier}
                    </pluginArtifact>
                </configuration>
                <executions>
                    <execution>
                        <goals>
                            <goal>compile</goal>
                            <goal>compile-custom</goal>
                        </goals>
                    </execution>
                </executions>
            </plugin>

            <!--Basic components-->
            <plugin>
                <groupId>org.apache.maven.plugins</groupId>
                <artifactId>maven-resources-plugin</artifactId>
                <version>3.2.0</version>
            </plugin>
            <plugin>
                <groupId>org.apache.maven.plugins</groupId>
                <artifactId>maven-compiler-plugin</artifactId>
                <version>3.8.1</version>
                <inherited>true</inherited>
                <configuration>
                    <source>1.8</source>
                    <target>1.8</target>
                    <encoding>utf-8</encoding>
                </configuration>
            </plugin>
            <plugin>
                <groupId>org.apache.maven.plugins</groupId>
                <artifactId>maven-surefire-plugin</artifactId>
                <version>2.21.0</version>
                <inherited>true</inherited>
                <configuration>
                    <forkCount>1</forkCount>
                    <reuseForks>false</reuseForks>
                    <skipTests>true</skipTests>
                </configuration>
            </plugin>
        </plugins>

    </build>
3. Engineering structure

Step 2: write helloword proto
//Statement version
syntax = "proto3";

option java_multiple_files = true;
//Specify the package under which the generated files are placed
option java_package = "top.joylee.example.grpc.hello";

//Declare rpc service interface
//Keyword: Service declares the service interface "class" to be generated
service Greeter {
    // Keyword: rpc declares a service method, including method name, request message (request body), and corresponding message (response body)
    // [note]: proto is named in Pascal. The difference between proto and hump naming is that the initial letter is capitalized.
    //         Don't worry about the method name when calling the method, because the plug-in will convert it for us.
    //         In addition, it is recommended to use maven plug-in to generate code to avoid generating syntax that conflicts with the JDK version
    rpc SayHello(HelloRequest) returns (HelloResponse);
}
//Claim request, response message
//Keywords: message declaration request body and response body
message HelloRequest {
    string name = 1;
}

message HelloResponse {
    string message = 1;
}
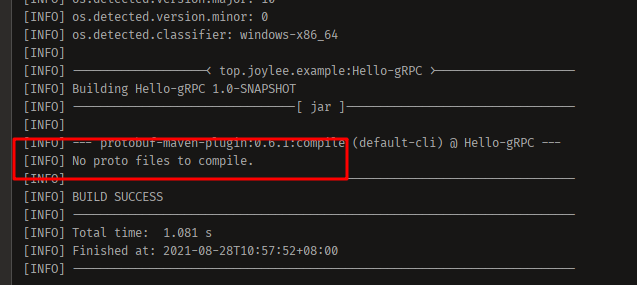
[note]: it has been marked in the engineering structure, but it should be mentioned that this file should be placed in src/main/proto folder, and the proto name must not be wrong. Otherwise, it is shown in the following figure:

Unable to generate code because the proto file cannot be found
Step 3: generate code using plug-ins
1. Say important things three times The location of the proto file should be in the main/proto folder
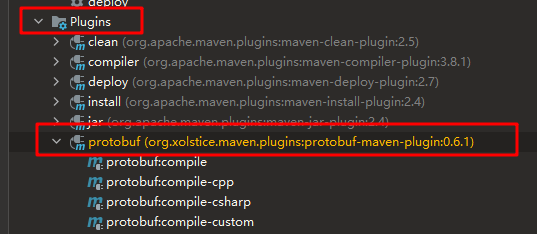
2. Check whether the maven plug-in is downloaded successfully

3. Compile generated code
3-1 first execute protobuf: reply to generate message related codes

3-2 then execute protobuf: compile custom to generate grpc service related code

The execution sequence of these two steps can be reversed, but both steps must be executed.
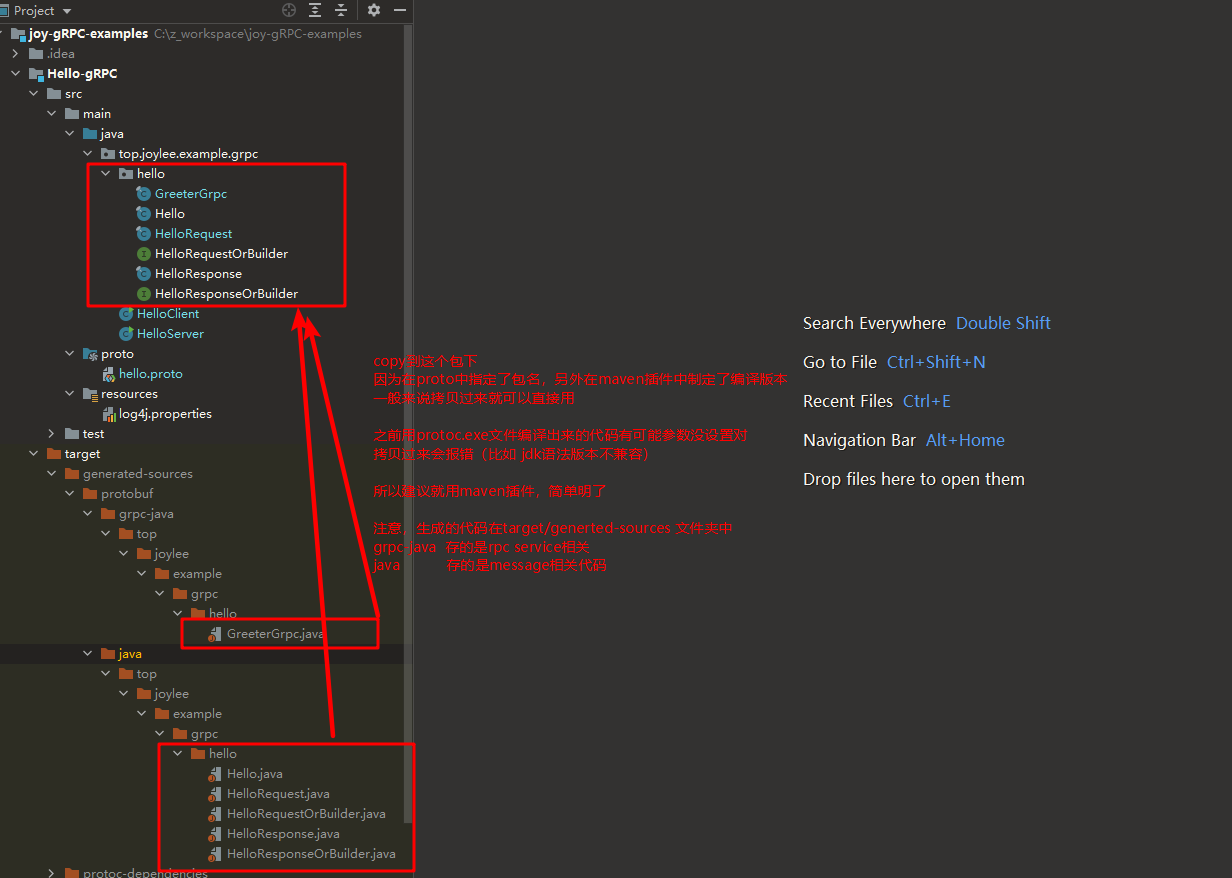
Step 4: copy the file to the corresponding package

Step 5: use the generated code to write the client and server
1. Server code
The final goal of server code is implementation rpc service defined in the proto file.
public class HelloServer {
    private final static Logger log = LoggerFactory.getLogger(HelloServer.class);

    private Server server;

    public static void main(String[] args) throws Exception {
        HelloServer helloServer = new HelloServer();
        helloServer.start();
        helloServer.blockUntilShutdown();
    }

    private void start() throws IOException {
        int port = 50001;
        server = ServerBuilder.forPort(port)
                .addService(new GreeterImpl())
                .build()
                .start();
        log.info("Server started.listening on {}", port);

        // Listen for jvm shutdown events and handle them
        Runtime.getRuntime().addShutdownHook(new Thread(() -> {
            log.error("**** shutdown g=RPC server since JVM is shutting down");
            try {
                stop();
            } catch (InterruptedException e) {
                log.error("await stop error,interrupted", e);
            }
            log.info("**** server shut down ,good bye ***");
        }));
    }

    private void blockUntilShutdown() throws InterruptedException {
        if (Objects.isNull(server)) {
            return;
        }
        server.awaitTermination();
    }


    private void stop() throws InterruptedException {
        if (Objects.isNull(server)) {
            return;
        }
        server.shutdown().awaitTermination(30, TimeUnit.SECONDS);
    }


    private static class GreeterImpl extends GreeterGrpc.GreeterImplBase {
        @Override
        public void sayHello(HelloRequest request, StreamObserver<HelloResponse> responseObserver) {
            log.info("...receive {} request", request.getName());
            HelloResponse response = HelloResponse.newBuilder().setMessage("Hello \t" + request.getName()).build();
            responseObserver.onNext(response);
            responseObserver.onCompleted();
            log.info("reply {} complete...", request.getName());
        }
    }
}
2. Client code
The client mainly shows how to create a channel through ManagedChannelBuilder, then get the stub through the channel and call the method.
/**
 * Hello gRPC client
 */
public class HelloClient {
    private static final Logger log = LoggerFactory.getLogger(HelloClient.class);
    private final GreeterGrpc.GreeterBlockingStub blockingStub;

    public HelloClient(Channel channel) {
        blockingStub = GreeterGrpc.newBlockingStub(channel);
    }

    public void greet(String name) {
        log.info("*** {} will try to greet ...", name);
        //Step 1: set the request body
        HelloRequest request = HelloRequest
                .newBuilder()
                .setName(name)
                .build();

        //Define response
        HelloResponse response;
        try {
            response = blockingStub.sayHello(request);
        } catch (StatusRuntimeException e) {
            log.error("gRPC failed,{}", e.getMessage(), e);
            return;
        }
        log.info("Great:{}", response.getMessage());
    }

    public static void main(String[] args) throws InterruptedException {
        String user = "Joy";
        String target = "localhost:50001";
        ManagedChannel channel = ManagedChannelBuilder.forTarget(target)
                .usePlaintext()
                .build();
        try {
            for (int i = 1; i <= 5; i++) {
                log.info("...The first{}Secondary request", i);
                HelloClient client = new HelloClient(channel);
                client.greet(user);
                log.info("The first{}Request completed...", i);
                TimeUnit.SECONDS.sleep(2);
            }
        } catch (Exception e) {
            log.error(e.getMessage(), e);
        } finally {
            channel.shutdownNow().awaitTermination(5, TimeUnit.SECONDS);
        }
    }
}
3. Run
Start the server and then the client. The running results are as follows:
Server:
