catalogue
2, keytool tool generates certificate
1.KeyStore, KeyManager and TrustManager classes
3.SSLServerSocketFactory and SSLSocketFactory classes
4.2. Handle handshake end event
3, Secure server and client based on SSL
4, Countersignature and signature verification
2. Signature verification API provided by Java
On the network, the transmission of information from the source host to the target host will pass through some other computers. In the process of data transmission, tools can be used to intercept the data spreading in the network and carry out some other operations. For example, when using online banking, the information on the network may be monitored by illegal elements, resulting in the disclosure of personal privacy, or it may replace the original information sent by users. Based on security considerations, Netscape company proposed SSL protocol, which aims to transmit data and information safely and confidentially on the network.
Java Secure Socket Extension (JSSE) provides API and reference implementation for Java network applications based on SSL and TLS protocols. Using JSSE can ensure the safe exchange of data between client programs and server programs using various application layer protocols (such as HTTP, FTP, etc.).
1, Concept introduction
1. Introduction to SSL
SSL(Secure Socket Layer) is a protocol to ensure the secure communication between two nodes on the network. It is between the transport layer and the application layer. IEIF(Internet Engineering Task Force) International Organization standardized SSL, specified RFC2246 specification and called it Transport Layer Security (TLS) (upgraded SSL). Both SSL and TLS are based on TCP/IP and use encryption technology to realize secure communication, ensure the confidentiality and integrity of communication data, and ensure that both sides of communication can verify each other's identity. Some application layer protocols can use SSL to ensure secure communication. For example, HTTP based on SSL protocol is called HTTPS protocol.
2. Encrypted communication
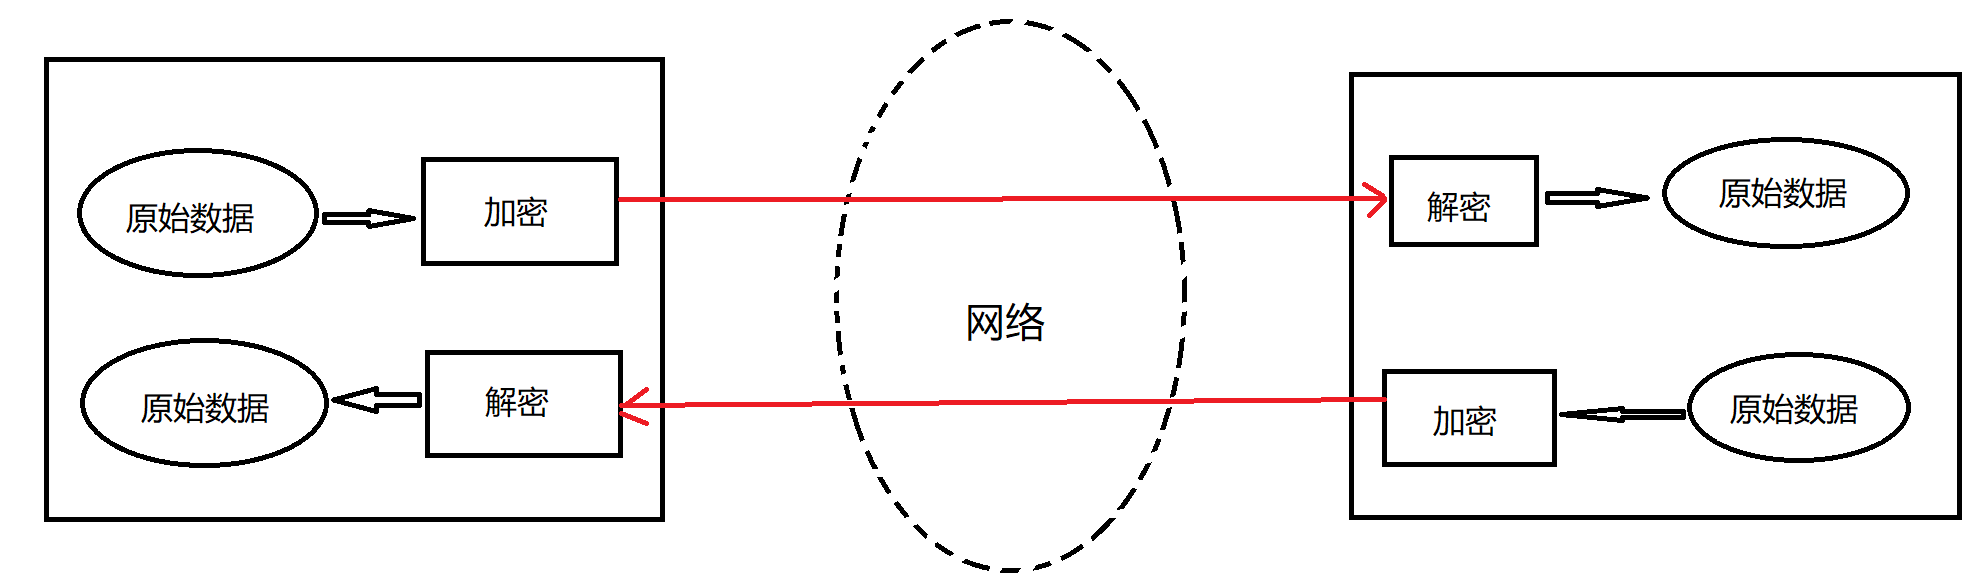
The basic principle of encryption technology is that when data is sent from one end to the other end, the sender encrypts the data first, and then sends the ciphertext to the receiver. In this way, the encrypted data is transmitted on the network. If someone intercepts this batch of data, because there is no decryption key, the real original data cannot be obtained. After receiving the encrypted data, the receiver decrypts the data first and then processes it.
3. Safety certificate
In addition to encrypting data communication, SSL also adopts an identity authentication mechanism to ensure that both sides of the communication can verify each other's real identity. Like "electronic ID card" "The same, but SSL is used to prove the identity of the client or server through the security certificate. When the client communicates with the server through a secure connection, the server will first show its security certificate to the client, which states that the server is secure and indeed the server. Each certificate is unique all over the world, and other illegal servers cannot fake it Impersonate the original server.
For a single customer, it is troublesome to obtain a security certificate from a recognized authority. In order to expand the customer base and facilitate customer access, many servers do not require customers to show security certificates. In some cases, the server will also ask the customer to show the security certificate to verify the identity of the customer, mainly in B2B(Business to Business) transactions.
There are two ways to obtain a security certificate:
- Obtain the certificate from the authority;
- Create a self signed certificate.
Obtain certificate from authority
The security certificate is made by encryption technology, which can hardly be forged by others. The safety certificate is issued by the international authority. When applying for the safety certificate, you must pay a certain fee. A security certificate is only valid for one IP address. If there are multiple IP addresses in the system environment, you must purchase a security certificate for each IP address.
Create a self signed certificate
In some cases, both sides of the communication only care about the secure transmission on the network and do not need each other to authenticate. In this case, self signed certificates can be used, and the keytool tool provided by JDK can create such certificates. Such a certificate is like a business card made by yourself. It lacks authority and can not achieve the purpose of identity authentication. (if you submit your business card to the other party, the identity letter written on the business card can only be judged by the other party). However, whether it is the certificate obtained from the authority or the certificate made by yourself, the encryption technology used is the same. Using these certificates, the communication can be encrypted safely.
4.SSL handshake
The security certificate contains both the key used to encrypt data and the digital signature used to verify identity. The security certificate adopts public key encryption technology. Public key encryption refers to the use of a pair of asymmetric keys for encryption or decryption. Each pair of keys consists of a public key and a private key. The public key is published, and the private key is secret and not public. Data used for public key encryption can only be decrypted by the private key. Conversely, data encrypted with the private key can only be decrypted by the public key. This asymmetric feature makes public key encryption very useful.
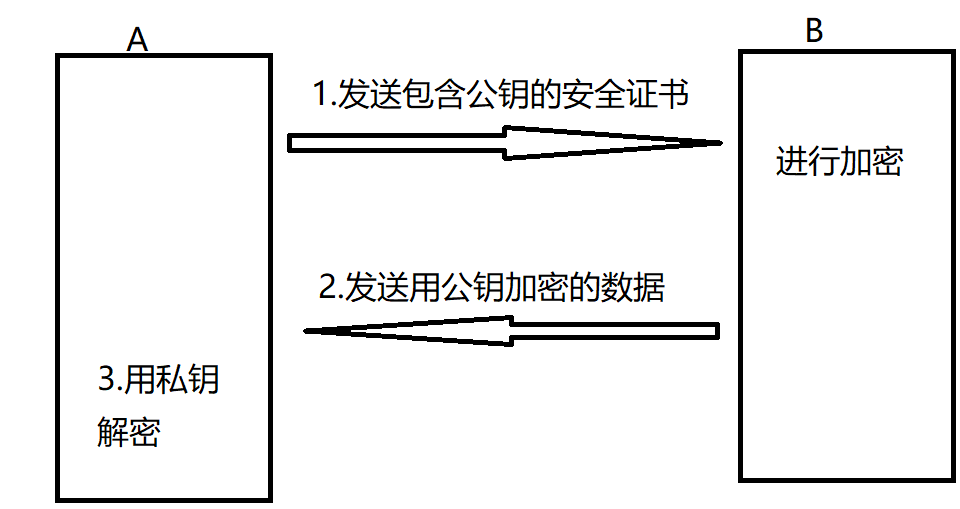
The security certificate contains this pair of asymmetric keys, and only the owner of the security certificate knows the private key. As shown in the figure below, when a sends its own security certificate to B, it actually sends B a public key. Then B can send data encrypted with the public key to A. only a can decrypt the data with the private key, so as to obtain the original data sent by A.
When communicating with the server, the client must first carry out SSL handshake. SSL handshake mainly completes the following tasks:
- Negotiate the encryption suite to use. The encryption suite contains a set of encryption parameters that specify information such as encryption algorithm and key length.
- Verify the identity of the other party. (optional)
- Determine the encryption algorithm used.
The process of SSL handshake uses asymmetric encryption to transfer data, so as to establish a secure session. After the SSL handshake is completed, both sides of the communication will use the symmetric encryption method to transfer the actual application data. (symmetric encryption means that both sides of the communication use the same key to encrypt data).
The specific process of SSL handshake is as follows:
- The client sends its SSL version number, encryption parameters, session related data and other necessary information to the server;
- The server sends its SSL version number, encryption parameters, session related data and other necessary information to the client, as well as the server's certificate. If the server needs to verify the identity of the client, the server will also issue a request for the client to provide a security certificate.
- The client verifies the server certificate. If the verification fails, it will prompt that SSL connection cannot be established. If successful, continue to the next step;
- The client generates a pre master secret for this session, encrypts it with the server public key and sends it to the server;
- If the server requires to verify the identity of the client, the client needs to sign some other data and send it to the server together with the client certificate;
- If the server requires authentication of the client's identity, check whether the Ca (certificate authority) signing the client's certificate is trusted. If you are no longer in the trust list, end this session. If the check is passed, the server decrypts the received preliminary master password with its own private key, and uses it to generate the master password of this session through some algorithms.
- Both the client and the server use this master password to generate the session key (symmetric key) of this session. This session key is used for any message delivered after the SSL handshake between the two parties. The main reason for this is that the amount of computation of symmetric encryption is more than one order of magnitude lower than that of asymmetric encryption, which can significantly improve the operation speed of both sides during conversation;
- The client informs the server that the messages sent thereafter are encrypted with this session key, and informs the server that the client has completed this SSL handshake;
- The server notifies the client that the messages sent thereafter are encrypted with this session key, and notifies the client that the server has completed this SSL handshake;
- The handshake is over and the session has been established. In the next session, both parties use the same session key to encrypt and decrypt the sent and received information respectively.
2, keytool tool generates certificate
There are two ways to obtain a security certificate: one is to buy it from an authority, and the other is to create a self signed certificate. Next, use the built-in certificate making tool keytool in JDK to create a self signed certificate., The tool location is < JDK root > \ bin \ keytool exe,
keytool tool puts forward the concept of keystore. The keystore can contain multiple entries. Each entry includes a self signed security certificate and a pair of asymmetric keys.
Communication between client and server based on SSL security protocol. First, the server needs to prepare its own security certificate. When shaking hands with SSL, it needs to send the security certificate to the client, who can verify the identity of the server. The following is the command to create the keystore:
keytool -genkeypair -alias ssl_server -keyalg RSA -keystore ./server_ks.keystore

//The above command will generate a keystore with a certificate entry named "ssl_server"
-genkeypair: Generate a pair of asymmetric keys
-alias: Specifies the alias of the entry and key pair, which is public
-keyalg: Specify the encryption algorithm. The above is RSA algorithm
-keystore: Set the storage path and file name of the keystore file
After executing the above command:
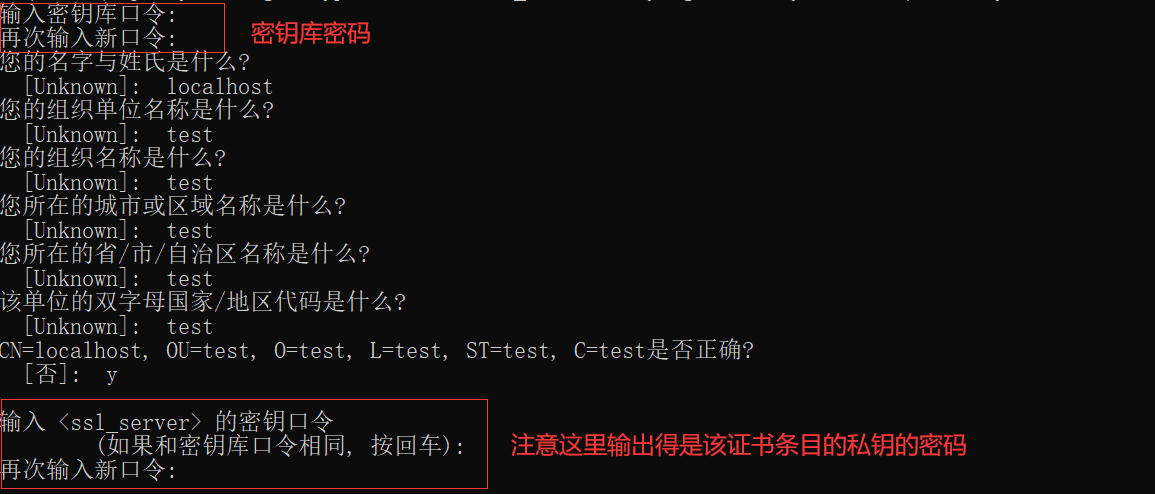
At this time, the server has been generated_ ks. Keystore is a file that is the repository where the server saves certificates.
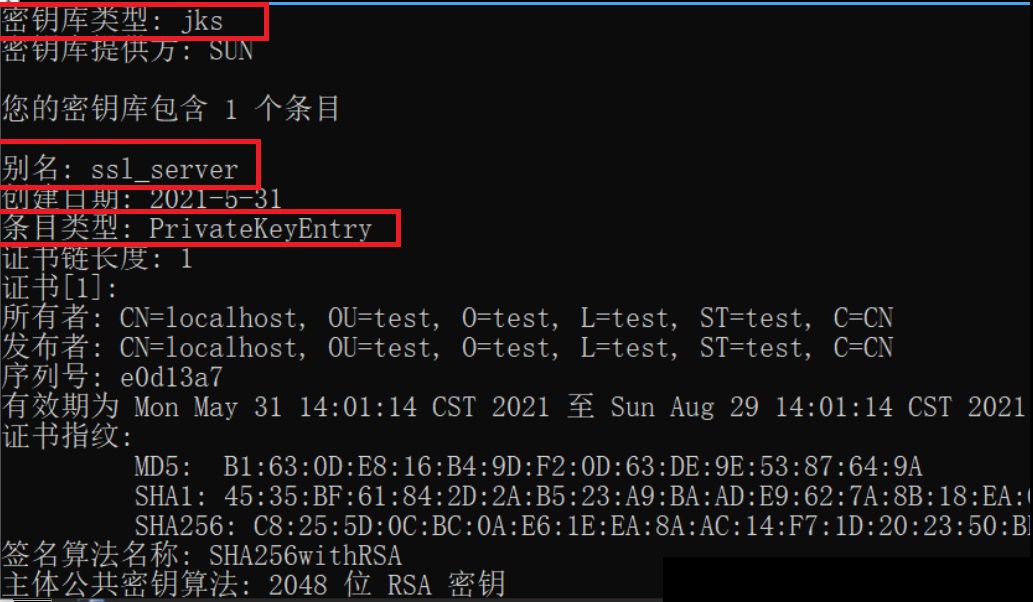
View the server through the following command_ ks. The information of keystore keystore will list the information of the certificate contained.
keytool -list -v -keystore ./server_ks.keystore -storepass "password"
Through the above operations, a self signed digital certificate is generated for the server. The client can only trust the certificate issued by the client when the warehouse does not trust the certificate issued by the client. Just set the trusted certificate warehouse in the client program.
First, a blank certificate warehouse is generated for the client (used to store the certificates trusted by the client)
//1. Generate a certificate warehouse client trusted by the client_trust_ks.keystore, which contains a file named SSL_ Certificate entry for client
keytool -genkeypair -alias ssl_client -keyalg RSA -keystore ./client_trust_ks.keystore

//Execute the following command to the SSL_ The client's certificate is deleted. At this time, the certificate warehouse trusted by the client is blank.
keytool -delete -alias ssl_client -keystore ./client_trust_ks.keystore
Next, we need to export the server-side Certificate (make a copy) and import it into the certificate warehouse trusted by the client.
//ssl_server exports this certificate to/ ssl_server.crt file (Note: this file only contains the public key in the key pair, not the private key)
keytool -export -alias ssl_server -keystore ./server_ks.keystore -file ./ssl_server.crt -storepass "password"

//Execute the following command to import. He will ask you whether you trust this certificate. Just enter 'Y' (the imported one only contains the public key, not the private key)
keytool -import -alias ssl_server -keystore ./client_trust_ks.keystore -file ./ssl_server.crt -storepass "password"
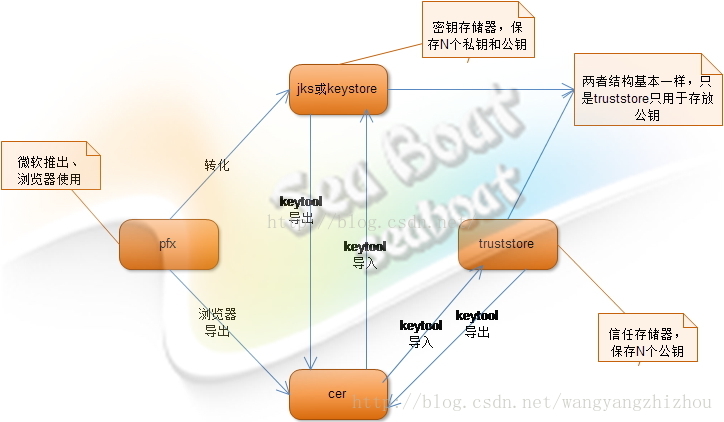
SSL protocol communication involves many file formats of key storage, which is easy to be confused, such as XXX cer,xxx.pfx,xxx.jks,xxx.keystore,xxx.truststore and other format files. So what are these differences?
- . crt and cer format file is commonly known as certificate, but this certificate has no private key and only contains public key;
- The. pfx format file, also known as the certificate, is generally used by browsers, and it contains not only the public key but also the private key. Of course, the private key is encrypted and cannot be decrypted without entering a password;
- The. jks format file represents the java key store, which can hold N public keys and private keys at the same time. It is a keystore;
- The. keystore format file is actually the same as jks is basically the same, but different companies have different names. The format of certificate repository generated by default;
- The. truststore format file represents the trust certificate repository, which only contains the public key of the communicating party. Of course, you can directly use the jks of the communicating party as the trust repository (even so, you can only know the public key of the communicating party. You know that the keys are encrypted and you can't get them, as long as the algorithm is not cracked).
Sometimes we need to convert pfx or cert into jks to facilitate ssl communication with java. For example, a bank only provides pfx certificate, and when we want to use java for ssl communication, we need to convert pfx into jks format.
3, Introduction to JSSE
JSSE encapsulates the underlying complex security communication details, so that developers can easily use it to develop secure network applications. The API of JSSE allows the implementation provided by a third party, which can be integrated into JSSE as a plug-in. These plug-ins must support Oracle specified encryption suite. (the encryption suite includes a set of encryption parameters that specify information such as the key length of the encryption algorithm.) For example:
SSL_DHE_RSA_EXPORT_WITH_DES40_CBC_SHA
 use SSL Protocol, key exchange algorithm is DHE,The encryption algorithm is RSA
The main class diagram of JSSE is as follows
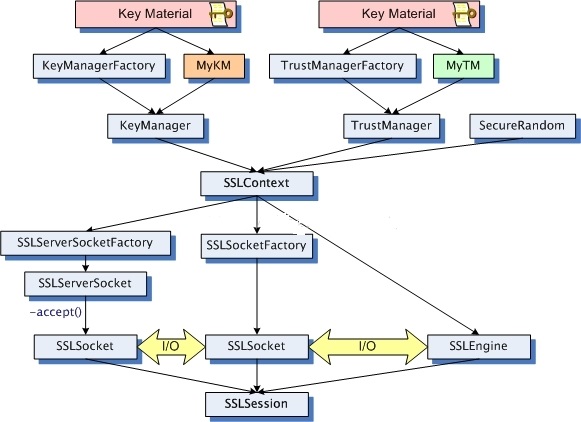
1.KeyStore, KeyManager and TrustManager classes
During secure communication, both client and server are required to support SSL or TCL protocol. Both the client and the server may need to set the security certificates used to verify their identity and which security certificates they trust each other. More commonly, the server only needs to set the security certificates used to verify its identity, while the client only needs to set the security certificates that trust the server.
The KeyStore class is used to store the KeyStore containing the security certificate. Create KeyStore objects as follows:
public static void main(String[] args) throws Exception {
    // Keystore password
    String passphrase = "password";
    // Keystore object, JKS is the abbreviation of Java keystore, the keystore type supported by Java.
    // Via keystore Getdefaulttype () can also obtain the platform default keystore type.
    KeyStore keyStore = KeyStore.getInstance("JKS");
    char[] password = passphrase.toCharArray();
    // Load the keystore (if you want to create an empty keystore, the following two parameters can be null)
    keyStore.load(new FileInputStream("E:\\server_ks.keystore"), password);
    // After loading, you can operate
    // Certificate entry name
    String alias = "ssl_server";

    // Methods in the following objects can be found according to API
    // Certificate object
    Certificate certificate = keyStore.getCertificate(alias);
    // Get public key object
    PublicKey publicKey = certificate.getPublicKey();
    // Get the private key object and fill in the private key password here. (Note: Here you need to enter the password of the private key in the certificate entry, which is consistent with the keystore password)
    PrivateKey privateKey = ((KeyStore.PrivateKeyEntry) keyStore.getEntry(alias,new KeyStore.PasswordProtection(passphrase.toCharArray()))).getPrivateKey();
    // Encode and output the key in Base64
    String strPrivateKey = Base64.getEncoder().encodeToString(privateKey.getEncoded());
    String strPublicKey = Base64.getEncoder().encodeToString(publicKey.getEncoded());
    System.out.println("Private key:" + strPrivateKey);
    System.out.println("Public key:" + strPublicKey);
}
The task of the KeyManager interface is to select the security certificate used to confirm your identity and send it to the other party. Create a KeyManager object using KeyManagerFactory.
// The parameter is the standard name of the requested trust management algorithm
KeyManagerFactory keyManagerFactory = KeyManagerFactory.getInstance("SunX509");
keyManagerFactory.init(keyStore, password);
KeyManager[] keyManagers = keyManagerFactory.getKeyManagers();
The task of the TrustManager interface is to decide whether to trust the other party's security certificate (this interface is an empty interface, its sub interface is X509TrustManager, and this interface has only one implementation class X509ExtendedTrustManager). TruesManagerFactory is responsible for creating TrustManager objects.
TrustManagerFactory trustManagerFactory = TrustManagerFactory.getInstance("SunX509");
trustManagerFactory.init(keyStore);
TrustManager[] trustManagers = trustManagerFactory.getTrustManagers();
2.SSLContext class
SSLContext is responsible for setting various information related to secure communication, such as the protocol used (SSL or TLS), its own security certificate and the other party's security certificate. SSLContext is also responsible for constructing SSLServerSocketFactory, SSLSocketFactory and ssengine objects. The initialization method is as follows:
SSLContext sslCtx = SSLContext.getInstance("TLS");
sslCtx.init(keyManagers, trustManagers, null);
ServerSocketFactory ssf = sslCtx.getServerSocketFactory();
/*
    javax.net.ssl.SSLContext.init(KeyManager[] km, TrustManager[] tm, SecureRandom random)
    The parameter random is used to set the security random number. If the parameter is null, the init() method will adopt the default SecureRandom implementation.
    The parameters km and tm can also be null.
    If km == null, create the default KeyManager object and its associated keystore object. The keystore object is from the system property javax net. ssl. Obtain the security certificate from the keystore. If such a property does not exist, the content of the keystore object is empty.
    If tm == null, create a default TrustManager object and its associated KeyStore object. The KeyStore object obtains the security certificate according to the following steps:
    1.First try javax. From the system property net. ssl. Get the security certificate from truststore.
    2.If the previous step fails, try to use the < JDK root > / lib / security / jssecacerts file as the security certificate
    3.If the previous step fails, try to use the < JDK root > / lib / security / cacerts file as the security certificate
    4.If the previous step fails, the content of the KeyStore object is empty
*/
3.SSLServerSocketFactory and SSLSocketFactory classes
SSLServerSocketFactory is responsible for creating SSLServerSocket objects, and SSLSocketFactory is responsible for creating SSLSocket objects. SSLServerSocketFactory object and SSLSocketFactory object can be created in two ways:
- Call getServerSocketFactory() method / getSocketFactory() method of SSLContext class. As above.
- Call the static getDefault() method of SSLServerSocketFactory class / SSLSocketFactory class. Returns a default SSServerSocketFactory object, which is associated with a default SSLContext object. Getdeault() through SSLContext Init (null, null, null) initializes the default SSLContext object.
4.SSLSocket class
SSLSocket is a subclass of Socket, so they have many similarities. In addition, SSLSocket also has methods related to secure communication.
4.1. Set up encryption suite
In the handshake phase, the client and server need to negotiate the encryption suite actually used. The handshake will fail in the following two cases:
- There is no same encryption suite that both parties are using
- Although such a suite exists, one or both parties do not use the security certificate of the encryption suite.
sslSocket.getSupportedCipherSuites();    //This method will return the encryption suite group supported by the current sslSocket object.
sslSocket.setEnabledCipherSuites(suites); //This method is used to set the encryption suite group that can be used by the current sslSocket object.
//The encryption suite groups that can be used should be a subset of the supported encryption suite groups.
4.2. Handle handshake end event
The SSL handshake takes a long time. When the SSL handshake is completed, a HandshakeCompletedEvent event will be sent, which is monitored by the HandshakeCompletedListener interface. The addHandshakeCompletedListener() method of SSLSocket class is responsible for registering HandshakeCompletedListener listeners. For example:
//Execute after handshake
sslSocket.addHandshakeCompletedListener(new HandshakeCompletedListener() {
    @Override
    public void handshakeCompleted(HandshakeCompletedEvent event) {
        SSLSession sslSession = event.getSession(); // Get session SSLSession
        String suite = event.getCipherSuite(); // Get the encryption suite actually used
        SSLSocket sSocket = event.getSocket(); // Gets the SSLSocket that issued the event
    }
});
4.3. Manage SSL sessions
A client program may open multiple secure sockets to the same port of a server. If SSL handshake is carried out for each secure connection, the communication efficiency will be greatly reduced. In order to improve the efficiency of secure communication, SSL protocol allows multiple sslsockets to share the same SSL session. In the same session, only the first opened SSLSocket needs SSL handshake, which is responsible for generating and exchanging keys. The other sslsockets share key information.
Within a reasonable time frame, if the client program opens multiple secure sockets like the same port of a server, JSSE will automatically reuse SSL sessions. The SSLSession interface represents an SSL session.
The method of sslscreate determines whether to allow the creation of a new session. The default is true.
- falg==true, for the newly created SSLSocket, if there is already an available session, directly join the session; if not, create a new one.
- flag==false, for the newly created SSLSocket, if there is already an available session, you can directly join the session. If not, you can't communicate with the other party safely.
SSLSocket's startHandshake() method explicitly performs an SSL handshake. The method has the following uses:
- Make the session use the new key;
- Make the session use the new encryption suite;
- Restart a session.
// To ensure that the original session is not reused, the original session should be invalidated first
sslSocket.getSession().invalidate();
sslSocket.startHandshake();
4.4. Customer model
In most cases, the client does not need to confirm its identity to the server. Therefore, when a communication terminal does not need to confirm its identity to the other party, it is said to be in client mode, otherwise it is said to be in server mode. Only one of the communication parties can be in server mode and the other in client mode. (both server and client can be in client mode or server mode)
The setUserClientMode(boolean mode) method of SSLSocket is used to set the client mode or server mode.
- mode == true, which means you are in customer mode, that is, you don't need to confirm your identity to the other party.
- mode == false, which means you are in server mode, that is, you need to confirm your identity to the other party.
When the SSL handshake starts, it is not allowed to call this method, otherwise it will cause illegal parameter exceptions.
When SSLSocket is in server mode, you can also decide whether to require the other party to provide identity authentication through the following methods:
- setWantClientAuth(boolean want): when the parameter is true, it indicates that you want the other party to provide identity authentication. If the other party fails to show it, the connection will not be interrupted and the communication can continue.
- setNeedClientAuth(boolean need): when the need parameter is not true, it means that the other party must provide identity authentication. If the other party fails to show it, the connection is interrupted.
5.SSLServerSocket class
SSLServerSocket is a subclass of ServerSocket class. In addition to the methods provided by ServerSocket, it also has methods related to secure communication. These methods have the same function as the methods with the same name in the SSLSocket class.
3, Secure server and client based on SSL
1. Server side implementation
public class SecureServer {
    private SSLServerSocket sslServerSocket;
    private int port = 54199;

    public SecureServer() {
	// Enable the log to track the underlying SSL handshake process
        System.setProperty("javax.net.debug", "all");
    }

    public void startUp() throws Exception {
        SSLContext sslContext = createSSLContext();
        SSLServerSocketFactory ssf = sslContext.getServerSocketFactory();
        sslServerSocket = (SSLServerSocket) ssf.createServerSocket(port);
        System.out.println("Server started");
        // The server side is in server mode by default and does not need to verify the identity of the other party

	// Get supported encryption suite
        String[] suites = sslServerSocket.getSupportedCipherSuites();
	// Set available encryption suite
	sslServerSocket.setEnabledCipherSuites(suites);
	service();
    }

    private SSLContext createSSLContext() throws Exception {
        // Server certificate warehouse
	String keyStoreFileName = "C:\\User\\YHJ\\server_ks.keystore";
	String passphrase = "password";
	char[] password = passphrase.toCharArray();

	KeyStore ks = KeyStore.getInstance("JKS");
	ks.load(new FileInputStream(keyStoreFileName), password);
	KeyManagerFactory kmf = KeyManagerFactory.getInstance("SunX509");
	kmf.init(ks, password);

	SSLContext sslContext = SSLContext.getInstance("SSL");
	// Parameter 2 is TrustManager []. If null is set here, the certificate trusted by the server is not set.
	// Since the server is not set, the client does not need to provide a security certificate.
	// If the client needs to provide a security certificate, the server can create a TrustManagerFactory,
	// He creates a TrustManager, which decides whether to trust the security certificate provided by the client according to the information in the associated KeyStore
	sslContext.init(kmf.getKeyManagers(), null, null);

	return sslContext;
    }

    private void service() {
        Socket socket = null;
        DataInputStream dis = null;
        DataOutputStream dos = null;
        try {
	    socket = sslServerSocket.accept();
	    System.out.println("Client received:" + socket.getRemoteSocketAddress() + "Connection of");
            dis = new DataInputStream(socket.getInputStream());
	    dos = new DataOutputStream(socket.getOutputStream());
	    String message = null;
	    while (true) {
	        // Read messages sent by clients
		message = dis.readUTF();
		if ("bye".equals(message)) {
		    close(socket, dis, dos);
		    return;
		}
		dos.writeUTF("Response from server:" + message);
	    }

	} catch (IOException e) {
	    e.printStackTrace();
	}
    }
}
2. Client implementation
public class SecureClient {
    private String host = "localhost";
    private int port = 54199;
    private SSLSocket sslSocket;

    public SecureClient() {
        System.setProperty("javax.net.debug", "all");
    }

    public void conntect() throws Exception {
        SSLContext sslContext = createSSLContext();
        SSLSocketFactory sslSocketFactory = sslContext.getSocketFactory();
	sslSocket = (SSLSocket) sslSocketFactory.createSocket();
	// Get the encryption suite supported by the client
	String[] suites = sslSocket.getSupportedCipherSuites();
	sslSocket.setEnabledCipherSuites(suites);
	// The client is set to client mode (you do not need to verify your identity to the server)
	sslSocket.setUseClientMode(true);
	// The server is required to provide identity authentication
	sslSocket.setNeedClientAuth(true);

	sslSocket.connect(new InetSocketAddress(host, port));
	System.out.println("Successfully connected to the server");
	talk();
    }

    private void talk() {
        DataInputStream dis = null;
        DataOutputStream dos = null;
        try {
	    dis = new DataInputStream(sslSocket.getInputStream());
	    dos = new DataOutputStream(sslSocket.getOutputStream());
	    dos.writeUTF("Hello server");
	    System.out.println(dis.readUTF());
	    dos.writeUTF("bye");
	} catch (IOException e) {
	    e.printStackTrace();
	}
    }

    private SSLContext createSSLContext() throws Exception {
        String passphrase = "password";
        char[] password = passphrase.toCharArray();

        String keyStoreFileName = "E:\\client_trust_ks.keystore";
	KeyStore keyStore = KeyStore.getInstance("JKS");
	keyStore.load(new FileInputStream(keyStoreFileName), password);
	TrustManagerFactory tmf = TrustManagerFactory.getInstance("SunX509");
	tmf.init(keyStore);

	SSLContext sslContext = SSLContext.getInstance("SSL");
	sslContext.init(null, tmf.getTrustManagers(), null);
	return sslContext;
    }
}
4, Countersignature and signature verification
1. Concept introduction
The main content introduced above is the encrypted communication based on SSL. The main function of encryption and decryption is to ensure the security of data transmission. Transmitting data through encryption can avoid being easily intercepted, and it can also ensure that the interceptor can not read the data content, that is, to prevent information disclosure. The main function of countersigning is to prevent data tampering, denial (repudiation) and counterfeiting.
- Encryption and decryption: the sender encrypts the data through the public key, and the receiver decrypts the data through its own private key;
- Signature verification: the sender encrypts the data through its own private key to form a signature summary, and sends the original data to the receiver together with the signature summary; After receiving the message, the receiver splits the original data and the signature summary. The receiver uses the public key provided by the sender to calculate the original data to form the summary value, and compares whether the signature summary sent by the sender is consistent with that generated by itself; If it is consistent, the signature verification is successful, otherwise it fails (indicating that the data has been tampered with).
Take an example to illustrate the role of signature verification: suppose there is a website that sends an HTTP request, the new user registers on the front page, inputs the account password and submits the request to the background. If the request is intercepted by the middleman, it will change the intercepted account password and submit it to the background. Then the background thinks this is the data sent by the sender, Save the changed account password. If the signature is added to the request and then the signature is verified in the background, the background signature verification will fail after the middleman intercepts and modifies it. Signature verification is to prevent data from being tampered with. I'm sure you sent this data.
Of course, the HTTP protocol is plaintext transmission. Even if the signature verification can prevent the information from being tampered with, it can not avoid the information leakage after the plaintext transmission data is intercepted. It is directly built on TCP. HTTPS uses SSL to encrypt the communication, which can prevent the information leakage. (HTTPS = HTTP + SSL)
2. Signature verification API provided by Java
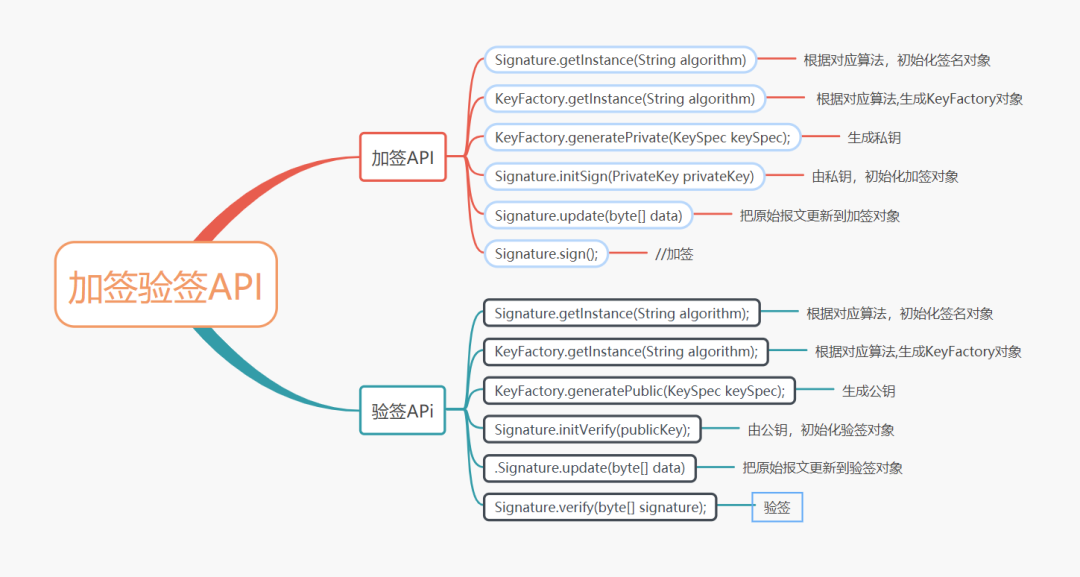
For specific introduction, please refer to the official Java API document. The following simulates the above example and uses relevant APIs to add and verify signatures.
First, use the asymmetric key for signature verification:
// Private key
public static final String privateKeyStr = "MIIEvgIBADANBgkqhkiG9w0BAQEFAASCBKgwggSkAgEAAoIBAQCjvhQeFhN0xMUjOGEh7jdL0zXriqfjSCN86/xZ9dPmpuchv4C7NfAhksHwpI8dThCK4uk0w3cGPh1eC9T+m8wE8/caAaTbX7SzTferYUL8prNdeX7+omc9B/MFHARe1yDVTKYYevgncbSWwxnyOP+s/lFWzwPfWv7Nb/NjTfwyTJzZqTvZrlGKdV76EoV/ENkwaky+UK9k/bDrQVOcOhI65DLMqVxGKzFVm09cwxJIWcwEg0/SlhcZW7Mkx197ZDBUs5b7JOu/ELvW7EgIadk9BW/mlL9dYHrIoDYbvr+5kZBIbkAnRxqrheezf8Zj+FmdcF0KZ4kC9ypaJQj5HIcPAgMBAAECggEACKoqTl1Esk0nUXHOUglVC8IlfE1eDPzoQ9gJBomnqPD0EikcGswD5QLrGFzc5eQXpAHV7WDaj44B59QgdUixRyHR1aJ4otMxsLtTe9ItxUjc/PlM6xSU+fnNtluBL7OanS7tKyZ2sz+lGsVAPj0d6n2auElEHzGlgiGGc57Q1ah6BEVZb9XdfkYbvfIlzK/4O/+NscfScK/7GoBahphaaUbKfjplP0qt2QQkb7aLYr5WNnJdmukFsbeFkX6H0slBQj0w+EZxIpfHhADrt7enwRdfOXfxMbp6mu0V7VAGrZbX/UJt9lIn7Ui680Gh9Bf6Yb1PwMnb2q5xSRk2D9vUAQKBgQD+vHE8z9Uoer9Hva/JHf02u+iokToupVM6r7IPAh+yoAq1Pb9XvnPI8fxS0+oyyKA7NN/2pxxxA+51zQ9ZSQSqMmgzo9swJMWT6z61SRr+BSsLzwH28btQgdVo8PpmUNe80OaerffABoSWXDrtKiqmnuuXQZy8PSoz3eTWBu+ggQKBgQCkjg8fbkq93iKaCXWm6RDou2MaezkIiShDQ0bZypw36xMV18fOE2KUs8mxi+AGrMYxFd6xqC5PXflAOGmuG9paeKDHn/fWsPZB66VTgx54iuOFZUqKSk29g1h387PQlFBMOaO9LIfhVFj+9hTs4auPb1W23aMvpgl+7zjhE7JfjwKBgQCyV8ZD2BIZXA6tMH1wpeFQv7A8zCha3f5uOPHFliwRCAFXMJrU2I8BoYGRj7IIyfN8YCFo80hzS1hY+y8CyJ9OdSoE9XQQub3mOK3XiA4wx/eCNfTfKhCFZdC+vu/gUDsqg2rir1OkCiwrhPjwcDQaIWs5o4MTOxNf6rs6qPJ9gQKBgBFQoWa9REAWT63FsQuPGqhij1sJ/EZZqFLrkVj5aNa5dZimy+9zOrxK7r4v6bLKG1Cu7G/lMnpHeSK4zOX1KFS8vK5Ett9wX3kwQoU3Fs24T5iJv/4tM2DtoTF+Az2/XXOn3QLa3LFpHrQ1UJ5cYKEHJg3H5JPu9LDWmzWTzQEhAoGBAOIWfbJQKO/JT2E4zL/ArW8XfRgRxYx6iZGIbYwndhVzri6qhWF1+0oqPilXoUn6TVd972C45AkDJj//8rRTHxIe116CV13A097Tr+AKdIZHzJFE2y+3UOcsbL+RcYpsovigo+b99IJ2huF6Ta2xwieIKhtHOsWQl5k1h9IaXrsT";
// Public key
public static final String publicKeyStr = "MIIBIjANBgkqhkiG9w0BAQEFAAOCAQ8AMIIBCgKCAQEAo74UHhYTdMTFIzhhIe43S9M164qn40gjfOv8WfXT5qbnIb+AuzXwIZLB8KSPHU4QiuLpNMN3Bj4dXgvU/pvMBPP3GgGk21+0s033q2FC/KazXXl+/qJnPQfzBRwEXtcg1UymGHr4J3G0lsMZ8jj/rP5RVs8D31r+zW/zY038Mkyc2ak72a5RinVe+hKFfxDZMGpMvlCvZP2w60FTnDoSOuQyzKlcRisxVZtPXMMSSFnMBINP0pYXGVuzJMdfe2QwVLOW+yTrvxC71uxICGnZPQVv5pS/XWB6yKA2G76/uZGQSG5AJ0caq4Xns3/GY/hZnXBdCmeJAvcqWiUI+RyHDwIDAQAB";
1. Generate a string to be signed
// Generate string to be signed
public static String genSignStr(JSONObject jsonObject) {
    StringBuffer signBuffer = new StringBuffer();

    // Alphabetical ascending order by key
    List<String> keys = new ArrayList<String>(jsonObject.keySet());

    Collections.sort(keys, String.CASE_INSENSITIVE_ORDER);
        for (int i = 0; i < keys.size(); i++) {
	    String key = (String) keys.get(i);
	    if ("sign".equals(key)) {
		continue;
	    }
	    String value = jsonObject.getString(key);
	    // Empty string does not participate in signature
	    if (value == null || value.equalsIgnoreCase("null") || value.equals("")) {
	        continue;
	    }
	    signBuffer.append((i == 0 ? "" : "&") + key + "=" + value);
	}

	String signSrc = signBuffer.toString();
        if (signSrc.startsWith("&")) {
	    signSrc = signSrc.replaceFirst("&", "");
	}

	return signSrc;
}
2. Signature
/**
 * Countersign
 *
 * @param signSrc       String to be signed
 * @param strPrivateKey Private key
 * @param algorithm     signature algorithm
 */
public static String sign(String signSrc, String strPrivateKey, String algorithm) throws Exception {
    byte[] keyBytes = Base64.getDecoder().decode(strPrivateKey);
    // The PKCS8EncodedKeySpec class represents the ASN of the private key 1 code
    KeySpec keySpec = new PKCS8EncodedKeySpec(keyBytes);
    // Returns a KeyFactory according to the specified signature algorithm
    KeyFactory keyFactory = KeyFactory.getInstance("RSA");
    // Generate a private key object from the provided key specification (key material).
    PrivateKey privateKey = keyFactory.generatePrivate(keySpec);
    // The Signature class is used to provide the application with the function of digital Signature algorithm. Digital Signature is used for authentication and integrity assurance of digital data.
    Signature signature = Signature.getInstance(algorithm);
    // Initialize this object for signature.
    signature.initSign(privateKey);
    // Updates the data to be signed with the specified byte array.
    signature.update(signSrc.getBytes("UTF-8"));
    // Returns the signature bytes of all updated data.
    byte[] bytes = signature.sign();
    return Base64.getEncoder().encodeToString(bytes);
}
3. Signature verification
/**
 * Signature verification
 * @param signSrc      String to be signed
 * @param signMessage  String after metadata signature
 * @param strPublicKey Public key
 * @param algorithm    signature algorithm
 */
public static boolean verify(String signSrc, String signMessage, String strPublicKey, String algorithm) throws Exception {
    byte[] keyBytes = Base64.getDecoder().decode(strPublicKey);
    KeySpec keySpec = new X509EncodedKeySpec(keyBytes);
    KeyFactory keyFactory = KeyFactory.getInstance("RSA");
    PublicKey publicKey = keyFactory.generatePublic(keySpec);
    Signature signature = Signature.getInstance(algorithm);
    // Initialize this object for validation.
    signature.initVerify(publicKey);
    signature.update(signSrc.getBytes("UTF-8"));
    // verification
    return signature.verify(Base64.getDecoder().decode(signMessage));
}
Test:
public class User {
    private String username;
    private String password;
    private String sign;

    public User(String username, String password) {
        this.username = username;
        this.password = password;
    }
    //Omit getter s and setter s
}
public static void main(String[] args) throws Exception {
    // 1. Generate the string signSrc to be signed
    User user = new User("yhj123456", "1234567");
    String userJsonStr = JSONObject.toJSONString(user);
    // Signsrc = = password = 12345678 & username = yhj123456 generated here
    String signSrc = SignUtil.genSignStr(JSONObject.parseObject(userJsonStr));

    // 2. Signature
    String signMessage = SignUtil.sign(signSrc, SignUtil.privateKeyStr, "SHA256withRSA");
    user.setSign(signMessage);

    //-------Send request to background--------------

    // 3. The background splits the string to be signed and the signature string for signature verification
    boolean isOk = SignUtil.verify(signSrc, signMessage, SignUtil.publicKeyStr, "SHA256withRSA");        //true
}
reference resources:
https://blog.csdn.net/u011179993/article/details/49274423
https://blog.csdn.net/u011077027/article/details/100731436