Segmentation is very important for image interpretation, so don't lag behind the popular trend. Let's implement it, and we will soon become professionals!
What is semantic segmentation?
It describes the process of associating each pixel of an image with a category label (such as flowers, people, roads, sky, ocean or car), that is, we need to input an image and then output a category decision for each pixel in the image. For example, the following input image is a dog sitting on a bed:
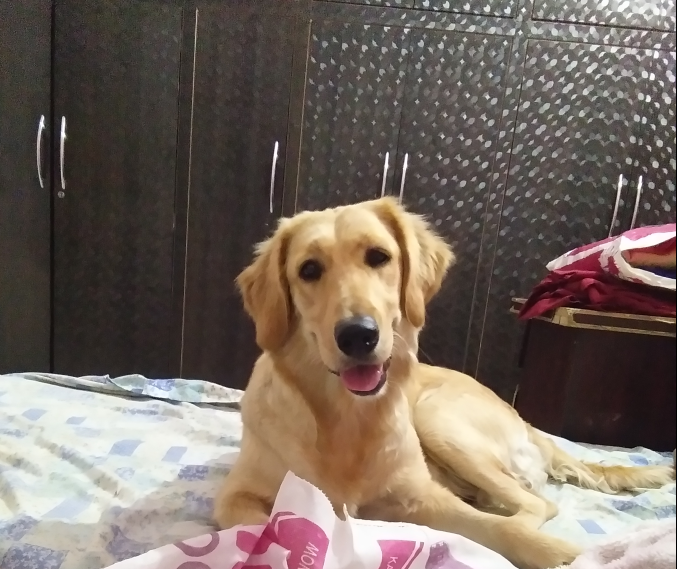
Therefore, in the output, we want to define a set of categories for each pixel, namely dog, bed, back table and cabinet. After semantic segmentation, the image looks like this:
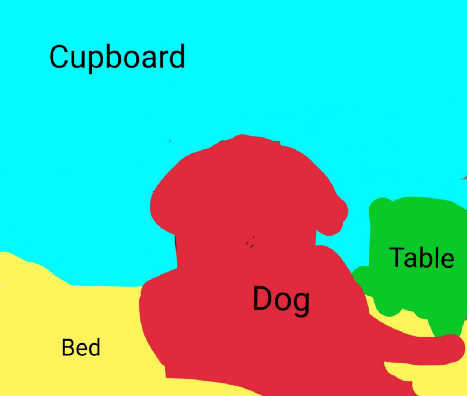
An interesting thing about semantic segmentation is that it does not distinguish between instances, that is, if there are two dogs in this image, they will be described as only one tag, dog, rather than dog1 and dog2.
Semantic segmentation is generally used to:
- Automatic driving
- Industrial inspection
- Notable region classification in satellite images
- Medical image monitoring
Implementation of semantic segmentation:
- The first method is sliding window. We decompose the input image into many small local images, but this method will be very expensive in calculation. Therefore, we did not really use this method in practice.
- Another method is complete convolution network, in which the network has a whole stack of convolution layers and no fully connected layers, so as to retain the size of input space, which is also extremely expensive in calculation.
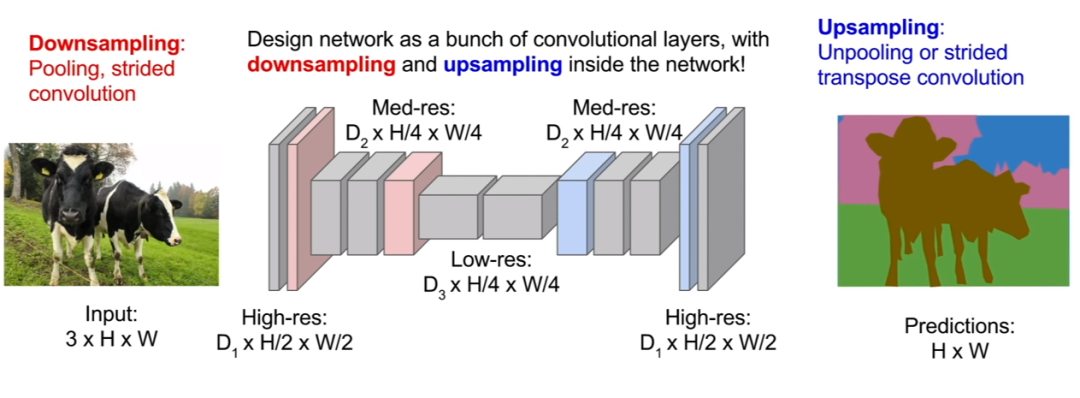
- The third and best method is to up sample and down sample the image. Therefore, we do not need to convolute the full spatial resolution of the image. We may traverse a small number of convolution layers at the original resolution, then down sample the feature image, and then up sample it. Here, we just want to improve the spatial resolution of our prediction in the second half of the network so that our output image can now have the same dimension as our input image. It is much more computationally efficient because we can make the network very deep and run at a cheaper spatial resolution.
Let's do this in Code:
- Import the necessary libraries required for processing, i.e Important functions of pytoch, such as data loader, variables, transformation and optimizer related functions. Import the dataset classes of VOC12 and cityscapes from transform Import Relabel, ToLabel and Colorize classes from iouEval.py file Import the iouEval class from the. Py file.
#SSCV IIITH 2K19
import random
import time
import numpy as np
import torch
print(torch.__version__)
import math
from PIL import Image, ImageOps
from torch.optim import SGD, Adam, lr_scheduler
from torch.autograd import Variable
from torch.utils.data import DataLoader
from torchvision.transforms import  Resize
from torchvision.transforms import ToTensor, ToPILImage
from dataset import cityscapes
from dataset import idd_lite
import sys
print(sys.executable)
from transform import Relabel, ToLabel, Colorize
import matplotlib
from matplotlib import pyplot as plt
%matplotlib inline
import importlib
from iouEval import iouEval, getColorEntry #importing iouEval class from the iouEval.py file
from shutil import copyfile
- Define several global parameters:
NUM_CHANNELS = 3 #RGB Images
NUM_CLASSES = 8 #IDD Lite has 8 labels or Level1 hierarchy of labels
USE_CUDA = torch.cuda.is_available()
IMAGE_HEIGHT = 160
DATA_ROOT = '/tmp/school/6-segmentation/user/1/6-segmentation/idd1_lite'
BATCH_SIZE = 2
NUM_WORKERS = 4
NUM_EPOCHS = 100
ENCODER_ONLY = True
device = torch.device("cuda" )
#device = 'cuda'
color_transform = Colorize(NUM_CLASSES)
image_transform = ToPILImage()
IOUTRAIN = False
IOUVAL = True- Enhancement, i.e. performing different functions of random enhancement on images and targets:
class MyCoTransform(object):
 def __init__(self, enc, augment=True, height=160):
 self.enc=enc
 self.augment = augment
 self.height = height
 pass
 def __call__(self, input, target):
 # Resizing data to required size
 input = Resize((self.height,320), Image.BILINEAR)(input)
 target = Resize((self.height,320), Image.NEAREST)(target)
if(self.augment):
 # Random horizontal flip
 hflip = random.random()
 if (hflip < 0.5):
 input = input.transpose(Image.FLIP_LEFT_RIGHT)
 target = target.transpose(Image.FLIP_LEFT_RIGHT)

 #Random translation 0–2 pixels (fill rest with padding)
 transX = random.randint(0, 2)
 transY = random.randint(0, 2)
input = ImageOps.expand(input, border=(transX,transY,0,0), fill=0)
 target = ImageOps.expand(target, border=(transX,transY,0,0), fill=7) #pad label filling with 7
 input = input.crop((0, 0, input.size[0]-transX, input.size[1]-transY))
 target = target.crop((0, 0, target.size[0]-transX, target.size[1]-transY))
input = ToTensor()(input)

 target = ToLabel()(target)

 target = Relabel(255,7)(target)
 return input, target
- Loading data: we will follow the semantics recommended by pytorch and use the data loader to load data.
best_acc = 0
co_transform = MyCoTransform(ENCODER_ONLY, augment=True, height=IMAGE_HEIGHT)
co_transform_val = MyCoTransform(ENCODER_ONLY, augment=False, height=IMAGE_HEIGHT)
#train data
dataset_train = idd_lite(DATA_ROOT, co_transform, 'train')
print(len(dataset_train))
#test data
dataset_val = idd_lite(DATA_ROOT, co_transform_val, 'val')
print(len(dataset_val))
loader_train = DataLoader(dataset_train, num_workers=NUM_WORKERS, batch_size=BATCH_SIZE, shuffle=True)
loader_val = DataLoader(dataset_val, num_workers=NUM_WORKERS, batch_size=BATCH_SIZE, shuffle=False)
- Since it is a classification problem, we use cross entropy loss, but why?
The answer is negative logarithm, which is not good when the value is small, and it is not good when the value is large. Because we add the loss function to all the correct categories, the actual situation is that when the network is the correct category and assigned high confidence, the loss is low, but when the network is the correct category and assigned low confidence, the loss is high.
criterion = torch.nn.CrossEntropyLoss()
- Now let's load the model and optimize it!
model_file = importlib.import_module('erfnet')
model = model_file.Net(NUM_CLASSES).to(device)
optimizer = Adam(model.parameters(), 5e-4, (0.9, 0.999), eps=1e-08, weight_decay=1e-4)
start_epoch = 1- Therefore, the ultimate essence of coding is training!
import os
steps_loss = 50
my_start_time = time.time()
for epoch in range(start_epoch, NUM_EPOCHS+1):
print(" — — — TRAINING — EPOCH", epoch, " — — -")
epoch_loss = []
time_train = []
doIouTrain = IOUTRAIN
doIouVal = IOUVAL
if (doIouTrain):
iouEvalTrain = iouEval(NUM_CLASSES)
model.train()
for step, (images, labels) in enumerate(loader_train):
start_time = time.time()
inputs = images.to(device)
targets = labels.to(device)
outputs = model(inputs, only_encode=ENCODER_ONLY)
# zero the parameter gradients
optimizer.zero_grad()
# forward + backward + optimize
loss = criterion(outputs, targets[:, 0])
loss.backward()
optimizer.step()
epoch_loss.append(loss.item())
time_train.append(time.time() — start_time)
if (doIouTrain):
#start_time_iou = time.time()
iouEvalTrain.addBatch(outputs.max(1)[1].unsqueeze(1).data, targets.data)
#print ("Time to add confusion matrix: ", time.time() — start_time_iou)
# print statistics
if steps_loss > 0 and step % steps_loss == 0:
average = sum(epoch_loss) / len(epoch_loss)
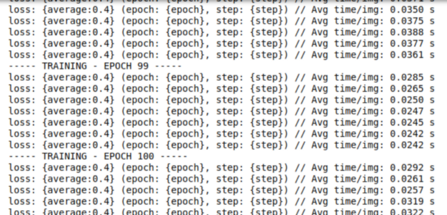
print('loss: {average:0.4} (epoch: {epoch}, step: {step})', "// Avg time/img: %.4f s" % (sum(time_train) / len(time_train) / BATCH_SIZE))
average_epoch_loss_train = sum(epoch_loss) / len(epoch_loss)
iouTrain = 0
if (doIouTrain):
iouTrain, iou_classes = iouEvalTrain.getIoU()
iouStr = getColorEntry(iouTrain)+'{:0.2f}'.format(iouTrain*100) + '\033[0m'
print ("EPOCH IoU on TRAIN set: ", iouStr, "%")
my_end_time = time.time()
print(my_end_time — my_start_time)After training 100 epoch s, we will see:
- verification:
#Validate on val images after each epoch of training
print(" — — — VALIDATING — EPOCH", epoch, " — — -")
model.eval()
epoch_loss_val = []
time_val = []
if (doIouVal):
 iouEvalVal = iouEval(NUM_CLASSES)
for step, (images, labels) in enumerate(loader_val):
 start_time = time.time()
inputs = images.to(device)
 targets = labels.to(device)

 with torch.no_grad():
 outputs = model(inputs, only_encode=ENCODER_ONLY)
 #outputs = model(inputs)
 loss = criterion(outputs, targets[:, 0])
 epoch_loss_val.append(loss.item())
 time_val.append(time.time() — start_time)
#Add batch to calculate TP, FP and FN for iou estimation
 if (doIouVal):
 #start_time_iou = time.time()
 iouEvalVal.addBatch(outputs.max(1)[1].unsqueeze(1).data, targets.data)
 #print ("Time to add confusion matrix: ", time.time() — start_time_iou)

 if steps_loss > 0 and step % steps_loss == 0:
 average = sum(epoch_loss_val) / len(epoch_loss_val)
 print('VAL loss: {average:0.4} (epoch: {epoch}, step: {step})',
 "// Avg time/img: %.4f s" % (sum(time_val) / len(time_val) / BATCH_SIZE))
average_epoch_loss_val = sum(epoch_loss_val) / len(epoch_loss_val)
iouVal = 0
if (doIouVal):
iouVal, iou_classes = iouEvalVal.getIoU()
 print(iou_classes)
 iouStr = getColorEntry(iouVal)+'{:0.2f}'.format(iouVal*100) + '\033[0m'
 print ("EPOCH IoU on VAL set: ", iouStr, "%")
- Visual output:
# Qualitative Analysis
dataiter = iter(loader_val)
images, labels = dataiter.next()
if USE_CUDA:
 images = images.to(device)
inputs = images.to(device)
with torch.no_grad():
 outputs = model(inputs, only_encode=ENCODER_ONLY)
label = outputs[0].max(0)[1].byte().cpu().data
label_color = Colorize()(label.unsqueeze(0))
label_save = ToPILImage()(label_color)
plt.figure()
plt.imshow(ToPILImage()(images[0].cpu()))
plt.figure()
plt.imshow(label_save)

Output image
Soon we can have our model ready! Feel free to use our newly designed model, try to add more epoch and observe that our model performs better!
Therefore, in short, we will now be able to easily associate each pixel of the image with a class label and adjust the superparameters to see the changes in the display. This paper shows the basic knowledge of semantic segmentation. To classify instances, we need to segment instances, which is an advanced version of semantic segmentation.