1 understand the separation of reading and writing
Facing the increasing system access, the throughput of database is facing a huge bottleneck. For the application system with a large number of concurrent read operations and less write operations at the same time, the database is divided into the master database and the slave database. The master database is responsible for transactional addition, deletion and modification operations, and the slave database is responsible for query operations, which can effectively avoid row locks caused by data updates, and greatly improve the query performance of the whole system.
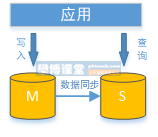
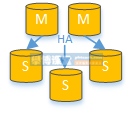
Through the configuration of one master and many slaves, the query requests can be evenly distributed to multiple data copies, which can further improve the processing capacity of the system. Using multi master and multi slave mode can not only improve the throughput of the system, but also improve the availability of the system. It can still not affect the normal operation of the system when any database is down or even the disk is physically damaged.
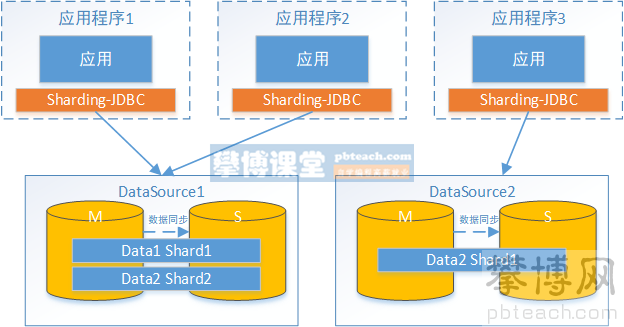
The data content in the data nodes with separate reading and writing is consistent, but the data content of each data node with horizontal fragmentation is not the same. The combination of horizontal slicing and read-write separation can more effectively improve the performance of the system.
Sharding JDBC read-write separation is to route read and write operations to the master database and slave database respectively according to the analysis of SQL semantics. It provides transparent read-write separation, allowing users to use the master-slave database cluster as much as they use a database.
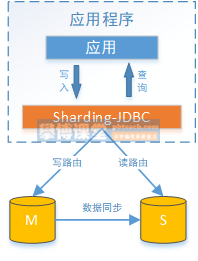
Sharding JDBC provides a master-slave read-write separation configuration, which can be used independently or in combination with sub database and table. If there is a write operation in the same thread and the same database connection, the subsequent read operations are read from the master database to ensure data consistency. Sharding JDBC does not provide the data synchronization function of master-slave database, and other mechanisms need to be adopted to support it.
Next, let's discuss the user in the above example_ DB for read-write separation. In order to realize the read-write separation of sharding JDBC, first, the master-slave synchronization configuration of mysql should be carried out.
2.mysql master-slave synchronization (windows)
1, Add mysql instance
Copy the original mysql, such as D: \ mysql-5.7.25 (as the master database) - > D: \ mysql-5.7.25-s1 (as the slave database), and modify the my ini:
[mysqld]
#Set 3307 port
port = 3307
# Set mysql installation directory
basedir=D:\mysql-5.7.25-s1
# Set the storage directory of mysql database data
datadir=D:\mysql-5.7.25-s1\data
Then install from the library as a windows service. Note the location of the configuration file:
D:\mysql-5.7.25-s1\bin>mysqld install mysqls1 --defaults-file="D:\mysql-5.7.25-s1\my.ini"
Since the slave database is copied from the master database, the data in it is completely consistent. You can log in with the original account and password.
2, Modify the configuration file (my.ini) of master and slave libraries, and add the following contents:
Main library:
[mysqld]
#Open log
log-bin = mysql-bin
#Set the service id, and the master and slave cannot be consistent
server-id = 1
#Set the database to be synchronized
binlog-do-db=user_db
#Shielding system library synchronization
binlog-ignore-db=mysql
binlog-ignore-db=information_schema
binlog-ignore-db=performance_schema
From library:
[mysqld]
#Open log
log-bin = mysql-bin
#Set the service id, and the master and slave cannot be consistent
server-id = 2
#Set the database to be synchronized
replicate_wild_do_table=user_db.%
#Shielding system library synchronization
replicate_wild_ignore_table=mysql.%
replicate_wild_ignore_table=information_schema.%
replicate_wild_ignore_table=performance_schema.%
Restart the master and slave libraries:
net start [Main library service name]
net start [Slave library service name mysqls1]
Please note that there is a file auto in the data directory of master-slave MySQL CNF, the uuid is defined in the file. To ensure that the uuid of the master-slave database instance is different, it is recommended to delete it directly and regenerate it after restarting the service.
3, Authorized master-slave copy special account
#Switch to the bin directory of the main database and log in to the main database
mysql -h localhost -uroot -p
#Authorized active / standby replication special account
GRANT REPLICATION SLAVE ON *.* TO 'db_sync'@'%' IDENTIFIED BY 'db_sync';
#Refresh permissions
FLUSH PRIVILEGES;
#Confirm the location and record the file name and location
show master status;

4, Set the synchronization data from the slave database to the master database and check the link
#Switch to the slave bin directory and log in to the slave
mysql -h localhost -P3307 -uroot -p
#Stop synchronization first
 STOP SLAVE;
#Modify the point from the library to the main library, and use the file name and location recorded in the previous step
CHANGE MASTER TO
 master_host = 'localhost',
 master_user = 'db_sync',
 master_password = 'db_sync',
 master_log_file = 'mysql-bin.000002',
 master_log_pos = 154;
#Start synchronization
START SLAVE;
#View slave library status_ IO_ Running and slave_ SQL_ Yes indicates that the synchronization is successful. If it is not yes, please check the error_log, and then check the related exceptions.
show slave status\G

#Note that if the standby database has a primary database pointing to it, you need to clear it by executing the following command first
STOP SLAVE IO_THREAD FOR CHANNEL '';
reset slave all;
Finally, test the modification of the database in the master database to see whether the slave database can be synchronized successfully.
3. Realize sharding JDBC read-write separation
(1) Modify in sharding JDBC rules
# Add data source s0 and use the slave library configured for master-slave synchronization above.
spring.shardingsphere.datasource.names = m0,m1,m2,s0
...
spring.shardingsphere.datasource.s0.type = com.alibaba.druid.pool.DruidDataSource
spring.shardingsphere.datasource.s0.driver-class-name = com.mysql.jdbc.Driver
spring.shardingsphere.datasource.s0.url = jdbc:mysql://localhost:3307/user_db?useUnicode=true
spring.shardingsphere.datasource.s0.username = root
spring.shardingsphere.datasource.s0.password = root

....

# The master library defines ds0 as user from the logical data source of the slave library_ db
spring.shardingsphere.sharding.master-slave-rules.ds0.master-data-source-name=m0
spring.shardingsphere.sharding.master-slave-rules.ds0.slave-data-source-names=s0

# t_user sub table policy, which is fixed to the T of ds0_ User real table
spring.shardingsphere.sharding.tables.t_user.actual-data-nodes = ds0.t_user
....
(2) Testing
Execute the testInsertUser unit test:
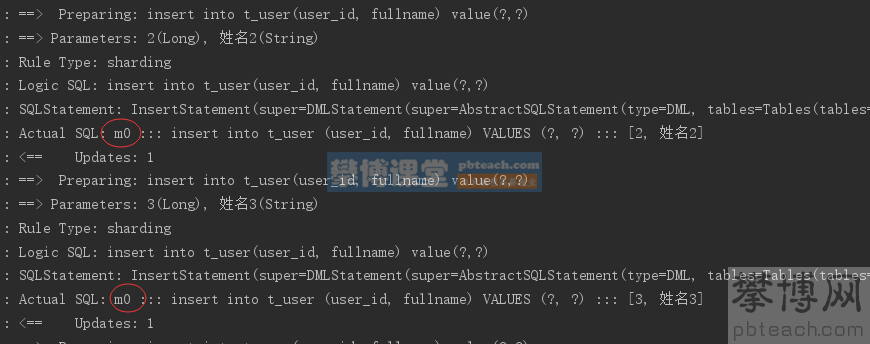
It can be seen from the log that all write operations fall into the m0 data source.
Execute the testSelectUserbyIds unit test:
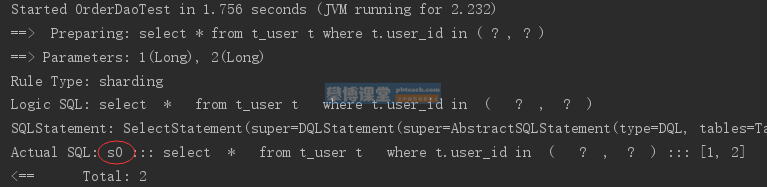
It can be seen from the log that all write operations fall into the s0 data source and reach the target.
4 more references
Reference code: https://github.com/pbteach/PB-Sharding-JDBC
Sharding JDBC series tutorials: http://www.pbteach.com/java/java_06_04/index.html