As a patient with obsessive-compulsive disorder, he has always been obsessed with automatic deployment. Personally, I think the most important thing of automatic deployment is stability and reliability. After research and testing, GitHub and Tencent cloud The two platforms have successfully completed the practice of fully automatic deployment of websites.
This article is contributed by the user "still" of Serverless community
Scheme introduction
Business requirements
Bloggers have a simple, purely static document site docs.ioiox.com , using docsify The Markdown rendering program of the project usually edits the document through the local VSCode and submits it to GitHub. Earlier, GitHub Pages was directly used to bind domain names for access, but due to network problems, the experience was not good.
Seek solutions
Tencent cloud Object storage COS service can provide static web services and configure CDN domain name for access. Then we need to solve the following two problems:
- How to make GitHub automatically synchronize files to Tencent cloud COS
- Tencent cloud How does the CDN corresponding to COS refresh automatically
Solution
- GitHub Action - automatically upload to COS after configuring each Push code
- Tencent cloud Cloud function SCF - automatically refresh the corresponding CDN link after detecting file changes in COS
Scheme flow chart

Phase I - GitHub Actions

In November 2019, GitHub officially opened the function of GitHub Actions, which can be used freely without application. At present, it is charged according to the use time of workflow, and the free quota of 2000 minutes per month for individual users is basically enough.
obtain Tencent cloud API key
Sign in Tencent cloud Control panel - access control - access key - API key management
New key
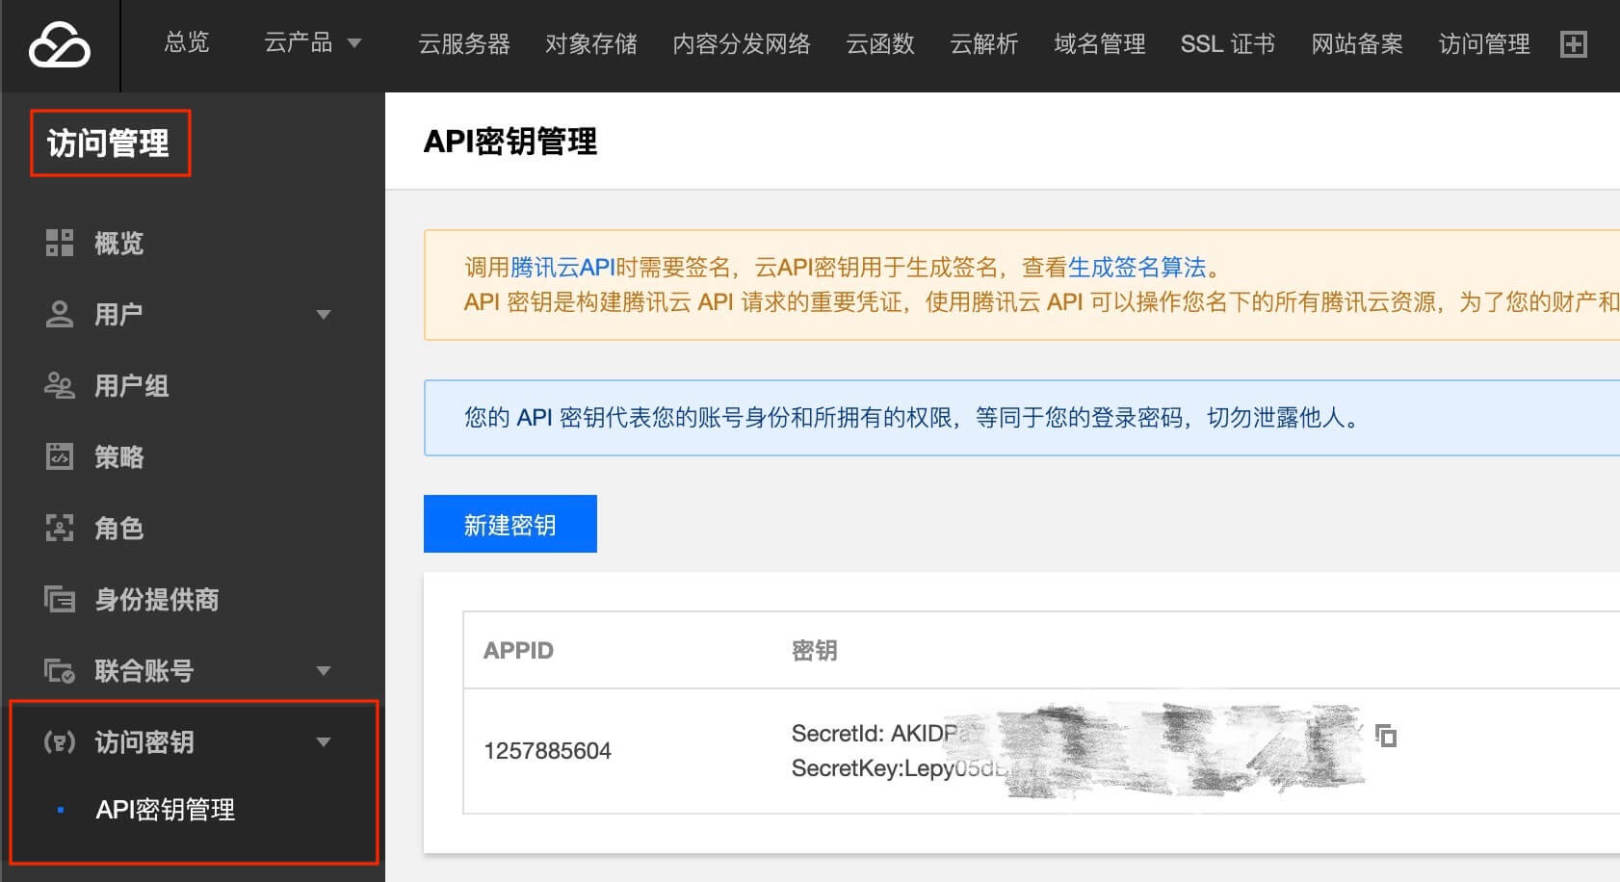
This key has all permissions. To ensure security, you can also add sub users and configure the permissions corresponding to COS and CDN
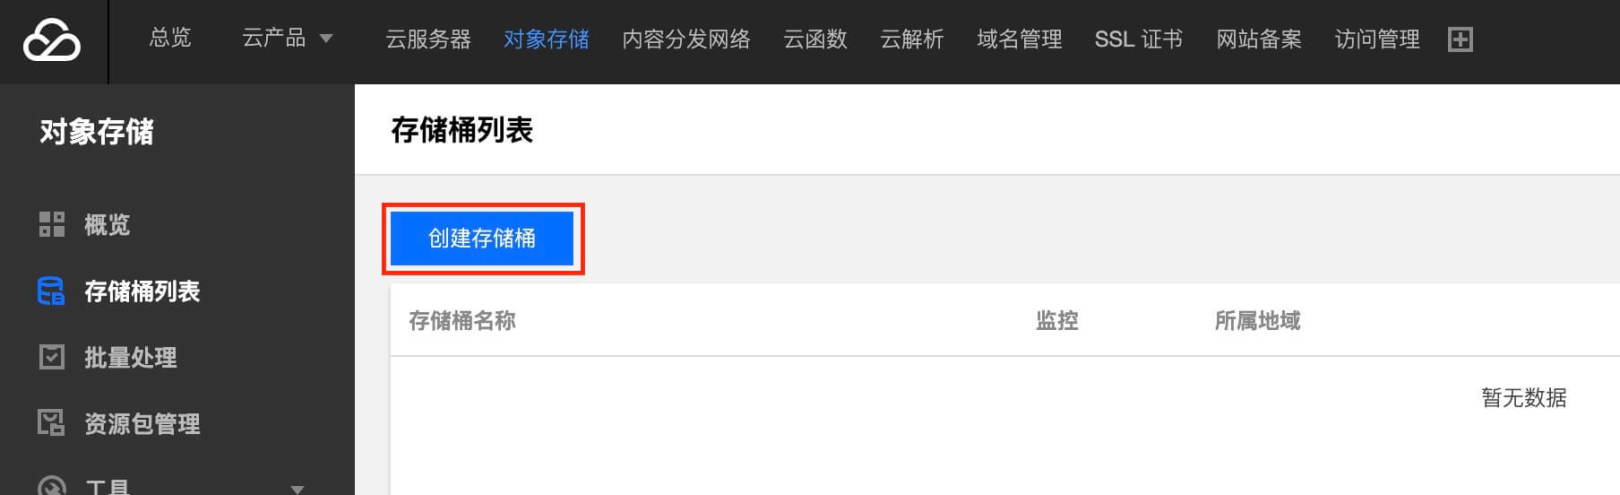
to configure Tencent cloud COS
Sign in Tencent cloud Control panel - object storage - bucket list
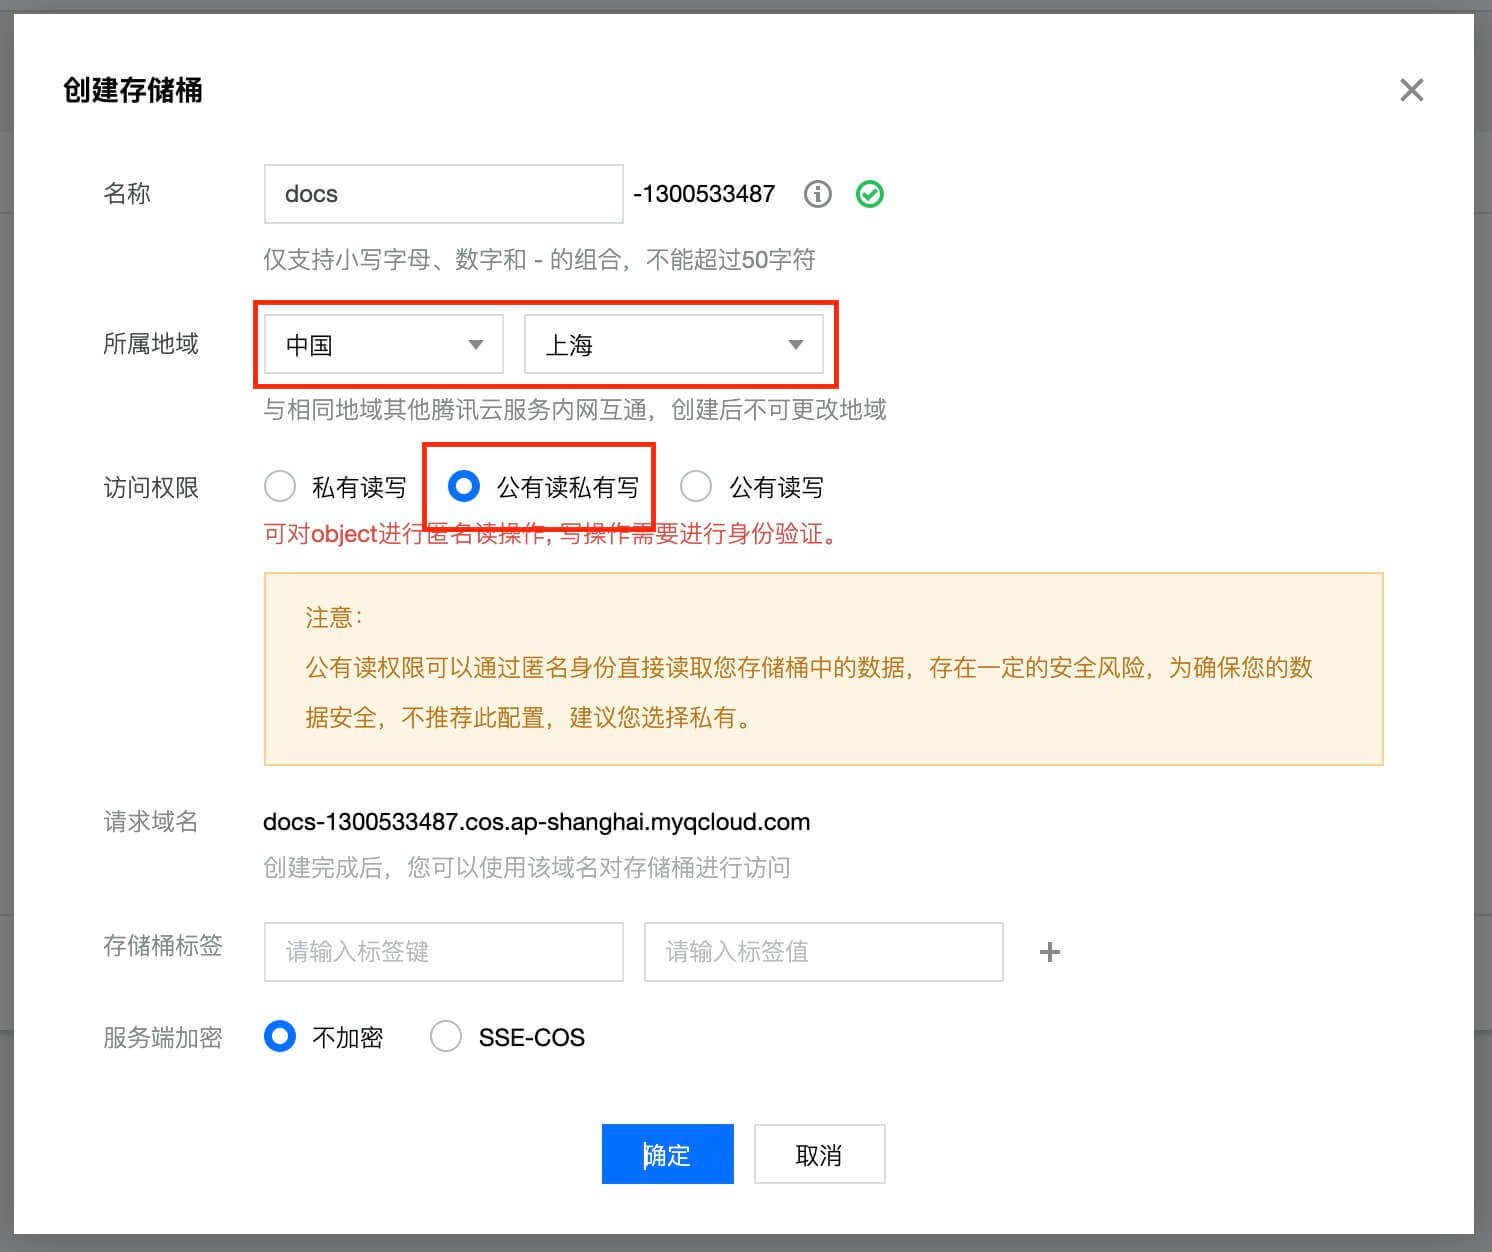
Create bucket
Select the appropriate region and set the permission to public read and private write
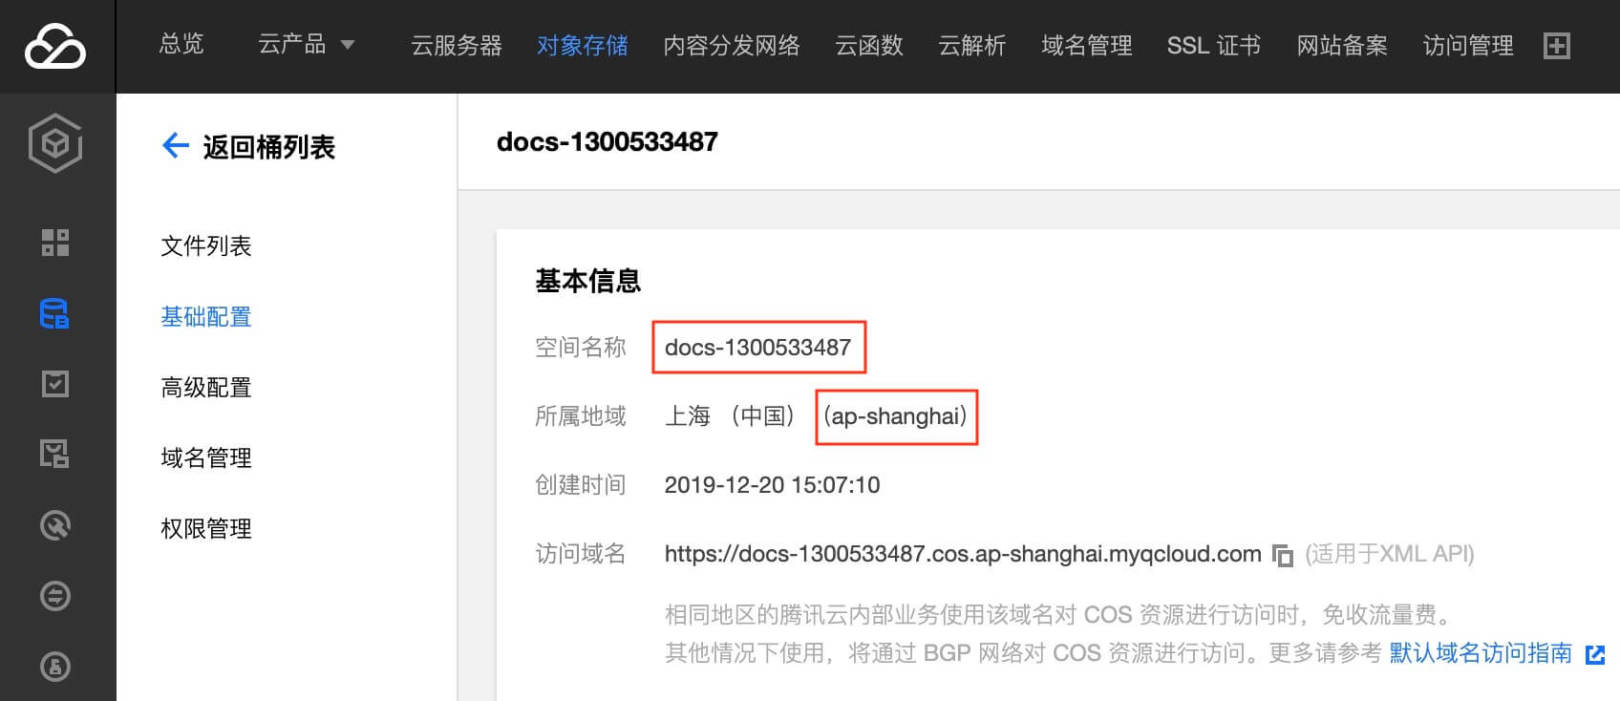
Get bucket related information
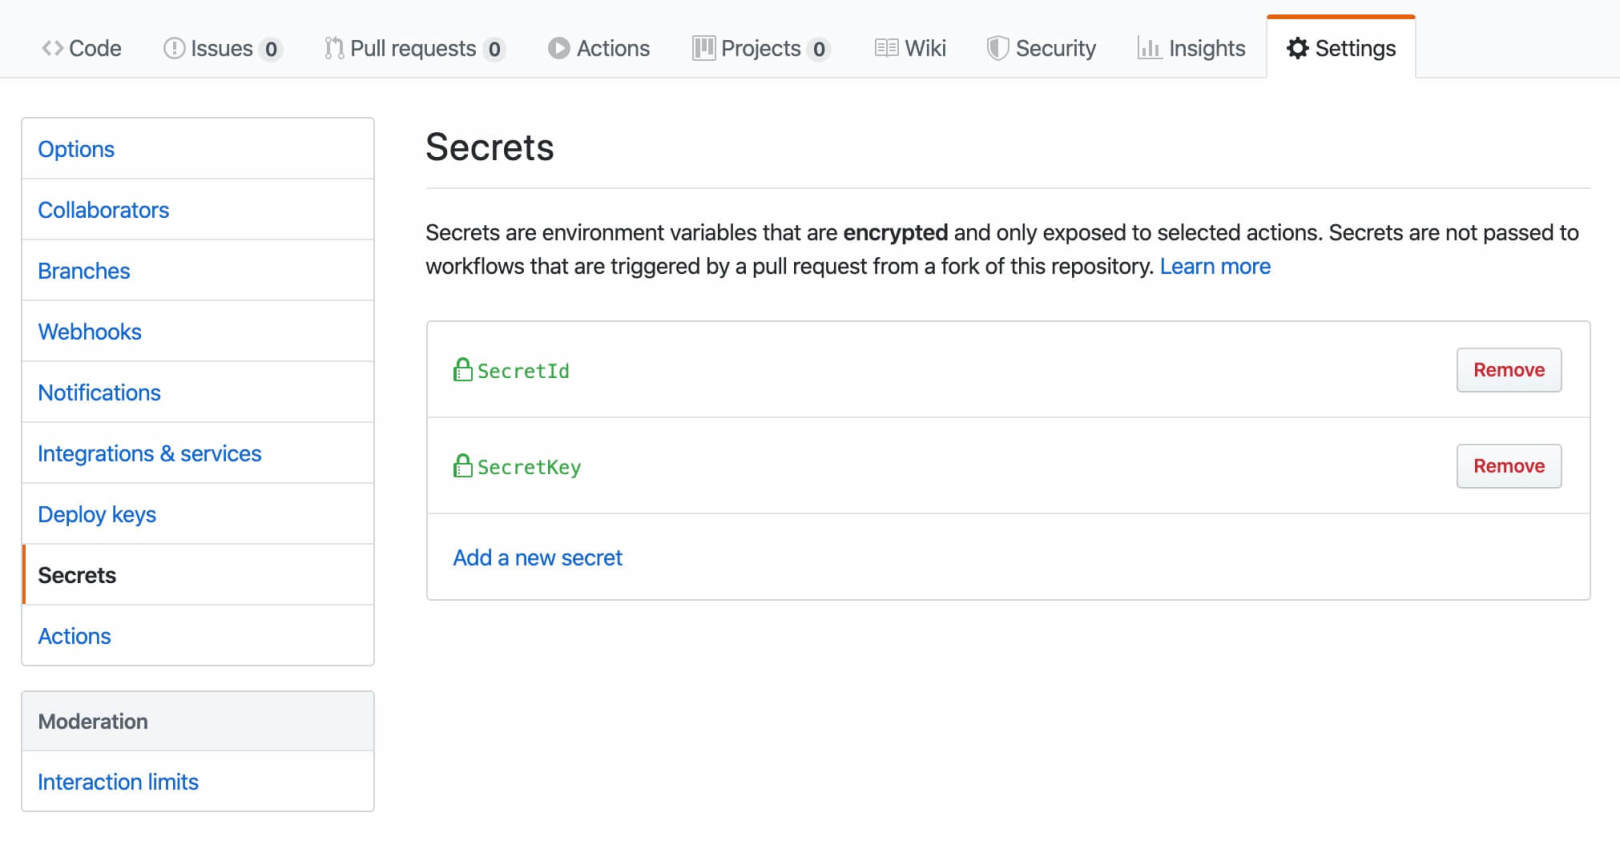
Configure GitHub Actions
GitHub warehouse - Settings - Secrets
Add the secret ID and secret key as the one just obtained Tencent cloud API key
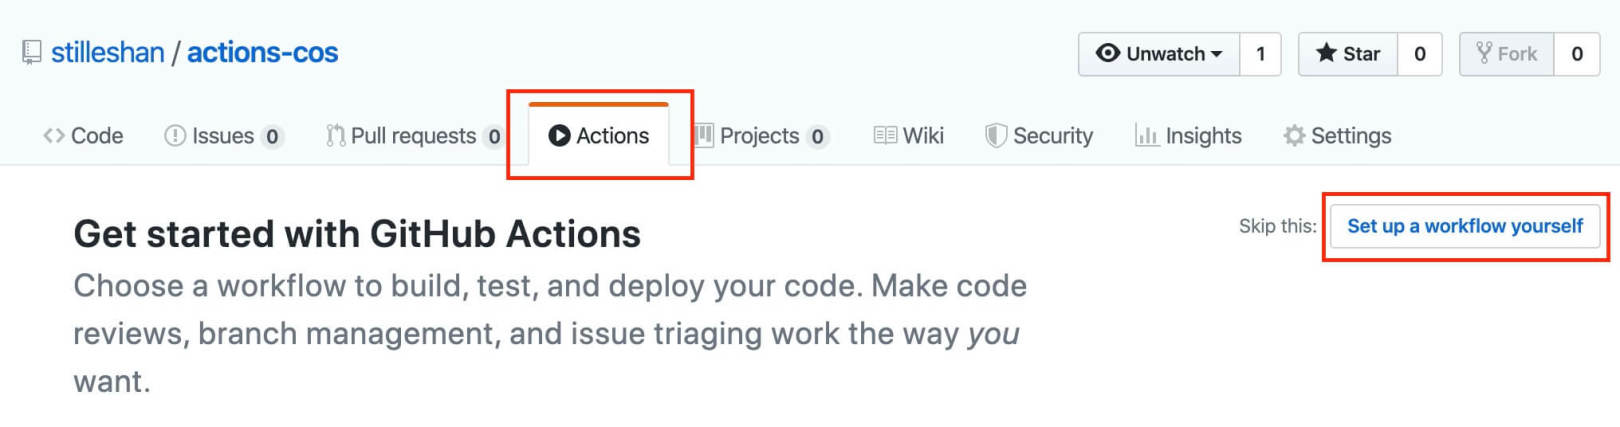
GitHub warehouse - Actions
There will be many recommended workflows by default. Here, select Set up a workflow yourself to configure it.
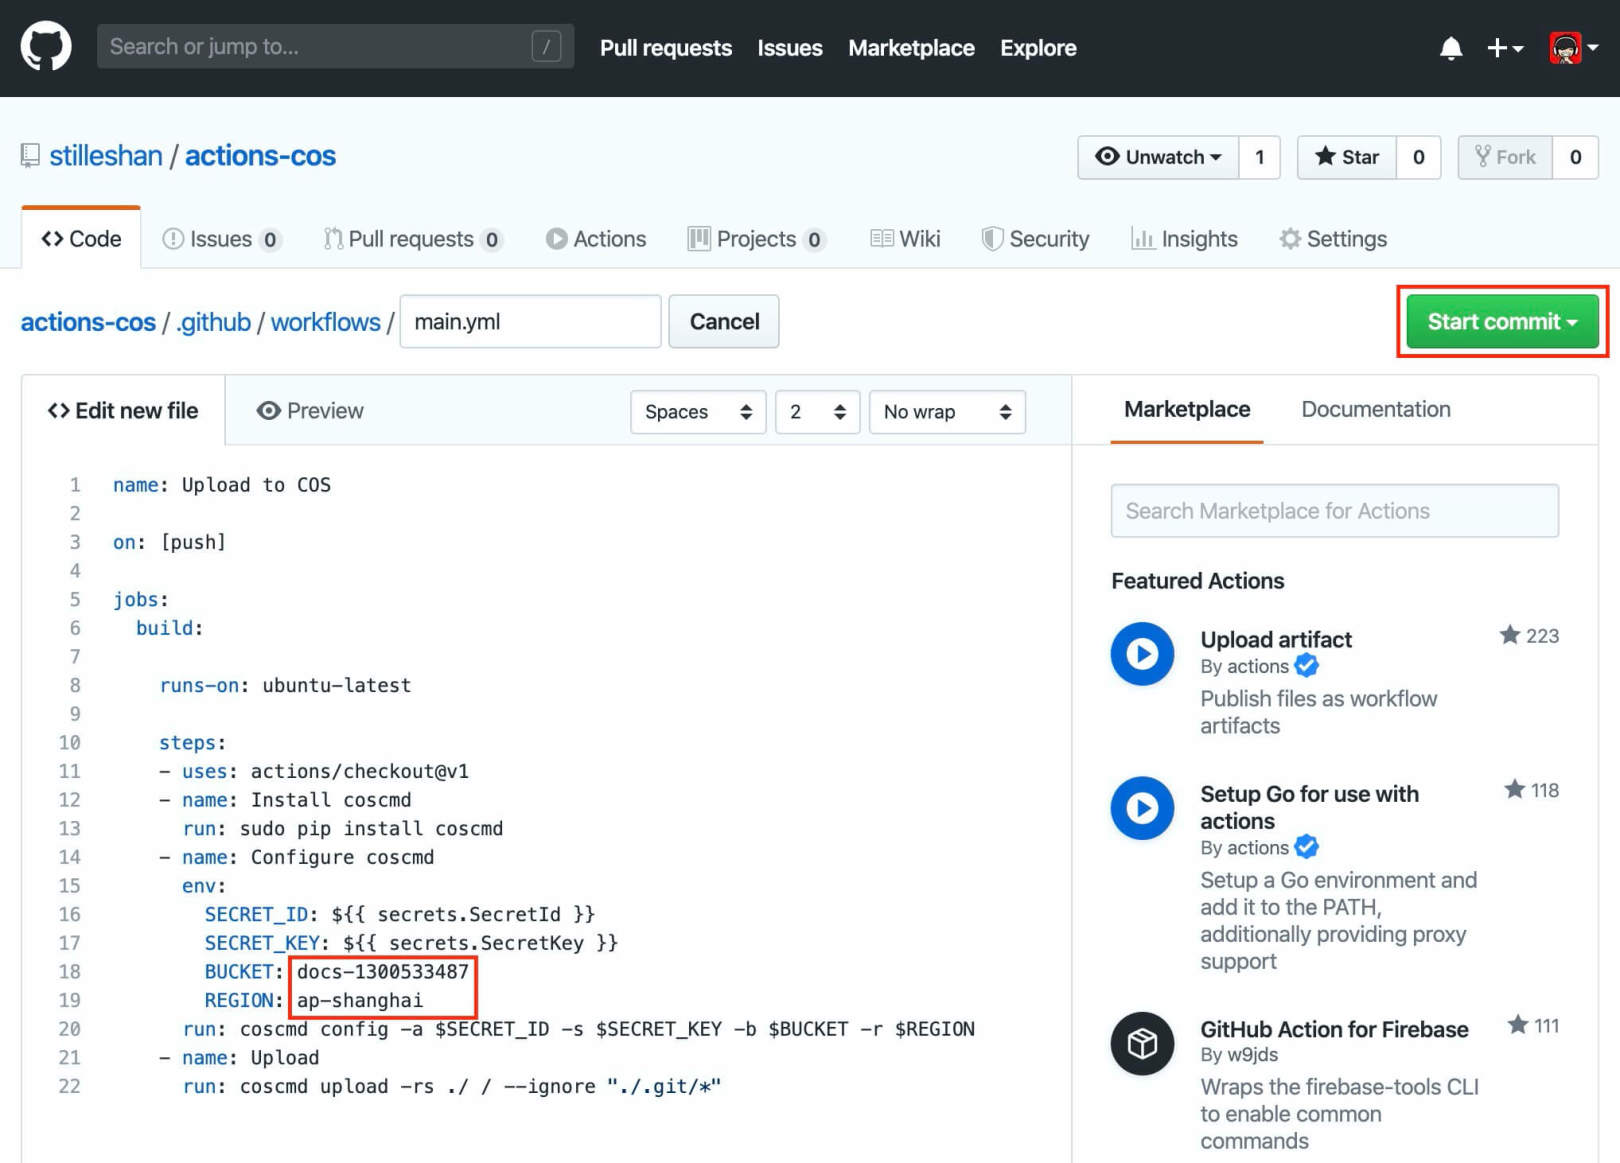
The system will create a yml configuration file of workflow, delete the preset code and copy the following sample code.
The two red areas in the figure need to be modified to the name and area obtained by the bucket just created
Then submit it in the upper right corner.
yml profile sample
name: Upload to COS

on: [push]

jobs:
  build:

    runs-on: ubuntu-latest

    steps:
    - uses: actions/checkout@v1
    - name: Install coscmd
      run: sudo pip install coscmd
    - name: Configure coscmd
      env:
        SECRET_ID: ${{ secrets.SecretId }}
        SECRET_KEY: ${{ secrets.SecretKey }}
        BUCKET: docs-1300533487
        REGION: ap-shanghai
      run: coscmd config -a $SECRET_ID -s $SECRET_KEY -b $BUCKET -r $REGION
    - name: Upload
      run: coscmd upload -rs --delete -f ./ / --ignore "./.git/*"
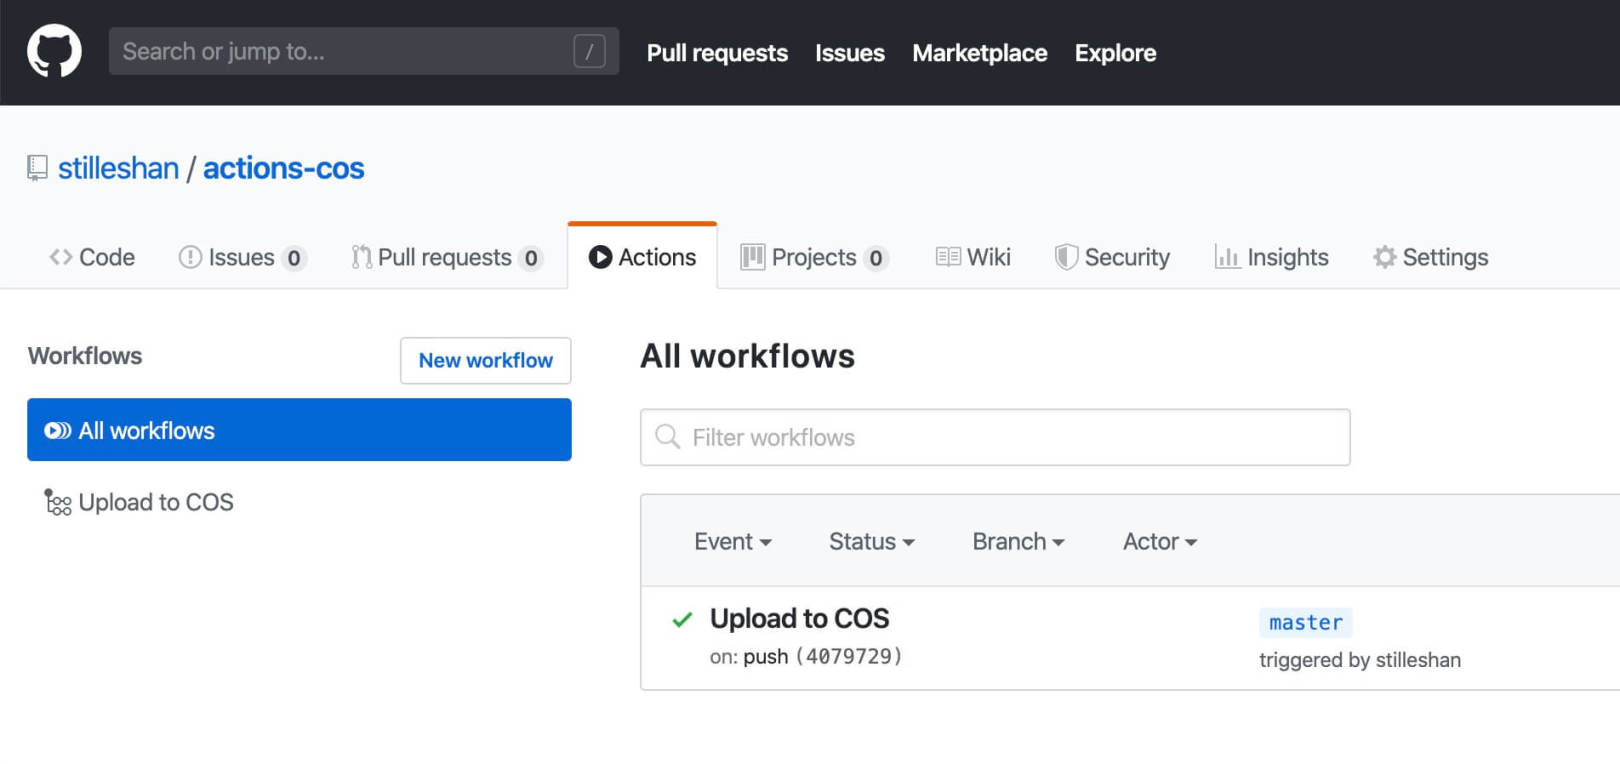
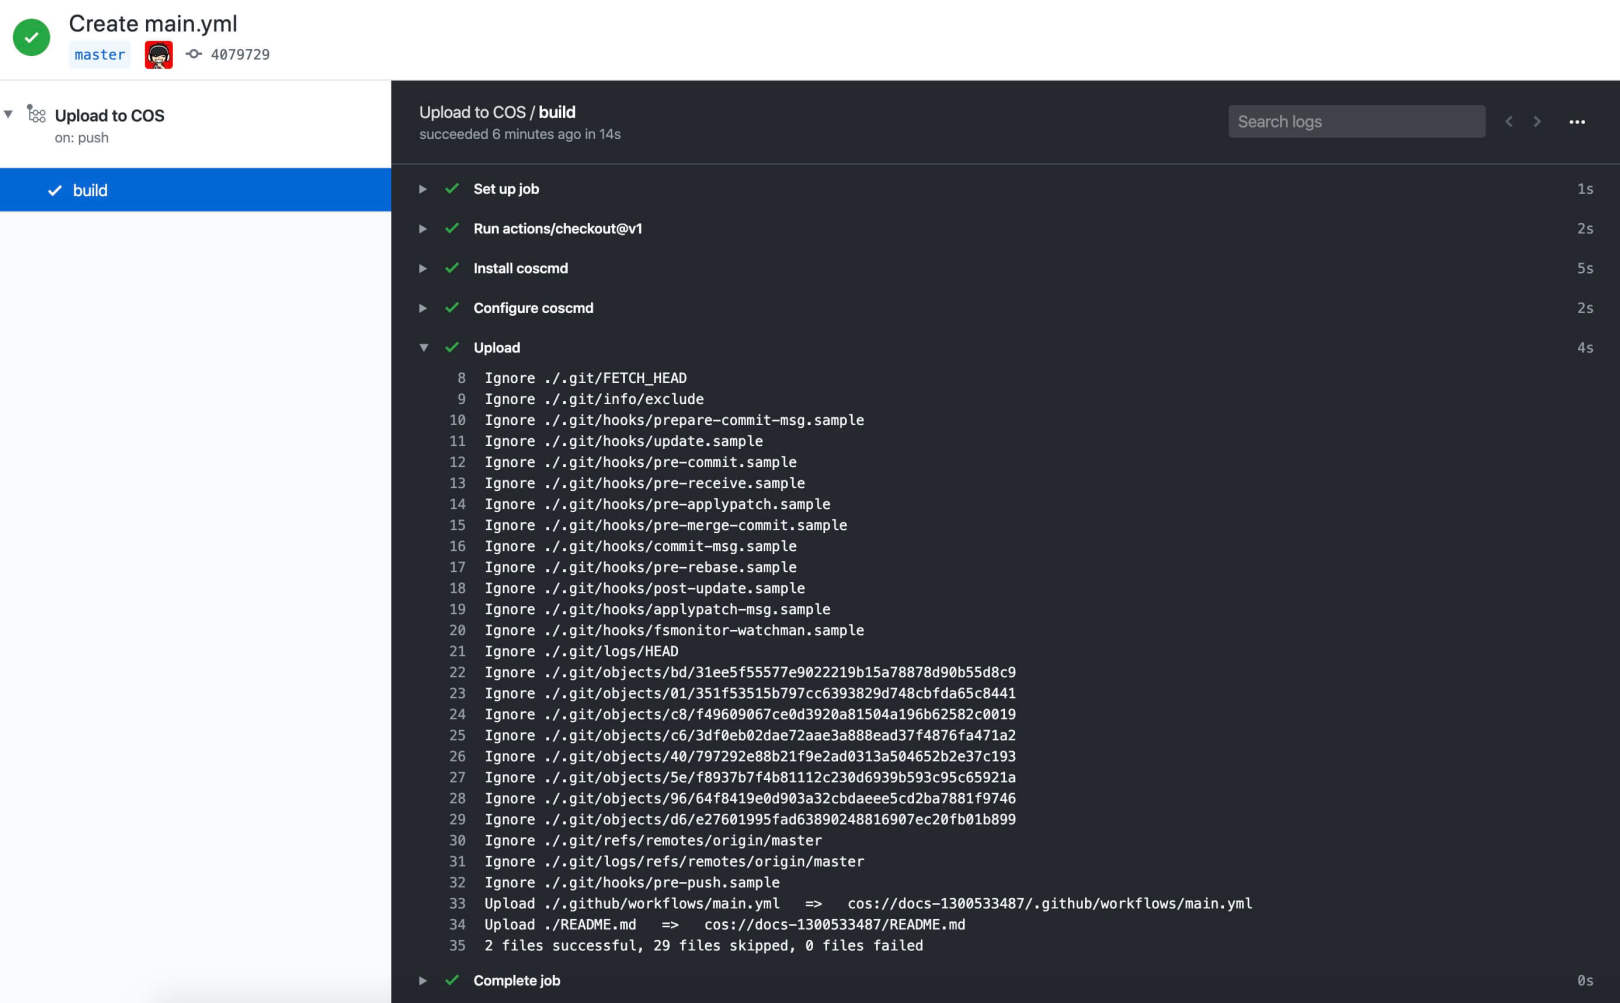
Test GitHub Actions
After submitting yml, the system detects main yml push will start running the workflow. According to the yml configuration file, the whole workflow is simply understood as installation Tencent cloud And upload the whole warehouse to the warehouse according to the configured SecretId, SecretKey, BUCKET and REGION Tencent cloud COS, while ignoring git folder. The upload -rs command will use md5 to compare the existing files in the bucket, and the same files will skip uploading.
Phase II- Tencent cloud Function SCF
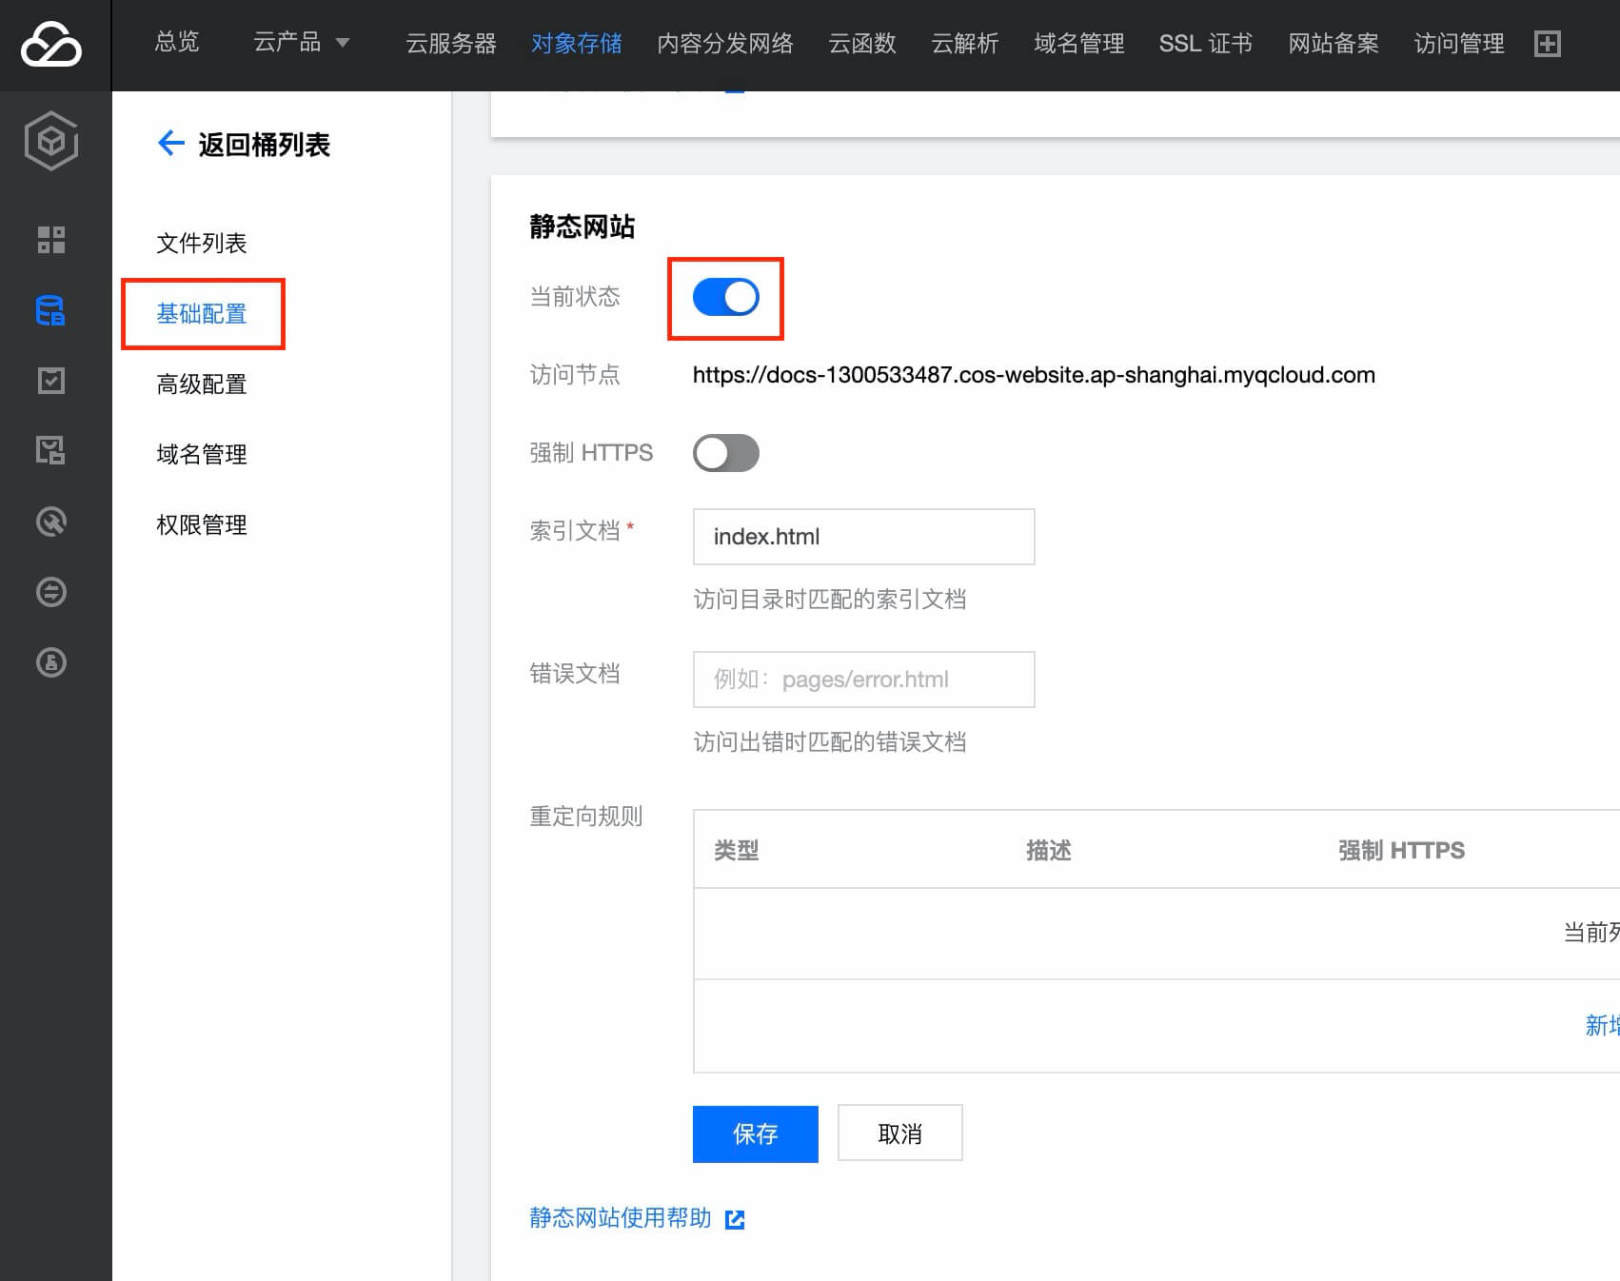
to configure Tencent cloud CDN domain name
Sign in Tencent cloud Control panel - object storage
Enter the created bucket - basic configuration - open static website
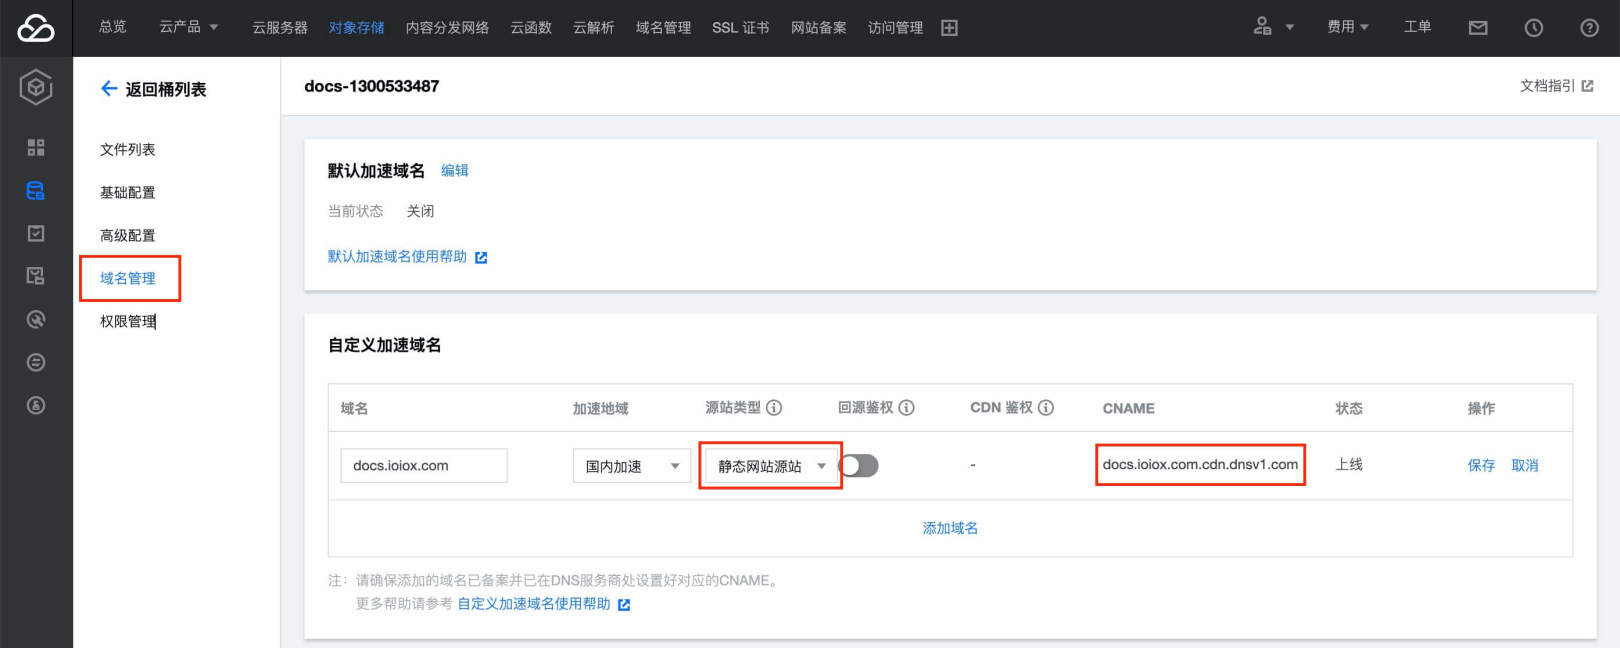
Domain name management
Add a custom accelerated domain name, set the domain name to point to the generated CNAME address, and change the origin type to the static website origin.
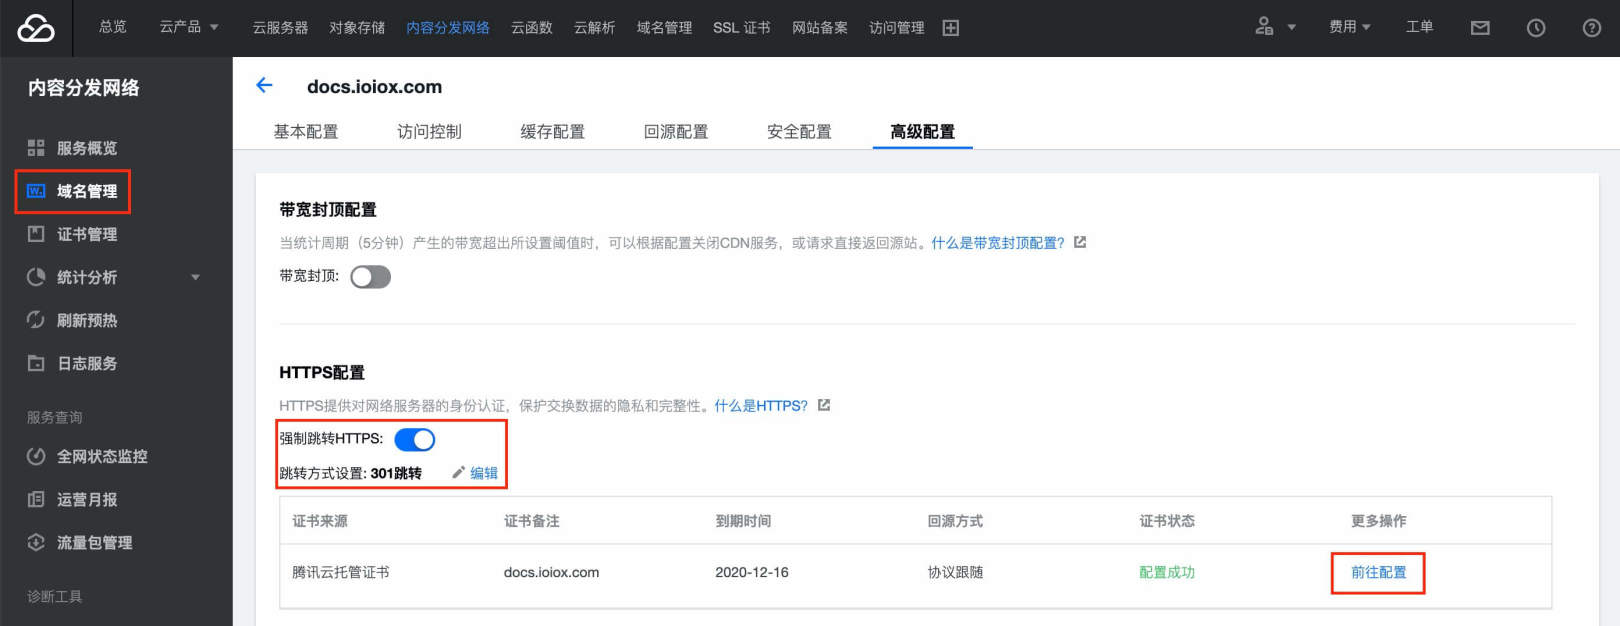
Control panel - content distribution network - domain name management
Click Add domain name - Advanced Configuration
Turn on HTTPS, set the forced jump to HTTPS, and change the jump method to 301. Click Configure to apply for a free certificate.
Configure cloud function SCF
Sign in Tencent cloud Control panel - cloud functions
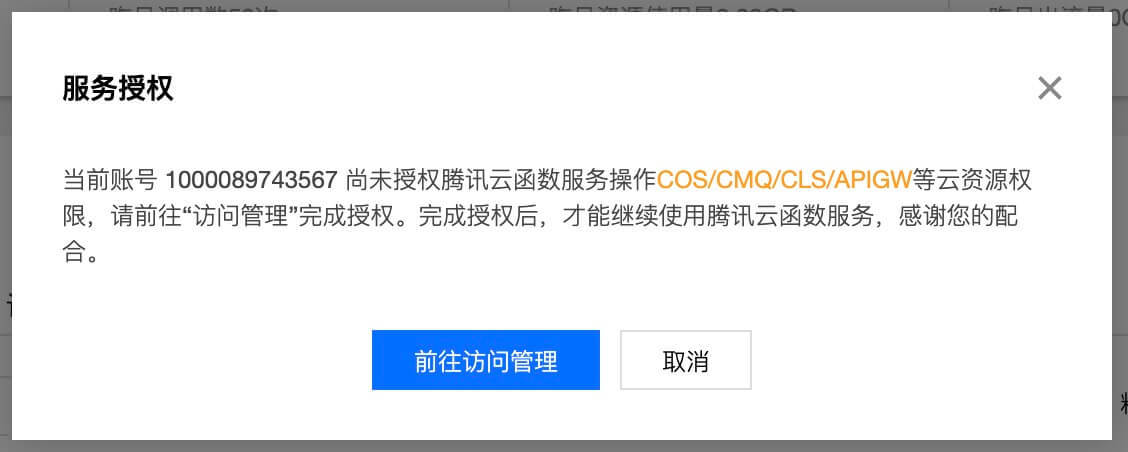
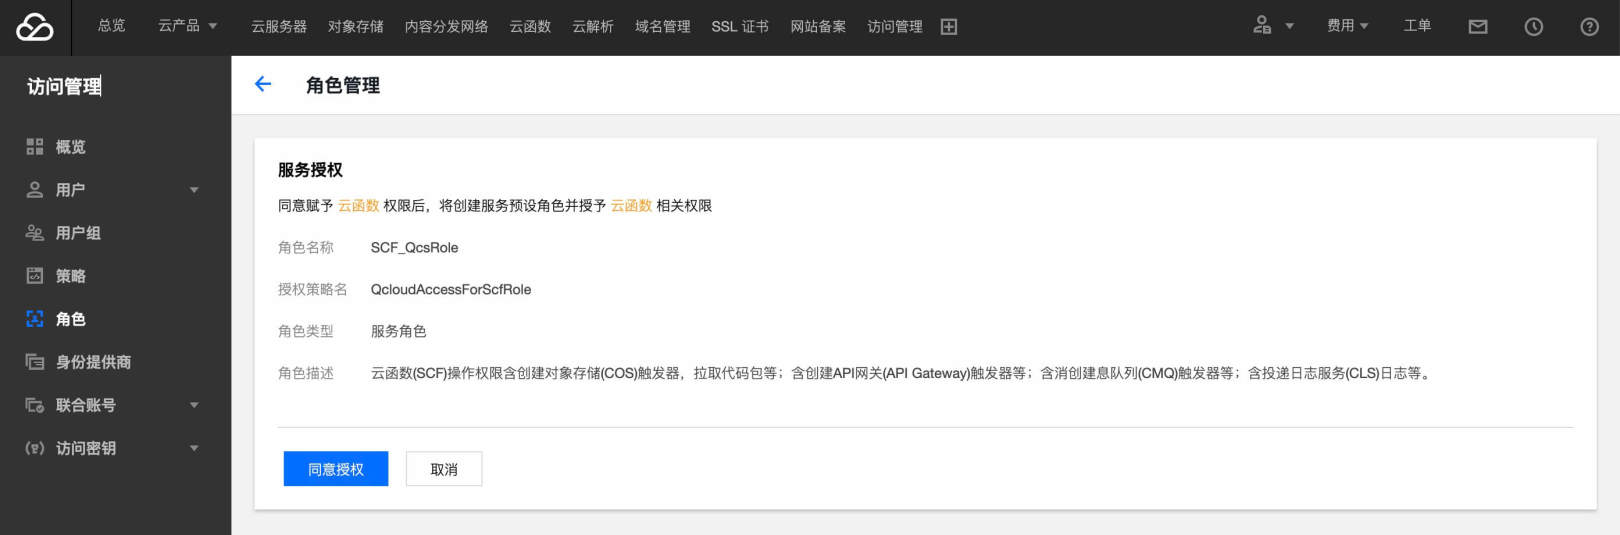
Using cloud functions for the first time may jump out of the service authorization box. You need to go to visit, add and agree to authorization. This role has no effect on the cloud function added this time.
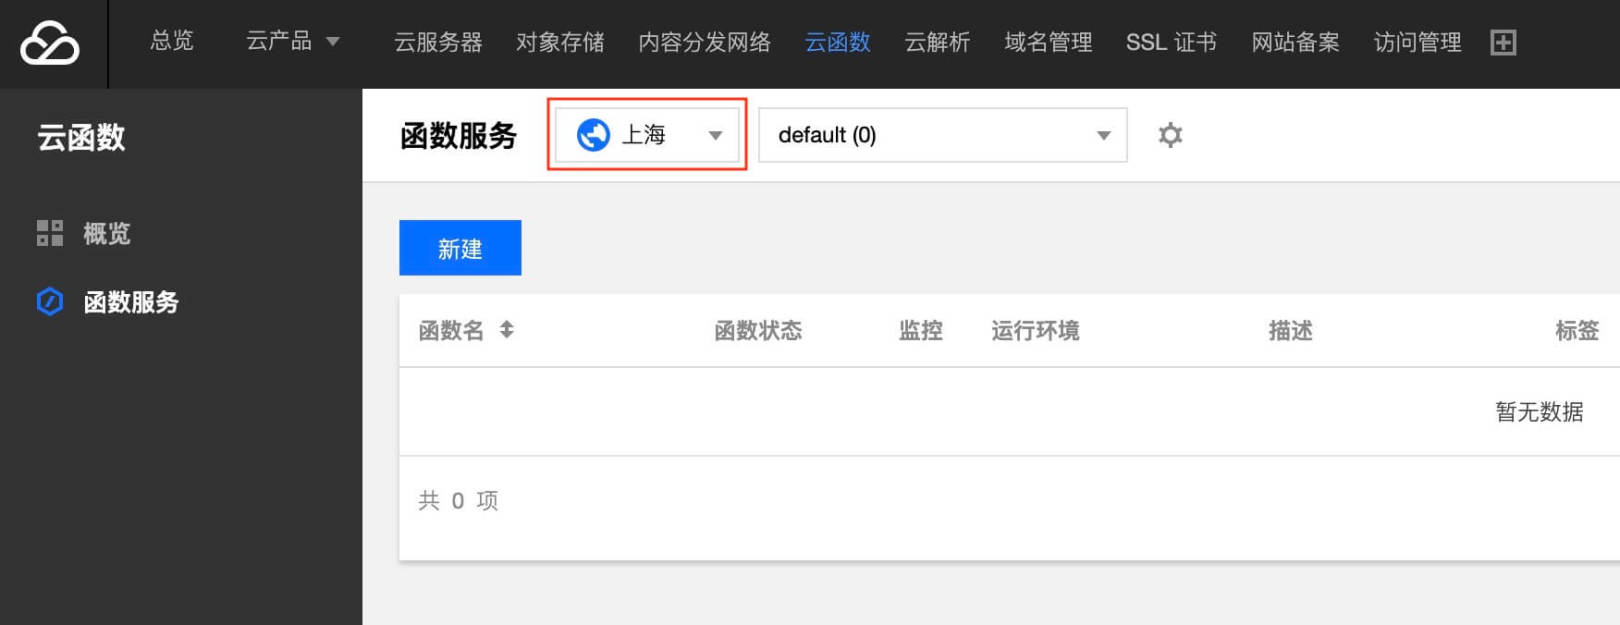
Select the same area as your bucket and create a new one
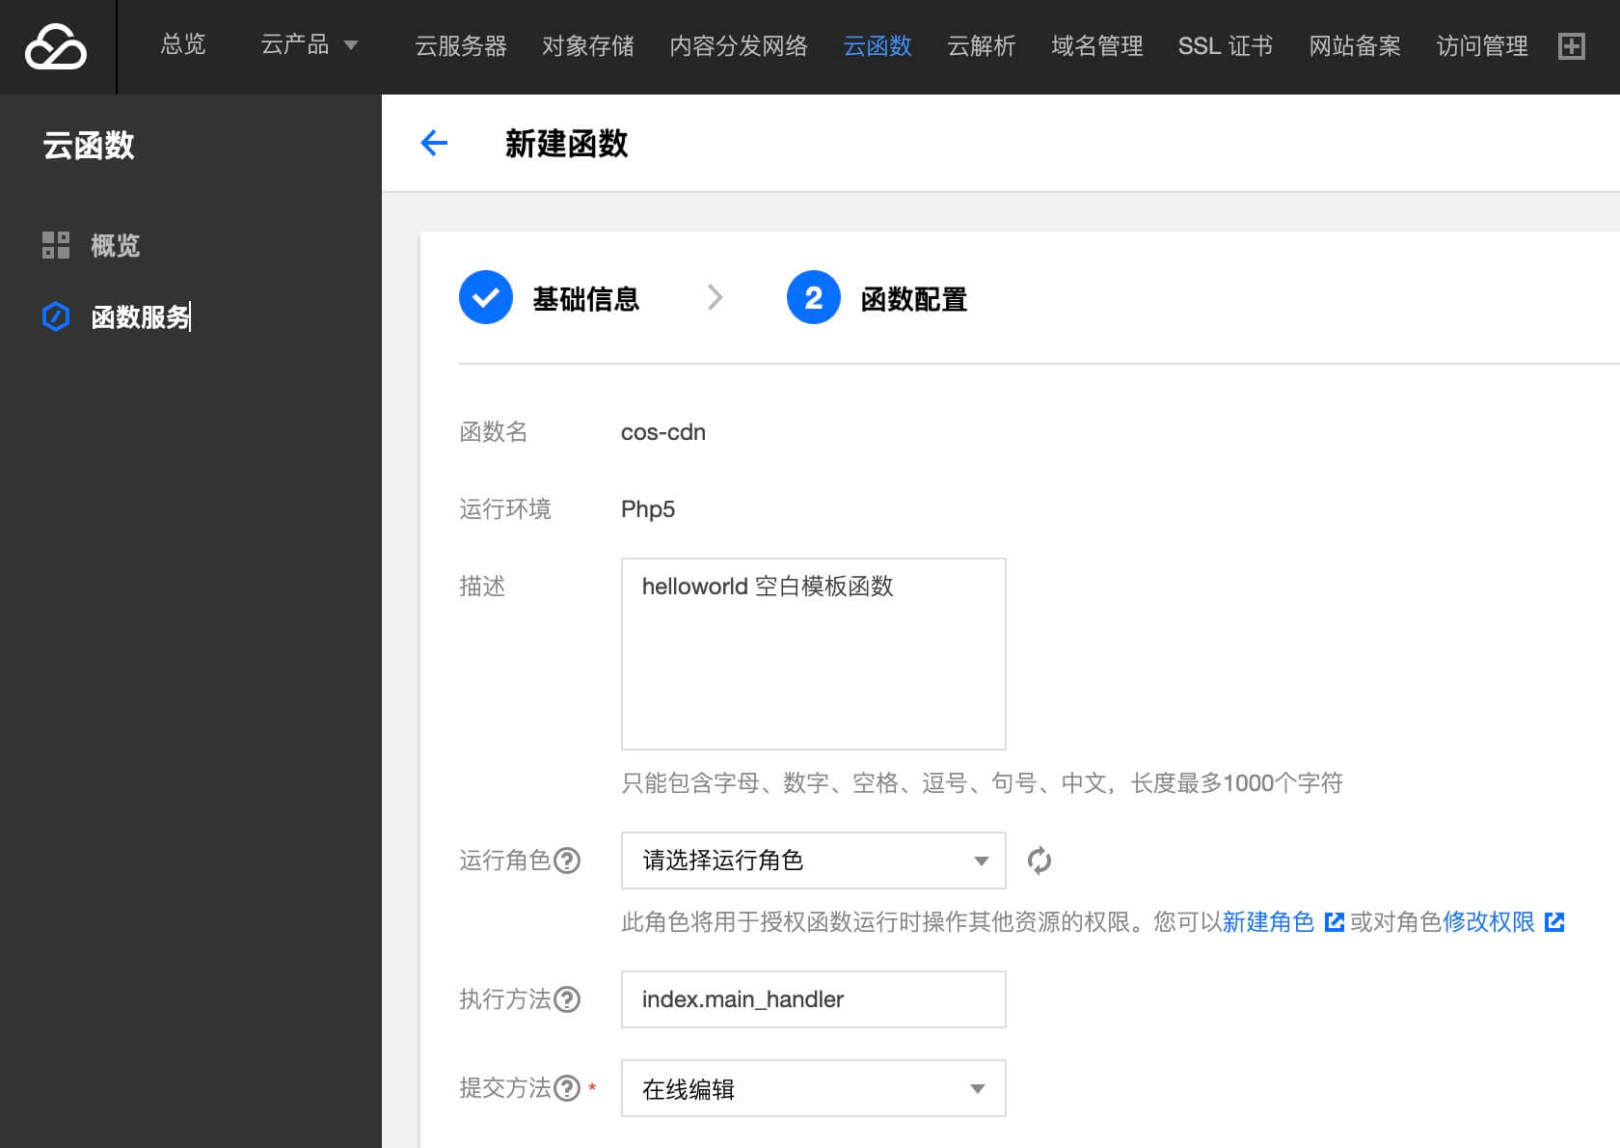
Fill in the function name, select Php 5.6 for the running environment, and select blank function for the creation method. Next step.
Function configuration
The upper part can remain the default
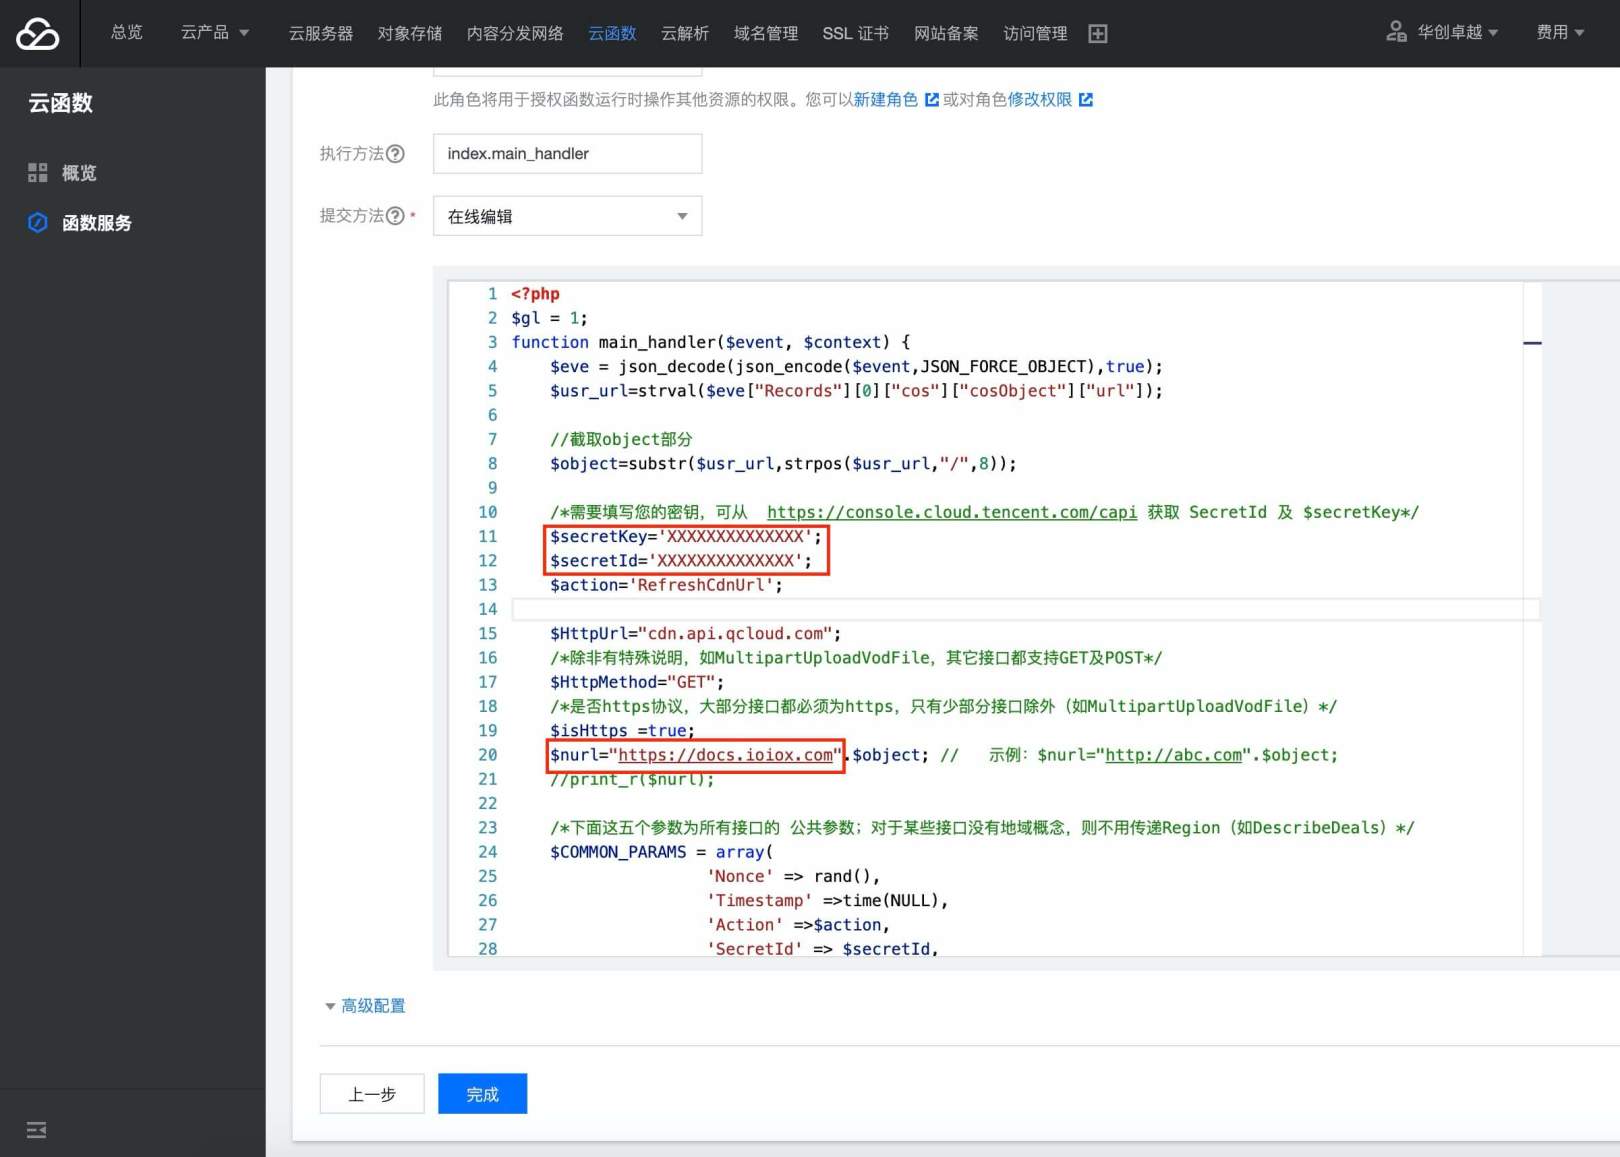
Delete the default code and copy the following sample code here
The two red marks on the figure need to be modified to the API KEY obtained before. Note that the order of ID and KEY here is opposite to that when GitHub Actions is configured before, and change the CDN link to your domain name. If the domain name has been configured with https and certificate, make sure it is https here.
Just finish
Function code sample
<?php
$gl = 1;
function main_handler($event, $context) {
    $eve = json_decode(json_encode($event,JSON_FORCE_OBJECT),true);
    $usr_url=strval($eve["Records"][0]["cos"]["cosObject"]["url"]);

    //Intercept object part
    $object=substr($usr_url,strpos($usr_url,"/",8));

    /*You need to fill in your key, which can be downloaded from https://console.cloud.tencent.com/capi Get secret ID and $secret key*/
    $secretKey='XXXXXXXXXXXXXX';
    $secretId='XXXXXXXXXXXXXX';
    $action='RefreshCdnUrl';

    $HttpUrl="cdn.api.qcloud.com";
    /*Unless otherwise specified, such as MultipartUploadVodFile, other interfaces support GET and POST*/
    $HttpMethod="GET";
    /*Whether to use https protocol, most interfaces must be https, except for a few interfaces (such as MultipartUploadVodFile)*/
    $isHttps =true;
    $nurl="https://XXXX.XXXX.com".$object; / / example: $nurl="http://abc.com".$object;
    //print_r($nurl);

    /*The following five parameters are common to all interfaces; For some interfaces without Region concept, Region (such as DescribeDeals) need not be passed*/
    $COMMON_PARAMS = array(
                    'Nonce' => rand(),
                    'Timestamp' =>time(NULL),
                    'Action' =>$action,
                    'SecretId' => $secretId,
                    'SignatureMethod' => 'HmacSHA256',
                    'urls.0' => $nurl
                    );
    $PRIVATE_PARAMS = array();
    //**********Perform CDN refresh URL operation**********/
    CreateRequest($HttpUrl,$HttpMethod,$COMMON_PARAMS,$secretKey, $PRIVATE_PARAMS, $isHttps);
   return "RefreshCdnUrl OK";
}
/***************CDN API Call method***************/
function CreateRequest($HttpUrl,$HttpMethod,$COMMON_PARAMS,$secretKey, $PRIVATE_PARAMS, $isHttps)
{
        $FullHttpUrl = $HttpUrl."/v2/index.php";

        /***************The request parameters are arranged in ascending dictionary order according to the parameter names. Note that this sort is case sensitive*************/
        $ReqParaArray = array_merge($COMMON_PARAMS, $PRIVATE_PARAMS);
        ksort($ReqParaArray);

        /**********************************Generate original signature**********************************
         * The request method, URI address and sorted request parameters are spliced together according to the following format to generate the original signature. The original in this request is
         * GETcvm.api.qcloud.com/v2/index.php?Action=DescribeInstances&Nonce=345122&Region=gz
         * &SecretId=AKIDz8krbsJ5yKBZQ    ·1pn74WFkmLPx3gnPhESA&Timestamp=1408704141
         * &instanceIds.0=qcvm12345&instanceIds.1=qcvm56789
         * ****************************************************************************/
        $SigTxt = $HttpMethod.$FullHttpUrl."?";
        $isFirst = true;
        foreach ($ReqParaArray as $key => $value)
        {
                if (!$isFirst)
                {
                        $SigTxt = $SigTxt."&";
                }
                $isFirst= false;
                /*When splicing the original signature, if the parameter name carries, Replace with*/
                if(strpos($key, '_'))
                {
                        $key = str_replace('_', '.', $key);
                }
                $SigTxt=$SigTxt.$key."=".$value;
        }
        /*********************Generate a Signature according to the original Signature string $SigTxt******************/
        $Signature = base64_encode(hash_hmac('sha256', $SigTxt, $secretKey, true));

        /***************For splicing request strings, urlencode the request parameters and signatures********************/
        $Req = "Signature=".urlencode($Signature);
        foreach ($ReqParaArray as $key => $value)
        {
                $Req=$Req."&".$key."=".urlencode($value);
        }

        /*********************************Send request********************************/
        if($HttpMethod === 'GET')
        {
                if($isHttps === true)
                {
                        $Req="https://".$FullHttpUrl."?".$Req;
                }
                else
                {
                        $Req="http://".$FullHttpUrl."?".$Req;
                }
                $Rsp = file_get_contents($Req);
        }
        else
        {
                if($isHttps === true)
                {
                        $Rsp= SendPost("https://".$FullHttpUrl,$Req,$isHttps);
                }
                else
                {
                        $Rsp= SendPost("http://".$FullHttpUrl,$Req,$isHttps);
                }
        }
        var_export(json_decode($Rsp,true));
}
function SendPost($FullHttpUrl, $Req, $isHttps)
{
        $ch = curl_init();
        curl_setopt($ch, CURLOPT_POST, 1);
        curl_setopt($ch, CURLOPT_POSTFIELDS, $Req);
        curl_setopt($ch, CURLOPT_URL, $FullHttpUrl);
        curl_setopt($ch, CURLOPT_RETURNTRANSFER, true);
        if ($isHttps === true) {
                curl_setopt($ch, CURLOPT_SSL_VERIFYPEER,  false);
                curl_setopt($ch, CURLOPT_SSL_VERIFYHOST,  false);
        }
        $result = curl_exec($ch);
        return $result;
}
?>
Test function code
Confirm that the API and CDN configurations are correct, click test and return to success.

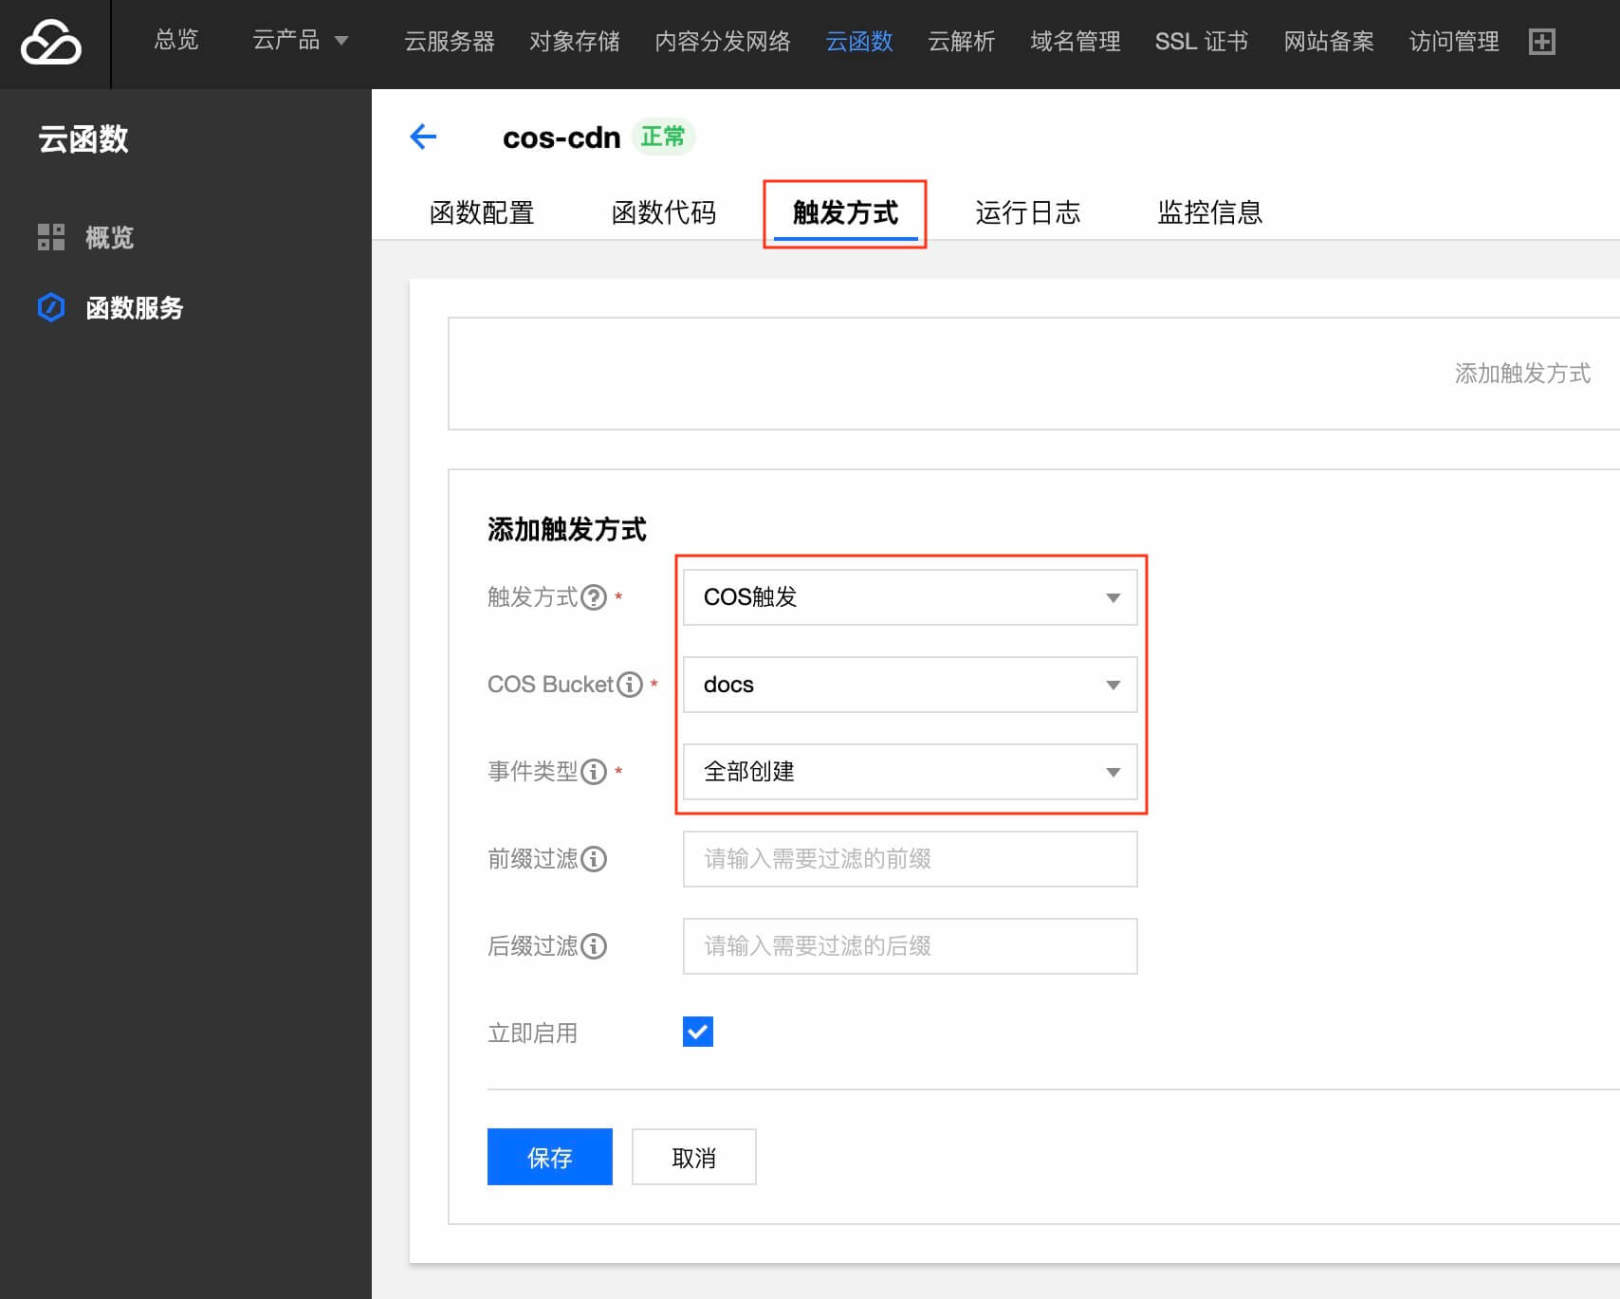
Add trigger method
Here you need to add two trigger methods: create all and delete all
Trigger mode: COS trigger
COS Bucket: select your bucket (please make sure the bucket and cloud function area are the same again)
Event type: create all and delete all
Test configuration
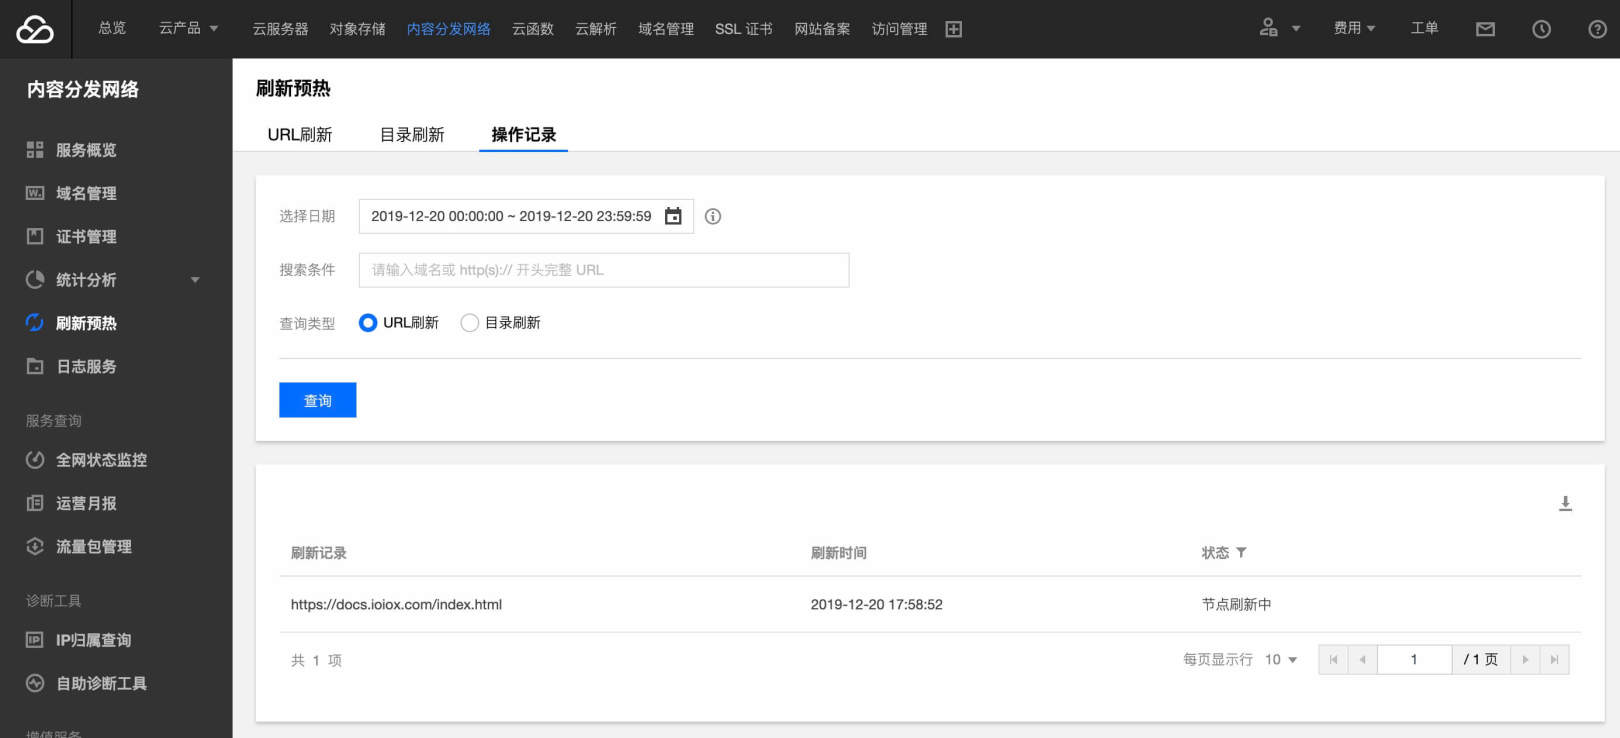
Tencent cloud Console - content distribution network
Refresh preheating on the left - operation record - query
You can see a successful test record just now. Now you can try to test the whole process from Push code to GitHub.
Serverless Framework 30 day trial plan
We sincerely invite you to experience the most convenient way of Serverless development and deployment. During the trial period, the associated products and services provide free resources and professional technical support to help your business realize Serverless quickly and conveniently!
Details can be found at: Serverless Framework trial program
One More Thing
What can you do in three seconds? Take a sip of water, read an email, or -- deploy a complete Serverless application?
Copy link to PC browser to access: https://serverless.cloud.tencent.com/deploy/express
Deploy at top speed in 3 seconds and experience the fastest in history immediately Serverless HTTP Combat development!
Portal:
- GitHub: github.com/serverless
- Official website: serverless.com
Welcome to: Serverless Chinese network , you can Best practices Experience more about the development of Serverless applications!
Recommended reading: Serverless architecture: from principle, design to project practice