nginx problem handling
1. Cache files on the client
If the user repeatedly accesses the same file of the server, it can be cached to the client to avoid the server repeatedly transmitting the same file and save time
Open the configuration file and add a location under the default location
location ~* \.(jpg|html|txt|mp3) ${/ / when it is found that the user is accessing a page ending in. JPG or. HTML, etc
expires 30d; / / cache the above accessed files in the client for 30 days
}
sbin/nginx -s reload / / reload the configuration file after configuration
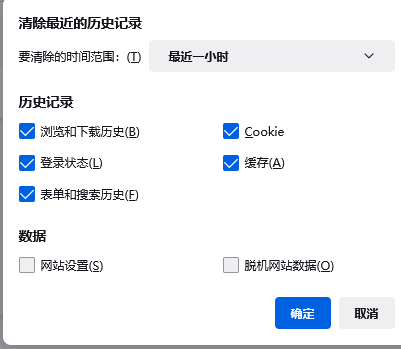
Clear the history using Firefox, and then visit 192.168.2.5/a.html
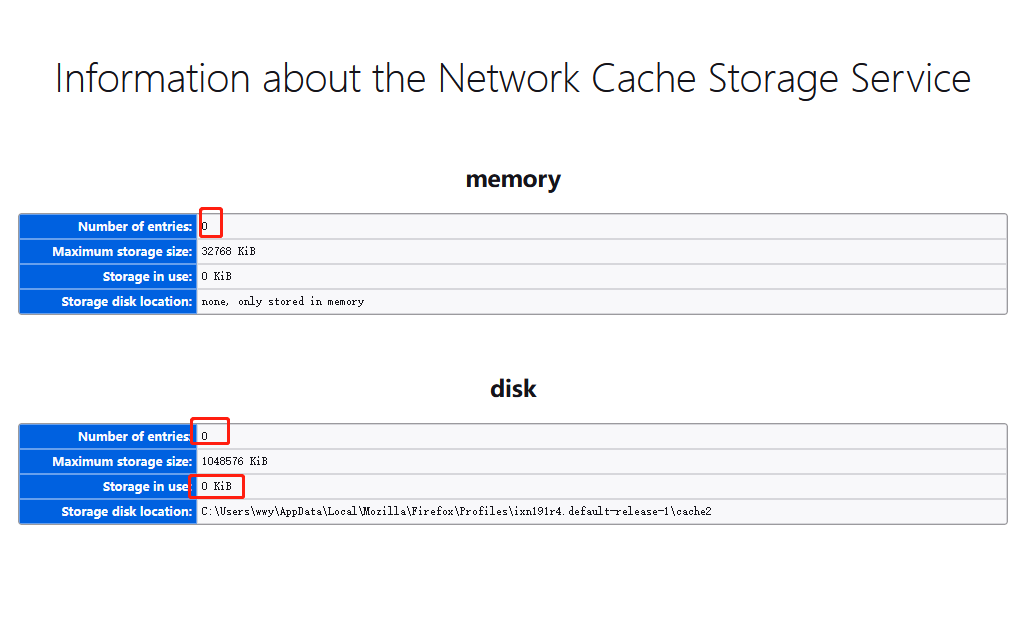
Then enter about:cache in the address bar
Check the list of disk files, find the accessed files, and look at the last penultimate column (Expires)
The information shows how long it expires. You can see that the expiration time of the file is one month later, indicating that the cache is successful
Start service
Reload
Turn off and disable firewall


Clear the browser history, refresh the address bar, and enter "about:cache"
Refresh after visiting several web pages


2. Support super long address bar
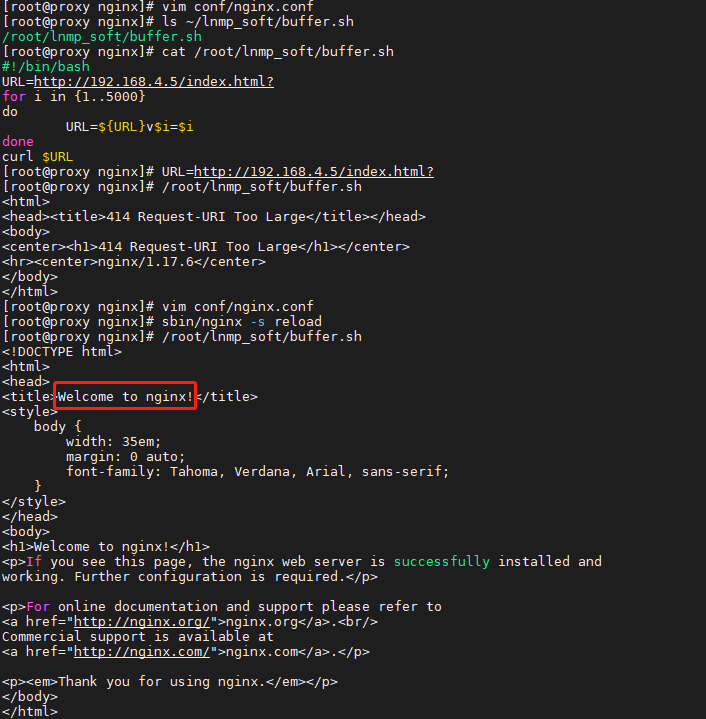
By default, nginx cannot support long address bar, and 414 error will be reported
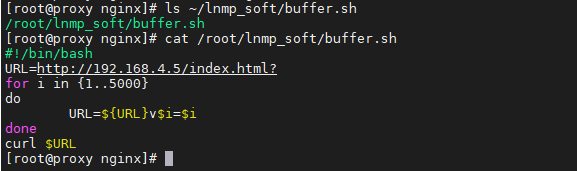
Running script 414 reports an error

Script interpretation:
The re assignment process of the address in the above script is as follows, and the constant super address will be generated finally
URL=http://192.168.4.5/index.html?
URL=http://192.168.4.5/index.html?v1=1
URL=http://192.168.4.5/index.html?v1=1v2=2
URL=http://192.168.4.5/index.html?v1=1v2=2v3=3
URL=http://192.168.4.5/index.html?v1=1v2=2v3=3.......................v5000=5000
Open the configuration file and add two lines above the default virtual host
client_header_buffer_size 200k; / / the first line indicates that the length of the header information (including the address bar) of the website visited by the user supports the size of 200K
large_client_header_buffers 4 200k; / / the second line indicates that if 200K is not enough, give another four 200ks

Run the script again successfully, and the page content will be displayed
3. Optimize nginx concurrency
Using proxy and web1, the firewall and selinux are closed

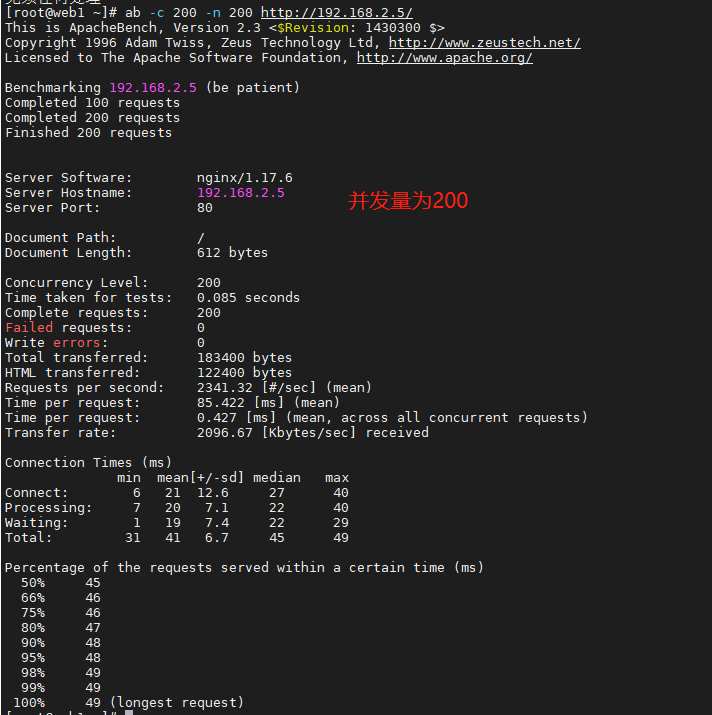
[root@web1 ~]# yum -y install httpd-tools
ab -c 200 -n 200 http://192.168.2.5/ / / use the stress test tool to simulate 200 people, one time for each person. A total of 200 visits to the 2.5 website are successful
ab -c 2000 -n 2000 http://192.168.2.5 / / simulate 2000 people, once per person, 2000 times in total
 Right 2.5 Failed to initiate access to your website

Back to porxy
Next, optimize
open nginx Configuration file modification line 3, line 13-
 	 worker_processes  2;   //The number of nginx processes started is usually consistent with the number of cpu cores
     worker_connections  50000;   //Concurrent accesses supported per nginx process

sbin/nginx -s reload
Both proxy and web1 execute the following commands
ulimit -n / / query the number of open files in the system
ulimit -n 100000 / / the number of times a temporary definition file can be opened at the same time is 100000
Go back to web1 host and execute the command ab -c 2000 -n 2000 http://192.168.2.5/ See 100% success
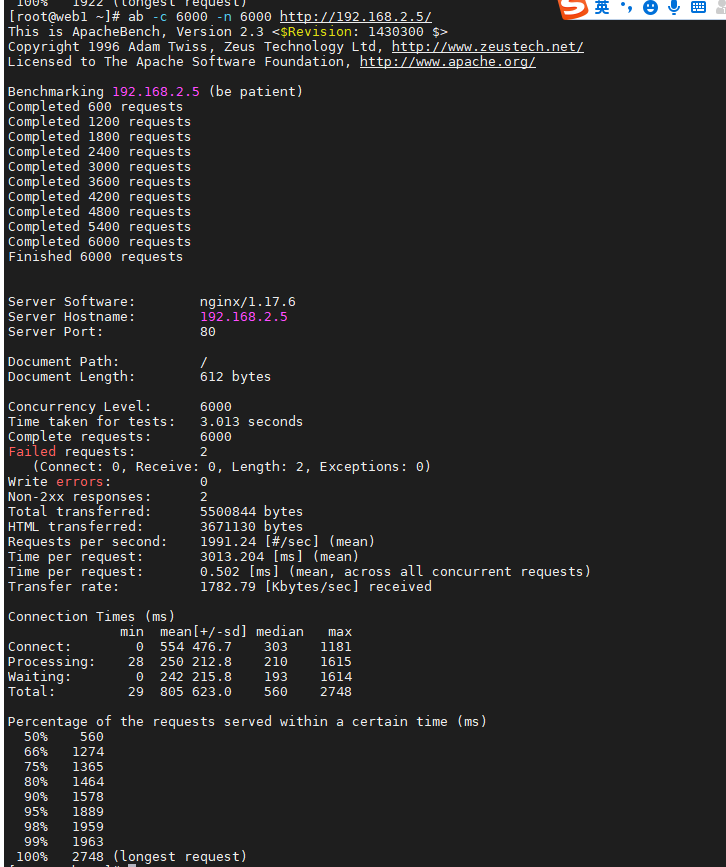 Here I tested 6000, showing 100%, indicating success.
Set permanent
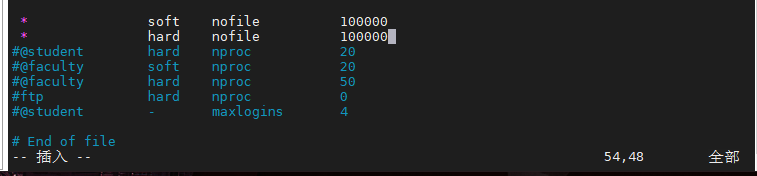
vim /etc/security/limits.conf   //Open the configuration file to permanently modify lines 53 and 54
*               soft    nofile          100000     #soft limits what you want to use now
*               hard    nofile         100000      #Hard hard limit maximum
reboot restart

Solve the problem that users log in to the website repeatedly due to too many cluster hosts
In a cluster, if the website requires the user to enter the user name and password to log in before continuing to visit, then after the user logs in to one of the cluster hosts, the request may be polled by the proxy server to another server as he continues to visit the page, so the user does not log in to the other server, If you want to view the page after logging in, you need to log in again. In this way, the more cluster hosts, the more times customers need to log in repeatedly
Deploy the environment according to the following requirements
proxy web1 web2
nginx lnmp lnmp
stay proxy The host home directory will lnmp_soft.tar.gz copy to web1
[root@proxy ~]# scp lnmp_soft.tar.gz 192.168.2.100:
First in web1 host:
yum -y install gcc make pcre-devel openssl-devel
[root@web1 ~]# tar -xf lnmp_soft.tar.gz
[root@web1 ~]# cd lnmp_soft/
tar -xf nginx-1.17.6.tar.gz
cd  nginx-1.17.6/
./configure   //to configure
make   //compile
make  install   //install
yum -y install mariadb mariadb-server mariadb-devel   //mount this database
 Related software packages
yum -y install php php-mysql php-fpm   //Install php related packages
systemctl start mariadb
systemctl start php-fpm
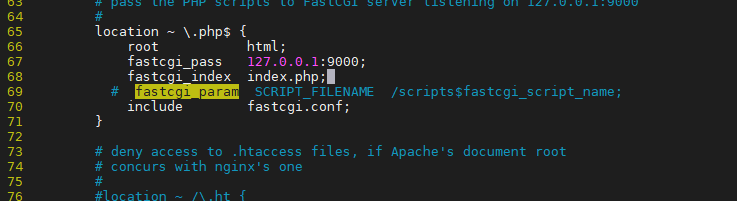
[root@web1 nginx]# vim conf/nginx.conf / / modify the configuration file to realize dynamic and static separation,
Amendment 65~71 Behavior the following states
vim conf/nginx.conf    //Modify the configuration file to realize dynamic and static separation, and modify 65~71 the following states
        location ~ \.php$ {
            root           html;
            fastcgi_pass   127.0.0.1:9000;
            fastcgi_index  index.php;
        #   fastcgi_param  SCRIPT_FILENAME  /scripts$fastcgi_script_name;
            include        fastcgi.conf;
        }

Good configuration lnmp after
[root@web1 nginx]# systemctl stop httpd
[root@web1 nginx]# sbin/nginx / / start the service

Testing
After configuring lnmp
cd ~/lnmp_soft/php_scripts/
tar -xf php-memcached-demo.tar.gz / / release the web page with login function
CP - R PHP memcached demo / * / usr / local / nginx / HTML / / / copy page
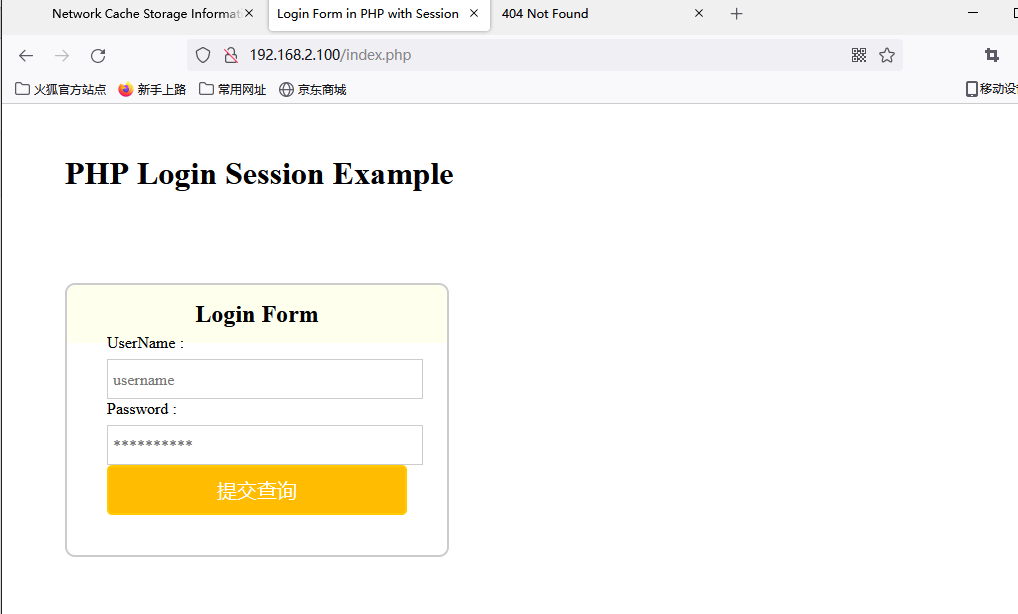
Go to nginx and use Firefox browser to access http://192.168.2.100/index.php You can see the web page with login interface
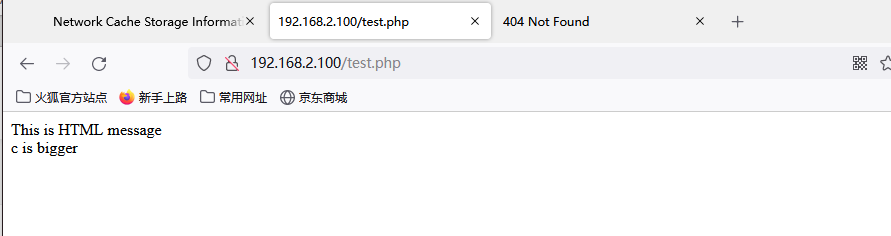
[root@web1 nginx]# cp ~/lnmp_soft/php_scripts/test.php  html/

[root@web1 nginx]# tar -xf ~/lnmp_soft/php_scripts/php-memcached-demo.tar.gz
[root@web1 nginx]# ls
client_body_temp  fastcgi_temp  logs                proxy_temp  scgi_temp
conf              html          php-memcached-demo  sbin        uwsgi_temp
Test access
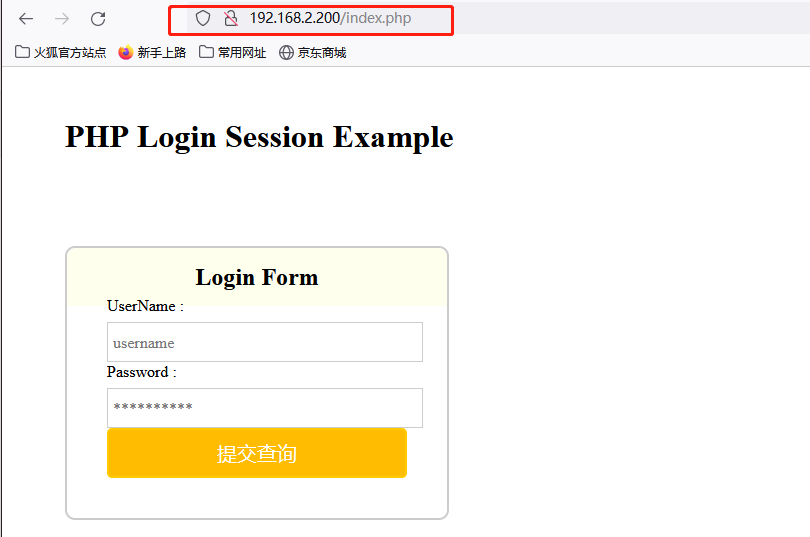
As like as two peas are configured, web1 will also configure the web2 according to the same process.
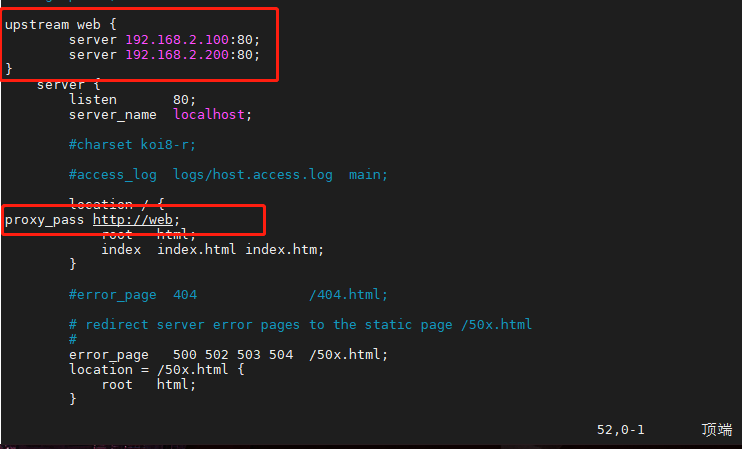
Then in proxy The host is configured as a cluster. Note that the host cannot be configured with dynamic and static separation
upstream web {     //Add a cluster on the default virtual host
        server 192.168.2.100:80;
        server 192.168.2.200:80;
}

location  /  {
     proxy_pass http://web;  // Then call the cluster in the location in the default virtual host

sbin/nginx -s reload  //Reload configuration file
http://192.168.2.5/index.php / / after that, test the effect, refresh the page continuously, and you will see the login interface of web1 and web2 (you need to mark it on the index.php page of web1 and web2 in advance)
be careful! proxy Do not configure dynamic and static separation for the host
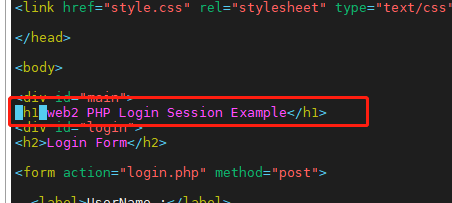
    vim html/index.php

<h1>web1 PHP Login Session Example</h1> 
Refresh the page to realize polling

Session is stored on the server side and saves user name, login status and other information
Cookies are distributed by the server to the client and saved in a file on the client
The main content saved is the sessionID
index.php # pre login page
home.php # post login page
Client Cookies ------ proxy ------ web1 - Session
------ web2 Session
After the current environment is built, you can test according to the following steps:
Delete the session files of web1 and web2
rm -rf /var/lib/php/session/*
Delete the history of Firefox browser (mainly cookies)
http://192.168.2.5/index.php / / login twice to succeed. Currently, login twice is normal!!
When logging in, you need to log in twice to succeed!

In the above experiment, because web1 and web2 store sessions in their respective / var/lib/php/session directories, customers need to log in repeatedly. In order to unify the location of session storage (this storage method is usually called session sharing), special database tools need to be installed
memcache is a database service that can use memory to read and write data
proxy host:
yum  -y  install  memcached  telnet    //Install package
systemctl  start  memcached   //Open service
telnet  127.0.0.1  11211   //Connect memcache for detection

Post test memcached:
set abc 0 200 3     //Create the variable abc (overwrite if abc already exists). 0 is uncompressed data. The data storage time is 200 seconds and three characters are stored. After entering the carriage, for example, xyz is used to store these three characters
get abc    //Get variable abc
replace abc 0 200 3   //Override abc. At this time, the variable abc must exist
delete abc   //Delete abc
add abc 0 200 3  //Add abc variable. If abc already exists, the addition will fail
flush_all   //Delete all data
quit  //sign out

Go to web1 and web2 hosts to modify the location where session files are stored
vim  /etc/php-fpm.d/www.conf   //To the last page

php_value[session.save_handler] = memcache  //This is changed to memcache, which means that the session is not stored in local ordinary files, but to find memcache

php_value[session.save_path] = tcp://192.168.2.5:11211 / / the path here is modified to the server address and port where memcache service is installed


yum -y install php-pecl-memcache   //Install the software package associated with php and memcached service
systemctl restart php-fpm

Turn off firewall and selinux on all hosts
Finally, clear the history of the browser and visit it again http://192.168.2.5/index.php Only one login can succeed