NFS Server
Introduction to NFS Server
NFS (Network File System) is one of the file systems supported by FreeBSD, which allows computers in the network (different computers, different operating systems) to share resources through TCP/IP networks, mainly on unix series operating systems. In NFS applications, client applications of local NFS can read and write files transparently on remote NFS servers, just like accessing local files.
NFS servers allow PC s to mount directories shared by the NFS servers in the network to the local file system, whereas on the local system, the directory of that remote host appears to be its own disk partition.
Since NFS supports many functions, and different functions are started by different programs, each function starts with a few ports enabled to transmit data, the corresponding ports for NFS functions are not fixed, but rather randomly selected ports less than 1024 that are not used for transmission. However, this can cause problems for clients to connect to the server because clients need to know the relevant ports on the server side to be able to connect.
A service called RPC (Remote Procedure Call) is required. Since the server randomly selects several port numbers when starting NFS and actively registers with RPC, RPC knows the port number corresponding to each NFS function, and RPC notifies the client of the port number so that the client can connect to the correct port. RPC uses the fixed port number port 111 to listen to the client's needs and respond to the client with the correct port number.
Note: Start RPC before starting NFS, otherwise NFS will not be able to register with RPC. In addition, if the RPC restarts, the previously registered data will disappear, so after the RPC restarts, all services it manages will need to be restarted to register with the RPC again.
setup nfs server
Primary parse file
/etc/exports Main profile (file does not necessarily exist):
/etc/exports Syntax and parameters for configuration files:
share directory    Host name (permissions)
1.Host Name Settings
 You can use the complete IP Or a network number, such as 172.24.8.128 Or 172.24.8.0/24 Or 172.24.8.128/255.255.255.0
 Host name can be used, but it must be in/etc/hosts Or can be used DNS Domain name resolution resolves the corresponding IP Address. You can use the*"Represents all hosts.
Permissions need to be written in parentheses, which are immediately followed by the host name. Privilege-related parameters can be written multiple times, separated by commas. Specific parameters are described below:
Parameters:
rw/ro #The permissions shared by the directory are read-write or read-only, but ultimately read-write or not, depending on the rwx of the file system
sync/async sync #Represents that the data will be written to both memory and hard disk synchronously, while async means that the data will be temporarily stored in memory first, not directly written to the hard disk.

no_root_squash/root_squash #If the owner and group of the file created by the client in the shared directory are the root user and the root group, there are two situations when displaying the owner and group of the file:
no_root_squash Express:The owner and group of the file are root Users and root Group;
root_squash Express:take root Users and groups are mapped to anonymous users and groups (default). all_squash/no_all_squash
all_squash:When all users of the client create a file, the client maps the users and groups of the file to anonymous users and groups
no_all_squash:The file created by the client's normal user UID and GID As much as it is, the server will display as much (default settings)
anonuid=/anongid= :Maps the users and groups of the file to the specified UID and GID,If you do not specify a default of 65534 ( nfsnobody)
/usr/sbin/exportfs   Maintain NFS Command to share resources, which can be used to re-share/etc/exports Updated directory resources, will NFS server Shared directories uninstall or re-share, etc.

/var/lib/nfs/*tab
 stay NFS On the server, log files are placed in/var/lib/nfs There are two important log files in the directory, one is etab,Major Records NFS The full permission setting value of the shared directory; The other is xtab,Recorded links to this NFS Server related client data.

/usr/sbin/showmount  This command is used primarily for client End. This command can be viewed NFS Shared directory resources
Experiment 1 Open/nfs/shared directory for all users to query data;
Step 1: Configure the master profile
[root@localhost nfs]# vim /etc/exports
/nfs/shared  *(ro)
Step 2: Create a shared directory
[root@localhost nfs]# mkdir -p /nfs/shared/
[root@localhost shared]# vim haha
Step 3: Start Services
[root@localhost ~]# systemctl restart rpcbind
[root@localhost ~]# systemctl restart nfs
Step 4: Client Validation Results
[root@localhost nfs]# showmount -e 192.168.58.73
Export list for 192.168.58.73:
/nfs/shared *
[root@localhost /]# cd /mnt/
[root@localhost mnt]# ll
total 4
-rw-r--r--. 1 root root 5 Jan  7 00:04 haha
Experiment 2
Requirements: Open/nfs/upload directory, which is the data upload directory of the host of 172.24.8.0/24 network segments, and map the owner and group of all upload files of the host of this segment to nfs-upload with UID and GID of 2001;
Step 1: Configure the main profile
[root@localhost nfs]# vim /etc/exports
/nfs/upload  192.168.58.0/24(rw,anonuid=2001,anongid=2001)
Maps the users and groups of the file to the specified UID and GID,
Step 2: Create a shared directory and modify permissions
[root@localhost nfs]# mkdir -p /nfs/upload/
[root@localhost upload]# vim haha

[root@localhost upload]# chmod o+w upload/ #Note the permissions to modify the file directory to ensure that client hosts can upload
Step 3: Start the service
[root@localhost upload]# exportfs -r #This command only needs to be entered when you start the service on the server side and update the configuration again
Step 4: Client Configuration
[root@localhost mnt]# groupadd nfs-upload -g 2001
[root@localhost mnt]# useradd nfs-upload -g 2001 -u 2001
 Add to uid For 2001, gid For users and groups in 2001.
Step 5: Open the service and verify the results
[root@localhost mnt]# mount 192.168.58.73:/nfs/upload  /data/upload/ #The mount directory here can be created by the client itself.
[root@localhost mnt]# cd /data/upload/
[root@localhost upload]# ll
total 8
-rw-r--r--. 1 nfs-upload nfs-upload 5 Jan  6 23:36 ha
-rw-r--r--. 1 root       root       0 Jan  6 23:14 haha
-rw-r--r--. 1 nobody     nobody     5 Jan  6 23:18 hahaha
Experiment 3
Requirement: Share the / home/tom (home directory for uid=1111, gid=1111 Tom users) directory only to jerry users on 172.24.8.129 host, which jerry has access to, new files, and delete files.
Step 1: Create a tom user setup uid and gid on the server side
[root@localhost upload]# groupadd tom -g 1111
[root@localhost upload]# useradd tom -u 1111 -g 1111
Step 2: Configure the parse file
[root@localhost home]# vim /etc/exports
/home/tom    192.168.58.66(rw)
Step 3: Change Shared File Permissions to Start the Service
[root@localhost home]# chmod 770 tom/
Note: The permissions are changed here to give the client access to modify the directory file
[root@localhost home]# exportfs -r
Step 4: Client creates a jerry user
[root@localhost data]# useradd jerry  -g 1111
Note: Creation and tom Same User gid
Step 5: Client Validation

Experiment 3 Automount
In general NFS file system usage, if the client wants to use the file system provided by the server, it can use / etc/rc. D/rc. Set automount at boot-up in local (/etc/rc.d/rc.local file commands written, executed once before each boot system user logon); You can also mount using mount manually after logging in to the system.
Because of network problems, the connection between the NFS server and the client will not always exist. When we mount the NFS server, it is possible for either party to go offline and the other party to wait for a timeout. To solve this problem, the following ideas have emerged:
1. Let the system mount automatically when the client needs to use the NFS file system.
2. When the NFS file system is used up, let NFS uninstall automatically.
This led to the autofs service.
autofs is a service on the client side that continuously detects a specified directory and presets that when a subdirectory of that directory is used, NFS file system resources from the server side will be obtained and automatically mounted.
Step 1: Client Configuration
[root@client ~]# yum install autofs -y
 Note: Specify the specific directory detected in the main profile as/nfs(This directory does not need to exist beforehand because autofs The directory is created actively, and the corresponding data file is/etc/auto.nfs(The file name can be customized)
[root@localhost nfs]# vim /etc/auto.master
/data   /etc/auto.data  Define the home directory where the server mounts to the client

[root@localhost nfs]# vim /etc/auto.data
autofs -fstype=nfs,rw 192.168.58.73:/nfs/autofs   Note: Define the subdirectory that the server mounts to the client, and be sure to note that it is.

[root@localhost /]# Mkdir/data Create Home Directory
Step 2: Server-side configuration
[root@localhost nfs]# mkdir /nfs/autofs #Create shared user directory
[root@localhost autofs]# vim haha
[root@localhost autofs]# exportfs -r
Step 3: Client Validation Configuration
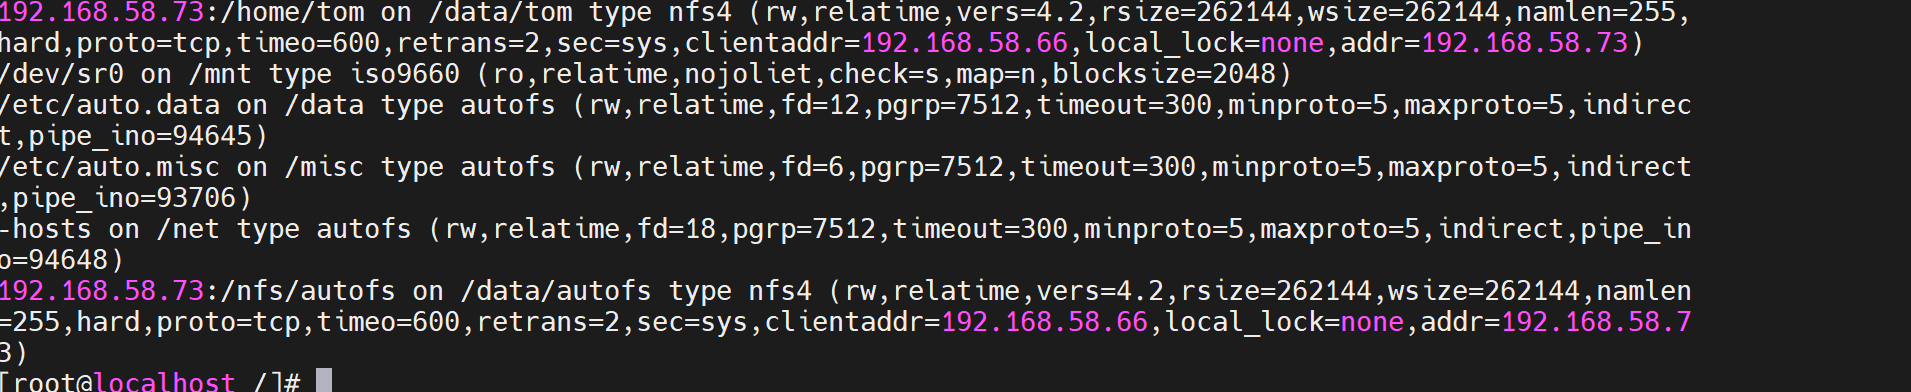
[root@localhost /]# mount #When entered, you will see the mount information at the bottom of the display information
[root@localhost data]# Cd/data/Enter Client Mount Directory View
[root@localhost data]# ll
total 0
drwxr-xr-x. 2 root root 18 Jan  7 01:29 autofs
[root@localhost data]# cd autofs/
[root@localhost autofs]# ll
total 4
-rw-r--r--. 1 root root 3 Jan  7 01:29 haha
[root@localhost autofs]#