Design pattern
This article talks about several common design patterns.
Create pattern
The function of the creation mode is to create an object. When it comes to creating an object, the most familiar thing is to new an object and then set the related attributes. However, in many scenarios, we need to provide the client with a more friendly way to create objects, especially when we define classes but need to provide them to other developers.
Singleton mode
Let's talk about the singleton mode first. This is relatively simple.
- Hungry singleton: it initializes immediately when the class is loaded and creates a singleton object
public class HungrySingleton {
    // Advantages: no lock, high execution efficiency and thread safety
    // Disadvantages: the class is initialized when it is loaded. Whether you use it or not, I occupy space
    // Other hungry Chinese writing methods are not listed
    private static final HungrySingleton HUNGRY_SINGLETON = new HungrySingleton();

    private HungrySingleton() {
    }

    public static HungrySingleton getInstance() {
        return HUNGRY_SINGLETON;
    }
}
- Lazy singleton: instantiate only when it is needed externally
// This form takes into account both the memory waste of hungry Han style and the synchronized performance of simple hungry Han style singletons
// The other single examples of hungry Han style will not be listed
public class LazyInnerClassSingleton {
    // When LazyInnerClassGeneral is used by default, the internal class will be initialized first
    // If not used, the inner class is not loaded
    private LazyInnerClassSingleton() {
        if (LazyHolder.LAZY != null) {
            throw new RuntimeException("Multiple instances are not allowed");
        }
    }
    // Every keyword is not redundant
    // static is to share the space of the singleton
    // Ensure that this method will not be overridden or overloaded
    public static final LazyInnerClassSingleton getInstance() {
        // Before returning the result, the inner class must be loaded first
        return LazyHolder.LAZY;
    }
    //Not loaded by default
    private static class LazyHolder {
        private static final LazyInnerClassSingleton LAZY = new LazyInnerClassSingleton();
    }
}
- Others: use Map, ThreadLocal, enumeration, serialization, etc. to implement singleton. Interested partners can learn about it
Prototype mode
The prototype pattern is very simple: there is a prototype instance, and a new instance is generated based on this prototype instance, that is, "clone".
There is a clone() method in the Object class, which is used to generate a new Object. Of course, if we want to call this method, java requires our class to implement the clonable interface first. This interface does not define any methods, but if we do not do so, CloneNotSupportedException will be thrown during clone().
protected native Object clone() throws CloneNotSupportedException;
java cloning is a shallow cloning. When an object reference is encountered, the cloned object and the reference in the original object will point to the same object. The usual way to implement deep cloning is to serialize the object and then deserialize it.
Simple factory mode
First define several classes:
public interface ICourse {
    void signIn();
}
public class JavaCourse implements ICourse {
    @Override
    public void signIn() {
        System.out.println("sign in java course success!");
    }
}
public class PythonCourse implements ICourse {
    @Override
    public void signIn() {
        System.out.println("sign in python course success!");
    }
}
Let's look at the simple factory model
@Slf4j
public class ISimpleCourseFactory {
	// Pass in the type of clazz to get the instance of the target class
    public ICourse createCourse(Class<?> clazz) {
        ICourse course = null;
        try {
            course = (ICourse) clazz.newInstance();
        } catch (InstantiationException | IllegalAccessException e) {
            log.error("course is not exist.");
        }
        return course;
    }
}
In short, the simple factory pattern is usually like this. A factory class XxxFactory has a static method that returns different instance objects derived from the same parent class (or implementing the same interface) according to our different parameters.
Factory method model
The simple factory model is very simple. If it can meet our needs, I don't think we should bother. The reason why we need to introduce the factory pattern is that we often need to use two or more factories, and it may be complex to build instances.
public abstract class ICourseFactory {
    /**
     * The extraction common logic is executed before the factory method is executed
     */
    public void beforeCreateCourse() {
        System.out.println("---- do something before create course ----");
    }

    /**
     * Create ICourse
     *
     * @return ICourse
     */
    abstract ICourse createCourse();

    public void afterCreateCourse() {
        System.out.println("---- do something after create course ----");
    }
}
// java course factory
public class JavaCourseFactory extends ICourseFactory {
    @Override
    public void beforeCreateCourse() {
        System.out.println("prepared to create JavaCourse");
    }

    @Override
    public void afterCreateCourse() {
        super.afterCreateCourse();
    }

    @Override
    public ICourse createCourse() {
        beforeCreateCourse();
        ICourse iCourse = new PythonCourse();
        afterCreateCourse();
        return iCourse;
    }
}
// python course factory
public class PythonCourseFactory extends ICourseFactory {
    @Override
    public void beforeCreateCourse() {
        System.out.println("Hello,iChen,we are creating PythonCourse!");
    }

    @Override
    public ICourse createCourse() {
        beforeCreateCourse();
        ICourse iCourse = new JavaCourse();
        afterCreateCourse();
        return iCourse;
    }

    @Override
    public void afterCreateCourse() {
        System.out.println("PythonCourse created!");
    }
}
Abstract factory pattern
When it comes to product families, it is necessary to introduce the abstract factory pattern.
Add several class definitions:
// Abstract factory interface to produce a course, with course notes and course videos
public interface IAbstractCourseFactory {
    /**
     * Abstract project get ICourse
     *
     * @return ICourse
     */
    ICourse getCourse();

    /**
     * Abstract project get INote
     *
     * @return INote
     */
    INote getNote();

    /**
     * Abstract project get IVideo
     *
     * @return IVideo
     */
    IVideo getVideo();
}
// Notebook product interface
public interface INote {
    /**
     * Get notes
     */
    void getNoteContent();
}
// java note taking implementation
public class JavaNote implements INote {
    @Override
    public void getNoteContent() {
        System.out.println("here is java note!");
    }
}
// Video product interface
public interface IVideo {
    /**
     * Get video address
     */
    void getVideoUrl();
}
// java video implementation
public class JavaVideo implements IVideo {
    @Override
    public void getVideoUrl() {
        System.out.println("here is java video url!");
    }
}
We now want to produce java courses and python courses, which belong to one product family, but java courses are only used together with java notes and videos, not Python notes and videos. So you need multiple factories
// The implementation of java course factory is used to produce Java courses and corresponding notes and videos
// At the same time, you can also define the implementation of a python factory to produce Python related products
public class JavaCourseFactory implements IAbstractCourseFactory {
    @Override
    public ICourse getCourse() {
        return new JavaCourse();
    }

    @Override
    public INote getNote() {
        return new JavaNote();
    }

    @Override
    public IVideo getVideo() {
        return new JavaVideo();
    }
}
Test class:
public class AbstractFactoryTest {
    public static void main(String[] args) {
        // Use the same factory to produce products of the same product family
        IAbstractCourseFactory javaCourseFactory = new JavaCourseFactory();
        javaCourseFactory.getCourse().signIn();
        javaCourseFactory.getNote().getNoteContent();
        javaCourseFactory.getVideo().getVideoUrl();
    }
}
Builder pattern
The classes of xbuilder that we often meet are usually the product of the builder pattern. In fact, there are many variants of the builder mode, but for the client, we usually use the same mode:
Food food = new FoodBuilder().a().b().c().build();
Food food = Food.builder().a().b().c().build();
The routine is to create a new Builder first, then call a bunch of methods in a chain, and finally call the build() method again, and we have the objects we need.
A regular builder model:
public class User {
    // Here are the properties of "a pile"
    private String name;
    private String password;
    private String nickName;
    private int age;

    // The constructor is privatized, or the client will call the constructor directly
    private User(String name, String password, String nickName, int age) {
        this.name = name;
        this.password = password;
        this.nickName = nickName;
        this.age = age;
    }
    // Static methods are used to generate a Builder. This is not necessary, but it is a good habit to write this method,
    // Some code requires others to write new user UserBuilder(). a()... Build () doesn't look that good
    public static UserBuilder builder() {
        return new UserBuilder();
    }

    public static class UserBuilder {
        // As like as two peas, User is a bunch of attributes.
        private String  name;
        private String password;
        private String nickName;
        private int age;

        private UserBuilder() {
        }

        // The chain call sets the value of each attribute and returns this, that is, UserBuilder
        public UserBuilder name(String name) {
            this.name = name;
            return this;
        }

        public UserBuilder password(String password) {
            this.password = password;
            return this;
        }

        public UserBuilder nickName(String nickName) {
            this.nickName = nickName;
            return this;
        }

        public UserBuilder age(int age) {
            this.age = age;
            return this;
        }

        // The build() method is responsible for "copying" the properties set in UserBuilder to User.
        // Of course, you can do some checking before "copying"
        public User build() {
            if (name == null || password == null) {
                throw new RuntimeException("User name and password are required");
            }
            if (age <= 0 || age >= 150) {
                throw new RuntimeException("Illegal age");
            }
            // You can also assign the function of "default value"
              if (nickName == null) {
                nickName = name;
            }
            return new User(name, password, nickName, age);
        }
    }
}
The core is: first set all properties to Builder, and then copy these properties to the actual object when building () method.
Look at the call of the client:
public class APP {
    public static void main(String[] args) {
        User user = User.builder()
                .name("foo")
                .password("pAss12345")
                .age(25)
                .build();
    }
}
To tell you the truth, the chain writing of the builder mode is very attractive. However, I feel that this mode is useless because I have written a lot of "useless" builder code. However, when there are many attributes, some are required and some are optional, this mode will make the code much clearer. We can force the caller to provide required fields in the builder's construction method. In addition, the code for verifying various parameters in the build() method is more elegant than that in the User's construction method.
As an aside, readers are strongly recommended to use lombok. After using lombok, a lot of codes above will become as follows:
@Builder
public class User {
	private String  name;
	private String password;
	private String nickName;
	private int age;
}
How about saving time to do something else.
Creation mode summary
Creating patterns is generally simple. Their function is to generate instance objects. It is the first step of all kinds of work. Because we write object-oriented code, of course, our first step is to create an object.
Simple factory mode is the simplest; The factory mode adds the dimension of selecting factories on the basis of the simple factory mode. The first step is to select an appropriate factory; Abstract factory pattern has the concept of product family. If each product has compatibility problems, it is necessary to use abstract factory pattern. Not to mention the singleton mode. In order to ensure that the same Object is used globally, on the one hand, it is for security and on the other hand, it is to save resources; The builder pattern deals specifically with the type with many attributes in order to make the code more beautiful; The prototype pattern is the least used. It is enough to understand the knowledge related to the clone() method in the Object class.
Structural model
Static proxy mode
Since it is an agent, it is necessary to hide the real implementation from the client, and the agent is responsible for all requests of the client. Of course, the agent is just an agent. It will not complete the actual business logic, but a layer of skin. However, for the client, it must be the real implementation required by the client.
Static proxies can only be fixed to a class or type
public interface FoodService {
    // Kung Pao Chicken
    Food makeChicken();
    // Hand-Pulled Noodle Soup with Beef
    Food makeNoodle();
}

public class FoodServiceImpl implements FoodService {
    public Food makeChicken() {
    	Food f = new Chicken()
        f.setChicken("1kg");
        f.setSpicy("1g");
        f.setSalt("3g");
        return f;
    }
    public Food makeNoodle() {
        Food f = new Noodle();
        f.setNoodle("500g");
        f.setSalt("5g");
        return f;
    }
}

// The agent needs to be "like" a real implementation class, so it needs to implement FoodService
public class FoodServiceProxy implements FoodService {

    // There must be a real implementation class inside. Of course, it can also be injected through construction methods
    private FoodService foodService = new FoodServiceImpl();

    public Food makeChicken() {
        System.out.println("We're about to start making chicken");
        // If we define this sentence as the core code, then the core code is made by the real implementation class,
        // Agents just do "insignificant" things before and after the core code
        Food food = foodService.makeChicken();
        System.out.println("The chicken is done. Add some pepper"); // enhance
        food.addCondiment("pepper");
        return food;
    }
    public Food makeNoodle() {
        System.out.println("Prepare Ramen~");
        Food food = foodService.makeNoodle();
        System.out.println("The production is finished")
        return food;
    }
}
For client calls, note that we need to instantiate the interface with a proxy:
public static void main(String[] args){
	 // Proxy classes are used here to instantiate
    FoodService foodService = new FoodServiceProxy();
	foodService.makeChicken();
}
Dynamic agent mode
Compared with static proxy mode, dynamic proxy does not specify the target type of proxy, and any type can be proxy.
There are two types of dynamic agents, one is JDK dynamic agent and the other is CGLIB dynamic agent
Define several categories first:
public interface Person {
    /**
     * Find object
     */
    void findLover();
}

public class Girl implements Person {
    @Override
    public void findLover() {
        System.out.println("tall, rich and handsome");
        System.out.println("Height 180 cm");
        System.out.println("There are six abdominal muscles");
    }
}

public class Customer {
    public void findLover() {
        System.out.println("Son requirements: white skin, beautiful big legs");
    }
}
- JDK dynamic proxy: the target class must implement the interface
// proxy class
public class JDKMeipo implements InvocationHandler {
	// A real object with a target class inside
    private Object target;

    public Object getInstance(Object target) throws Exception {
        this.target = target;
        Class<?> clazz = target.getClass();
        // Pay attention to clazz Getinterfaces(), passing the interface
        return Proxy.newProxyInstance(clazz.getClassLoader(), clazz.getInterfaces(),It's the interface, this);
    }

    @Override
    public Object invoke(Object proxy, Method method, Object[] args) throws Throwable {
        before();
        // Call target method
        Object obj = method.invoke(this.target, args);
        after();
        return obj;
    }

    private void before() {
        System.out.println("I'm a matchmaker. I want to find you someone. Now I've confirmed your needs");
        System.out.println("Start looking");
    }

    private void after() {
        System.out.println("OK If you want, get ready");
    }
}
JDK Proxy generates proxy with simple logic and relatively low execution efficiency. Dynamic calls are reflected every time
Test code
public class JDKProxyTest {
    public static void main(String[] args) {
        Person obj = (Person) new JDKMeipo().getInstance(new Girl());
        obj.findLover();
    }
}
- CDLIB dynamic proxy can proxy any ordinary class without any requirements
public class CglibMeipo implements MethodInterceptor {
    public Object getInstance(Class<?> clazz) throws Exception {
        // Equivalent to Proxy, Proxy tool class
        Enhancer enhancer = new Enhancer();
        enhancer.setSuperclass(clazz);
        enhancer.setCallback(this);
        return enhancer.create();
    }

    @Override
    public Object intercept(Object o, Method method, Object[] objects, MethodProxy methodProxy) throws Throwable {
        before();
        // Call target method
        Object obj = methodProxy.invokeSuper(o, objects);
        after();
        return obj;
    }

    private void before() {
        System.out.println("I'm a matchmaker. I want to find you someone. Now I've confirmed your needs");
        System.out.println("Start looking");
    }

    private void after() {
        System.out.println("OK If you want, get ready");
    }
}
CGLib generates more complex proxy logic, higher efficiency and higher calling efficiency. It generates a FastClass that contains all the logic, and there is no need for reflection calls.
CGLib cannot delegate the method of final
Test code
public class CglibTest {
    public static void main(String[] args) {
        Customer obj = (Customer) new CglibMeipo().getInstance(Customer.class);
        System.out.println(obj);
        obj.findLover();
    }
}
Adapter mode
After talking about the proxy mode and the adapter mode, it is because they are very similar. Here we can make a comparison.
What the adapter mode does is that there is an interface to be implemented, but our existing objects are not satisfied. We need to add a layer of adapter for adaptation.
Generally speaking, there are three adapter modes: default adapter mode, object adapter mode and class adapter mode. Don't rush to distinguish these. Let's look at the examples first.
- Default adapter mode
First, let's take a look at the simplest adapter pattern, the default adapter pattern.
We use the FileAlterationListener in the Apache commons IO package as an example. This interface defines many methods for monitoring files or folders. Once the corresponding operation occurs, the corresponding method will be triggered.
public interface FileAlterationListener {
    void onStart(final FileAlterationObserver observer);
    void onDirectoryCreate(final File directory);
    void onDirectoryChange(final File directory);
    void onDirectoryDelete(final File directory);
    void onFileCreate(final File file);
    void onFileChange(final File file);
    void onFileDelete(final File file);
    void onStop(final FileAlterationObserver observer);
}
A big problem with this interface is that there are too many abstract methods. If we want to use this interface, it means that we need to implement each abstract method. If we just want to monitor file creation and file deletion events in folders, we still have to implement all methods. Obviously, this is not what we want.
Therefore, we need the following adapter to implement the above interface, but all methods are empty methods. In this way, we can instead define our own class to inherit the following class.
public class FileAlterationListenerAdaptor implements FileAlterationListener {

    public void onStart(final FileAlterationObserver observer) {
    }

    public void onDirectoryCreate(final File directory) {
    }

    public void onDirectoryChange(final File directory) {
    }

    public void onDirectoryDelete(final File directory) {
    }

    public void onFileCreate(final File file) {
    }

    public void onFileChange(final File file) {
    }

    public void onFileDelete(final File file) {
    }

    public void onStop(final FileAlterationObserver observer) {
    }
}
For example, we can define the following classes. We only need to implement the methods we want to implement:
public class FileMonitor extends FileAlterationListenerAdaptor {
    public void onFileCreate(final File file) {
        // File creation
        doSomething();
    }

    public void onFileDelete(final File file) {
        // File deletion
        doSomething();
    }
}
Of course, the above is only one of the adapter modes, and it is also the simplest one. There is no need to say more. Next, we will introduce the * * orthodox * * adapter mode.
- Object Adapter Pattern
Let's take a look at an example in the Head First design pattern. I modified it a little to see how to adapt the chicken to the duck, so that the chicken can also be used as a duck. Because we don't have an appropriate implementation class for this interface, we need an adapter.
public interface Duck {
    public void quack(); // The quack of a duck
    public void fly(); // fly
}
public interface Cock {
    public void gobble(); // The cooing of a chicken
    public void fly(); // fly
}
public class WildCock implements Cock {
    public void gobble() {
        System.out.println("Coo");
    }
    public void fly() {
        System.out.println("Chickens can fly, too");
    }
}
The duck interface has two methods, fly() and square (). If chicken Cock wants to impersonate duck, the fly() method is ready-made, but chicken can't quack like duck. There is no square () method. Adaptation is needed at this time:
// There is no doubt that first of all, the adapter must need implements Duck to be used as a duck
public class CockAdapter implements Duck {

    Cock cock;
    // A chicken instance is required in the construction method. This class is used to adapt the chicken to a duck
      public CockAdapter(Cock cock) {
        this.cock = cock;
    }

    // Method for realizing duck quack
    @Override
      public void quack() {
        // Inside is actually the cooing of a chicken
        cock.gobble();
    }

      @Override
      public void fly() {
        cock.fly();
    }
}
The client call is simple:
public static void main(String[] args) {
	// There is a pheasant
	Cock wildCock = new WildCock();
	// Successfully adapted pheasant to duck
	Duck duck = new CockAdapter(wildCock);
	...
}
Here, you will know what the adapter mode is. It's just that we need a duck, but we only have a chicken. At this time, we need to define an adapter to act as a duck, but the methods in the adapter are still implemented by the chicken.
- Class adapter mode
public interface Target{
    void method1();
    void method2();
    void method3();
}

public class Something{
    void method1(){...};
    void method2(){...};
}

public class SomethingAdapter extends Something implements Target{
    void method3(){
        System.out.println("This method needs to be implemented by yourself");
    }
}
It should be easy for you to understand the above code. Through the inherited method, the adapter automatically obtains most of the required methods. At this time, it is easier to use the client directly. Target t = new SomeAdapter(); That's it.
Bridging mode
Understanding bridging patterns is actually understanding code abstraction and decoupling.
We first need a bridge, which is an interface that defines the interface methods provided.
public interface DrawAPI {
	public void draw(int radius, int x, int y);
}
Then there are a series of implementation classes:
public class RedPen implements DrawAPI {
    @Override
    public void draw(int radius, int x, int y) {
        System.out.println("Draw with red strokes, radius:" + radius + ", x:" + x + ", y:" + y);
    }
}
public class GreenPen implements DrawAPI {
    @Override
    public void draw(int radius, int x, int y) {
        System.out.println("Draw with green strokes, radius:" + radius + ", x:" + x + ", y:" + y);
    }
}
public class BluePen implements DrawAPI {
    @Override
    public void draw(int radius, int x, int y) {
        System.out.println("Draw with blue strokes, radius:" + radius + ", x:" + x + ", y:" + y);
    }
}
Define an abstract class whose implementation classes need to use the DrawAPI:
public abstract class Shape {
    protected DrawAPI drawAPI;
    protected Shape(DrawAPI drawAPI) {
        this.drawAPI = drawAPI;
    }
    public abstract void draw();
}
Define subclasses of abstract classes:
// circular
public class Circle extends Shape {
    private int radius;
    public Circle(int radius, DrawAPI drawAPI) {
        super(drawAPI);
        this.radius = radius;
    }
    public void draw() {
        drawAPI.draw(radius, 0, 0);
    }
}
// rectangle
public class Rectangle extends Shape {
    private int x;
    private int y;
    public Rectangle(int x, int y, DrawAPI drawAPI) {
        super(drawAPI);
        this.x = x;
        this.y = y;
    }
    public void draw() {
        drawAPI.draw(0, x, y);
    }
}
Finally, let's look at the client demonstration:
public static void main(String[] args) {
    Shape greenCircle = new Circle(10, new GreenPen());
    Shape redRectangle = new Rectangle(4, 8, new RedPen());
    greenCircle.draw();
    redRectangle.draw();
}
Decoration mode
It is not easy to make the decoration pattern clear. Maybe readers know that several classes in Java IO are typical decorative pattern applications, but readers may not know the relationship between them. Maybe they forget after reading this section. I hope readers can have a deeper understanding of it after reading this section.
First, let's look at a simple diagram. When looking at this diagram, we can understand the following hierarchy:
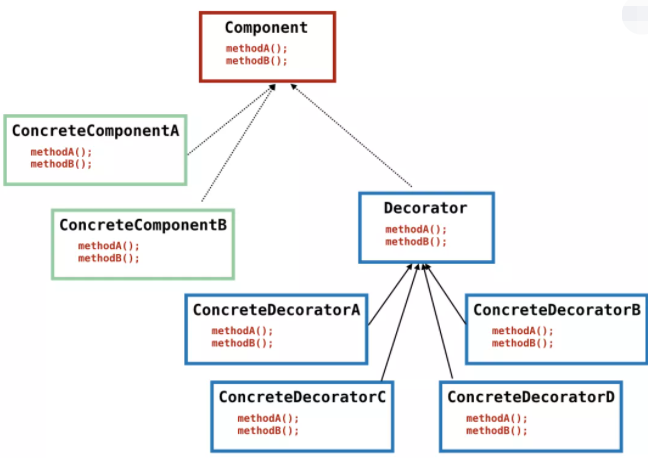
Let's talk about the starting point of the decoration mode. As can be seen from the figure, the interface Component actually has two implementation classes: ConcreteComponentA and ConcreteComponentB. However, if we want to enhance these two implementation classes, we can adopt the decoration mode and decorate the implementation classes with specific decorators to achieve the purpose of enhancement.
Briefly explain the decorator from the name. Since it is decoration, it is often to add small functions. Moreover, we should meet the requirement that multiple small functions can be added. In the simplest way, the agent mode can enhance functions, but it is not easy for the agent to enhance multiple functions. Of course, you can say that the multi-layer packaging method of using the agent to wrap the agent, but in that case, the code will be complex.
First, understand some simple concepts. From the figure, we can see that all concrete decorators * can be used as components because they all implement all interfaces in components. The difference between them and the Component implementation class ConcreteComponent * is that they are just decorators and play a decorative role, that is, even if they look awesome, they are only decorated with layers in the specific implementation.
Pay attention to the Component and Decorator mixed in various nouns in this paragraph. Don't get confused.
Let's take a look at an example. First clarify the decoration mode, and then introduce the application of decoration mode in java io.
Recently, "happy lemon" has become popular in the street. We divide the drinks of happy lemon into three categories: black tea, green tea and coffee. On the basis of these three categories, many flavors have been added, such as kumquat lemon black tea, kumquat lemon pearl green tea, mango black tea, mango pearl black tea, roasted pearl black tea, roasted pearl mango green tea, coconut germ coffee Caramel, cocoa, coffee, etc. each store has a long menu, but look carefully. In fact, there are few raw materials, but they can match many combinations. If customers need, they can also make many drinks that do not appear in the menu.
In this example, black tea, green tea and coffee are the most basic drinks, while others such as kumquat, lemon, mango, pearl, coconut and caramel are used for decoration. Of course, in the development, we can really develop these categories like stores: lemon blacktea, lemon greentea, mango blacktea, mango lemon greentea... However, we soon found that this is definitely not possible, which will lead to the need to combine all the possibilities. What if the guest needs to add double lemon to the black tea? What about three lemons?
Stop talking nonsense and code.
First, define the beverage abstract base class:
public abstract class Beverage {
	// Return description
	public abstract String getDescription();
	// Return price
	public abstract double cost();
}
Then there are three basic beverage implementation categories, black tea, green tea and coffee:
public class BlackTea extends Beverage {
	public String getDescription() {
    	return "black tea";
    }
	public double cost() {
    	return 10;
    }
}
public class GreenTea extends Beverage {
    public String getDescription() {
        return "Green Tea";
    }
    public double cost() {
        return 11;
    }
}...// Coffee omission
Define seasoning, that is, the base class of decorator. This class must inherit from Beverage:
// Seasoning
public abstract class Condiment extends Beverage {}
Then let's define lemon, mango and other specific condiments. They belong to decorators. There is no doubt that these condiments must inherit the Condiment class:
public class Lemon extends Condiment {
    private Beverage bevarage;
    // It is very important to introduce specific drinks, such as black tea or green tea without decoration,
    // Of course, it can also be introduced into the decorated mango green tea, which can be made into mango lemon green tea
    public Lemon(Beverage bevarage) {
        this.bevarage = bevarage;
    }
    public String getDescription() {
        // decorate
        return bevarage.getDescription() + ", Add lemon";
    }
    public double cost() {
        // decorate
        return beverage.cost() + 2; // It costs 2 yuan with lemon
    }
}

public class Mango extends Condiment {
    private Beverage bevarage;
    public Mango(Beverage bevarage) {
        this.bevarage = bevarage;
    }
    public String getDescription() {
        return bevarage.getDescription() + ", Add mango";
    }
    public double cost() {
        return beverage.cost() + 3; // It costs 3 yuan to add mango
    }
}
...// Add a class to each seasoning
Look at the client call:
public static void main(String[] args) {
    // First, we need a basic drink, black tea, green tea or coffee
    Beverage beverage = new GreenTea();
    // Start decorating
    beverage = new Lemon(beverage); // Add a lemon first
    beverage = new Mongo(beverage); // Add another mango

    System.out.println(beverage.getDescription() + " Price:¥" + beverage.cost());
    //"Green tea, lemon and mango price: ¥ 16"
}
If we need mango pearl double lemon black tea:
Beverage beverage = new Mongo(new Pearl(new Lemon(new Lemon(new BlackTea()))));
Isn't it abnormal?
It may be clearer to look at the following figure:
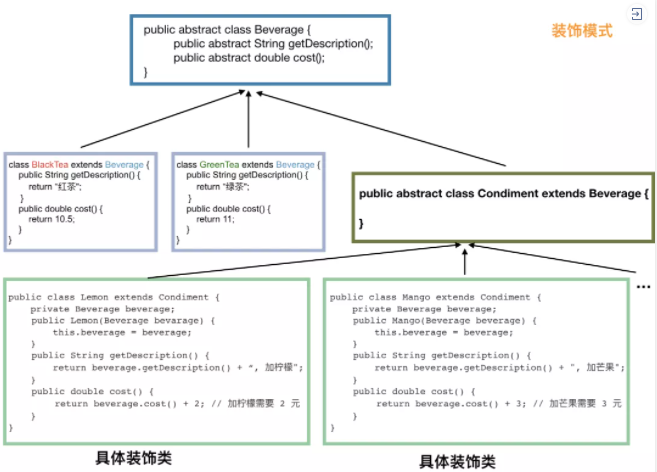
By now, everyone should have known the decoration mode.
Next, let's talk about the decoration mode in java IO. See the following figure for some classes derived from InputStream:
[the external chain image transfer fails. The source station may have an anti-theft chain mechanism. It is recommended to save the image and upload it directly (img-f0akbyze-1642314297955) (C: \ users \ administrator \ appdata \ roaming \ typora \ typora user images \ image-20220116132753049. PNG)]
We know that InputStream represents the input stream. The specific input sources can be file InputStream, PipedInputStream, ByteArrayInputStream, etc. These are like black tea and green tea in the previous example of milk tea, which belong to the basic input stream.
FilterInputStream undertakes the key nodes of the decoration mode. Its implementation class is a series of decorators. For example, BufferedInputStream represents decoration with buffer, which makes the input stream have the function of buffer. LineNumberInputStream represents decoration with line number, which can be obtained during operation. The decoration of DataInputStream, Enables us to convert from the input stream to basic type values in java.
Of course, in java IO, if we use decorators, it is not suitable for interface oriented programming, such as:
InputStream inputStream = new LineNumberInputStream(new BufferedInputStream(new FileInputStream("")));
As a result, InputStream still does not have the ability to read line numbers, because the method to read line numbers is defined in the LineNumberInputStream class.
We should use it like this:
DataInputStream is = new DataInputStream(
                              new BufferedInputStream(
                                  new FileInputStream("")));
Therefore, it is difficult to find pure code that strictly conforms to the design pattern.
Facade mode
Facade Pattern (also known as Facade Pattern) is used in many source codes. For example slf4j, it can be understood as the application of Facade Pattern. This is a simple design pattern. Let's talk about it directly in the code.
First, we define an interface:
public interface Shape {
   void draw();
}
Define several implementation classes:
public class Circle implements Shape {
    @Override
    public void draw() {
       System.out.println("Circle::draw()");
    }
}

public class Rectangle implements Shape {
    @Override
    public void draw() {
       System.out.println("Rectangle::draw()");
    }
}
Client call:
public static void main(String[] args) {
    // Draw a circle
      Shape circle = new Circle();
      circle.draw();

      // draw a rectangle
      Shape rectangle = new Rectangle();
      rectangle.draw();
}
The above is the code we often write. If we need to draw a circle, we need to instantiate a circle first, and if we need to draw a rectangle, we need to instantiate a rectangle first, and then call the corresponding draw() method.
Next, let's see how to use facade mode to make client calls more friendly.
Let's define a facade first:
public class ShapeMaker {
   private Shape circle;
   private Shape rectangle;
   private Shape square;

   public ShapeMaker() {
      circle = new Circle();
      rectangle = new Rectangle();
      square = new Square();
   }

  /**
   * The following defines a bunch of methods, and the specific methods that should be called are determined by this facade
   */

   public void drawCircle(){
      circle.draw();
   }
   public void drawRectangle(){
      rectangle.draw();
   }
   public void drawSquare(){
      square.draw();
   }
}
Let's see how the client calls:
public static void main(String[] args) {
  ShapeMaker shapeMaker = new ShapeMaker();

  // Client calls are now clearer
  shapeMaker.drawCircle();
  shapeMaker.drawRectangle();
  shapeMaker.drawSquare();
}
The advantages of facade mode are obvious. The client no longer needs to pay attention to which implementation class should be used during instantiation. It can directly call the methods provided by the facade, because the method name of the methods provided by the facade class is already very friendly to the client.
Combination mode
Composite pattern is used to represent data with hierarchical structure, which makes our access to single object and composite object consistent.
Let's take a direct look at an example. Each employee has attributes such as name, department and salary, as well as a set of subordinate employees (although the set may be empty), and subordinate employees have the same structure as their own. They also have attributes such as name and department, as well as their set of subordinate employees.
public class Employee {
   private String name;
   private String dept;
   private int salary;
   private List<Employee> subordinates; // subordinate

   public Employee(String name,String dept, int sal) {
      this.name = name;
      this.dept = dept;
      this.salary = sal;
      subordinates = new ArrayList<Employee>();
   }

   public void add(Employee e) {
      subordinates.add(e);
   }

   public void remove(Employee e) {
      subordinates.remove(e);
   }

   public List<Employee> getSubordinates(){
     return subordinates;
   }

   public String toString(){
      return ("Employee :[ Name : " + name + ", dept : " + dept + ", salary :" + salary+" ]");
   }
}
Usually, this class needs to define methods such as add(node), remove(node) and getChildren().
This is actually a combination model. I won't introduce this simple model too much. I believe readers don't like watching me write nonsense.
Structural model summary
Earlier, we talked about agent mode, adapter mode, bridge mode, decoration mode, facade mode and combination mode. Can readers explain these models clearly? When talking about these patterns, do you have a clear picture or processing flow in mind?
The proxy mode is used for method enhancement. The adapter mode is used to adapt the interface by packaging the chicken into a duck. The bridge mode is well decoupled. The decoration mode can be seen from the name and is suitable for the scenes of decoration classes or enhanced classes. The advantage of the facade mode is that the client does not need to care about the instantiation process, but only needs to call the required methods, Composite mode is used to describe data with hierarchical structure. Meta mode is used to cache created objects in a specific scene to improve performance.
Behavioral model
Behavioral patterns focus on the interaction between various classes, and divide responsibilities clearly, making our code clearer.
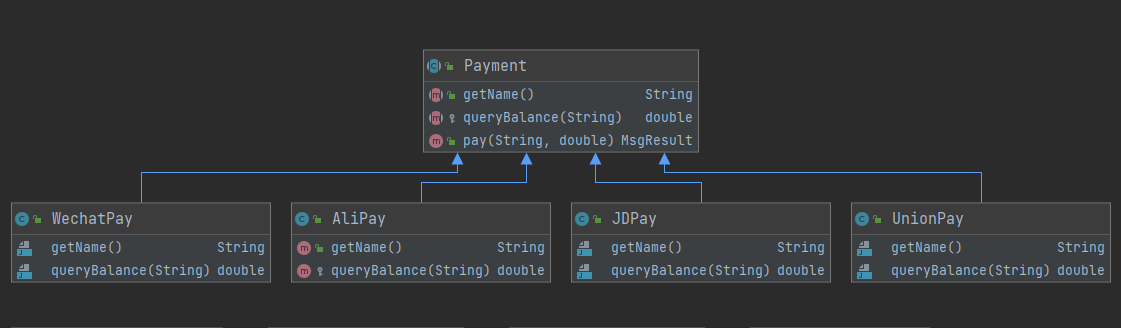
Strategy mode
The following design is the payment function, and there are many payment methods.
First define several classes
public class MsgResult {
    private int code;
    private Object data;
    private String msg;

    public MsgResult(int code, String msg, Object data) {
        this.code = code;
        this.data = data;
        this.msg = msg;
    }

    @Override
    public String toString(){
        return ("Payment status:[" + code + "]," + msg + ",Transaction details:" + data);
    }
}

public class Order {
    private String uid;
    private String orderId;
    private double amount;

    public Order(String uid,String orderId,double amount){
        this.uid = uid;
        this.orderId = orderId;
        this.amount = amount;
    }

    public MsgResult pay(){
        return pay(PayStrategy.DEFAULT_PAY);
    }
	//It perfectly solves the process of switch, and there is no need to write switch in code logic
    //There is no need to write if else if
    public MsgResult pay(String payKey){
        Payment payment = PayStrategy.get(payKey);
        System.out.println("Welcome" + payment.getName());
        System.out.println("The transaction amount is:" + amount + ",Start deduction...");
        return payment.pay(uid,amount);
    }
}
Then, define a policy interface:
public abstract class Payment {

    //Payment type
    public abstract String getName();

    //Check the balance
    protected abstract double queryBalance(String uid);

    //Deduction payment
    public MsgResult pay(String uid, double amount) {
        if(queryBalance(uid) < amount){
            return new MsgResult(500,"Payment failed","Sorry, your credit is running low");
        }
        return new MsgResult(200,"Payment successful","Payment amount:" + amount);
    }
}
Then we define several specific strategies:
public class AliPay extends Payment {

    @Override
    public String getName() {
        return "Alipay";
    }

    @Override
    protected double queryBalance(String uid) {
        return 900;
    }
}
public class JDPay extends Payment {

    @Override
    public String getName() {
        return "Jingdong Baitiao";
    }

    @Override
    protected double queryBalance(String uid) {
        return 500;
    }
}
public class UnionPay extends Payment {

    @Override
    public String getName() {
        return "UnionPay payment";
    }

    @Override
    protected double queryBalance(String uid) {
        return 120;
    }
}
public class WechatPay extends Payment {

    @Override
    public String getName() {
        return "Wechat payment";
    }

    @Override
    protected double queryBalance(String uid) {
        return 256;
    }
}
Classes using policies:
public class PayStrategy {
    public static final String ALI_PAY = "AliPay";
    public static final String JD_PAY = "JdPay";
    public static final String UNION_PAY = "UnionPay";
    public static final String WECHAT_PAY = "WechatPay";
    public static final String DEFAULT_PAY = ALI_PAY;

    private static final Map<String,Payment> PAY_STRATEGY = new HashMap<String,Payment>();
    static {
        PAY_STRATEGY.put(ALI_PAY,new AliPay());
        PAY_STRATEGY.put(WECHAT_PAY,new WechatPay());
        PAY_STRATEGY.put(UNION_PAY,new UnionPay());
        PAY_STRATEGY.put(JD_PAY,new JDPay());
    }

    public static Payment get(String payKey){
        if(!PAY_STRATEGY.containsKey(payKey)){
            return PAY_STRATEGY.get(DEFAULT_PAY);
        }
        return PAY_STRATEGY.get(payKey);
    }
}
Client presentation:
public class PayStrategyTest {
    public static void main(String[] args) {
        // Omit adding items to the shopping cart and placing orders from the shopping cart
        // Start directly from the order
        Order order = new Order("1", "20180311001000009", 324.45);
        // Start payment, choose WeChat payment, Alipay, UnionPay card, Jingdong IOUs, money paid
        // The specific payment algorithm of each channel is different
        // The basic algorithm is fixed
        // This value is determined at the time of payment
        System.out.println(order.pay(PayStrategy.ALI_PAY));
    }
}
The picture may be clearer
Observer mode
The observer mode is nothing more than two operations for us. Observers subscribe to topics they care about and notify observers of data changes.
First define the interface between the event and the listener
// Event interface
public interface Event<T> {
    // Get event data
    T getSource();
}
// listener interface
public interface EventListener<T> {
    // Event trigger
    void onApplication(T event);
}
Redefine events and listeners
public class EmpAddEvent implements Event<String> {

    private static final List<EventListener<EmpAddEvent>> EVENT_LISTENERS = new ArrayList<>();

    private final String empId;

    public EmpAddEvent(String empId) {
        this.empId = empId;
    }

    @Override
    public String getSource() {
        return empId;
    }

    // Register listener
    public static void registerListener(EventListener<EmpAddEvent> listener) {
        EVENT_LISTENERS.add(listener);
    }

    // Publish event
    public static void publishEvent(EmpAddEvent empAddEvent) {
        for (EventListener<EmpAddEvent> eventListener : EVENT_LISTENERS) {
            eventListener.onApplication(empAddEvent);
        }
    }
}
public class EmpAddEventListener implements EventListener<EmpAddEvent> {
    @Override
    public void onApplication(EmpAddEvent event) {
        String empId = event.getSource();
        System.out.println("Added emp, id = " + empId);
    }
}
Test it
public class ListenerTest {
    static {
        // Register listeners in advance
        EmpAddEvent.registerListener(new EmpAddEventListener());
    }

    public static void main(String[] args) {
        EmpAddEvent empAddEvent = new EmpAddEvent("1");
        EmpAddEvent.publishEvent(empAddEvent);
    }
}
Of course, jdk also provides similar support. For details, please refer to Java util. Observable and Java util. Observer these two classes.
In the actual production process, the observer mode is often implemented by message middleware. If you want to implement the stand-alone observer mode, the author suggests readers to use EventBus in Guava, which has both synchronous and asynchronous implementations. This paper mainly introduces the design mode, so I won't talk about it.
In addition, even the above code will have many variants. Just remember the core part, that is, there must be a place to store all observers, and then traverse the observers and call their callback functions when the event occurs.
Responsibility chain model
The chain of responsibility usually needs to establish a one-way list first, then the caller needs to call the header node, and the latter will automatically flow down. For example, process approval is a good example. As long as the end user submits an application, a responsibility chain is automatically established according to the content information of the application, and then the flow can begin.
In such a scenario, users can receive prizes by participating in an activity, but the activity requires a lot of rule verification before it can be released. For example, it is necessary to verify whether the user is a new user, whether there is a limit on the number of participants today, whether there is a limit on the number of participants in the whole audience, and so on. After the set rules are passed, the user can take away the prize.
If the product gives you this requirement, I think what most people must think at the beginning is to use a List to store all the rules, and then foreach will execute each rule. However, don't worry. What's the difference between the responsibility chain model and what we said?
First, we need to define the base class of nodes on the process:
public abstract class RuleHandler {
    // Successor node
    protected RuleHandler successor;

    public abstract void apply(Context context);

    public void setSuccessor(RuleHandler successor) {
        this.successor = successor;
    }

    public RuleHandler getSuccessor() {
        return successor;
    }
}
Next, we need to define each specific node.
Verify whether the user is a new user:
public class NewUserRuleHandler extends RuleHandler {
    public void apply(Context context) {
        if (context.isNewUser()) {
            // If there is a successor node, pass it on
            if (this.getSuccessor() != null) {
                this.getSuccessor().apply(context);
            }
        } else {
            throw new RuntimeException("This activity is limited to new users");
        }
    }
}
Verify whether the user's region can participate:
public class LocationRuleHandler extends RuleHandler {
    public void apply(Context context) {
        boolean allowed = activityService.isSupportedLocation(context.getLocation);
        if (allowed) {
            if (this.getSuccessor() != null) {
                this.getSuccessor().apply(context);
            }
        } else {
            throw new RuntimeException("Sorry, your region can't participate in this event");
        }
    }
}
Check whether the prize has been received:
public class LimitRuleHandler extends RuleHandler {
    public void apply(Context context) {
        int remainedTimes = activityService.queryRemainedTimes(context); // Query remaining prizes
        if (remainedTimes > 0) {
            if (this.getSuccessor() != null) {
                this.getSuccessor().apply(userInfo);
            }
        } else {
            throw new RuntimeException("You're too late. The prizes have been collected");
        }
    }
}
client:
public static void main(String[] args) {
    RuleHandler newUserHandler = new NewUserRuleHandler();
    RuleHandler locationHandler = new LocationRuleHandler();
    RuleHandler limitHandler = new LimitRuleHandler();

    // It is assumed that this activity only verifies the region and the number of prizes, and does not verify new and old users
    locationHandler.setSuccessor(limitHandler);

    locationHandler.apply(context);
}
The code is actually very simple, that is, first define a linked list, and then pass it on after passing through any node. If this node has a successor node, then pass it on.
As for the similarities and differences between it and the previous practice of using a List to store the rules to be executed, leave it to the readers to ponder for themselves.
Template method pattern
The template method pattern is very common in code with inheritance structures.
There is usually an abstract class:
public abstract class AbstractTemplate {
    // This is the template method
    public void templateMethod() {
        init();
        apply();
        end();
    }

    protected void init() {
        System.out.println("init The abstraction layer has been implemented, and subclasses can also choose to override");
    }

    // Leaving subclasses to implement this is the focus, which can be used as hook methods
    protected abstract void apply();

    protected void end() {
    }
}
The template method calls 3 methods, where apply() is an abstract method, and the subclass must implement it. In fact, several abstract methods in the template method are completely free. We can also set the three methods as abstract methods, so that the subclasses can be implemented. In other words, the template method is only responsible for defining what should be done in the first step, what should be done in the second step and what should be done in the third step. As for how to do it, it is implemented by subclasses.
Let's write an implementation class:
public class ConcreteTemplate extends AbstractTemplate {
    public void apply() {
        System.out.println("Subclass implementation abstract method apply");
    }

    public void end() {
        System.out.println("We can put method3 It can be used as a hook method and can be overwritten when necessary");
    }
}
Client call Demo:
public static void main(String[] args) {
    AbstractTemplate t = new ConcreteTemplate();
    // Call template method
    t.templateMethod();
}
The code is actually very simple. You can basically understand it when you see it. The key is to learn to use it in your own code.
State mode
In State Pattern, the behavior of a class changes based on its state. In the state mode, we create objects representing various states and a context object whose behavior changes with the change of the state object.
I won't talk nonsense. Let's talk about a simple example. The most basic demand of commodity inventory center is to reduce inventory and replenish inventory. Let's see how to write it in status mode.
The core is that our focus is no longer on the operation of the Context, but on the operation of the Context.
Define status interface:
public interface State {
    public void doAction(Context context);
}
Define inventory reduction status:
public class DeductState implements State {

    public void doAction(Context context) {
        System.out.println("Goods sold, ready to reduce inventory");
        context.setState(this);

        //...  Perform specific operations for inventory reduction
    }

    public String toString() {
        return "Deduct State";
    }
}
Define replenishment status:
public class RevertState implements State {

    public void doAction(Context context) {
        System.out.println("Replenish this item");
        context.setState(this);

        //...  Perform the specific operation of adding inventory
    }

    public String toString() {
        return "Revert State";
    }
}
Context was used earlier Setstate (this), let's see how to define the context class:
public class Context {
    private State state;
    private String name;
    public Context(String name) {
        this.name = name;
    }

    public void setState(State state) {
        this.state = state;
    }
    public void getState() {
        return this.state;
    }
}
Let's take a look at the client call, and you'll know it clearly:
public static void main(String[] args) {
        // What we need to operate is iPhone X
        Context context = new Context("iPhone X");

        // See how to replenish inventory
        State revertState = new RevertState();
        revertState.doAction(context);

        // Similarly, the inventory reduction operation is also very simple
        State deductState = new DeductState();
        deductState.doAction(context);

        // If necessary, we can get the current status
        // context.getState().toString();
        }
Readers may find that in the above example, if we don't care what state the current context is in, the context can not maintain the state attribute, so the code will be much simpler.
However, the example of commodity inventory is only an example after all. We still have many examples that need to know the status of the current context.
Behavioral model summary
The behavioral mode part introduces the strategy mode, observer mode, responsibility chain mode, template method mode and state mode. In fact, the classic behavioral modes also include memo mode, command mode, etc., but their use scenarios are relatively limited, and the length of this paper is very large, so I won't introduce them.