In How to realize concurrent upload of large files in JavaScript? And How to realize parallel downloading of large files in JavaScript? In these two articles, Po introduced how to use async pool library to optimize the function of transferring large files. In this article, Po Ge will introduce several schemes of HTTP transmission of large files. However, before introducing the specific scheme, let's use {node JS to generate a "large" file.
const fs = require("fs");

const writeStream = fs.createWriteStream(__dirname + "/big-file.txt");
for (let i = 0; i <= 1e5; i++) {
  writeStream.write(`${i} I'm brother Po. Welcome to the way of cultivating immortals in the whole stack\n`, "utf8");
}

writeStream.end();
After the above code runs successfully, a text file with a size of ^ 5.5 MB ^ will be generated in the current execution directory, which will be used as the "material" of the following scheme. After the preparation, let's introduce the first scheme - data compression.
1, Data compression
When using HTTP for large file transmission, we can consider compressing large files. Usually, when the browser sends a request, it will carry the "accept" and "accept - * request header information, which is used to tell the server the file types supported by the current browser, the list of supported compressed formats and the supported languages.
accept: */*
accept-encoding: gzip, deflate, br
accept-language: zh-CN,zh;q=0.9
The compression ratio of gzip can usually exceed 60%, while the br algorithm is specially designed for HTML. The compression efficiency and performance are better than gzip, and the compression density can be increased by another 20%.
The "accept encoding" field in the above HTTP request header is used to tell the server the content encoding method (usually a compression algorithm) that the client can understand. Through content negotiation, the server will select a method supported by the client and notify the client of the selection through the response header "content encoding".
cache-control: max-age=2592000
content-encoding: gzip
content-type: application/x-javascript
The above response header tells the browser that the {JS script returned is processed by the} gzip compression algorithm. However, it should be noted that compression algorithms such as gzip usually only have a good compression rate for text files, while the data of multimedia files such as pictures, audio and video is already highly compressed. Compression with gzip will not have a good compression effect, and may even become larger.
After understanding the "accept encoding" and "content encoding" fields, let's verify the effects of not opening "gzip" and "gzip".
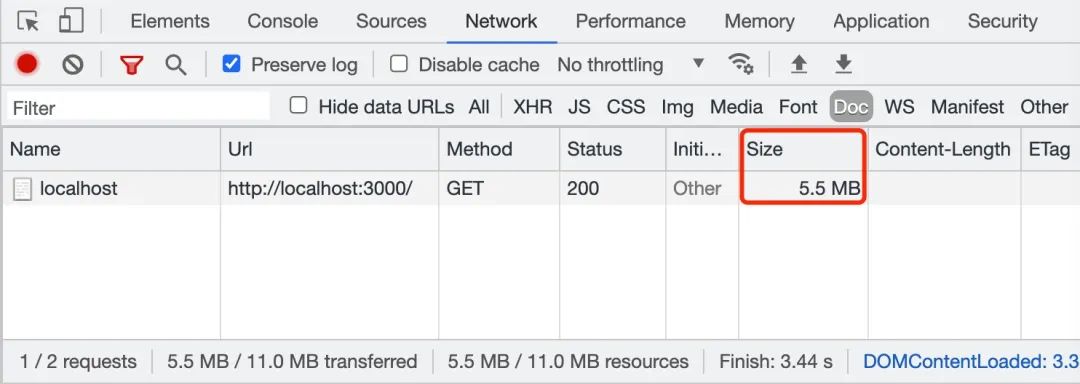
1.1 gzip is not enabled
const fs = require("fs");
const http = require("http");
const util = require("util");
const readFile = util.promisify(fs.readFile);

const server = http.createServer(async (req, res) => {
  res.writeHead(200, {
    "Content-Type": "text/plain;charset=utf-8",
  });
  const buffer = await readFile(__dirname + "/big-file.txt");
  res.write(buffer);
  res.end();
});

server.listen(3000, () => {
  console.log("app starting at port 3000");
});
1.2 open gzip
const fs = require("fs");
const zlib = require("zlib");
const http = require("http");
const util = require("util");
const readFile = util.promisify(fs.readFile);
const gzip = util.promisify(zlib.gzip);

const server = http.createServer(async (req, res) => {
  res.writeHead(200, {
    "Content-Type": "text/plain;charset=utf-8",
    "Content-Encoding": "gzip"
  });
  const buffer = await readFile(__dirname + "/big-file.txt");
  const gzipData = await gzip(buffer);
  res.write(gzipData);
  res.end();
});

server.listen(3000, () => {
  console.log("app starting at port 3000");
});
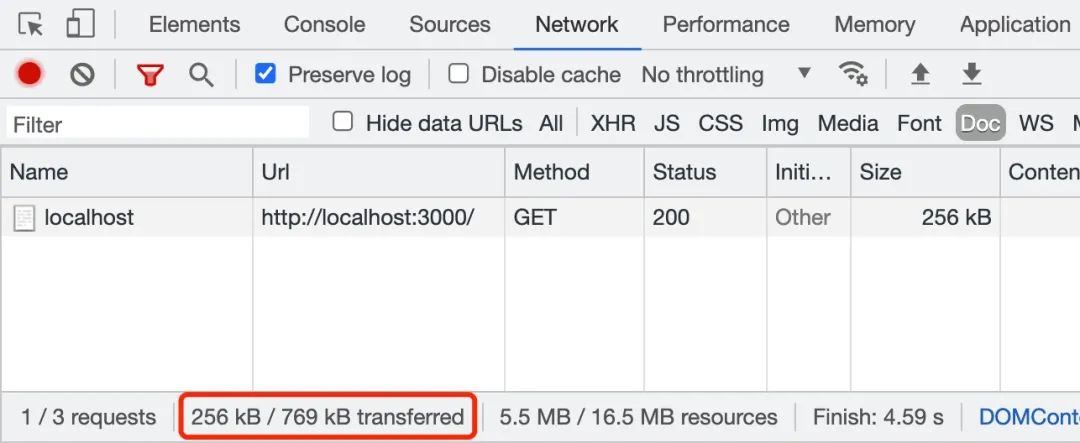
By observing the above two figures, we can intuitively feel that when transmitting # 5.5 MB # big file Txt file, if you enable gzip compression, the file will be compressed to 256 kB. This greatly speeds up the transmission of files. In the actual working scenario, we can use "nginx" or "koa static" to enable the "gzip" compression function. Next, let's introduce another scheme - block transmission coding.
2, Block transmission coding
Block transmission coding is mainly used in the following scenarios, that is, a large amount of data needs to be transmitted, but the length of the response cannot be obtained before the request is processed. For example, when you need to generate a large HTML table with the data obtained from the database query, or when you need to transmit a large number of pictures.
To use block transfer encoding, you need to configure the transfer encoding field in the response header and set its value to chunked or gzip, chunked:
Transfer-Encoding: chunked
Transfer-Encoding: gzip, chunked
The value of the {transfer encoding} field in the response header is} chunked, indicating that the data is sent in a series of blocks. It should be noted that the fields "transfer encoding" and "content length" are mutually exclusive, that is, the two fields in the response message cannot appear at the same time. Let's look at the coding rules of block transmission:
-
Each block includes two parts: block length and data block;
-
The block length is represented by hexadecimal digits and ends with \ r\n \;
-
The data block immediately follows the block length and also ends with \ r\n , but the data does not contain \ r\n;
-
A termination block is a regular block that represents the end of the block. The difference is that its length is 0, i.e. 0\r\n\r\n.
After knowing the relevant knowledge of block transmission coding, Po Ge will use {big file Txt file to demonstrate how the block transmission coding is realized.
2.1 data blocking
const buffer = fs.readFileSync(__dirname + "/big-file.txt");
const lines = buffer.toString("utf-8").split("\n");
const chunks = chunk(lines, 10);

function chunk(arr, len) {
  let chunks = [],
    i = 0,
    n = arr.length;
  while (i < n) {
    chunks.push(arr.slice(i, (i += len)));
  }
  return chunks;
}
2.2 block transmission
// http-chunk-server.js
const fs = require("fs");
const http = require("http");

//Omit data block code
http
  .createServer(async function (req, res) {
    res.writeHead(200, {
      "Content-Type": "text/plain;charset=utf-8",
      "Transfer-Encoding": "chunked",
      "Access-Control-Allow-Origin": "*",
    });
    for (let index = 0; index < chunks.length; index++) {
      setTimeout(() => {
        let content = chunks[index].join("&");
        res.write(`${content.length.toString(16)}\r\n${content}\r\n`);
      }, index * 1000);
    }
    setTimeout(() => {
      res.end();
    }, chunks.length * 1000);
  })
  .listen(3000, () => {
    console.log("app starting at port 3000");
  });
Use node HTTP chunk server After the JS command starts the server, access it in browsing http://localhost:3000/ Address, you will see the following output results:
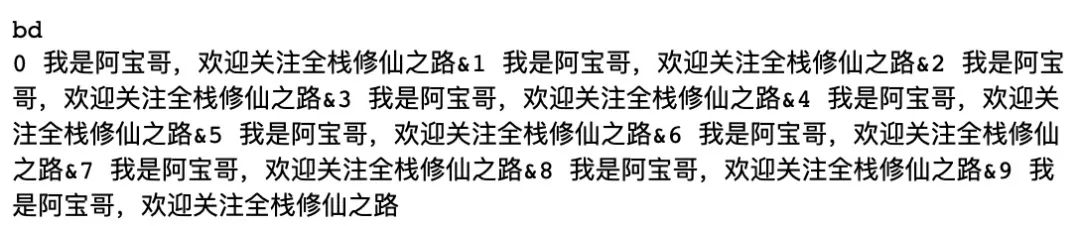
The above figure shows the contents returned by the first data block. When all data blocks are transmitted, the server will return the termination block, that is, send 0\r\n\r\n to the client. In addition, for the returned chunked data, we can also use the response object in the # fetch # API to read the returned data block in the form of stream, that is, through # response body. GetReader () to create the reader, then call reader.. Read () method to read the data.
2.3 streaming transmission
In fact, when using {node JS when returning large files to the client, we'd better use the form of stream to return the file stream, which can avoid taking up too much memory when processing large files. The specific implementation method is as follows:
const fs = require("fs");
const zlib = require("zlib");
const http = require("http");

http
  .createServer((req, res) => {
    res.writeHead(200, {
      "Content-Type": "text/plain;charset=utf-8",
      "Content-Encoding": "gzip",
    });
    fs.createReadStream(__dirname + "/big-file.txt")
      .setEncoding("utf-8")
      .pipe(zlib.createGzip())
      .pipe(res);
  })
  .listen(3000, () => {
    console.log("app starting at port 3000");
  });
When the file data is returned in the form of stream, the value of the "transfer encoding" field in the HTTP response header is "chunked", indicating that the data is sent in a series of blocks.
Connection: keep-alive
Content-Encoding: gzip
Content-Type: text/plain;charset=utf-8
Date: Sun, 06 Jun 2021 01:02:09 GMT
Transfer-Encoding: chunked
If you are interested in node If you are interested in JS stream, you can read "semlinker / node deep" on Github - learn more about node JS stream foundation # this article.
Project address: https://github.com/semlinker/node-deep
3, Scope request
The HTTP protocol range request allows the server to send only part of the HTTP message to the client. Range requests are useful when transferring large media files or when used in conjunction with the breakpoint continuation function of file download. If there is an "accept ranges" header in the response (and its value is not "none"), it indicates that the server supports the range request.
In a Range header, multiple parts can be requested at one time, and the server will return them in the form of multipart files. If the server returns a Range response, you need to use the 206 Partial Content status code. If the requested Range is illegal, the server will return 416 Range not satisfactory status code, indicating client error. The server allows to ignore the header of "Range" and return the whole file. The status code is 200.
3.1 Range syntax
Range: <unit>=<range-start>-
Range: <unit>=<range-start>-<range-end>
Range: <unit>=<range-start>-<range-end>, <range-start>-<range-end>
Range: <unit>=<range-start>-<range-end>, <range-start>-<range-end>, <range-start>-<range-end>
-
Unit: the unit of range request, usually bytes.
-
< range start >: an integer indicating the starting value of the range in a specific unit.
-
< range end >: an integer indicating the end value of the range in a specific unit. This value is optional. If it does not exist, it means that the range extends to the end of the document.
After understanding the syntax of "Range", let's take a look at the actual use example:
3.1.1 single scope
$ curl http://i.imgur.com/z4d4kWk.jpg -i -H "Range: bytes=0-1023"
3.1.2 multiple ranges
$ curl http://www.example.com -i -H "Range: bytes=0-50, 100-150"
3.2 Range request example
3.2.1 server code
// http/range/koa-range-server.js
const Koa = require("koa");
const cors = require("@koa/cors");
const serve = require("koa-static");
const range = require('koa-range');

const app = new Koa();

//Registration Middleware
app.use(cors()); //Register CORS Middleware
app.use(range); //Registration scope request Middleware
app.use(serve(".")); //Register static resource Middleware

app.listen(3000, () => {
  console.log("app starting at port 3000");
});
3.2.2 client code
<!DOCTYPE html>
<html lang="zh-cn">
  <head>
    <meta charset="UTF-8" />
    <meta http-equiv="X-UA-Compatible" content="IE=edge" />
    <meta name="viewport" content="width=device-width, initial-scale=1.0" />
    <title>Large file range request example (PO GE)</title>
  </head>
  <body>
    <h3>Large file range request example (PO GE)</h3>
    <div id="msgList"></div>
    <script>
      const msgList = document.querySelector("#msgList");
      function getBinaryContent(url, start, end, responseType = "arraybuffer") {
        return new Promise((resolve, reject) => {
          try {
            let xhr = new XMLHttpRequest();
            xhr.open("GET", url, true);
            xhr.setRequestHeader("range", `bytes=${start}-${end}`);
            xhr.responseType = responseType;
            xhr.onload = function () {
              resolve(xhr.response);
            };
            xhr.send();
          } catch (err) {
            reject(new Error(err));
          }
        });
      }

      getBinaryContent(
        "http://localhost:3000/big-file.txt",
        0, 100, "text"
      ).then((text) => {
        msgList.append(`${text}`);
      });
    </script>
  </body>
</html>
Use node koa range server After the JS command starts the server, access it in browsing http://localhost:3000/index.html Address, you will see the following output results:

The corresponding HTTP request header and response header (including only part of the header information) of this example are as follows:
3.2.3 HTTP request header
GET /big-file.txt HTTP/1.1
Host: localhost:3000
Connection: keep-alive
Referer: http://localhost:3000/index.html
Accept-Encoding: identity
Accept-Language: zh-CN,zh;q=0.9,en;q=0.8,id;q=0.7
Range: bytes=0-100
3.2.4 HTTP response header
HTTP/1.1 206 Partial Content
Vary: Origin
Accept-Ranges: bytes
Last-Modified: Sun, 06 Jun 2021 01:40:19 GMT
Cache-Control: max-age=0
Content-Type: text/plain; charset=utf-8
Date: Sun, 06 Jun 2021 03:01:01 GMT
Connection: keep-alive
Content-Range: bytes 0-100/5243
Content-Length: 101
That's all for the scope request. If you want to understand its application in practical work, you can continue to read How to realize parallel downloading of large files in JavaScript? This article.
4, Summary
In this paper, Po Ge introduces three schemes of HTTP transmission of large files. I hope that after understanding these knowledge, it will be helpful to your future work. In practical use, we should pay attention to the difference between "transfer encoding" and "content encoding". Transfer encoding will be automatically decoded and restored to the original data after transmission, while content encoding must be decoded by the application itself.
5, Reference resources
-
Perspective HTTP protocol
-
MDN - HTTP request scope
-
MDN - Accept-Encoding