brief introduction
Official website address: https://shardingsphere.apache.org/index_zh.html
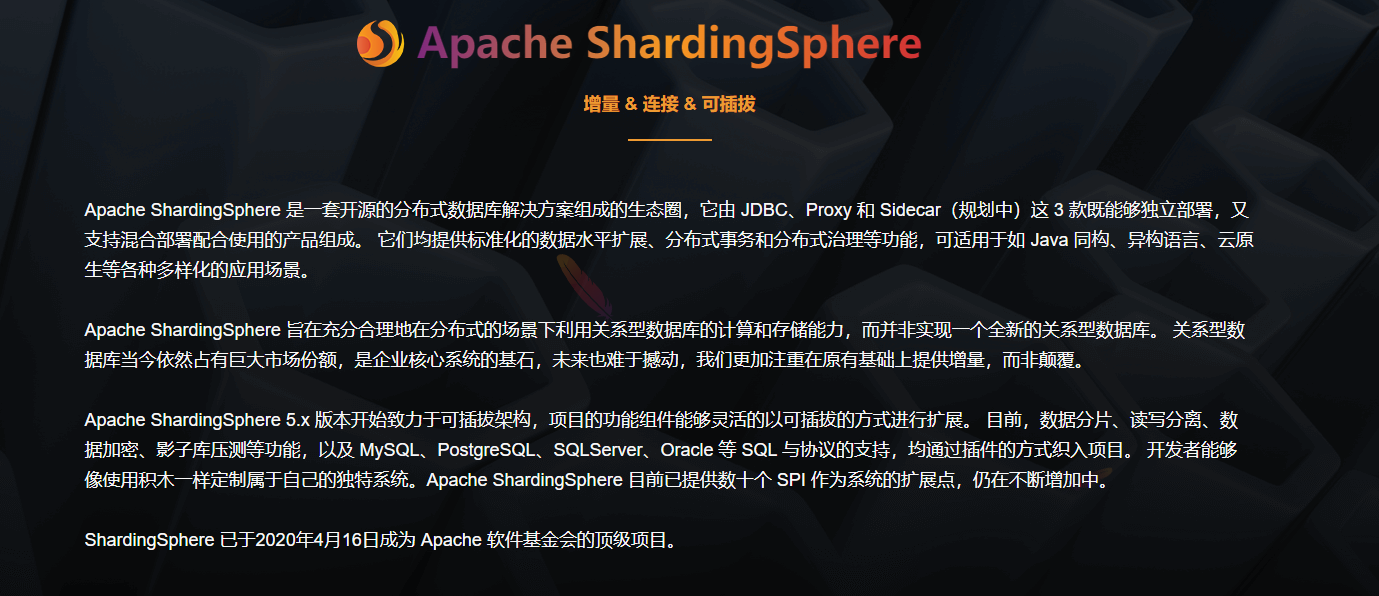
Apache ShardingSphere is positioned as Database Plus, which aims to build the upper standard and ecology of multi-mode database. It focuses on how to make full and rational use of the computing and storage capacity of the database, rather than realizing a new database. ShardingSphere stands at the upper level of the database and pays more attention to their cooperation than the database itself.
Connectivity, increment, and pluggability are the core concepts of Apache ShardingSphere.
- Connection: through the flexible adaptation of database protocol, SQL dialect and database storage, it can quickly connect applications with multi-mode heterogeneous databases;
- Increment: obtain the access traffic of the database, and provide transparent increment functions such as traffic redirection (data fragmentation, read-write separation, shadow database), traffic deformation (data encryption, data desensitization), traffic authentication (security, audit, permission), traffic governance (fusing, flow restriction) and traffic analysis (quality of service analysis, observability);
- Pluggable: the project adopts micro kernel + three-layer pluggable model, so that the kernel, functional components and ecological docking can be pluggable and expanded in a flexible way, and developers can customize their own unique system like building blocks.
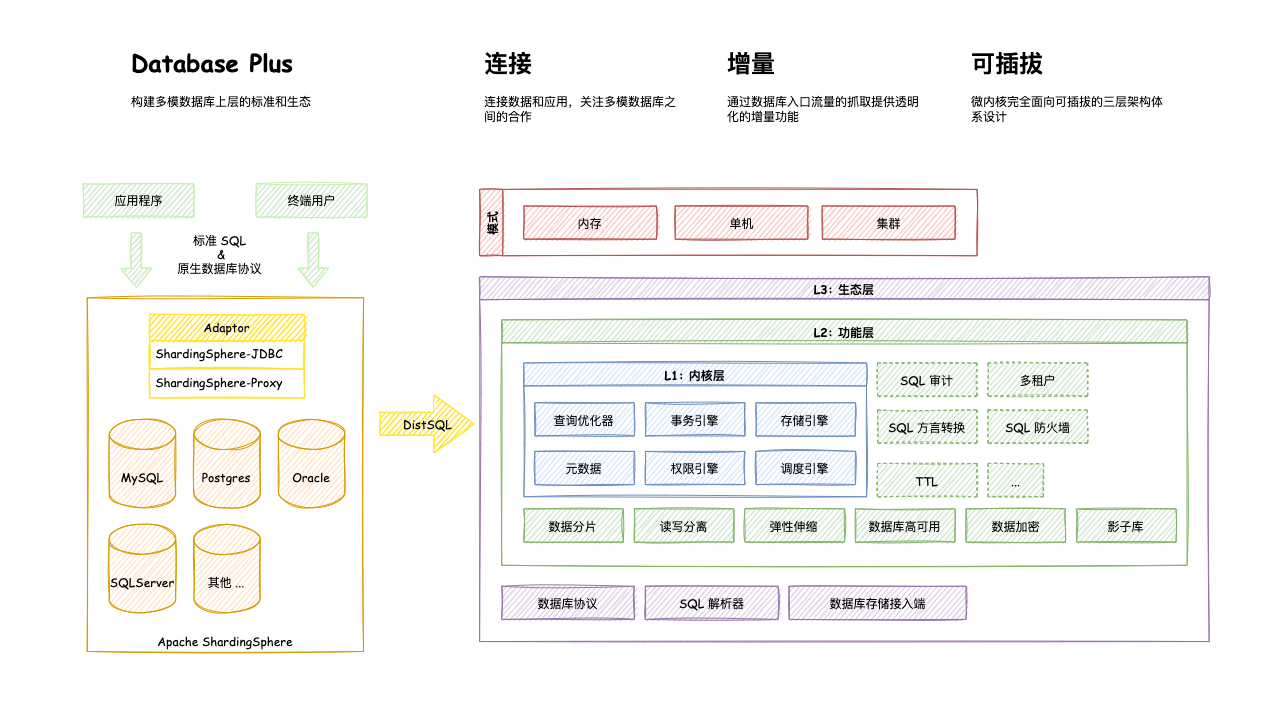
ShardingSphere-JDBC
Positioned as a lightweight Java framework, additional services are provided in the JDBC layer of Java. It uses the client to directly connect to the database and provides services in the form of jar package without additional deployment and dependency. It can be understood as an enhanced jdbc driver and is fully compatible with JDBC and various ORM frameworks.
- It is applicable to any ORM framework based on JDBC, such as JPA, Hibernate, Mybatis, Spring JDBC Template or directly using JDBC;
- Support any third-party database connection pool, such as DBCP, C3P0, BoneCP, HikariCP, etc;
- It supports any database that implements JDBC specification. At present, it supports MySQL, PostgreSQL, Oracle, SQLServer and any database that can be accessed using JDBC.
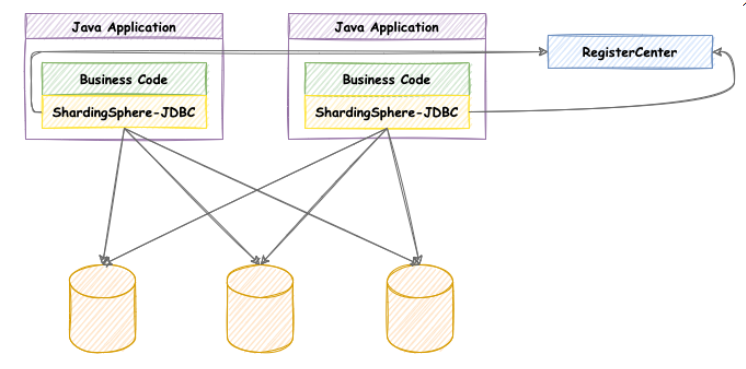
ShardingSphere-Proxy
Positioned as a transparent database agent, it provides a server version encapsulating the database binary protocol to support heterogeneous languages. At present, MySQL and PostgreSQL (compatible with openGauss and other PostgreSQL based databases) are available. It can use any access client compatible with MySQL/PostgreSQL protocol (such as MySQL Command Client, MySQL Workbench, Navicat, etc.) to operate data, which is more friendly to DBA s.
- It is completely transparent to the application and can be directly used as MySQL/PostgreSQL;
- Applicable to any client compatible with MySQL/PostgreSQL protocol.
hardingSphere-Sidecar(TODO)
Positioned as the cloud native database agent of Kubernetes, it represents all access to the database in the form of Sidecar. The meshing layer that interacts with the database is provided through the scheme of no center and zero intrusion, that is, Database Mesh, also known as database grid.
Database Mesh focuses on how to organically connect distributed data access applications with databases. It pays more attention to interaction, which effectively combs the interaction between chaotic applications and databases. Using Database Mesh, the application and database accessing the database will eventually form a huge grid system. The application and database only need to be seated in the grid system. They are the objects governed by the meshing layer.
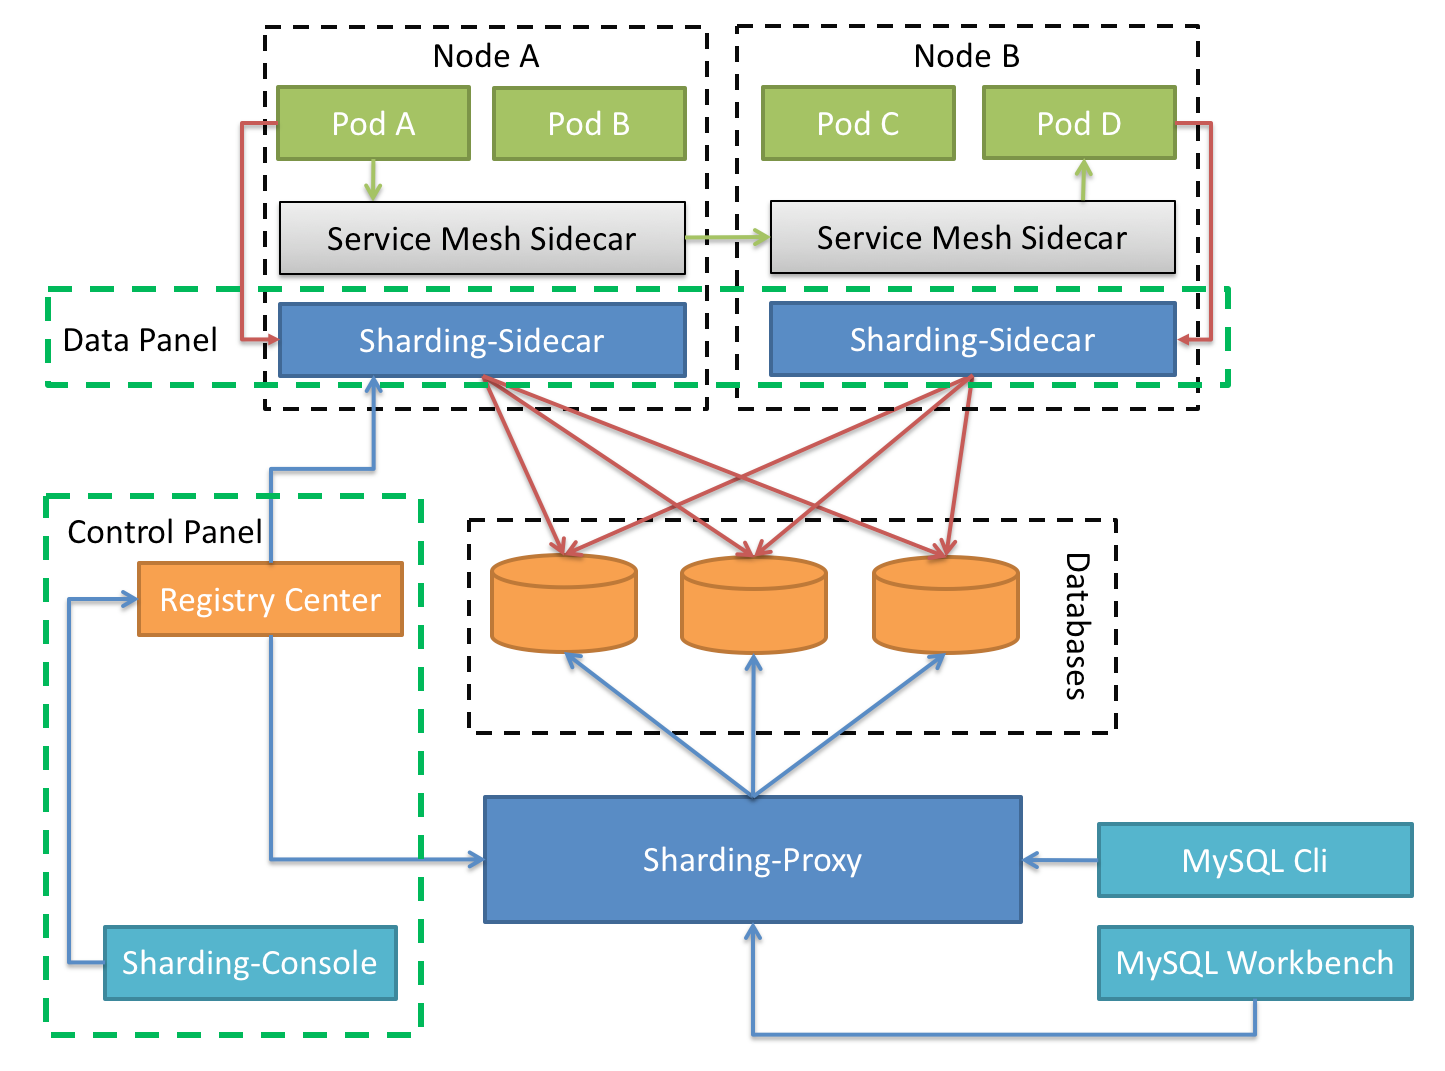
| ShardingSphere-JDBC | ShardingSphere-Proxy | ShardingSphere-Sidecar |
|---|---|---|
| database | Any MySQL/PostgreSQL | MySQL/PostgreSQL |
| Connection consumption | high | low |
| Heterogeneous language | Java only | arbitrarily |
| performance | Low loss | The loss is slightly higher |
| Decentralization | yes | no |
| Static entry | nothing | have |
hardingSphere function list
- Function list: 1. Database partition 2. Database partition and table 3. Read write separation 4. Customization of partition strategy 5. No centralized distributed primary key
- Distributed transaction: 1. Standardized transaction interface 2.XA strongly consistent transaction 3. Flexible transaction 4. Database governance
- Distributed governance: 1. Elastic scalability 2. Visual link tracking 3. Data encryption
Analysis of ShardingSphere data slicing kernel
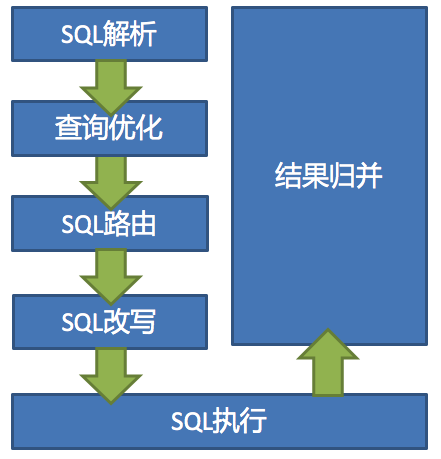
The main processes of data fragmentation of the three ShardingSphere products are completely consistent. The core consists of SQL parsing = > executor optimization = > sql routing = > sql rewriting = > sql execution = > result merging.
ShardingJDBC preparation
Mysql completes master-slave replication
liunx preparing mysql database
summary
Master slave replication (also known as AB replication) allows data from one MySQL database server (master server) to be replicated to one or more MySQL database servers (slave servers).
Replication is asynchronous, and the slave does not need a permanent connection to receive updates from the master.
Depending on the configuration, you can replicate all databases in the database, the selected database, or even the selected tables.
Advantages of master-slave replication
- Scale out solution – distribute load among multiple slaves to improve performance. In this environment, all writes and updates must be made on the master server. However, reads can be made on one or more slave devices. This model can improve write performance (because the master device is dedicated to updates) while significantly increasing the read speed of more and more slave devices.
- Data security · because the data is copied to the slave station and the slave station can pause the replication process, the backup service can be run on the slave station without damaging the corresponding master data.
- Analysis – you can create real-time data on the master server, while information analysis can be performed on the slave server without affecting the performance of the master server. Remote data distribution – you can use replication to create a local copy of the data for the remote site without permanently accessing the master server.
Principle of master-slave replication
The premise is that the database server as the master server must turn on the binary log
Any modification on the master server will be saved in the Binary log through its own I / 0 thread.
- Start an I/0 thread from the server, connect to the main server through the configured user name and password, request to read the binary log, and then write the read binary log to a local real log.
- Open an SQL thread from the server at the same time to regularly check the real log (this file is also binary). If an update is found, immediately execute the updated content on the local database.
Each slave server receives a copy of the entire contents of the master server binary log. - The slave device is responsible for determining which statements in the binary log should be executed.
Unless otherwise specified, all events in the master-slave binary log are executed on the slave station. If necessary, you can configure the slave server to process only events of specific databases or tables.
Complete master-slave replication based on Docker
Original link: https://www.cnblogs.com/songwenjie/p/9371422.html
Why build based on Docker?
- Limited resources
- Virtual machine construction requires machine configuration, and the steps of installing mysql are cumbersome
- Multiple Docker containers can run on one machine
- Docker containers are independent of each other. They have independent ip addresses and do not conflict with each other
- Docker is easy to use, and the container is started at the second level
Using Docker to build master-slave server
First, pull the docker image. Here we use mysql version 5.7:
docker pull mysql:5.7
Then use this image to start the container. Here, you need to start the master and slave containers respectively
Master:
docker run -p 3339:3306 --name mymysql -e MYSQL_ROOT_PASSWORD=123456 -d mysql:5.7
Slave:
docker run -p 3340:3306 --name mymysql -e MYSQL_ROOT_PASSWORD=123456 -d mysql:5.7
The externally mapped port of the Master is 3339 and the externally mapped port of the Slave is 3340. Because docker containers are independent of each other and each container has its own ip address, different containers using the same port will not conflict. Here, we should try to use the default 3306 port of mysql, otherwise we may be unable to connect to mysql in the docker container through ip.
Use the docker ps command to view the running containers
[root@iz2vcbxtcjxxdepmmofk3hz mysql3307]# docker ps
CONTAINER ID   IMAGE                 COMMAND                  CREATED          STATUS          PORTS                               NAMES
66392fd83cf1   mysql:5.7             "docker-entrypoint.s..."   51 minutes ago   Up 20 minutes   33060/tcp, 0.0.0.0:3308->3306/tcp   mysql-slave
f5b9761e3dee   mysql:5.7             "docker-entrypoint.s..."   51 minutes ago   Up 35 minutes   33060/tcp, 0.0.0.0:3307->3306/tcp   mysql-master
Configure master
Enter the Master container through the docker exec -it 627a2368c865 /bin/bash command or through the docker exec - it MySQL Master / bin / bash command. 627a2368c865 is the id of the container, and MySQL Master is the name of the container.
cd /etc/mysql, switch to the / etc/mysql directory, and then vi my.cnf to edit my.cnf. bash: vi: command not found will be reported. We need to install vim in the docker container. Install vim using the apt get install vim command
The following problems occur:
Reading package lists... Done
Building dependency tree
Reading state information... Done
E: Unable to locate package vim
Execute apt get update, and then execute apt get install VIM again to successfully install vim. Then we can use VIM to edit my.cnf and add the following configuration to my.cnf:
[mysqld]
## Be unique in the same LAN
server-id=100
## Enable the binary log function, and you can take any (key)
log-bin=mysql-bin
After the configuration is completed, you need to restart the mysql service to make the configuration effective. Use service mysql restart to complete the restart. Restarting the mysql service will stop the docker container. We also need the docker start mysql master to start the container.
Next, create a data synchronization user in the Master database and grant the user the slave REPLICATION SLAVE permission and REPLICATION CLIENT permission to synchronize data between the Master and slave databases.
CREATE USER 'slave'@'%' IDENTIFIED BY '123456';

GRANT REPLICATION SLAVE, REPLICATION CLIENT ON *.* TO 'slave'@'%';
Configure slave
Like configuring the master, add the following configuration in the Slave configuration file my.cnf:
[mysqld]
## Set up server_id, be unique
server-id=101
## Enable the binary log function for use when Slave is the Master of other Slave
log-bin=mysql-slave-bin
## relay_log configure relay log
relay_log=edu-mysql-relay-bin
After configuration, you also need to restart the mysql service and docker container. The operation is consistent with the configuration of the master.
Link master and slave
Enter mysql in Master and execute show master status;

The values of the File and Position fields will be used later. Before the subsequent operations are completed, it is necessary to ensure that the Master library cannot do any operations, otherwise the state will change and the values of the File and Position fields will change.
Enter mysql in Slave and execute
change master to master_host='172.17.0.3', master_user='slave', master_password='123456', master_port=3306, master_log_file='mysql-bin.000001', master_log_pos= 3298, master_connect_retry=30;
Command description:
master_host: the address of the Master refers to the independent ip of the container. You can query the ip of the container through docker inspect -- format = '{. Networksettings. IPAddress}}' container name | container id
master_port: the port number of the Master, which refers to the port number of the container
master_user: the user used for data synchronization
master_password: the password of the user used for synchronization
master_log_file: specifies which log file Slave starts copying data from, that is, the value of the file field mentioned above
master_log_pos: which Position to start reading, that is, the value of the Position field mentioned above
master_connect_retry: the time interval between retries if the connection fails. The unit is seconds. The default is 60 seconds
Execute show Slave status on mysql terminal in Slave \ g; Used to view master-Slave synchronization status.
Normally, SlaveIORunning and slavesqlrrunning are No, because we have not started the master-slave replication process. Use start slave to start the master-slave replication process, and then query the master-slave synchronization status again. show slave status \G;.
SlaveIORunning and slavesqlrrunning are both Yes, indicating that master-slave replication has been enabled. At this point, you can test whether the data synchronization is successful.
Read write separation
Project testing
New project import dependency
       <!--web-->
        <dependency>
            <groupId>org.springframework.boot</groupId>
            <artifactId>spring-boot-starter-web</artifactId>
        </dependency>

        <!--database-->
        <dependency>
            <groupId>mysql</groupId>
            <artifactId>mysql-connector-java</artifactId>
            <scope>runtime</scope>
        </dependency>
        <dependency>
            <groupId>org.mybatis.spring.boot</groupId>
            <artifactId>mybatis-spring-boot-starter</artifactId>
            <version>1.3.2</version>
        </dependency>
        <dependency>
            <groupId>com.alibaba</groupId>
            <artifactId>druid-spring-boot-starter</artifactId>
            <version>1.1.10</version>
        </dependency>

        <!--sharding-jdbc-->
        <dependency>
            <groupId>org.apache.shardingsphere</groupId>
            <artifactId>sharding-jdbc-spring-boot-starter</artifactId>
            <version>4.0.0-RC1</version>
        </dependency>
        <dependency>
            <groupId>org.apache.shardingsphere</groupId>
            <artifactId>sharding-core-common</artifactId>
            <version>4.0.0-RC1</version>
        </dependency>

        <dependency>
            <groupId>org.projectlombok</groupId>
            <artifactId>lombok</artifactId>
            <optional>true</optional>
        </dependency>
yaml configuration
server:
  port: 8085

spring:
  main:
    allow-bean-definition-overriding: true
  shardingsphere:
    # Parameter configuration display SQl
    props:
      sql:
        show: true
    # Configure data sources
    datasource:
      # Alias each data source
      names: ds1,ds2
      # Configure database connection information for each data source of master-ds1
      ds1: # master
        type: com.alibaba.druid.pool.DruidDataSource
        driver-class-name: com.mysql.cj.jdbc.Driver
        url: jdbc:mysql://localhost:3307/test?serverTimezone=Asia/Shanghai&useUnicode=true&characterEncoding=utf-8&useSSL=false&allowPublicKeyRetrieval=true&nullCatalogMeansCurrent=true
        username: root
        password: 123456
        maxPoolSize: 100
        minPoolSize: 5
      ds2: # slave
        type: com.alibaba.druid.pool.DruidDataSource
        driver-class-name: com.mysql.cj.jdbc.Driver
        url: jdbc:mysql://localhost:3308/test?serverTimezone=Asia/Shanghai&useUnicode=true&characterEncoding=utf-8&useSSL=false&allowPublicKeyRetrieval=true&nullCatalogMeansCurrent=true
        username: root
        password: 123456
        maxPoolSize: 100
        minPoolSize: 5
    #    Configure default data source
    sharding:
      # The default data source is mainly used for writing. Note that read-write separation must be configured. If not, all nodes will be regarded as slave
      default-data-source-name: ds1
    # Configure read write separation
    masterslave:
      name: ms # Name arbitrary
      master-data-source-name: ds1 # Main library
      slave-data-source-names: ds2 # Separate multiple commas from library
      # RANDOM random polling from node load balancing policy default
      load-balance-algorithm-type: round_robin

# mybatis configuration
mybatis:
  mapper-locations: classpath*:mapper/*.xml
  type-aliases-package: com.tuxc.entity
Database table
DROP TABLE IF EXISTS `master_slave`;
CREATE TABLE `master_slave`  (
  `id` int(11) NOT NULL AUTO_INCREMENT,
  `name` varchar(255) CHARACTER SET utf8mb4 COLLATE utf8mb4_general_ci NOT NULL,
  PRIMARY KEY (`id`) USING BTREE
) ENGINE = InnoDB AUTO_INCREMENT = 3 CHARACTER SET = utf8mb4 COLLATE = utf8mb4_general_ci ROW_FORMAT = Dynamic;
Test code writing
@Data
public class TestEntity {
  // Primary key
  private Integer id;
  // full name
  private String name;
}
@Repository
@Mapper
public interface TestMapper {

  @Select("select * from master_slave")
  List<TestEntity> selectByAll();

  @Insert("insert into master_slave (name) VALUES (#{name})")
  void insert(TestEntity testEntity);
}
test run
@RestController
@RequestMapping("/test/user")
public class TestController {

  @Autowired
  private TestMapper testMapper;

  @GetMapping
  public String insert(){
    TestEntity test = new TestEntity();
    test.setName("ndsjjdaa");
    testMapper.insert(test);
    return "success";
  }

  @GetMapping("findByAll")
  public List<TestEntity> findByAll(){
    return testMapper.selectByAll();
  }

}

Thus, read-write separation is realized
Sub database and sub table
Why do you want to separate databases and tables
For ordinary machines (4-core 16G), if the MySQL concurrency (QPS+TPS) of a single database exceeds 2k, the system is basically finished. It is best to control the concurrency at about 1k. Here comes a question: why do you want to divide databases and tables?
Sub database and sub table purpose: to solve the problems of high concurrency and large amount of data.
1. High concurrency will cause frequent IO reads and writes, which will naturally cause slow reads and writes, or even downtime. Generally, the concurrency of a single database should not exceed 2k, except for NB machines.
2. The problem of large amount of data. It is mainly caused by the implementation of the underlying index. The MySQL index is implemented as B+TREE. The amount of other data will lead to a very large index tree and slow query.
Second, the maximum storage limit of innodb is 64TB.
The most common way to solve the above problems is to divide the database into tables.
The purpose of database and table splitting is to split a table into N tables, so as to control the data volume of each table within a certain range and ensure the performance of SQL. It is recommended that the data of a table should not exceed 500W.
concept
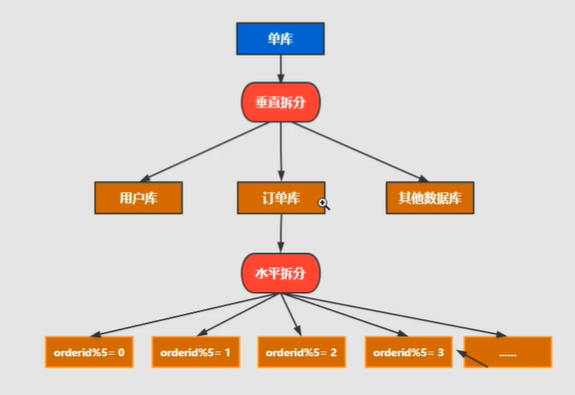
It is also divided into vertical split and horizontal split.
Horizontal splitting: the data of a unified table is split into different tables in different libraries. It can be split according to time, region, or a business key dimension, or through hash. Finally, the specific data is accessed through routing. The structure of each table after splitting is consistent.
Vertical split: This is to split a table with many fields into multiple tables or multiple libraries. The structure of each library table is different, and each library table contains some fields. Generally speaking, it can be split according to the business dimension. For example, the order table can be divided into orders, order support, order address, order goods, order extension and other tables; it can also be divided according to the number Split according to the degree of cold and heat, 20% of the hot fields are split into one table and 80% of the cold fields are split into another table.
Non stop database and table data migration
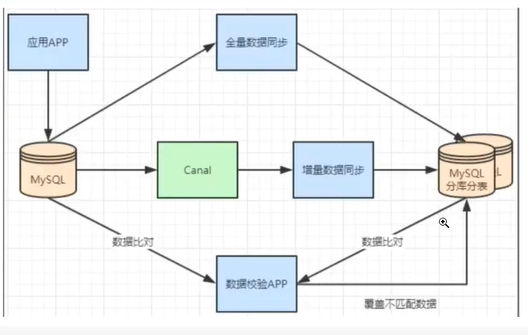
Generally, there is a process to split a database. At first, it is a single table, and then it is slowly split into multiple tables. Then let's see how to smoothly transition from MySQL single table to MySQL sub database and sub table architecture.
- mysql+canal is used for incremental data synchronization, and the database and table middleware is used to route the data to the corresponding new table.
- Using the database and table middleware, the full amount of data is imported into the corresponding new table.
- By comparing single table data with sub database and sub table data, the mismatched data is updated to the new table.
- After the data is stable, switch the single table configuration to the sub database and sub table configuration.
Method of dividing database and table
Logic table
Logical table refers to the general name of horizontally split database or data table and data structure table. For example, the user data is divided into two tables according to the user id%2: ksi_user0 and ksd_user1. Their logical table name is ksd_user.
The definition method in shardingjdbc is as follows:
spring:
  shardingsphere:
    sharding:
      tables:
        # Logical table name
        master-savle:
Database and table data nodes - actual data nodes
spring:
  shardingsphere:
    sharding:
      tables:
        # Logical table name
        master-savle: # Define the number of libraries and tables, otherwise an error will be reported
          # Data node: multiple data sources $- > {0.. n} logical table name $- > {0.. n} same table
          actual-data-nodes: ds$->{0..2}.master-savle$->{0..1}
          # Data node; Multiple data sources $- > {0.. n} logical table name $- > {0.. n} different tables
          actual-data-nodes: ds0.master-savle$->{0..1}, ds1.master-savle$->{2..4}
          # Specifies how a single data source is configured
          actual-data-nodes: ds0.master-savle$->{0..4}
          # Manually specify all
          actual-data-nodes: ds0.master-savle1, ds0.master-savle2, ds0.master-savle3
Data slicing is the smallest unit. It consists of data source name and data table, such as ds0.ksd_user0

Five partition strategies of database and table
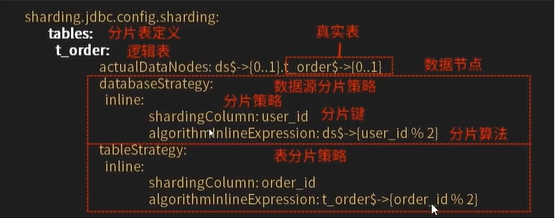
There are two types of data source fragmentation:
- Data source fragmentation
- Surface slice
These two are fragmentation rules with different dimensions, but their usable fragmentation strategies and rules are the same. They consist of two parts:
- Slice key
- Partition algorithm
First: none
Corresponding to the non shardingstrategy, SQL will be sent to all nodes for execution without fragmentation policy. This rule has no sub items to configure.
The second method: the inline line expresses the time division strategy {core, which must be mastered)
It corresponds to inlineshardingstrategy. When Groovy is used, it provides fragment operation support for = and in of SQL statements, and only supports single fragment key. For simple fragment algorithm, it can be used through simple configuration, so as to avoid cumbersome Java code opening. For example, ksd_user $(fragment key (data table field) userid% 5) indicates that ksd_user table is based on a certain field (userid) Module 5. Thus, it is divided into 5 tables, and the table names are: ksd_user0 to ksd_user4. If the library is the same.
spring:
  shardingsphere:
    sharding:
      tables:
        # Logical table name
        master-savle:
          # Data node: multiple data sources $- > {0.. n} logical table name $- > {0.. n} same table
          actual-data-nodes: ds$->{0..2}.master-savle$->{0..1}
          # Data source fragmentation strategy
          databaseStrategy:
            inline:
              shardingColumn: user_id
              algorithmlnlineExpression: ds$->{user_id%2}
          # Table partition strategy
          tableStrategy:
            inline:
              shardingColumn: order_id
              algorithmlnlineExpression: master-savle$->{order_id%2}
The third method is to divide databases and tables according to the actual time and date - according to the standard rules
Standard slice - Standard
- The corresponding StrandardShardingStrategy. Provides fragment operation support for =, in and between and in SQL statements.
- The stratardshardingstrategy only supports sharding keys. Two sharding algorithms, precisesshardingalgorithm and RangeShardingAlgorithm, are provided.
- Precision shardingalgorithm is required. Er, it is used to process the fragments of = and IN
- And rangeshardingalgorithm are optional and are used to process Betwwen and sharding. If and rangeshardingalgorithm are not configured, SQL Between AND will be processed according to the full database route.
/**
 *  Standard slice - Standard
 *  You must inherit PreciseShardingAlgorithm
 * @author tuxuchen
 * @date 2021/11/25 11:41
 */
public class BirthdayAlgorithm implements PreciseShardingAlgorithm<Date> {

  // There are several data sources to put several pieces of data
  List<Date> dateList = new ArrayList<>();

  {
    Calendar calendar1 = Calendar.getInstance();
    calendar1.set(2021, 1, 1, 0, 0, 0);
    Calendar calendar2 = Calendar.getInstance();
    calendar2.set(2022, 1, 1, 0, 0, 0);
    dateList.add(calendar1.getTime());
    dateList.add(calendar2.getTime());
  }

  /**
   *
   * @param collection Data source set ds1 ds2
   * @param preciseShardingValue
   * @return
   */
  @Override
  public String doSharding(Collection<String> collection, PreciseShardingValue<Date> preciseShardingValue) {
    // Gets the value of the attribute database
    Date date = preciseShardingValue.getValue();
    // Gets the name information list of the data source
    Iterator<String> iterator = collection.iterator();
    String target = null;
    for (Date s : dateList) {
      target = iterator.next();
      // If the data is later than the specified date, it is returned directly
      if (date.before(s)){
        break;
      }
    }
    return target; // Finally, DS1 and DS2 are returned
  }
}
spring:
  shardingsphere:
    sharding:
      tables:
        # Logical table name
        master-savle:
          # Data node: multiple data sources $- > {0.. n} logical table name $- > {0.. n} same table
          actual-data-nodes: ds$->{0..2}.master-savle$->{0..1}
          # Data source fragmentation strategy
          databaseStrategy:
            standard:
              shardingColumn: birthady # Field name
              preciseAlgorithmClassName: com.tuxc.config.BirthdayAlgorithm
          # Table partition strategy
          tableStrategy:
            inline:
              shardingColumn: order_id
              algorithmlnlineExpression: master-savle$->{order_id%2}
The fourth: ShardingSphere - comply with the fragmentation strategy (understand)
- Corresponding interface: HintShardingStrategy. The strategy is segmented through Hint rather than SQL parsing.
- For scenarios where the fragment field is determined not by SQL but by other external conditions, you can use SQL hint to inject the fragment field flexibly. For example, the database is divided according to the user's login time and primary key, but there is no such field in the database. SQL hint supports the use of Java API and SQL annotation. It makes the post database and table more flexible.

Fifth: ShardingSphere - hint fragmentation strategy (understand)
- It corresponds to the ComplexShardingStrategy. It complies with the sharding strategy and supports the sharding operations of -, in, between and in SQL statements.
- Complex shardingstrategy supports multi sharding keys. Due to the complex relationship between multi sharding keys, it does not carry out too much encapsulation. Instead, it directly transmits the sharding key combination and sharding operator to the sharding algorithm, which is completely implemented by the developer, providing maximum flexibility.

Distributed primary key configuration
Problem: if the primary key is self growing, the data stored in different databases are likely to have the same primary key
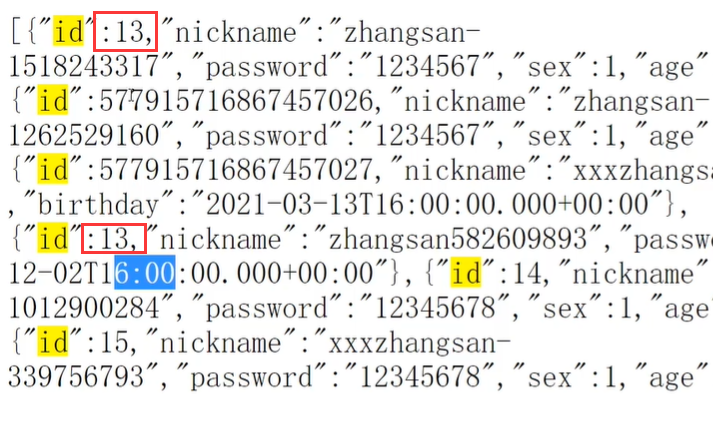
ShardingSphere provides a flexible way to configure the distributed primary key generation strategy. Configure the primary key generation strategy of each table in the partition rule configuration module. By default, snowflake algorithm is used to generate 64bit long integer data. Two configurations are supported
- SNOWFLAKE
- UUID
spring:
  shardingsphere:
    sharding:
      tables:
        # Logical table name
        master-savle:
          key-generator:
            #The listed database type of the primary key must be bigint type
            column: id
            type: SHOWFLAKE # Be careful to use capital letters
Note:
- The database primary key type should not grow by itself, otherwise it will not be inserted
- Using Showstack, the database column type must be bigint
- Configure primary key policy to use uppercase
Distributed transaction management
Local transaction
Without starting any distributed transaction manager, each data node is allowed to manage its own transactions. They do not have the ability to consult and communicate with each other, nor do they know the success of transactions of other data nodes. Local transactions have no loss in performance, but they are unable to achieve strong consistency and final consistency.
Two stage submission
The earliest distributed transaction model of XA protocol is the X/Open Distributed Transaction Processing (DTP) model proposed by X/Open international alliance, which is called XA protocol for short.
Distributed transactions implemented based on XA protocol have little business intrusion. Its biggest advantage is to be clear to users. Users can use distributed transactions based on XA protocol like local transactions. XA protocol can strictly guarantee transaction ACID characteristics.
Strictly guaranteeing the transaction ACID feature is a double-edged sword. All required resources need to be locked during transaction execution. It is more suitable for short transactions with a certain execution time. For long transactions, the exclusive use of data during the whole transaction will lead to an obvious decline in the concurrent performance of business systems that depend on hot data. Therefore, in the high concurrent performance first scenario, Distributed transaction based on XA protocol is not the best choice.
Flexible transaction
If a transaction that implements a transaction element of ACID is called a rigid transaction, a transaction based on a BASE transaction element is called a flexible transaction. BASE is the abbreviation of basic availability, flexible state and final number.
- Basically Available ensures that distributed transaction participants are not necessarily online at the same time.
- Soft state allows the system status update to have a certain delay, which may not be perceived by the customer.
- However, the final consistency of the system is usually guaranteed by message passing.
In ACID transactions, there are high requirements for isolation. In the process of transaction execution, all resources must be locked. The concept of flexible transactions is to move the mutex operation from the resource level to the business level through business logic. The system throughput can be improved by relaxing the requirements for strong consistency.
Both ACID based strong consistency transactions and BASE based final consistency transactions are not silver bullets. Their greatest strengths can be brought into play only in the most suitable scenarios. The differences between them can be compared in detail in the following table to help developers select technologies,
Using SpringBoot starter
Introduce Maven dependency
<!-- use XA This module needs to be introduced when a transaction occurs -->
<dependency>
    <groupId>org.apache.shardingsphere</groupId>
    <artifactId>shardingsphere-transaction-xa-core</artifactId>
    <version>${shardingsphere.version}</version>
</dependency>

<!-- use BASE This module needs to be introduced when a transaction occurs -->
<dependency>
    <groupId>org.apache.shardingsphere</groupId>
    <artifactId>shardingsphere-transaction-base-seata-at</artifactId>
    <version>${shardingsphere.version}</version>
</dependency>
Configure transaction manager
@Configuration
@EnableTransactionManagement
public class TransactionConfiguration {

    @Bean
    public PlatformTransactionManager txManager(final DataSource dataSource) {
        return new DataSourceTransactionManager(dataSource);
    }

    @Bean
    public JdbcTemplate jdbcTemplate(final DataSource dataSource) {
        return new JdbcTemplate(dataSource);
    }
}
Using distributed transactions
@Transactional
@ShardingSphereTransactionType(TransactionType.XA)  // Transactiontype.local, transactiontype.xa and transactiontype.base are supported
public void insert() {
    jdbcTemplate.execute("INSERT INTO t_order (user_id, status) VALUES (?, ?)", (PreparedStatementCallback<Object>) ps -> {
        ps.setObject(1, i);
        ps.setObject(2, "init");
        ps.executeUpdate();
    });
}