First, build a project to do a simple message publishing function. The code structure is as follows. Maven can manage dependencies very well.
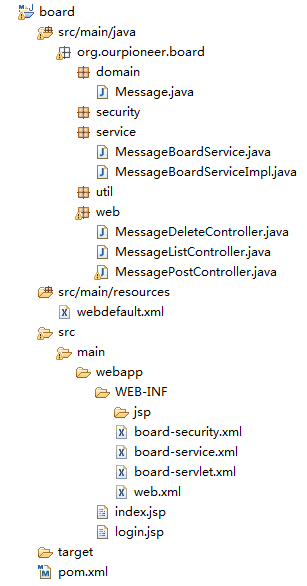
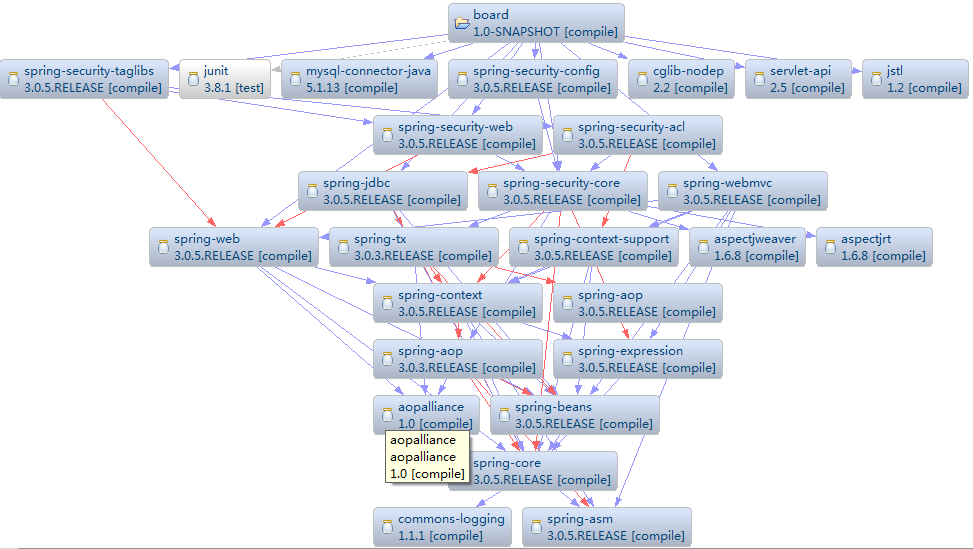
Hierarchical structure is adopted, but no database operations are used. A brief description is given. Database operations are used to authenticate users in the later Security framework. Let's look at dependencies, so that we can get a clearer understanding of Spring's hierarchy:
First, look at the basic web deployment description file web.xml. Write down the configuration used. Spring 3 uses Dispatcher Servlet to send requests, while the Security framework concatenates the filter mechanism for security processing. Configuration is simple, as follows, web requests in the form of. htm:
- <?xml version="1.0" encoding="UTF-8"?>
- <web-app version="2.5" xmlns="http://java.sun.com/xml/ns/javaee"
- xmlns:xsi="http://www.w3.org/2001/XMLSchema-instance"
- xsi:schemaLocation="http://java.sun.com/xml/ns/javaee
- http://java.sun.com/xml/ns/javaee/web-app_2_5.xsd">
- <context-param>
- <param-value>
- /WEB-INF/board-service.xml
- /WEB-INF/board-security.xml
- </param-value>
- </context-param>
- <listener>
- <listener-class>org.springframework.web.context.ContextLoaderListener</listener-class>
- </listener>
- <filter>
- <filter-name>springSecurityFilterChain</filter-name>
- <filter-class>org.springframework.web.filter.DelegatingFilterProxy</filter-class>
- </filter>
- <filter-mapping>
- <filter-name>springSecurityFilterChain</filter-name>
- <url-pattern>/*</url-pattern>
- </filter-mapping>
- <servlet>
- <servlet-name>board</servlet-name>
- <servlet-class>org.springframework.web.servlet.DispatcherServlet</servlet-class>
- </servlet>
- <servlet-mapping>
- <servlet-name>board</servlet-name>
- <url-pattern>*.htm</url-pattern>
- </servlet-mapping>
- </web-app>
The following is the configuration file of the Servlet, because we use annotations. Here, we only need to explain the view file, but also cooperate with the Security Framework. Here, we also declare the method interception annotations of the Security Framework. Here, we show that to intercept the Controller's method, we must use the Securit to intercept the Controller's method. The declaration of Y and Servlet are placed in a file, otherwise interception will not work:
- <?xml version="1.0" encoding="UTF-8"?>
- <beans xmlns="http://www.springframework.org/schema/beans"
- xmlns:xsi="http://www.w3.org/2001/XMLSchema-instance"
- xmlns:security="http://www.springframework.org/schema/security"
- xmlns:context="http://www.springframework.org/schema/context"
- xsi:schemaLocation="http://www.springframework.org/schema/beans
- http://www.springframework.org/schema/beans/spring-beans-3.0.xsd
- http://www.springframework.org/schema/context
- http://www.springframework.org/schema/context/spring-context-3.0.xsd
- http://www.springframework.org/schema/security
- http://www.springframework.org/schema/security/spring-security-3.0.xsd">
- <context:component-scan base-package="org.ourpioneer.board.web" />
- <bean
- class="org.springframework.web.servlet.view.InternalResourceViewResolver">
- <property name="prefix" value="/WEB-INF/jsp/" />
- <property name="suffix" value=".jsp" />
- </bean>
- <security:global-method-security
- jsr250-annotations="enabled" secured-annotations="enabled" />
- </beans>
The component scan of the org.ourpioneer.board.web package will reveal the controller of our annotation declaration. The following is the explanation of view parsing. We write the view file under / WEB-INF/jsp / and the file with the suffix of. jsp is the view file. Why declare the prefix and suffix well? Because we can write the file name directly in the program, it is very flexible, it does not care whether it is the same as the request path. The following is the configuration of the Security framework intercepted by the Controller method.
Configuration of Servlet related content, the rest is Service content, this is very simple, declare a bean is, in order to cooperate with the Security framework to connect to the database to verify user identity, here also configure a data source, using Spring's own data source implementation:
- <bean id="dataSource" class="org.springframework.jdbc.datasource.DriverManagerDataSource">
- <property name="driverClassName" value="com.mysql.jdbc.Driver" />
- <property name="url"
- value="jdbc:mysql://localhost:3306/board" />
- <property name="username" value="root" />
- <property name="password" value="123" />
- </bean>
- <bean id="messageBoardService" class="org.ourpioneer.board.service.MessageBoardServiceImpl" />
After configuring, let's take a look at the program code. First, let's look at the domain object Message defined, a very simple bean:
- package org.ourpioneer.board.domain;
- public class Message {
- private Long id;
- private String author;
- private String title;
- private String body;
- //The getter and setter methods are omitted
- }
The following is Service. We use the principle of separation of implementation and interface, and we may not use it in Web Service, but it is a good design principle. Four method declarations are defined in the interface:
- package org.ourpioneer.board.service;
- import java.util.List;
- import org.ourpioneer.board.domain.Message;
- public interface MessageBoardService {
- public List<Message> listMessages();
- public void postMessage(Message message);
- public void deleteMeesage(Message message);
- public Message findMessageById(Long messageId);
- }
The following is the implementation class of Service, just use List to place Message. Here we also intercept the method of Service safely. This is a more fine-grained interception. It will be described in detail later. Now we can ignore:
- package org.ourpioneer.board.service;
- import java.util.ArrayList;
- import java.util.LinkedHashMap;
- import java.util.List;
- import java.util.Map;
- import org.ourpioneer.board.domain.Message;
- import org.springframework.security.access.annotation.Secured;
- public class MessageBoardServiceImpl implements MessageBoardService {
- private Map<Long, Message> messages = new LinkedHashMap<Long, Message>();
- //@Secured( { "ROLE_ADMIN", "IP_LOCAL_HOST" })
- public synchronized void deleteMeesage(Message message) {
- messages.remove(message.getId());
- }
- //@Secured( { "ROLE_USER", "ROLE_GUEST" })
- public Message findMessageById(Long messageId) {
- return messages.get(messageId);
- }
- //@Secured( { "ROLE_USER", "ROLE_GUEST" })
- public List<Message> listMessages() {
- return new ArrayList<Message>(messages.values());
- }
- //@Secured( { "ROLE_USER" })
- public synchronized void postMessage(Message message) {
- message.setId(System.currentTimeMillis());
- messages.put(message.getId(), message);
- }
- }
Next it's time to get into the controller section. Let's look at it one by one.
- package org.ourpioneer.board.web;
- import java.util.List;
- import org.ourpioneer.board.domain.Message;
- import org.ourpioneer.board.service.MessageBoardService;
- import org.springframework.beans.factory.annotation.Autowired;
- import org.springframework.security.access.annotation.Secured;
- import org.springframework.stereotype.Controller;
- import org.springframework.ui.Model;
- import org.springframework.web.bind.annotation.RequestMapping;
- import org.springframework.web.bind.annotation.RequestMethod;
- @Controller
- @RequestMapping("/messageList.htm")
- public class MessageListController {
- @Autowired
- private MessageBoardService messageBoardService;
- @RequestMapping(method = RequestMethod.GET)
- //@Secured( { "ROLE_USER" })
- public String generateList(Model model) {
- List<Message> messages = java.util.Collections.emptyList();
- messages = messageBoardService.listMessages();
- model.addAttribute("messages", messages);
- return "messageList";
- }
- }
The annotated declaration of this kind of controller is the controller in Spring MVC. The following is the request mapping declaration, which handles the request of / messageList.htm. The injection of Service is automatically assembled, even the set method is not used. The following is the processing method. It can be seen that this is a simple POJO, even the method name is. We customize, just declare the HTTP request method, you can find the method, and Model is the object to pass data to the page, put the list of messages obtained into it, to see the return value, a string, what does it mean? JSP page name, is it simple, MVC performance incisive and vivid, this will find the page.
The following are the classes for publishing messages:
- package org.ourpioneer.board.web;
- import javax.servlet.http.HttpServletRequest;
- import org.ourpioneer.board.domain.Message;
- import org.ourpioneer.board.service.MessageBoardService;
- import org.springframework.beans.factory.annotation.Autowired;
- import org.springframework.security.access.annotation.Secured;
- import org.springframework.stereotype.Controller;
- import org.springframework.ui.Model;
- import org.springframework.validation.BindingResult;
- import org.springframework.web.bind.annotation.ModelAttribute;
- import org.springframework.web.bind.annotation.RequestMapping;
- import org.springframework.web.bind.annotation.RequestMethod;
- @Controller
- @RequestMapping("/messagePost.htm")
- public class MessagePostController {
- @Autowired
- private MessageBoardService messageBoardService;
- @RequestMapping(method = RequestMethod.GET)
- //@Secured( { "ROLE_USER" })
- public String setupForm(Model model) {
- Message message = new Message();
- model.addAttribute("message", message);
- return "messagePost";
- }
- @RequestMapping(method = RequestMethod.POST)
- //@Secured( { "ROLE_USER" })
- public String onSubmit(@ModelAttribute("message") Message message,
- BindingResult result, HttpServletRequest request) {
- message.setAuthor(request.getRemoteUser());
- if (result.hasErrors()) {
- return "messagePost";
- } else {
- messageBoardService.postMessage(message);
- return "redirect:messageList.htm";
- }
- }
- }
GET is to request to this page, POST is to publish a message, and finally redirect to messageList.htm, which is such a simple configuration. Note that the method implementation, first look at the page request method setupForm (model model model), the parameters have been explained above, is the data object passed to the page, which placed a Message object, what is the use? Sure page used, but this is an empty object, then naturally think of binding to form attributes, and then look at the page will be clear. The following is the onSubmit method, in which the parameters are defined by myself. Just remember that BindingResult should be written with the data object parameter Message, and the latter parameters can be written as you want. Then I want to use the HttpServletRequest object, and write it. It's really flexible. The implementation of the method is very simple, let alone talk about it.
Finally, the function is deleted, which is simpler:
- package org.ourpioneer.board.web;
- import org.ourpioneer.board.domain.Message;
- import org.ourpioneer.board.service.MessageBoardService;
- import org.springframework.beans.factory.annotation.Autowired;
- import org.springframework.security.access.annotation.Secured;
- import org.springframework.stereotype.Controller;
- import org.springframework.ui.Model;
- import org.springframework.web.bind.annotation.RequestMapping;
- import org.springframework.web.bind.annotation.RequestMethod;
- import org.springframework.web.bind.annotation.RequestParam;
- @Controller
- @RequestMapping("/messageDelete.htm")
- public class MessageDeleteController {
- @Autowired
- private MessageBoardService messageBoardService;
- @RequestMapping(method = RequestMethod.GET)
- //@Secured( { "ROLE_ADMIN" })
- public String messageDelete(
- @RequestParam(required = true, value = "messageId") Long messageId,
- Model model) {
- Message message = messageBoardService.findMessageById(messageId);
- messageBoardService.deleteMeesage(message);
- model.addAttribute("messages", messageBoardService.listMessages());
- return "redirect:messageList.htm";
- }
- }
Only if the permissions are set to administrator permissions can they be deleted, which is not necessary here. To look at the method parameters, we need a request parameter, messageId, to delete the identifier of the message. Here's the operation. It's very simple.
Finally, take a look at the page:
- <%@taglib prefix="c" uri="http://java.sun.com/jsp/jstl/core"%>
- <%@taglib prefix="security"
- uri="http://www.springframework.org/security/tags"%>
- <html>
- <head>
- <title>Message List</title>
- </head>
- <body>
- <h2>Welcome! <security:authentication property="name" /></h2>
- <security:authentication property="authorities" var="authorities" />
- <ul>
- <c:forEach items="${authorities}" var="authority">
- <li>${authority.authority}</li>
- </c:forEach>
- </ul>
- <hr />
- <c:forEach items="${messages}" var="message">
- <table>
- <security:authorize ifAllGranted="ROLE_ADMIN,ROLE_USER">
- <tr>
- <td>Author</td>
- <td>${message.author}</td>
- </tr>
- </security:authorize>
- <tr>
- <td>Title</td>
- <td>${message.title}</td>
- </tr>
- <tr>
- <td>Body</td>
- <td>${message.body}</td>
- </tr>
- <tr>
- <td colspan="2"><a
- href="messageDelete.htm?messageId=${message.id}">Delete</a></td>
- </tr>
- </table>
- <hr />
- </c:forEach>
- <a href="messagePost.htm">Post</a>
- <a href="<c:url value="/j_spring_security_logout" />">Logout</a>
- </body>
- </html>
List pages have the use of Security framework tags, which can be annotated first when doing MVC only. JSTL tags are used here to traverse the message list, which is very simple.
Following is the page for publishing messages:
- <%@taglib prefix="form" uri="http://www.springframework.org/tags/form"%>
- <html>
- <head>
- <title>Message Post</title>
- </head>
- <body>
- <form:form method="POST" modelAttribute="message">
- <table>
- <tr>
- <td>Title</td>
- <td><form:input path="title" /></td>
- </tr>
- <tr>
- <td>Body</td>
- <td><form:textarea path="body" /></td>
- </tr>
- <tr>
- <td colspan="2"><input type="submit" value="Post" /></td>
- </tr>
- </table>
- </form:form>
- </body>
- </html>
The data binding mentioned above is easy to see here. There is nothing more to explain.
When you're ready, you're ready to run. Let's start Jetty and see how it works. For Jetty's configuration, please refer to the author's previous comments on Integration of Maven and Jetty The description is very detailed.
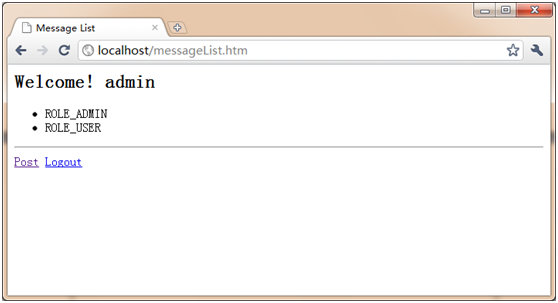
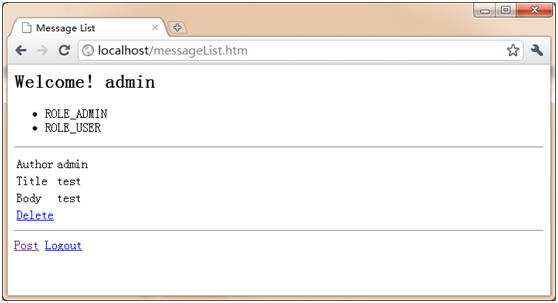
Because I combined the Security framework, I saw the list of identities I logged in. Here's the message, which is very simple: