brief introduction
TestNG is the abbreviation of Test Next Generation. It is inspired by JUnit and NUnit and adds many great functions on their basis, such as:
- Notes.
- Multithreading, such as all methods are in their own threads, one test class, one thread, etc.
- Verify that the code is multithreaded safe.
- Flexible test configuration.
- Data driven (@ DataProvider) is supported.
- Support parameterization.
- Powerful execution mechanism (TestSuite is not required).
- Can be combined with various tools (such as IDEA, Maven, etc.).
- Embedded BeanShell.
- Provide JDK functions for runtime and log (no dependencies need to be added).
- Provides methods for application server testing dependencies.
In a word, TestNG is powerful enough to cover all test types: unit test, functional test, end-to-end test, integration test, etc.
A simple example is as follows:
package example1;

import org.testng.annotations.*;

public class SimpleTest {

 @BeforeClass
 public void setUp() {
   // code that will be invoked when this test is instantiated
 }

 @Test(groups = { "fast" })
 public void aFastTest() {
   System.out.println("Fast test");
 }

 @Test(groups = { "slow" })
 public void aSlowTest() {
    System.out.println("Slow test");
 }

}
- setUp() will run after the test class is created and before the test method is executed.
- The Test method name can be arbitrary, and TestNG is identified by @ Test annotation.
- You can group test methods by group.
Then use xml to configure the running policy:
<project default="test">

 <path id="cp">
   <pathelement location="lib/testng-testng-5.13.1.jar"/>
   <pathelement location="build"/>
 </path>

 <taskdef name="testng" classpathref="cp"
          classname="org.testng.TestNGAntTask" />

 <target name="test">
   <testng classpathref="cp" groups="fast">
     <classfileset dir="build" includes="example1/*.class"/>
   </testng>
 </target>

</project>
Use ant call (the latest operation mode is given in Section 2 below):
c:> ant
Buildfile: build.xml

test:
[testng] Fast test
[testng] ===============================================
[testng] Suite for Command line test
[testng] Total tests run: 1, Failures: 0, Skips: 0
[testng] ===============================================


BUILD SUCCESSFUL
Total time: 4 seconds
Finally, you can read the report:
start test-output\index.html (on Windows)
How to run TestNG
In addition to the ant call mentioned earlier, the more common ways to run TestNG are the following two:
- IDEA
- Maven
IDEA
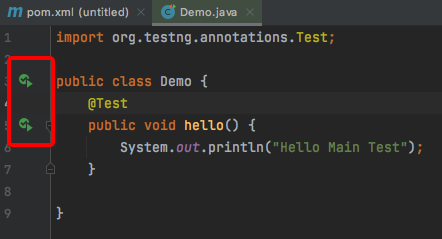
The first way to run TestNG in IDEA is to click the small arrow in front of the method or class:
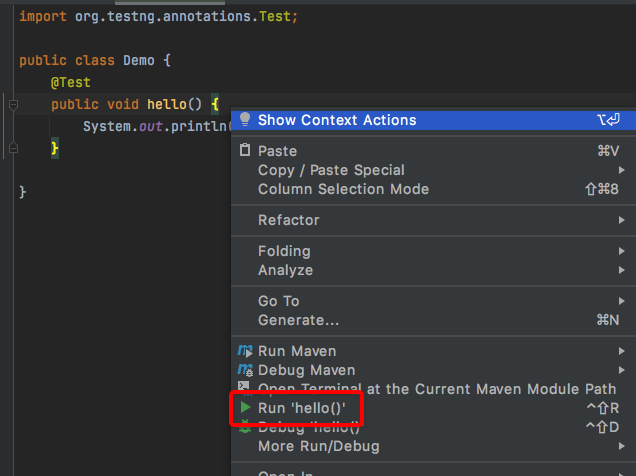
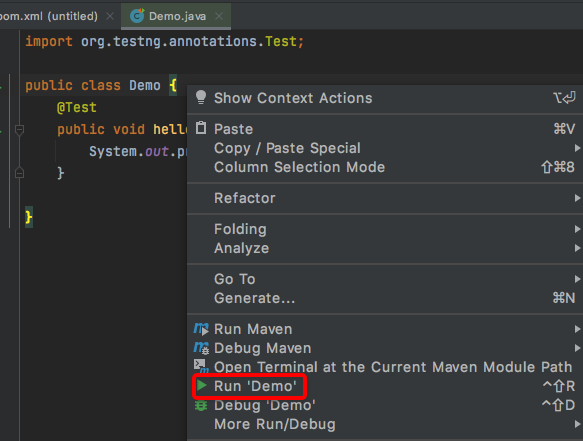
The second method is to right-click inside a method or class:
The third way is to use TestNG XML, IDEA can right-click TestNG XML. You can click on the file name and inside the file:
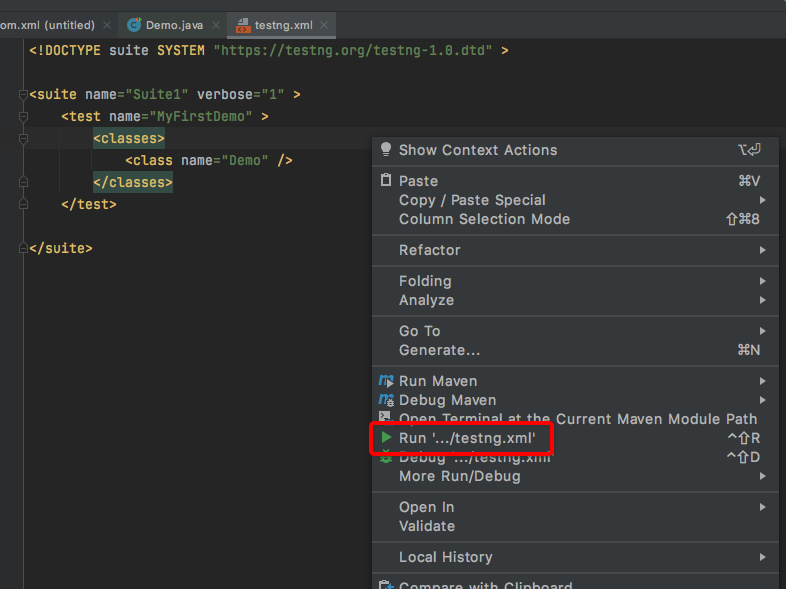
testng.xml supports many configurations, such as configuring test classes:
<!DOCTYPE suite SYSTEM "https://testng.org/testng-1.0.dtd" >

<suite name="Suite1" verbose="1" >
  <test name="Nopackage" >
    <classes>
       <class name="NoPackageTest" />
    </classes>
  </test>

  <test name="Regression1">
    <classes>
      <class name="test.sample.ParameterSample"/>
      <class name="test.sample.ParameterTest"/>
    </classes>
  </test>
</suite>
Configure test package:
<!DOCTYPE suite SYSTEM "https://testng.org/testng-1.0.dtd" >

<suite name="Suite1" verbose="1" >
  <test name="Regression1"   >
    <packages>
      <package name="test.sample" />
   </packages>
 </test>
</suite>
Configure groups and methods:
<!DOCTYPE suite SYSTEM "https://testng.org/testng-1.0.dtd" >

<suite name="Suite1" verbose="1" >
  <test name="Regression1">
    <groups>
      <run>
        <exclude name="brokenTests"  />
        <include name="checkinTests"  />
      </run>
    </groups>

    <classes>
      <class name="test.IndividualMethodsTest">
        <methods>
          <include name="testMethod" />
        </methods>
      </class>
    </classes>
  </test>
</suite>
By default, TestNG will be executed in xml order. You can set preserve order to false to random order:
<!DOCTYPE suite SYSTEM "https://testng.org/testng-1.0.dtd" >

<suite name="Suite1" verbose="1" >
  <test name="Regression1" preserve-order="false">
    <classes>

      <class name="test.Test1">
        <methods>
          <include name="m1" />
          <include name="m2" />
        </methods>
      </class>

      <class name="test.Test2" />

    </classes>
  </test>
</suite>
Maven
The official tutorial gives the command line to execute TestNG:
java org.testng.TestNG testng1.xml [testng2.xml testng3.xml ...]
The actual call cannot be adjusted, which can be realized with the help of Maven.
First in POM XML add:
<build>
    <plugins>
        <plugin>
            <groupId>org.apache.maven.plugins</groupId>
            <artifactId>maven-surefire-plugin</artifactId>
            <version>2.19.1</version>
            <configuration>
                <suiteXmlFiles>
                    <suiteXmlFile>testng.xml</suiteXmlFile>
                </suiteXmlFiles>
            </configuration>
        </plugin>
    </plugins>
</build>
Then execute the mvn clean test command.
Test methods and test classes
The method with @ Test annotation is the Test method, and the class containing the Test method is the Test class. For example:
package example1;

import org.testng.annotations.*;

public class SimpleTest {

 @BeforeClass
 public void setUp() {
   // code that will be invoked when this test is instantiated
 }

 @Test(groups = { "fast" })
 public void aFastTest() {
   System.out.println("Fast test");
 }

 @Test(groups = { "slow" })
 public void aSlowTest() {
    System.out.println("Slow test");
 }

}
@Test can also be placed on the test class, so that all methods under the test class are test methods, such as:
@Test
public class Test1 {
  public void test1() {
  }

  public void test2() {
  }
}
You can also use @ Test on Test classes and Test methods at the same time, such as grouping a Test:
@Test
public class Test1 {
  public void test1() {
  }

  @Test(groups = "g1")
  public void test2() {
  }
}
One thing to note is that the Test method annotated with @ Test will ignore the return value by default, unless in TestNG XML configuration:
<suite allow-return-values="true">

or

<test allow-return-values="true">
Test group
The test team is actually marking the test methods, such as smoke test cases and function test cases:
public class Test1 {
  @Test(groups = { "functest", "checkintest" })
  public void testMethod1() {
  }

  @Test(groups = {"functest", "checkintest"} )
  public void testMethod2() {
  }

  @Test(groups = { "functest" })
  public void testMethod3() {
  }
}
If only functest is configured, all test methods will be executed:
<test name="Test1">
  <groups>
    <run>
      <include name="functest"/>
    </run>
  </groups>
  <classes>
    <class name="example1.Test1"/>
  </classes>
</test>
If only checkint is configured, only the first two methods will be executed:
<test name="Test1">
  <groups>
    <run>
      <include name="checkintest"/>
    </run>
  </groups>
  <classes>
    <class name="example1.Test1"/>
  </classes>
</test>
In addition to specifying the full name, you can also use regular expressions:
@Test
public class Test1 {
  @Test(groups = { "windows.checkintest" })
  public void testWindowsOnly() {
  }

  @Test(groups = {"linux.checkintest"} )
  public void testLinuxOnly() {
  }

  @Test(groups = { "windows.functest" )
  public void testWindowsToo() {
  }
}
<test name="Test1">
  <groups>
    <run>
      <include name="windows.*"/>
    </run>
  </groups>

  <classes>
    <class name="example1.Test1"/>
  </classes>
</test>
Further, in addition to including test methods, the test group can also exclude:
<test name="Test1">
  <classes>
    <class name="example1.Test1">
      <methods>
        <include name=".*enabledTestMethod.*"/>
        <exclude name=".*brokenTestMethod.*"/>
      </methods>
     </class>
  </classes>
</test>
Another way is to use the enabled attribute of @ Test and @ Before/After.
Test groups can also be nested:
<test name="Regression1">
  <groups>
    <define name="functest">
      <include name="windows"/>
      <include name="linux"/>
    </define>

    <define name="all">
      <include name="functest"/>
      <include name="checkintest"/>
    </define>

    <run>
      <include name="all"/>
    </run>
  </groups>

  <classes>
    <class name="test.sample.Test1"/>
  </classes>
</test>
< define > < / define > defines the parent group, in which < include > is the child group.
Similarly, nested groups can also exclude sub groups:
@Test(groups = {"checkintest", "broken"} )
public void testMethod2() {
}
<test name="Simple example">
  <groups>
    <run>
      <include name="checkintest"/>
      <exclude name="broken"/>
    </run>
  </groups>

  <classes>
    <class name="example1.Test1"/>
  </classes>
</test>
Finally, for the location of grouping, if both test classes and test methods are marked with grouping, the grouping of test classes will affect all methods, such as:
@Test(groups = {"checkin-test"})
public class All {
    @Test(groups = {"func-test")
    public void method1() { ...}

    public void method2() { ...}
}
method2() belongs to the checkin test group, and method1 belongs to the func test and checkin test groups.
TestNG parameterization
There are two ways to parameterize TestNG. The first is from TestNG XML reads data, and the second is to read data through code.
From TestNG XML reading data
Look directly at the example:
@Parameters({ "first-name" })
@Test
public void testSingleString(String firstName) {
  System.out.println("Invoked testString " + firstName);
  assert "Cedric".equals(firstName);
}
<suite name="My suite">
  <parameter name="first-name"  value="Cedric"/>
  <test name="Simple example">
  <-- ... -->
-
@Parameters specifies the name of the parameterization.
-
The test method input parameter names correspond one by one.
-
testng. < parameter > defines parameterized values in XML.
In TestNG In XML, < parameter > can be defined either in < suite > or < test >. If there is a parameter with the same name, it will overwrite < suite > with < test >.
@Parameters can act on @ Test, @ Before/After and @ Factory, for example:
@Parameters({ "datasource", "jdbcDriver" })
@BeforeMethod
public void beforeTest(String ds, String driver) {
  m_dataSource = ...;                              // look up the value of datasource
  m_jdbcDriver = driver;
}
It can also be used in the construction method of the test class, but there can only be one construction method at most, so that the parameterized assignment can be carried out when initializing the class, which is convenient for the use of the test method
@The Optional parameter is used to identify, for example:
@Parameters("db")
@Test
public void testNonExistentParameter(@Optional("mysql") String db) { ... }
- If the db parameter cannot get a name, the mysql value will be taken.
Read data through code
The first parameterization method is actually a chicken's rib. The second method is the soul of TestNG parameterization. When @ DataProvider is used, it will return a two-dimensional array:
import org.testng.annotations.DataProvider;
import org.testng.annotations.Test;

public class DPTest {
    @DataProvider(name = "test1")
    public Object[][] createData1() {
        return new Object[][] {
                { "Cedric", 36},
                { "Anne", 37},
        };
    }

    @Test(dataProvider = "test1")
    public void verifyData1(String n1, Integer n2) {
        System.out.println(n1 + " " + n2);
    }
}
- @DataProvider is used for production data. name is the unique identifier.
- Specify the name in @ Test through the dataProvider property.
- The input parameters of the test method correspond to the elements in the array one by one.
The default @ DataProvider and @ Test are in the same class. If you want to put them in different classes, you need to define them as static methods (or classes without parameter construction methods), such as:
import org.testng.annotations.DataProvider;

public class StaticProvider {
    @DataProvider(name = "create")
    public static Object[][] createData() {
        return new Object[][] {
                new Object[] {42}
        };
    }
}
import org.testng.annotations.Test;

public class DiffClazzTest {
    @Test(dataProvider = "create", dataProviderClass = StaticProvider.class)
    public void test(Integer n) {
        System.out.println(n);
    }
}
- createData() is static.
- You need to specify the class of @ DataProvider through the dataProviderClass attribute of @ Test.
@The return value (parameter type) of DataProvider can be iterator < Object [] > in addition to the already mentioned Object [] []. It will not generate all data at once, but once every call to save memory, such as:
import org.testng.annotations.DataProvider;
import org.testng.annotations.Test;

import java.util.Arrays;
import java.util.Iterator;

public class IterTest {
    @DataProvider(name = "test1")
    public Iterator<Object[]> createData1() {
        Object[][] myObjects = new Object[][]{
                {"Cedric", 36},
                {"Anne", 37},
        };
        return Arrays.asList(myObjects).iterator();
    }

    @Test(dataProvider = "test1")
    public void verifyData1(String n1, Integer n2) {
        System.out.println(n1 + " " + n2);
    }
}
Seeing this, I have a good understanding of @ DataProvider, which supports two parameter types:
- Object[][]
- Iterator<Object[]>
If the test method has only one input parameter, can it only be realized in two dimensions:
import org.testng.annotations.DataProvider;
import org.testng.annotations.Test;

import java.util.Arrays;
import java.util.Iterator;

public class IterTest {
    @DataProvider(name = "test1")
    public Iterator<Object[]> createData1() {
        Object[][] myObjects = new Object[][]{{"x"}, {"y"}};
        return Arrays.asList(myObjects).iterator();
    }

    @Test(dataProvider = "test1")
    public void verifyData1(String n) {
        System.out.println(n);
    }
}
In fact, @ DataProvider supports one-dimensional arrays:
import org.testng.annotations.DataProvider;
import org.testng.annotations.Test;

public class IterTest {
    @DataProvider(name = "test1")
    public Object[] createData1() {
        Object[] myObjects = new Object[]{"x", "y"};
        return myObjects;
    }

    @Test(dataProvider = "test1")
    public void verifyData1(String n) {
        System.out.println(n);
    }
}
And iterators for one-dimensional arrays:
import org.testng.annotations.DataProvider;
import org.testng.annotations.Test;

import java.util.Arrays;
import java.util.Iterator;

public class IterTest {
    @DataProvider(name = "test1")
    public Iterator<Object> createData1() {
        Object[] myObjects = new Object[]{"x", "y"};
        return Arrays.asList(myObjects).iterator();
    }

    @Test(dataProvider = "test1")
    public void verifyData1(String n) {
        System.out.println(n);
    }
}
The most wonderful thing is that @ DataProvider supports reflection, that is, reverse obtaining the information of the test method:
@DataProvider(name = "dp")
public Object[][] createData(Method m) {
  System.out.println(m.getName());  // print test method name
  return new Object[][] { new Object[] { "Cedric" }};
}

@Test(dataProvider = "dp")
public void test1(String s) {
}

@Test(dataProvider = "dp")
public void test2(String s) {
}
- The input parameter of createData is Java lang.reflect. Method, so that you can get the information of the test method. For example, getName() here will get test1 and test2 in turn.
@DataProvider also supports Concurrency:
@DataProvider(parallel = true)// ...
The default is 10 threads, which can be in TestNG Modify in XML:
<suite name="Suite1" data-provider-thread-count="20" >...
One XML shares one thread pool. If you want to use multiple thread pools, you need to create multiple TestNG xml.
The icing on the cake is that the parameterization of TestNG will be printed in the test report:

Specify the use case execution order
There are two ways to specify the execution order of TestNG use cases: annotation and XML.
annotation
Use the dependsOnMethods property of @ Test:
@Test
public void serverStartedOk() {}

@Test(dependsOnMethods = { "serverStartedOk" })
public void method1() {}
Or the dependsOnGroups property:
@Test(groups = { "init" })
public void serverStartedOk() {}

@Test(groups = { "init" })
public void initEnvironment() {}

@Test(dependsOnGroups = { "init.*" })
public void method1() {}
@Before/After can also implement initialization, but their results will not appear in the test report.
By default, TestNG will force verification. The dependent use case must be successful before the current use case can be executed. Otherwise, the current use case will be marked as SKIP, which is called strong dependency. By setting alwaysRun=true, it can become a weak dependency. The current use case will be executed whether the dependent use case is executed successfully or not.
It should be noted that dependent test methods are executed according to the test class (group by class). For example, if there are multiple instances of a() method dependent on b() method, they will be executed in the following order:
a(1)
a(2)
b(2)
b(2)
Take a practical example, login and logout, if you want to achieve the following effects:
signIn("us")
signOut("us")
signIn("uk")
signOut("uk")
Then it needs to be configured in XML:
  <suite name="Factory" group-by-instances="true">
or
  <test name="Factory" group-by-instances="true">
XML
In TestNG Use < dependencies > and dependencies on in XML to specify the use case order:
<test name="My suite">
  <groups>
    <dependencies>
      <group name="c" depends-on="a  b" />
      <group name="z" depends-on="c" />
    </dependencies>
  </groups>
</test>
Create test cases dynamically
Suppose there is such a test case that the web page needs to be accessed multiple times during the test, the code will be written in TestNG as follows:
public class TestWebServer {
  @Test(parameters = { "number-of-times" })
  public void accessPage(int numberOfTimes) {
    while (numberOfTimes-- > 0) {
     // access the web page
    }
  }
}
<test name="T1">
  <parameter name="number-of-times" value="10"/>
  <classes>
    <class name= "TestWebServer" />
  </classes>
</test>

<test name="T2">
  <parameter name="number-of-times" value="20"/>
  <classes>
    <class name= "TestWebServer"/>
  </classes>
</test>

<test name="T3">
  <parameter name="number-of-times" value="30"/>
  <classes>
    <class name= "TestWebServer"/>
  </classes>
</test>
- Due to different access times, in TestNG Three tests are defined in the XML, and then the access times are passed to the @ Test test method with the help of parameterization.
- Loop through numberOfTimes in the @ Test test Test method.
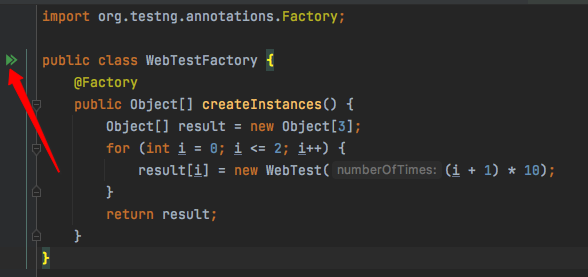
For this requirement, the Factory of TestNG can be used to simplify the code:
import org.testng.annotations.Factory;

public class WebTestFactory {
    @Factory
    public Object[] createInstances() {
        Object[] result = new Object[3];
        for (int i = 0; i <= 2; i++) {
            result[i] = new WebTest((i + 1) * 10);
        }
        return result;
    }
}
import org.testng.annotations.Test;

public class WebTest {
    private int m_numberOfTimes;

    public WebTest(int numberOfTimes) {
        m_numberOfTimes = numberOfTimes;
    }

    @Test
    public void testServer() {
        for (int i = 0; i < m_numberOfTimes; i++) {
            // access the web page
            System.out.println(i);
        }
    }
}
- WebTestFactory is a factory function that returns Object [].
- WebTestFactory dynamically creates multiple WebTest instances.
You can click the run button of WebTestFactory in the IDEA to execute the test:
Note that if you execute WebTest, you will be prompted No tests were found.
You can also use TestNG Driver in XML:
<class name="WebTestFactory" />
You can also drive directly in Code:
TestNG testNG = new TestNG();
testNG.setTestClasses(WebTestFactory.class);
testNG.run();
@Like @ Test, Factory can use dataProvider properties, such as:
@Factory(dataProvider = "dp")
public FactoryDataProviderSampleTest(int n) {
  super(n);
}

@DataProvider
static public Object[][] dp() {
  return new Object[][] {
    new Object[] { 41 },
    new Object[] { 42 },
  };
}
Ignore some test cases
TestNG can use the @ Ignore annotation to Ignore tests, such as:
import org.testng.annotations.Ignore;
import org.testng.annotations.Test;

@Ignore
public class TestcaseSample {

    @Test
    public void testMethod1() {
    }

    @Test
    public void testMethod2() {
    }
}
If it acts on a test class, it ignores all test methods under the class. If it only works on the test method, it is equivalent to @ Test(enabled=false). It can also be placed on the bag:
@Ignore
package com.testng.master;

import org.testng.annotations.Ignore;
Multithreaded parallel test case
You can add attributes to @ Test to make the use case execute in parallel with multiple threads:
@Test(threadPoolSize = 3, invocationCount = 10,  timeOut = 10000)
public void testServer() {
- threadPoolSize refers to 3 threads.
- invocationCount refers to 10 runs.
- timeOut refers to the blocking wait timeOut.
You can also use TestNG Set in XML, thread count specifies the number of threads, and parallel setting. Different values have different meanings:
methods:
<suite name="My suite" parallel="methods" thread-count="5">
All test methods are executed in different independent threads.
tests:
<suite name="My suite" parallel="tests" thread-count="5">
The test methods in the < test > tag will be executed in the same thread, and different < test > tags will be executed in different independent threads.
classes:
<suite name="My suite" parallel="classes" thread-count="5">
The test methods in the same class will be executed in the same thread, and different classes will be executed in different independent threads.
instances:
<suite name="My suite" parallel="instances" thread-count="5">
The test methods in the same instance will be executed in the same thread, and different instances will be executed in different independent threads. (Factory can create multiple instances)
Rerun failure case
TestNG will output the failed case to TestNG - failed after running XML file, you can run this file directly to rerun the failed case.
To boast, this design is great.
Sometimes, it is necessary to automatically retry when the use case fails, which can be implemented in the code as follows:
import org.testng.IRetryAnalyzer;
import org.testng.ITestResult;

public class MyRetry implements IRetryAnalyzer {

  private int retryCount = 0;
  private static final int maxRetryCount = 3;

  @Override
  public boolean retry(ITestResult result) {
    if (retryCount < maxRetryCount) {
      retryCount++;
      return true;
    }
    return false;
  }
}
import org.testng.Assert;
import org.testng.annotations.Test;

public class TestclassSample {

  @Test(retryAnalyzer = MyRetry.class)
  public void test2() {
    Assert.fail();
  }
}
- Implement the retry method of the IRetryAnalyzer interface.
- Specify the retry class in the retryAnalyzer of @ Test.
TestNG programming
In addition to the two operation modes of IDEA and Maven, TestNG can also be invoked directly in the program:
TestListenerAdapter tla = new TestListenerAdapter();
TestNG testng = new TestNG();
testng.setTestClasses(new Class[] { Run2.class });
testng.addListener(tla);
testng.run();
- TestListenerAdapter is the default and can implement org testng. The itestlistener interface customizes TestListener.
- setTestClasses adds a test class.
- run() runs.
You can also programmatically create a virtual TestNG xml,org. testng. Xmlclass and xmltest of XML package provide this capability:
XmlSuite suite = new XmlSuite();
suite.setName("TmpSuite");

XmlTest test = new XmlTest(suite);
test.setName("TmpTest");
List<XmlClass> classes = new ArrayList<XmlClass>();
classes.add(new XmlClass("test.failures.Child"));
test.setXmlClasses(classes) ;
This code will create such a TestNG xml:
<suite name="TmpSuite" >
  <test name="TmpTest" >
    <classes>
      <class name="test.failures.Child"  />
    <classes>
    </test>
</suite>
XmlSuite can be called through the TestNG program:
List<XmlSuite> suites = new ArrayList<XmlSuite>();
suites.add(suite);
TestNG tng = new TestNG();
tng.setXmlSuites(suites);
tng.run();
Write BeanShell in XML
Yes, BeanShell can be written in the XML of TestNG to replace < include > and < exclude >:
<test name="BeanShell test">
   <method-selectors>
     <method-selector>
       <script language="beanshell"><![CDATA[
         groups.containsKey("test1")
       ]]></script>
     </method-selector>
   </method-selectors>
  <!-- ... -->
- CDATA is used to prevent syntax conflicts with XML tags.
- There are three preset objects: method (current test method), testngMethod (description of current test method) and groups (group to which the current test method belongs), which can be used for matching.
- After using < script >, < include > and < exclude > will fail.
Listener
TestNG provides many listeners to customize TestNG behavior, which is similar to the meaning of Hook:
- IAnnotationTransformer
- IAnnotationTransformer2
- IHookable
- IInvokedMethodListener
- IMethodInterceptor
- IReporter
- ISuiteListener
- ITestListener
- ITestNGListener
- IAlterSuiteListener
For example, use IAnnotationTransformer to dynamically set the @ Test attribute:
public class MyTransformer implements IAnnotationTransformer {
  public void transform(ITest annotation, Class testClass,
      Constructor testConstructor, Method testMethod)
  {
    if ("invoke".equals(testMethod.getName())) {
      annotation.setInvocationCount(5);
    }
  }
}
If you want to modify @ Factory or @ DataProvider, you have to use iannotationtransformer 2.
For example, use IMethodInterceptor to set the execution order of the use case group:
public List<IMethodInstance> intercept(List<IMethodInstance> methods, ITestContext context) {
  List<IMethodInstance> result = new ArrayList<IMethodInstance>();
  for (IMethodInstance m : methods) {
    Test test = m.getMethod().getConstructorOrMethod().getAnnotation(Test.class);
    Set<String> groups = new HashSet<String>();
    for (String group : test.groups()) {
      groups.add(group);
    }
    //Let fast group execute first
    if (groups.contains("fast")) {
      result.add(0, m);
    }
    else {
      result.add(m);
    }
  }
  return result;
}
For example, if you want to customize the behavior before and after the test, you can write a Listener first:
public class BeforeAfterLog extends TestListenerAdapter {
 		public void onTestSuccess(ITestResult result) {
        System.out.println("onTestSuccess");
    }

    public void onTestFailure(ITestResult result) {
        System.out.println("onTestFailure");
    }
}
Then add the following on the test class:
@Listeners(BeforeAfterLog.class)
public class MyTest {
}
In this way, you don't have to write @ BeforeClass and @ AfterClass for each test class.
Dependency injection
TestNG supports adding specific classes to test methods for dependency injection (that is, obtaining TestNG related information):
- ITestContext
- XmlTest current < test > tag
- The testing method of Method at present
- Object [] input parameter of current test method
- ITestResult current test result
Different annotation support methods are shown in the following table:
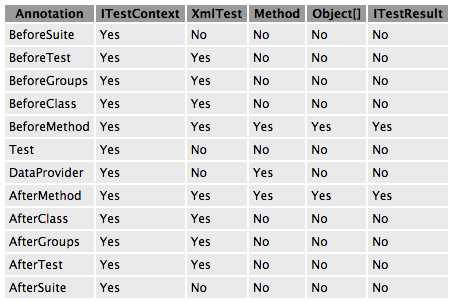
Example:
public class NoInjectionTest {

  @DataProvider(name = "provider")
  public Object[][] provide() throws Exception {
      return new Object[][] { { CC.class.getMethod("f") } };
  }

  @Test(dataProvider = "provider")
  public void withoutInjection(@NoInjection Method m) {
      Assert.assertEquals(m.getName(), "f");
  }

  @Test(dataProvider = "provider")
  public void withInjection(Method m) {
      Assert.assertEquals(m.getName(), "withInjection");
  }
}
@NoInjection is used to prohibit dependency injection.
Assert
TestNG supports the assert keyword assertion of Java, for example:
@Test
public void verifyLastName() {
  assert "Beust".equals(m_lastName) : "Expected name Beust, for" + m_lastName;
}
You can also use JUnit assertion methods:
import static org.testng.AssertJUnit.*;
//...
@Test
public void verify() {
  assertEquals("Beust", m_lastName);
}
journal
It is implemented by Listener. Look at the code directly:
public class DotTestListener extends TestListenerAdapter {
  private int m_count = 0;

  @Override
  public void onTestFailure(ITestResult tr) {
    log("F");
  }

  @Override
  public void onTestSkipped(ITestResult tr) {
    log("S");
  }

  @Override
  public void onTestSuccess(ITestResult tr) {
    log(".");
  }

  private void log(String string) {
    System.out.print(string);
    if (++m_count % 40 == 0) {
      System.out.println("");
    }
  }
}
Test report
TestNG comes with a test report, which will generate index HTML, which is ugly when opened. Allure is recommended.
If you want to get the data of the test report, you can get it from org testng. Methods of iReporter interface:
public void generateReport(List<ISuite> suites, String outputDirectory)
Get it according to its input.
If you want to add data to the test report, you can use org testng. Reporter class:
Reporter.log("M3 WAS CALLED");
YAML replaces XML
If you're tired of XML, try YAML.
For example, XML:
<suite name="SingleSuite" verbose="2" thread-count="4">

  <parameter name="n" value="42" />

  <test name="Regression2">
    <groups>
      <run>
        <exclude name="broken" />
      </run>
    </groups>

    <classes>
      <class name="test.listeners.ResultEndMillisTest" />
    </classes>
  </test>
</suite>
Change to YAML:
name: SingleSuite
threadCount: 4
parameters: { n: 42 }

tests:
  - name: Regression2
    parameters: { count: 10 }
    excludedGroups: [ broken ]
    classes:
      - test.listeners.ResultEndMillisTest
Much more comfortable. However, TestNG does not introduce YAML dependency packages, so you need to add them yourself:
<dependency>
  <groupid>org.yaml</groupid>
  <artifactid>snakeyaml</artifactid>
  <version>1.23</version>
</dependency>
Easter egg
After reading the official tutorial, I feel that the functions of the test framework are basically the same, but there are differences in technical implementation. To my surprise, TestNG failed cases can automatically generate an XML file of failed cases, which can be directly used to rerun. Also, I always thought TestNG could only use XML, but I didn't expect to use YAML. Finally, it gives - dtestng mode. Dryrun = true. Guess what it is. Sometimes you just want to see what tests will be executed when running, but you don't want to actually execute them, so you can use this parameter.
reference material: