1. Haoop Single Computer Distribution
1. Establish hadoop user and set hadoop user password
[root@server1 ~]# ls
hadoop-3.0.3.tar.gz  jdk-8u181-linux-x64.tar.gz
[root@server1 ~]# useradd hadoop
[root@server1 ~]# id hadoop
uid=1000(hadoop) gid=1000(hadoop) groups=1000(hadoop)
[root@server1 ~]# passwd hadoop


2. The installation and configuration of hadoop is not recommended under the user, so switch to the hadoop user and configure again.
[root@server1 ~]# mv * /home/hadoop/
[root@server1 ~]# su - hadoop
[hadoop@server1 ~]$ ls
hadoop-3.0.3.tar.gz  jdk-8u181-linux-x64.tar.gz


3. Unzip the jdk installation package and make soft links under hadoop users
[hadoop@server1 ~]$ tar zxf jdk-8u181-linux-x64.tar.gz
[hadoop@server1 ~]$ ls
hadoop-3.0.3.tar.gz  jdk1.8.0_181  jdk-8u181-linux-x64.tar.gz
[hadoop@server1 ~]$ ln -s jdk1.8.0_181/ java
[hadoop@server1 ~]$ ls
hadoop-3.0.3.tar.gz  java  jdk1.8.0_181  jdk-8u181-linux-x64.tar.gz

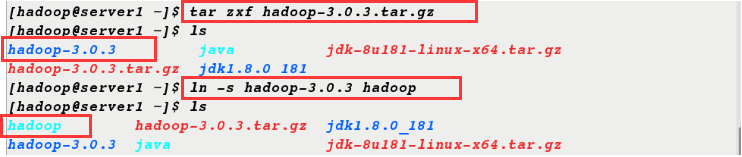
4. Unzip the hadoop installation package and make soft links under the hadoop user
[hadoop@server1 ~]$ tar zxf hadoop-3.0.3.tar.gz
[hadoop@server1 ~]$ ls
hadoop-3.0.3         java          jdk-8u181-linux-x64.tar.gz
hadoop-3.0.3.tar.gz  jdk1.8.0_181
[hadoop@server1 ~]$ ln -s hadoop-3.0.3 hadoop
[hadoop@server1 ~]$ ls
hadoop        hadoop-3.0.3.tar.gz  jdk1.8.0_181
hadoop-3.0.3  java                 jdk-8u181-linux-x64.tar.gz
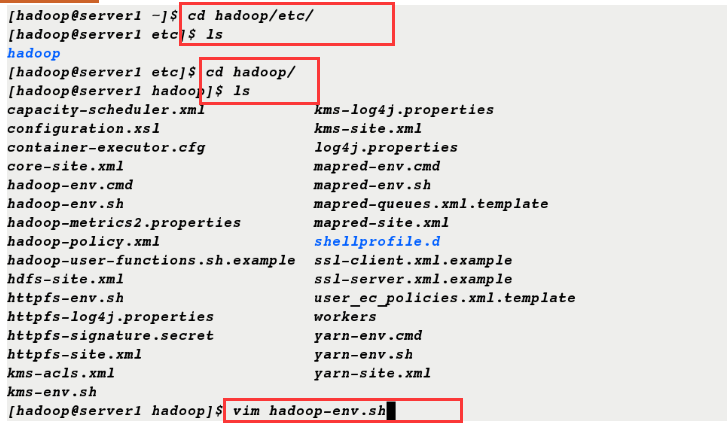
5. Configuring environment variables
[hadoop@server1 ~]$ cd hadoop/etc/
[hadoop@server1 etc]$ ls
hadoop
[hadoop@server1 etc]$ cd hadoop/
[hadoop@server1 hadoop]$ ls
capacity-scheduler.xml            kms-log4j.properties
configuration.xsl                 kms-site.xml
container-executor.cfg            log4j.properties
core-site.xml                     mapred-env.cmd
hadoop-env.cmd                    mapred-env.sh
hadoop-env.sh                     mapred-queues.xml.template
hadoop-metrics2.properties        mapred-site.xml
hadoop-policy.xml                 shellprofile.d
hadoop-user-functions.sh.example  ssl-client.xml.example
hdfs-site.xml                     ssl-server.xml.example
httpfs-env.sh                     user_ec_policies.xml.template
httpfs-log4j.properties           workers
httpfs-signature.secret           yarn-env.cmd
httpfs-site.xml                   yarn-env.sh
kms-acls.xml                      yarn-site.xml
kms-env.sh
[hadoop@server1 hadoop]$ vim hadoop-env.sh
export JAVA_HOME=/home/hadoop/java
[hadoop@server1 ~]$ vim .bash_profile
PATH=$PATH:$HOME/.local/bin:$HOME/bin:$HOME/java/bin
[hadoop@server1 ~]$ source .bash_profile
[hadoop@server1 ~]$ jps        ##Successful configuration can be invoked
1125 Jps
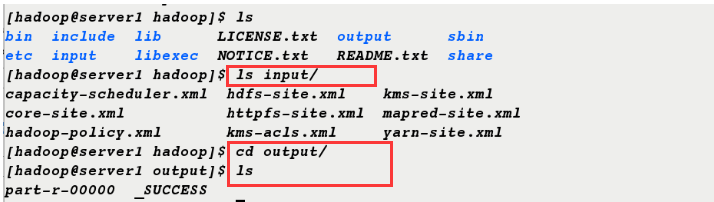
6. Under the Hadoop directory, create a new directory input and copy all files under etc/hadoop/directory ending in. xml to input
[hadoop@server1 ~]$ cd hadoop
[hadoop@server1 hadoop]$ ls
bin  include  libexec      NOTICE.txt  sbin
etc  lib      LICENSE.txt  README.txt  share
[hadoop@server1 hadoop]$ mkdir input
[hadoop@server1 hadoop]$ cp etc/hadoop/*.xml input
[hadoop@server1 hadoop]$ ls input/
capacity-scheduler.xml  hdfs-site.xml    kms-site.xml
core-site.xml           httpfs-site.xml  mapred-site.xml
hadoop-policy.xml       kms-acls.xml     yarn-site.xml


7. Execute this command
[hadoop@server1 hadoop]$ bin/hadoop jar share/hadoop/mapreduce/hadoop-mapreduce-examples-3.0.3.jar grep input output 'dfs[a-z.]+'
8. View the output directory
[hadoop@server1 hadoop]$ ls
bin  include  lib      LICENSE.txt  output      sbin
etc  input    libexec  NOTICE.txt   README.txt  share
[hadoop@server1 hadoop]$ ls input/
capacity-scheduler.xml  hdfs-site.xml    kms-site.xml
core-site.xml           httpfs-site.xml  mapred-site.xml
hadoop-policy.xml       kms-acls.xml     yarn-site.xml
[hadoop@server1 hadoop]$ cd output/
[hadoop@server1 output]$ ls
part-r-00000  _SUCCESS
II. Pseudo-Distributed
1. Editing configuration files
[hadoop@server1 ~]$ cd hadoop/etc/hadoop/
[hadoop@server1 hadoop]$ vim core-site.xml
<configuration>
<property>
<name>fs.defaultFS</name>
<value>hdfs://172.25.21.1:9000</value>
</property>
</configuration>
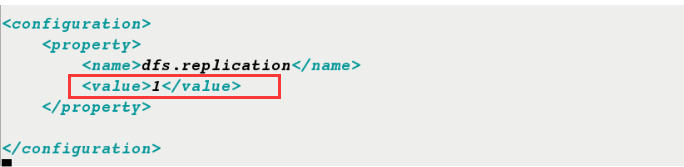
[hadoop@server1 hadoop]$ vim hdfs-site.xml
<configuration>
<property>
<name>dfs.replication</name>
<value>1</value>
</property>
</configuration>


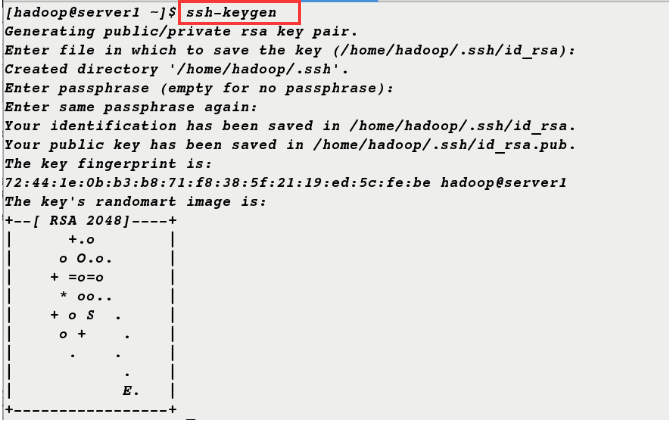
2. Generate keys for secret-free connections
[hadoop@server1 ~]$ ssh-keygen

[hadoop@server1 ~]$ ssh-copy-id localhost
[hadoop@server1 ~]$ ssh-copy-id 172.25.21.1
[hadoop@server1 ~]$ ssh-copy-id server1
3. Format and open services
[hadoop@server1 ~]$ cd hadoop
[hadoop@server1 hadoop]$ bin/hdfs namenode -format

[hadoop@server1 hadoop]$ sbin/start-dfs.sh
Starting namenodes on [server1]
Starting datanodes
Starting secondary namenodes [server1]


4. Browser access 172.25.21.1:9870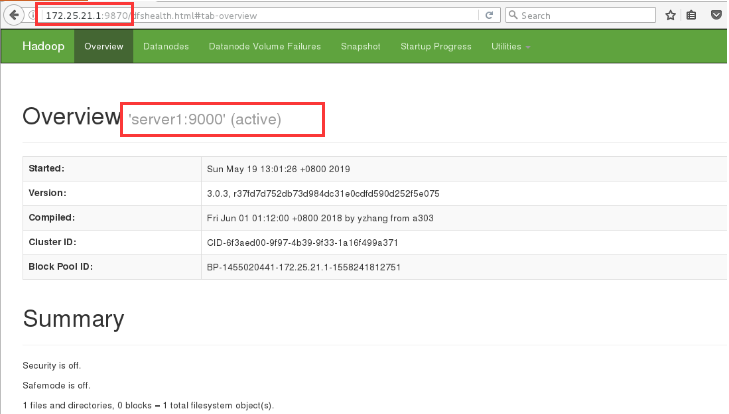
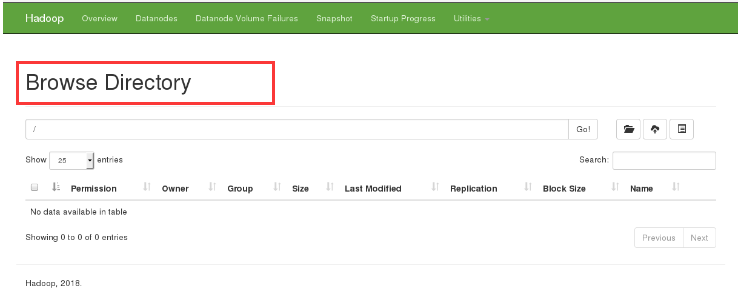
5. Create a directory and upload it to view the new directory in the browser
[hadoop@server1 hadoop]$ bin/hdfs dfs -mkdir /user
[hadoop@server1 hadoop]$ bin/hdfs dfs -mkdir /user/hadoop
[hadoop@server1 hadoop]$ bin/hdfs dfs -ls

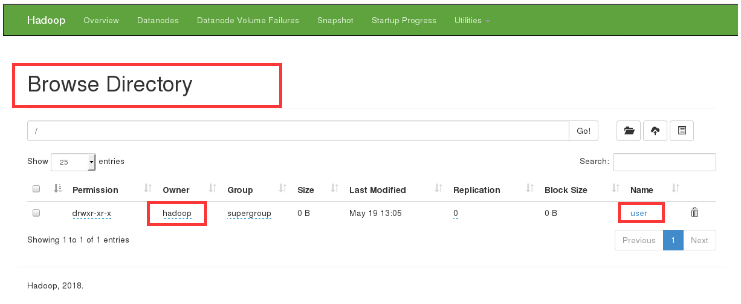
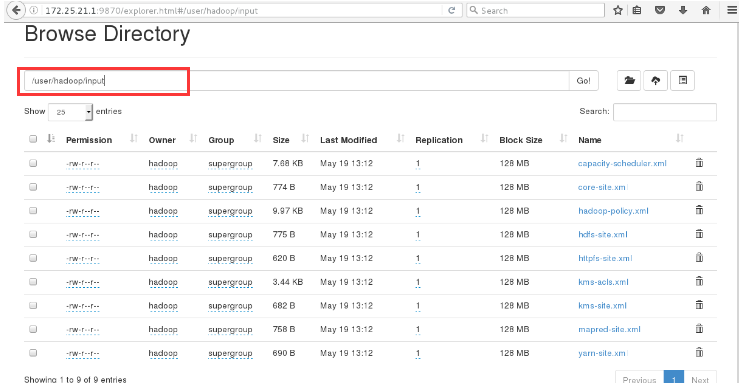
6. Upload input / directory to view the contents of the directory in the browser
[hadoop@server1 hadoop]$ bin/hdfs dfs -put input/
[hadoop@server1 hadoop]$ bin/hdfs dfs -ls
Found 1 items
drwxr-xr-x   - hadoop supergroup          0 2019-05-19 13:12 input

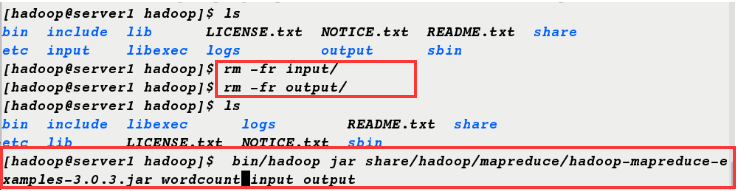
7. Delete input and output files and re-execute commands
[hadoop@server1 hadoop]$ ls
bin  include  lib      LICENSE.txt  NOTICE.txt  README.txt  share
etc  input    libexec  logs         output      sbin
[hadoop@server1 hadoop]$ rm -fr input/
[hadoop@server1 hadoop]$ rm -fr output/
[hadoop@server1 hadoop]$ ls
bin  include  libexec      logs        README.txt  share
etc  lib      LICENSE.txt  NOTICE.txt  sbin
[hadoop@server1 hadoop]$  bin/hadoop jar share/hadoop/mapreduce/hadoop-mapreduce-examples-3.0.3.jar wordcount input output          ##wordcount statistics
8. In this case, input and output will not appear in the current directory, but uploaded to the distributed file system, which can be seen in the browser.
[hadoop@server1 hadoop]$ ls
bin  include  libexec      logs        README.txt  share
etc  lib      LICENSE.txt  NOTICE.txt  sbin

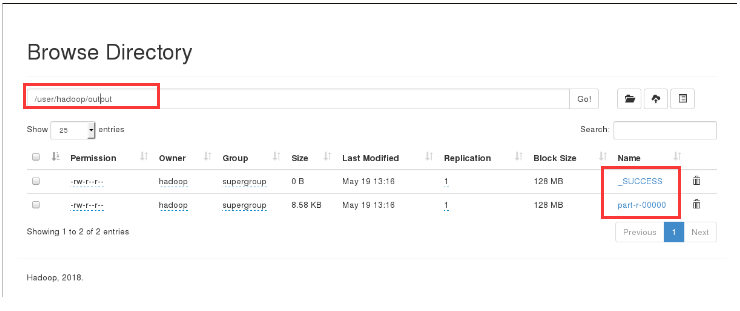
9. You can view the output directory directly.
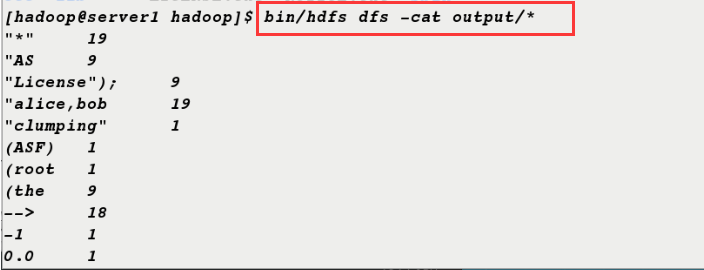
[hadoop@server1 hadoop]$ bin/hdfs dfs -cat output/*
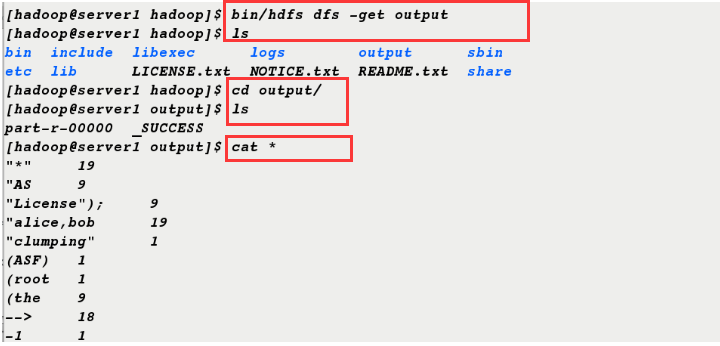
10. You can also download the output directory from the distributed file system and then view the contents of the directory.
[hadoop@server1 hadoop]$ bin/hdfs dfs -get output
[hadoop@server1 hadoop]$ ls
bin  include  libexec      logs        output      sbin
etc  lib      LICENSE.txt  NOTICE.txt  README.txt  share
[hadoop@server1 hadoop]$ cd output/
[hadoop@server1 output]$ ls
part-r-00000  _SUCCESS
[hadoop@server1 output]$ cat *
Complete Distribution
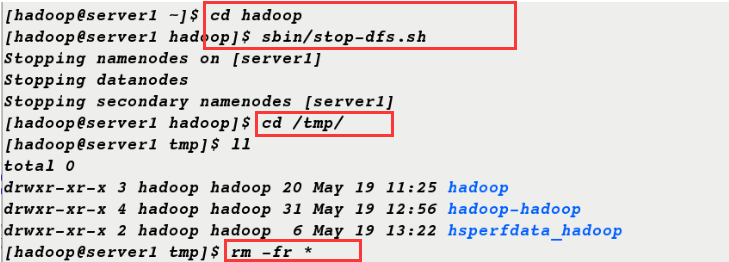
1. First stop the service and clear the original data
[hadoop@server1 ~]$ cd hadoop
[hadoop@server1 hadoop]$ sbin/stop-dfs.sh
Stopping namenodes on [server1]
Stopping datanodes
Stopping secondary namenodes [server1]
[hadoop@server1 hadoop]$ cd /tmp/
[hadoop@server1 tmp]$ ll
total 0
drwxr-xr-x 3 hadoop hadoop 20 May 19 11:25 hadoop
drwxr-xr-x 4 hadoop hadoop 31 May 19 12:56 hadoop-hadoop
drwxr-xr-x 2 hadoop hadoop  6 May 19 13:22 hsperfdata_hadoop
[hadoop@server1 tmp]$ rm -fr *
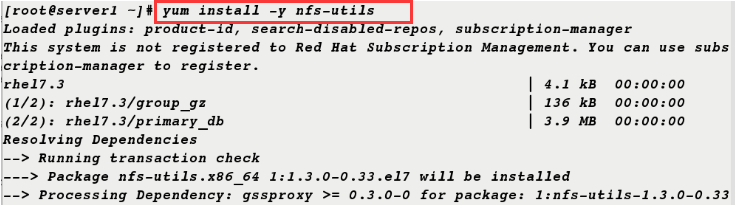
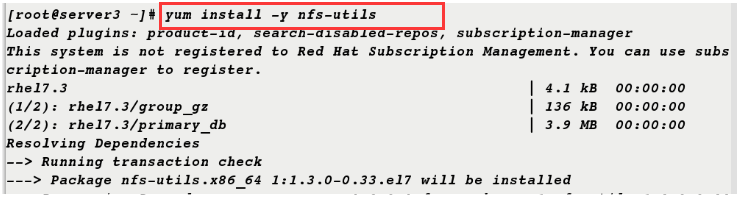
2. Install nfs-utils on server 1 and open rpcbind service
[root@server1 ~]# yum install -y nfs-utils
[root@server1 ~]# systemctl start rpcbind
3. Serr2 acts as a node to create new hadoop users
[root@server2 ~]# useradd hadoop
[root@server2 ~]# id hadoop
uid=1000(hadoop) gid=1000(hadoop) groups=1000(hadoop)

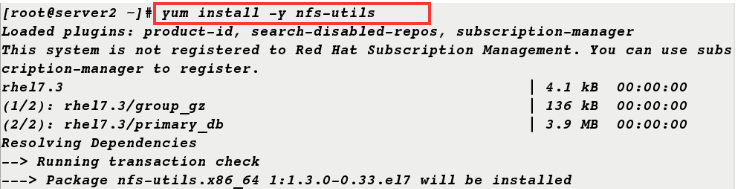
4. nfs-utils software is also installed on server 2 and rpcbind service is opened
[root@server2 ~]# yum install -y nfs-utils
[root@server2 ~]# systemctl start rpcbind

5. Serr3 acts as a node to create new hadoop users
[root@server3 ~]# useradd hadoop
[root@server3 ~]# id hadoop
uid=1000(hadoop) gid=1000(hadoop) groups=1000(hadoop)

6. nfs-utils is also installed on server 3 and rpcbind service is opened
[root@server3 ~]# yum install -y nfs-utils

[root@server3 ~]# systemctl start rpcbind

7. View hadoop user id, edit / etc/exports file and open nfs service
[root@server1 ~]# id hadoop
uid=1000(hadoop) gid=1000(hadoop) groups=1000(hadoop)

[root@server1 ~]# vim /etc/exports

/home/hadoop    *(rw,anonuid=1000,anongid=1000)

[root@server1 ~]# systemctl start nfs
[root@server1 ~]# exportfs -v


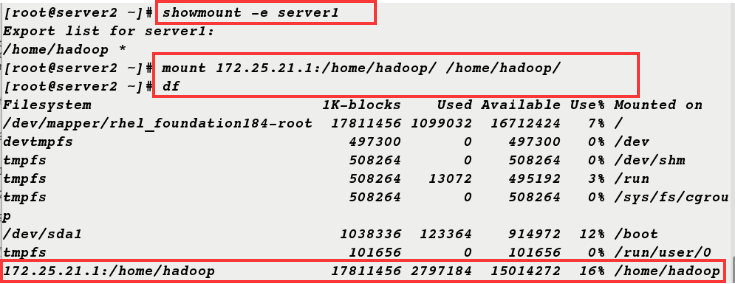
8. Serr2 can get the information from server1 and mount successfully.
[root@server2 ~]# showmount -e server1
Export list for server1:
/home/hadoop *
[root@server2 ~]# mount 172.25.21.1:/home/hadoop/ /home/hadoop/
[root@server2 ~]# df
Filesystem                          1K-blocks    Used Available Use% Mounted on
/dev/mapper/rhel_foundation184-root  17811456 1099032  16712424   7% /
devtmpfs                               497300       0    497300   0% /dev
tmpfs                                  508264       0    508264   0% /dev/shm
tmpfs                                  508264   13072    495192   3% /run
tmpfs                                  508264       0    508264   0% /sys/fs/cgroup
/dev/sda1                             1038336  123364    914972  12% /boot
tmpfs                                  101656       0    101656   0% /run/user/0
172.25.21.1:/home/hadoop             17811456 2797184  15014272  16% /home/hadoop
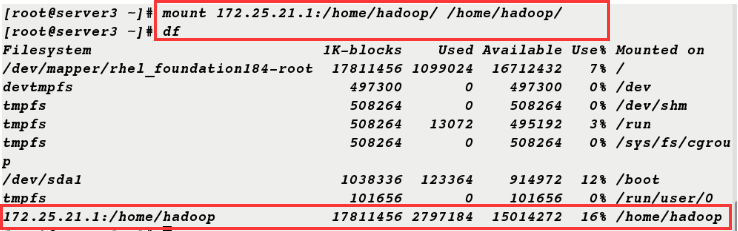
9. Serr3 also mounted successfully
[root@server3 ~]# mount 172.25.21.1:/home/hadoop/ /home/hadoop/
[root@server3 ~]# df
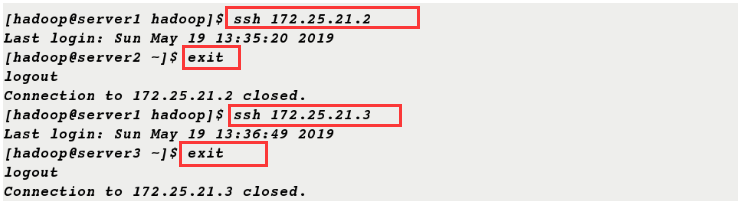
10. It was found that secret-free login was possible because information could be shared on the mount.
[hadoop@server1 hadoop]$ ssh 172.25.21.2
Last login: Sun May 19 13:35:20 2019
[hadoop@server2 ~]$ exit
logout
Connection to 172.25.21.2 closed.
[hadoop@server1 hadoop]$ ssh 172.25.21.3
Last login: Sun May 19 13:36:49 2019
[hadoop@server3 ~]$ exit
logout
Connection to 172.25.21.3 closed.
10. Reedit the configuration file
[hadoop@server1 ~]$ cd hadoop
[hadoop@server1 hadoop]$ cd etc/hadoop/
[hadoop@server1 hadoop]$ vim hdfs-site.xml
<configuration>
<property>
<name>dfs.replication</name>
<value>2</value> ##Two nodes
</property>
</configuration>
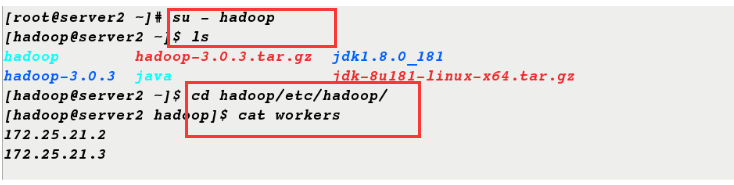
[hadoop@server1 hadoop]$ vim workers
172.25.21.2
172.25.21.3
11. Editing on server1, server2 and server3 nodes can also be seen
[root@server2 ~]# su - hadoop
[hadoop@server2 ~]$ ls
hadoop        hadoop-3.0.3.tar.gz  jdk1.8.0_181
hadoop-3.0.3  java                 jdk-8u181-linux-x64.tar.gz
[hadoop@server2 ~]$ cd hadoop/etc/hadoop/
[hadoop@server2 hadoop]$ cat workers
172.25.21.2
172.25.21.3

[root@server3 ~]# su - hadoop
[hadoop@server3 ~]$ ls
hadoop        hadoop-3.0.3.tar.gz  jdk1.8.0_181
hadoop-3.0.3  java                 jdk-8u181-linux-x64.tar.gz
[hadoop@server3 ~]$ cd hadoop/etc/hadoop/
[hadoop@server3 hadoop]$ cat workers
172.25.21.2
172.25.21.3

12. Format and start the service
[hadoop@server1 hadoop]$ bin/hdfs namenode -format

[hadoop@server1 hadoop]$ sbin/start-dfs.sh
Starting namenodes on [server1]
Starting datanodes
Starting secondary namenodes [server1]

13.jps command to see secondary NameNode in server1
[hadoop@server1 hadoop]$ jps
14777 SecondaryNameNode
14922 Jps
14590 NameNode

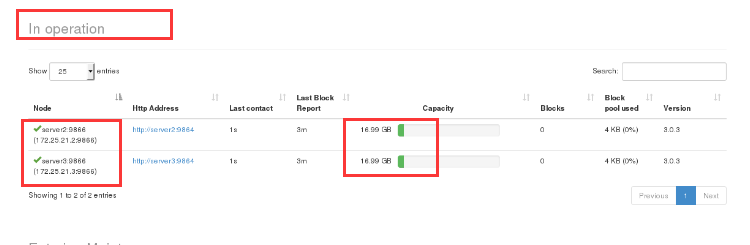
DataNode appears in server2 and server3
[hadoop@server2 ~]$ jps
10841 Jps
10779 DataNode
[hadoop@server3 ~]$ jps
10823 Jps
10760 DataNode


14. View two nodes in the browser and the data has been uploaded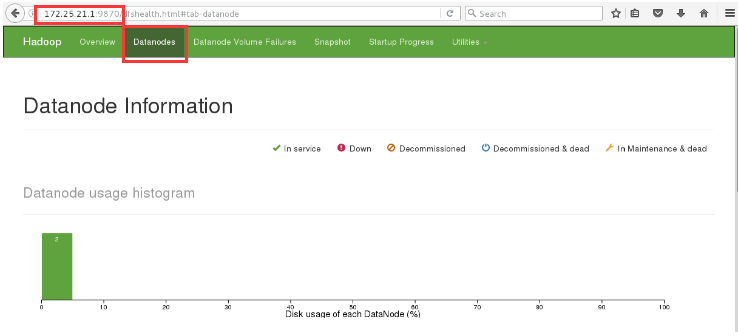
15. New directory to view directory information in browser
[hadoop@server1 hadoop]$ bin/hdfs dfs -mkdir /user
[hadoop@server1 hadoop]$ bin/hdfs dfs -mkdir /user/hadoop
[hadoop@server1 hadoop]$ ls
bin  include  libexec      logs        output      sbin
etc  lib      LICENSE.txt  NOTICE.txt  README.txt  share

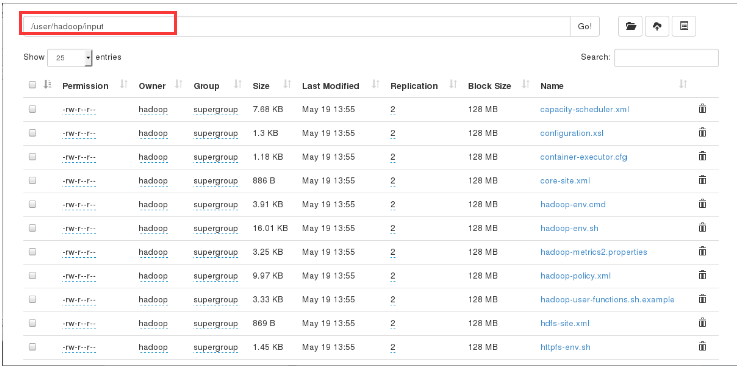
16. Upload etc/hadoop/files to a distributed file system and rename them input
[hadoop@server1 hadoop]$ bin/hdfs dfs -put etc/hadoop/ input

17. The / user/hadoop/input file information is available in the browser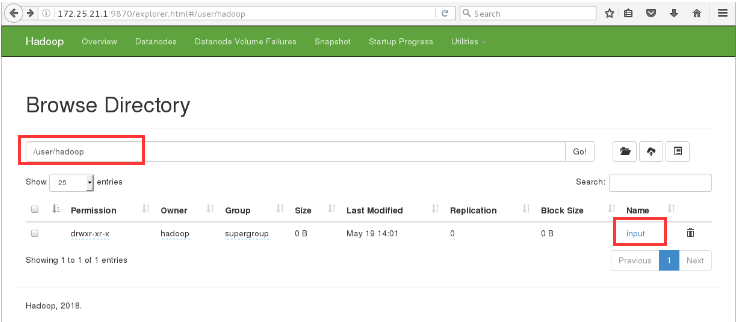
18. Delete the input file, the browser can not view the input file information
[hadoop@server1 hadoop]$ bin/hdfs dfs -rm -r input
Deleted input

