#Skill 1 vue3 0+cli4. 5 project quick creation process
This article is based on my own habits, so that I can quickly and comprehensively create a vue3 project.
It's not written to create a cli project process.
vue framework
vue is a single page program with only one entry file index HTML, route jump will not refresh the page, and the running speed is fast. And without refreshing, the data will not be initialized, so the data can be shared between pages.
1. Create project
# win+R cmd
d:
cd allvue

vue create Project name

choice right3 (contain vuex ,router)
2. Start the project
cd Project name
npm run serve
Open the project directory in hbuilder.
3. Install and configure plug-ins
First open main JS, write the string of app in this form.
const app=createApp(App)
app.use(store)
app.use(router)
app.mount('#app')
3.1 installing axios
npm install -save axios
Configuration: main Introduce axios into JS and pay attention to the location
// 1. Introduce axios
import axios from 'axios'

const app=createApp(App)

//2.axios is associated with the global attribute of vue instance object
app.config.globalProperties.$axios=axios

app.use(store)
app.use(router)
app.mount('#app')
3.2 installing jquery and bootstrap
@4 means bootstrap 4
npm install jquery bootstrap@4 popper.js --save
Configuration: open main js
import "bootstrap/dist/css/bootstrap.min.css";
import "bootstrap/dist/js/bootstrap.min.js"
3.3 introduction of project pictures
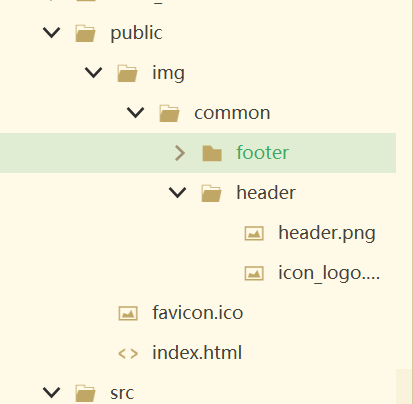
Create img, CSS and JS folders under public. Img is used to put the pictures of each module. Note that the pictures should also be distinguished by module directory.
Picture Directory:

Usage:
1. The picture address should be chosen by yourself, usually“../../public/img/xxx.jpg"
<img src="/public/img/a.jpg">
2.
<img :src="imga">
data(){
	imga:'/public/img/a.jpg'
}
3.stay js In the words of require('../../../public...')
3.3 configuration vuex
To configure vuex, wait until global data is needed, and then configure it as required.
4. Create component directory
1. src/compenents Create module directory under
	home.vue
	common catalogue(Copy and paste directly below, f2 Change directory name)
	goods catalogue
	...
2.	goods Create components in the module directory
	goodslist.vue(Copy and paste below, f2 Change name)
	mycart.vue
	... The components in other module directories can also be copied and pasted to complete.
<!-- 3.  Copy and paste the following into each component once. And change it to your own component name. -->
<template>
	<div>
		<h1>Name of this component</h1>
	</div>
</template>

<script>
	export default {
	  name: '',//Name of this component
	  data() {
	    return {
	      arr:[],
	    }
	  },
	  created(){
		  console.log(1)
	  },
	  methods:{
		  func(){

		  }
	  }

	}
</script>

<style scoped>

</style>
5.vue changes the default home page to its own home page
router/index.js
//Introduce your home page, home vue,
import home from "../components/home.vue"
const routes = [
    //   The corresponding to "/" is changed to the name of the home component introduced by yourself
  {
    path: '/',
    name: 'home',
    component: home
  },
 ]
App.vue
Remove all router links
6. Common component practices
After you have your own vue pages, you should add the necessary public components to almost every page.
For example: all components have header Vue and footer vue. Whether it's the home page or other modules.
Step 1: in router / index JS.
router/index.js
// common
import header from '../components/common/header.vue'
import footer from '../components/common/footer.vue'

//The header and footer are introduced into the home page, and the router is configured.

const router=[
    {
    path: '/',
    name: 'home',
    components: {
    		default:home,
    		header:header,
    		footer:footer
    	}
  },
    //Other modules are also applied to.
  {
    path: '/goodscate',
    name: 'goodscate',
    component: {
    		default:goodscate,
    		header:header,
    		footer:footer
    	}
  },
]
App.vue
Because the page actually shows app vue file, < router view / > represents the vue data layer body. It can be displayed on the page together with the body through two named views, header and footer.
<template>
  <div id="nav">
	<router-view name="header"></router-view>
	<router-view/>
	<router-view name="footer"></router-view>

  </div>
</template>
7. Establish a router
Open router / index js
1. Lead in components
//1. Under Src / components
//For example, home vue
import home from "../components/home.vue"
import Component name from "../components/Component name.vue"

//2. Under Src / components / xxx directory
//For example, the header under common
import header from '../components/common/header.vue'
import Component name from '../components/Directory name/Component name.vue'
2. Configure routing for components
(this is not recommended because there are generally common components).
const routes = [
    //Home should be changed to the name of the home component introduced by yourself
  {
    path: '/',
    name: 'home',
    component: home
  },
  //Other modules
  {
    path: '/goodscate',
    name: 'goodscate',
    component: goodscate
  },
  // ...
  // Nested parent-child modules, such as goodslist and goodsdetail
   {
	path: "/goodslist",// father
    component: goodslist,
	children:[//Give the father a chidren son
		{
			path: "goodsdetail",//Notice there's nothing here/
			component: goodsdetail,
		}
		]
	},

 ]
2.1 common component configuration routing
If you have a common component, configure the route as follows:
const routes = [
    //Home should be changed to the name of the home component introduced by yourself
  {
    path: '/',
    name: 'home',
    components: {
    		default:home,
    		header:header,
    		footer:footer
    	}
  },
  //Other modules
  {
    path: '/goodscate',
    name: 'goodscate',
    component: {
    		default:goodscate,
    		header:header,
    		footer:footer
    	}
  },
  // ...

 ]
2.2 writing method of nested components
// Nested parent-child modules, such as goodslist and goodsdetail
   {
	path: "/goodslist",// father
    component: goodslist,
	children:[//Give the father a chidren son
		{
			path: "goodsdetail",//Notice there's nothing here/
			component: {
    		default:goodsdeatail,
    		header:header,
    		footer:footer
    	}
		}
		]
	},
2.3 writing method of transmission parameter occupation route
// goodscate.vue needs to pass several parameters, and goodslist takes up several bits
{
  	path: "/goodslist/:id/:content",
    component: goodslist,
}