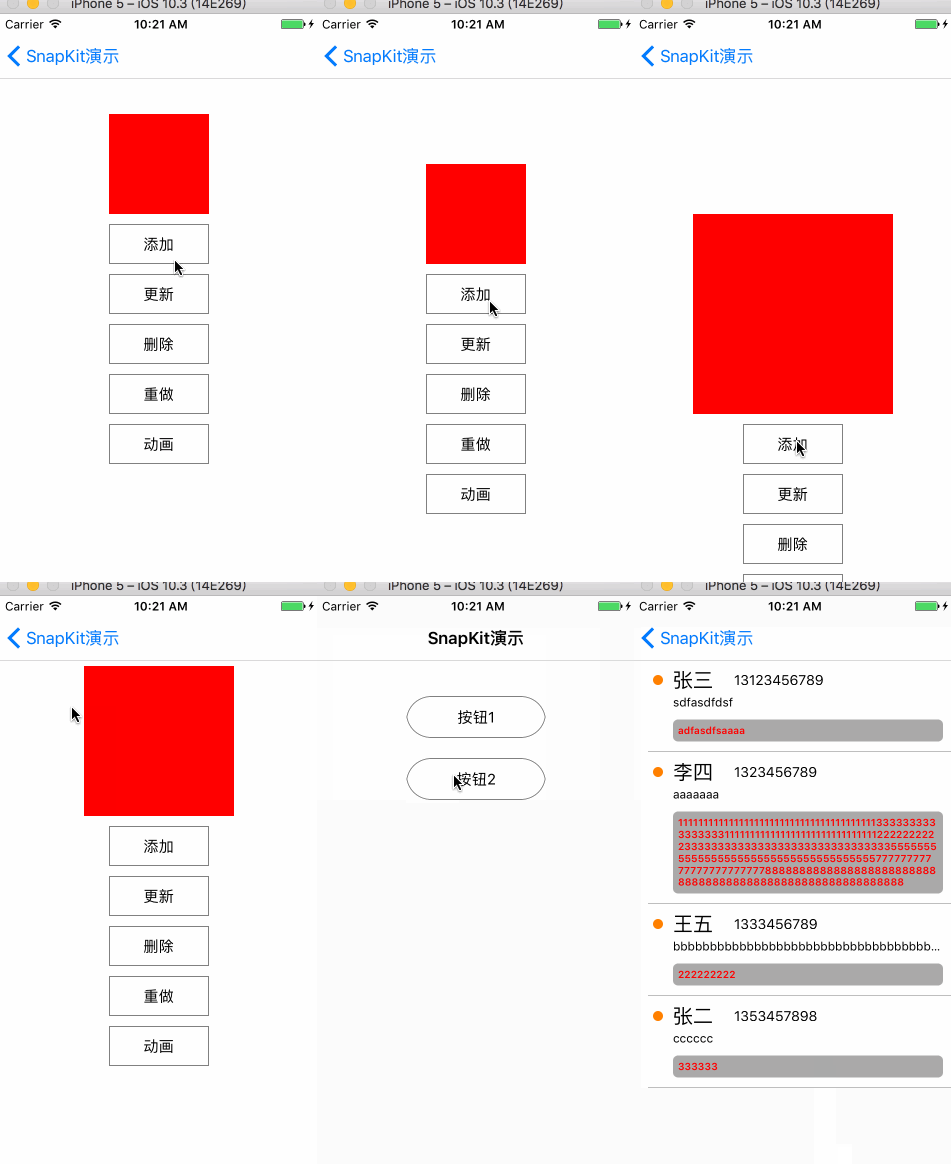
SnapKit functions as SDAutoLayout and Masonry (the predecessors) to achieve automatic layout of controls by constraints; it is more convenient to maintain than StoryBoard because of its code implementation. I think the automatic layout of iOS is very similar to the Relative Layout in Android, which determines the final size and location through the relative relationship with parent control, child control and sibling control.
GtiHub address: https://github.com/SnapKit/SnapKit

Use Cocoapod to refer to the project:
# Uncomment the next line to define a global platform for your project
# platform :ios, '9.0'

target 'SnapkitTest' do
  # Comment the next line if you're not using Swift and don't want to use dynamic frameworks
  use_frameworks!
  pod 'SnapKit', '~> 3.2.0'
  # Pods for SnapkitTest

  target 'SnapkitTestTests' do
    inherit! :search_paths
    # Pods for testing
  end

  target 'SnapkitTestUITests' do
    inherit! :search_paths
    # Pods for testing
  end

end
Add import SnapKit to the Swift file header.
SnapKit: snp.makeConstraint method is used to add constraints, including: margin, width, height, left and right distance; SnapKit also supports deletion constraints, update constraints, and relative position (inset,offset) and multiple correction (multipleBy and divideBy).
SnapKit supports the following properties:
| ViewAttribute | Layout Attribute |
| view.snp.left | NSLayoutAttribute.Left |
| view.snp.right | NSLayoutAttribute.Right |
| view.snp.top | NSLayoutAttribute.Top |
| view.snp.bottom | NSLayoutAttribute.Bottom |
| view.snp.leading | NSLayoutAttribute.Leading |
| view.snp.trailing | NSLayoutAttribute.Trailing |
| view.snp.width | NSLayoutAttribute.Width |
| view.snp.height | NSLayoutAttribute.Height |
| view.snp.centerX | NSLayoutAttribute.CenterX |
| view.snp.centerY | NSLayoutAttribute.CenterY |
| view.snp.baseline | NSLayoutAttribute.Baseline |
Home page 2 buttons:
        button1?.snp.makeConstraints{ make in
            make.width.equalTo(140)
            make.height.equalTo((button1?.snp.width)!).multipliedBy(0.3)   //Get the value by the ratio of width to height, similar to Android's layout_weight
            make.centerX.equalTo(self.view.center.x)   //centering
            make.top.equalTo(100)
        }

        button2?.snp.makeConstraints({ make in
            make.width.equalTo(140)
            make.height.equalTo((button2?.snp.width)!).multipliedBy(0.3)
            make.centerX.equalTo(self.view.center.x)
            make.top.equalTo(button1!.snp.bottom).offset(20)   //Relative Position, Longitudinal Button Spacing
        })
When you click the button to switch to the next interface, it can also be implemented in code (the other is set in StoryBorad).
self.navigationController?.pushViewController(SimpleUseViewController(), animated: false)
Click "Button 1" to display 1 red block and 5 buttons. Click on 5 buttons to see how to add, delete, update constraints, and add the animation effect when switching.
Note: When changing constraints, the layoutIfNeede function must be used to force the interface to be refreshed.
      UIView.animate(withDuration: 1, animations: {
                self.view.layoutIfNeeded()    //Forced refresh layout

})class LineTableViewCell: UITableViewCell {
var icon: UIView? //Circle Icon
var name: UILabel?
var mobile: UILabel?
var desc: UILabel?
var container: UIView?
var comment: UILabel?
let gapHori: CGFloat = 20 //Transverse spacing
override init(style: UITableViewCellStyle, reuseIdentifier: String?) {
super.init(style: style, reuseIdentifier: reuseIdentifier)
initViews()
}
required init?(coder aDecoder: NSCoder) {
fatalError("init(coder:) has not been implemented")
}
override func awakeFromNib() {
super.awakeFromNib()
// Initialization code
}
override func setSelected(_ selected: Bool, animated: Bool) {
super.setSelected(selected, animated: animated)
// Configure the view for the selected state
}
func initViews() {
name = UILabel()
name?.font = UIFont.systemFont(ofSize: 20)
name?.textColor = UIColor.black
name?.text = "Full name"
name?.sizeToFit() //Fill in text without width or height. Wap_content equivalent to Android
self.contentView.addSubview(name!)
name?.snp.makeConstraints{ make in
make.top.equalTo(contentView).offset(15)
make.left.equalTo(contentView).offset(40)
}
icon = UIView()
icon?.backgroundColor = UIColor.orange
icon?.layer.cornerRadius = 5
icon?.layer.masksToBounds = true
self.contentView.addSubview(icon!)
icon?.snp.makeConstraints{ make in
make.top.equalTo(contentView).offset(15)
make.left.equalTo(contentView).offset(gapHori)
make.width.height.equalTo(10)
make.centerY.equalTo((name?.snp.centerY)!)
}
mobile = UILabel()
mobile?.font = UIFont.systemFont(ofSize: 14)
mobile?.textColor = UIColor.black
mobile?.text = "Phone number"
mobile?.sizeToFit()
self.contentView.addSubview(mobile!)
mobile?.snp.makeConstraints{ make in
make.top.equalTo(self.contentView).offset(15)
make.left.equalTo(name!.snp.right).offset(gapHori)
make.centerY.equalTo((name?.snp.centerY)!)
}
desc = UILabel()
desc?.font = UIFont.systemFont(ofSize: 12)
desc?.textColor = UIColor.black
desc?.numberOfLines = 1 //Up to 1 line
desc?.lineBreakMode = .byTruncatingTail //When the boundary is exceeded, it shows that ___________.
desc?.sizeToFit()
desc?.text = "describe"
self.contentView.addSubview(desc!)
desc?.snp.makeConstraints{ make in
make.top.equalTo((name?.snp.bottom)!).offset(10)
make.left.equalTo((name?.snp.left)!)
make.right.equalTo(contentView).offset(-10)
}
//Similar to adding a TextView in Android View Group
container = UIView()
container?.backgroundColor = UIColor.lightGray
container?.layer.cornerRadius = 5
self.contentView.addSubview(container!)
container?.snp.makeConstraints{ make in
make.top.equalTo((desc?.snp.bottom)!).offset(10)
make.left.equalTo((desc?.snp.left)!)
make.right.equalTo(contentView).offset(-10)
make.bottom.equalTo(contentView).offset(-10)
}
comment = UILabel()
comment?.lineBreakMode = .byWordWrapping
comment?.font = UIFont.boldSystemFont(ofSize: 10)
comment?.textColor = UIColor.red
comment?.numberOfLines = 0 //0 denotes unrestricted rows
comment?.sizeToFit()
container?.addSubview(comment!)
comment?.snp.makeConstraints{ make in
make.edges.equalTo(container!).inset(UIEdgeInsetsMake(5, 5, 5, 5)) //Insert is similar to android's padding at the edge of the parent layout
}
}
}